Painting Image onto surface plane
-
Hello All,
I've been using sketchup for about 5 years and have continued to have a similar problem with painting an image on a surface plane. The graphic becomes pixelated and unreadable when the camera is zoomed close to the surface. Once I zoom the camera away from the surface, at a good distance away, the image then becomes legible. To counteract this problem, I thought that a work around would be to scale the entire model down to the same scale of the image, and then paint the surface. But the same problem occurs.
I've included an image sample of the problem. I've spoken with other people about this and I have yet to find someone that has a solution. Hopefully one of you out there can help.
Thanks in advance,
andy


-
Is the graphic you've posted the largest one you have? Or do you have a larger version of it?
-
Hi Andy,
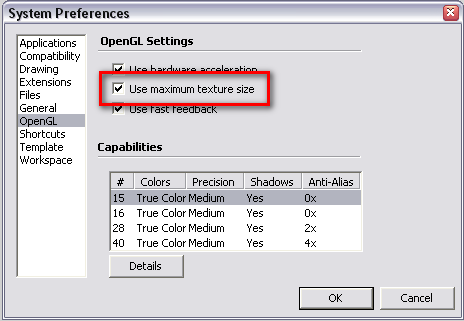
By default, SU only displays images up to 1024 pixels. Since version 7, you can double this resolution by checking max. texture size in your Preferences (see attached screenshot). This is still only 2048 pixels however so if you need bigger resolution, you will have to slice up your image in an editor and apply it to neighbouring rectangles. You can hide or soften the edges between.
-
Thanks for the response! The OpenGL did make the image crisper, but once I exported the image, the quality appeared the same as before. I'm currently using the free version of sketchup...do I need a pro version to make use of a higher quality exporter?
-
No, Pro will not produce any higher quality images.
How big is the original resolution of that image? -
The original file is 150dpi and its a jpg.
-
DPI does not say anything about its size but just a setting what quality it should be printed (which has obviously nothing to do with on-screen display).
What is the size in pixels?
-
How many pixels wide is the image?
-
5400 width x 9312 height
-
@andyjchew said:
5400 width x 9312 height
Since SketchUp can't display textures in any larger size than 2048 - when you've enabled Large Textures - split your texture into several smaller pieces no larger than 2048 in any direction.
-
Sorry to borrow the thread but how do you make a face 2048 wide so you get the "perfect" resolution from my 2048 image?
Meaning, I cut my image up into 2048 dpi segments and I want to apply them to a face. Do I just eyeball it or is there another way?
maybe I am misunderstanding...
thanks, sorry to ask out of turn.
Stuart
-
Stuart, that's actually a good question. One way to do that is to change the canvas size. So suppose you have an image that is 3000 pixels wide. You might divide it into thirds--there's no reason you have to go to 2048--by setting the canvas width to 1000 and set the part you'll keep to the left side. Save the result. Undo, set the part you'll keep to the center, Save, Undo, Set the part to keep to the right and Save again.
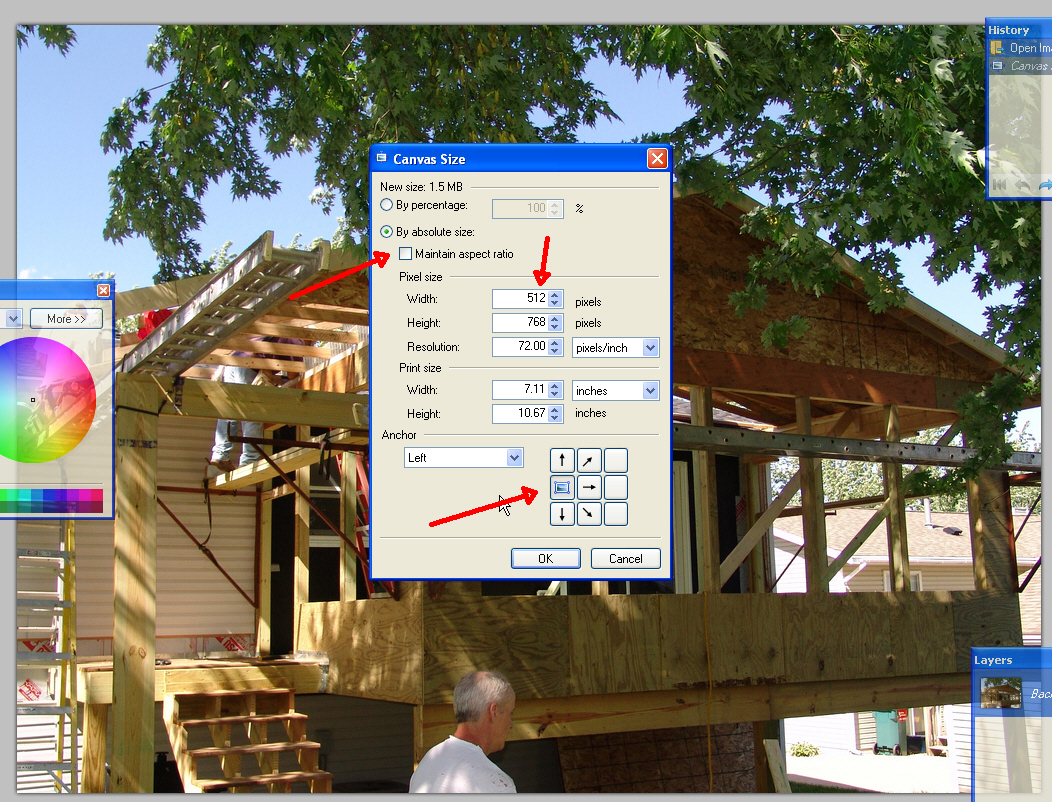
In this quick screen shot I am dividing an image that is 1024 pixels wide into two halves. I've unchecked the box for maintaining aspect ratio and entered 512 into the box for width. Then I've set the "Anchor" to the left side. Hitting OK would leave me with the left side of the image. All I would need to do for the right side is Undo, select the right side instead of the left and hit OK again.
-
So what I suggested in my post above - you need to split your image.
@Stuart; you do not adjust the rectangle to the image. Your image has to be as big as needed to cover the area it depicts. So I would go this way;
- Prepare the image in PS (or what you use) and split it up into as many pieces as needed (each piece must be 2048 pixels or smaller).
- Bring in the image and scale it as big as you need it to be.
- Now split the faces to the exact same number (and arrangement) as you did with the image in step 1.
- Now right lick on each, split face and "make unique texture".
(This would actually be already enough if SU did not make such a bad job with texture quality like AA and all other, blurring losses). - So now, right click on each face again and "edit texture image". Here bring into PS the original, corresponding piece and paste it on top, flatten, save...
-
So are you saying that the quality of the export will improve? I've included two images. The first is a screen shot showing that the quality of the image has indeed improved. The second is an export with poor quality.


-
Well, you need to understand one thing when exporting.
An image has a certain resolution (size) in pixels. Now if you paint a face with that image and look too close, it will always be pixelated. Zooming in in 3D SU is just the same as zooming in in your image editor. When a pixel of the raster image grows bigger than a pixel on your screen, it will start getting "pixelated"
The same way if a pixel of the image is larger than a pixel on your export, it will fall apart.
Certainly you can get the best out of it is you split it up since this way you can at least utilize the largest image display in SU available.
As for the export quality... I am not sure why it is doing it. Could you share the file somehow? (Hopefully it is not too big to upload here). What export settings are you using?
-
Hey thanks for the great answers to my question!

I learn something new here everyday! (and I have a lot to learn....)
Thanks again!
Stuart
Hello! It looks like you're interested in this conversation, but you don't have an account yet.
Getting fed up of having to scroll through the same posts each visit? When you register for an account, you'll always come back to exactly where you were before, and choose to be notified of new replies (either via email, or push notification). You'll also be able to save bookmarks and upvote posts to show your appreciation to other community members.
With your input, this post could be even better 💗
Register Login


Advertisement