Help with Rafters
-
I am a new user. I am part way through designing an outdoor room with a fireplace. The area will be covered with a roof. I have the posts and beams in place, but am having a really hard time with the rafters. The area is not rectangular.
Would any of you experts care to give me a hand with this design? I can post or email the file as it is now.
Since I am new to this forum, I am not sure how things are done here. I could certainly use some help but since this is my first post, I am not exactly sure how thing are done in this forum.
If anyone is interested in helping me, please let me know how I should proceed from here.
Thanks in advance.
Bob
-
This is a great place for help, if you could post at least a pic or even better the model, I'm sure you'll get plenty of advice and help.
Mike
-
@alpro said:
This is a great place for help, if you could post at least a pic or even better the model, I'm sure you'll get plenty of advice and help.
Mike
Thanks Mike, I have attached the file. I would like to add 2 x 6 rafters to this model on 16" centers. Because beams are not parallel, each rafter will have a slightly different pitch.
Thanks in advance for any help or advice.
Bob
-
One way to approach it is similar to how a carpenter might. Work out each one in the field. Make a board of whatever the rafter size, set on the center beam in position, but level (leave it long to cut the ends). Make one board and move / copy / duplicate it to all positions. Then rotate each board down to intersect the beams with the proper birdsmouth. This operation has to be done for each rafter on one side, because they are all different. I think you can rotate starting from a center line on top of the center beam (put in a guide line) and rotating using the bottom of the rafter as a guide, snapping to the near side of the outside beam.
Use "intersect with model:" command to cut out the birdsmouths and trim the ends. this requires making a cut plane (same for all rafters) for your tails and and peak, and a lot of cleanup. Remember to try the "group and delete" method for getting rid of unwanted material. It helps in retaining the common lines with the parts you want to preserve. You can double click an unwanted face, group, and delete.It usually leaves surrounding faces intact.You can also select a number of faces by selecting with a right to left selection rectangle, group, and delete. So a birdsmouth can be cleared in one action (you have to be aligned more or less at the side view to avoid selecting the wrong stuff)
Of course you only have to do one side of the symmetrical roof. You might make all the rafters one component and scale it -1 for the other side-- so subsequent changes are made to each side, by only working on one.
I tried to think of other methods, but I think the plane is warped and each rafter has unique cut angles. Maybe one of the maths wizzes here has a faster way.
Good Luck. It resembles a pavilion I am working on now, but I have single slope. Peter
Oh, and post images of your finished work here.
-
I have fought this problem for hours. Because the roof will not be on one plane, I cannot get any of the rafters to line up. At this point, I have given up on trying to draw the rafters and am just trying to fill in the roof.
Unfortunately, I am running into the same problem. The trapazoid that encloses the roof footprint is on multiple planes. As a result, I cannot fill the area with color or use the push pull tool to simulate the space that would be taken up by the rafters. Here is the latest version of the model.
There must be a way to do this. Any help would be appreciated.
Bob
-
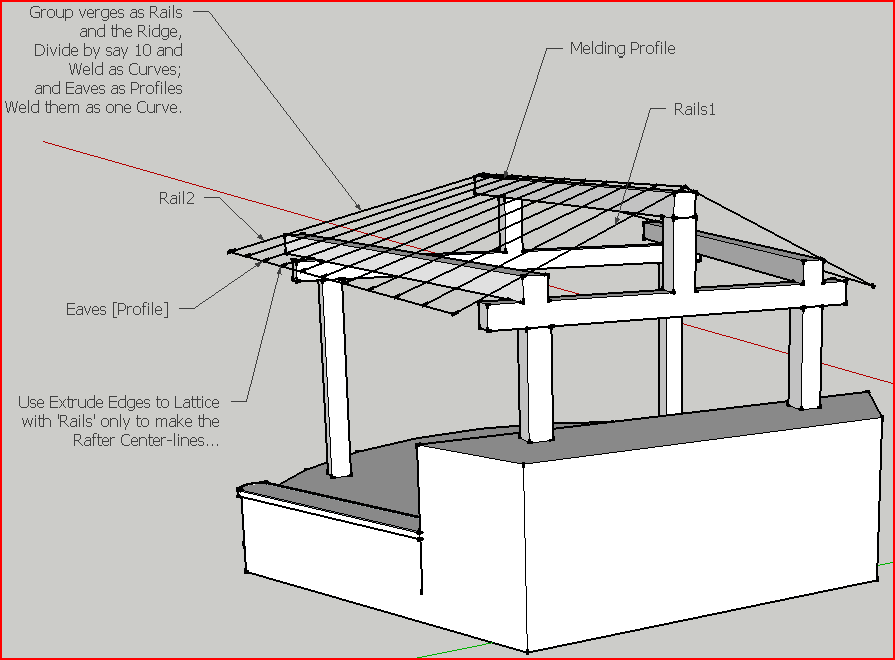
Here's a solution using my 'Extrude Edges by Rails to Lattice' [EEbyRailsToLattice] and 'Extrude Edges by Face' [EEbyFace] and so manual adjustment
-
You can get my EEbyRailsByLattice
http://forums.sketchucation.com/viewtopic.php?p=242239#p242239
and EEbyFace
http://forums.sketchucation.com/viewtopic.php?p=224218#p224218
as a part of the Extrusion Toolset zipped set from here
http://forums.sketchucation.com/viewtopic.php?p=217663#p217663 ...Arcs etc are already 'Curves' - but to 'Weld' plain Edges into 'Curves' use weld.rb from here
http://www.smustard.com/script/Weld
Note o split single lines into two [or more] edges before 'welding' them use the built-in 'Divide'... and then 'weld'. -
Bob,
the rafters will not be on the same plane, as you noted before. But my method works and so dies. Tugs. . I figured that the roof plane could be made using sandbox or another plugin based on lines copied from the rafters you should be able to texture it too but there's technique to all of this. It's a challenging project for starting out. I am on vacation and no computer so, that's all I got....
Peter -
Thanks to both Tig and Peter. I am afraid that I am just too new at this to be able to duplicate Tig's work. At this point, I do not even understand all the terminology. Is it possible to send me the model or post the file in this forum?
The next step will be adding the roof. Suggestions on how to do that would be greatly appreciated.
I really appreciate the help.
Bob
-
The rafters are the hard bit,
The roof is easy...
*Tip:*Edge==Line in Ruby-Speak...
You CAN do any 'scripted work' using the built-in tools [at least there are two symmetrical halves reducing the work...]
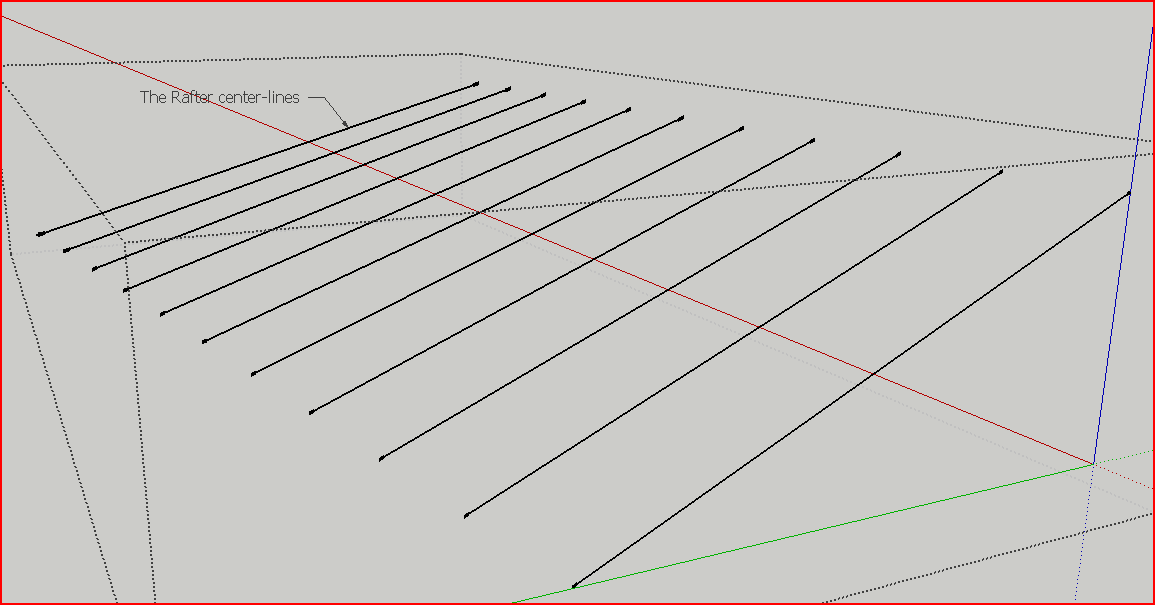
e.g. 'Divide' the eaves and ridge lines into the needed segments [~10?], then draw individual lines between their relative end-points, these are the rafter-lines.
This is much easier with the EEbyRalilsToLattice > Rails, but it can be done 'by-hand'...
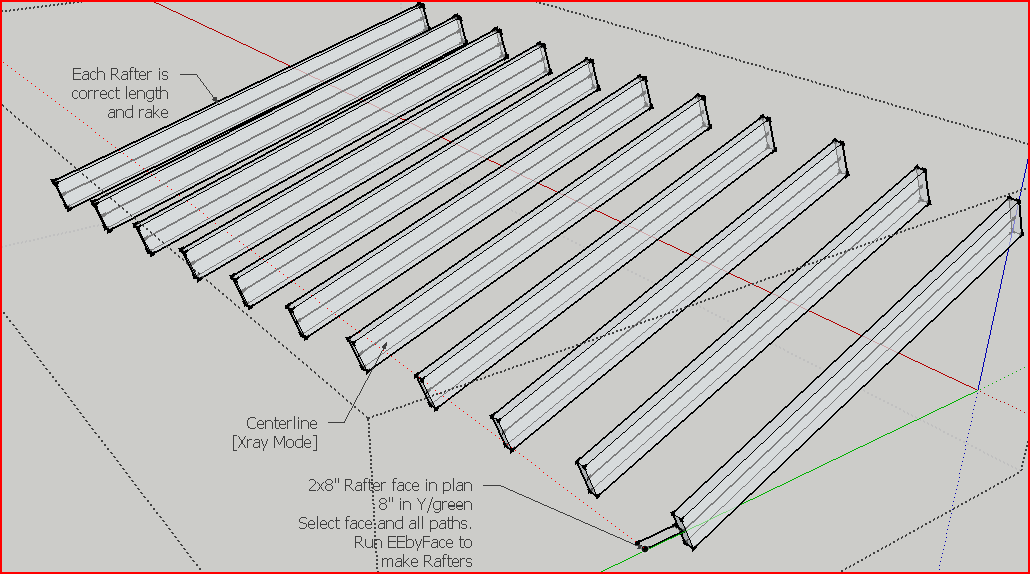
Now you need to do a FollowMe/Extrusion a long each rafter-line - this is mush easier with a Plugin like ExtrudeEdgesbyFace [draw the rafter cross-section 'flat', select its face and the edges [lines] you want it to 'FollowMe' along]; now tidy up the ends where the two roof-planes' rafters meet..........Where do you trip up on 'my' version? Explain and we can help you..........
-
Thanks for your help Tig. The problem is that I do not even know how to get started. Your tips assume that I have more knowledge of how to use SketchUp than I do at this point. I have the trapazoid that marks the edges of the rafters. I have installed the plug-ins that you provided.
Please give me a hint as to what the first few steps are.
Bob
-
You already have edges that form the ridge and eaves lines.
Select all of these these [hold Ctrl to add to the selection] and then use the right-click context-menu [Make]Group.
Double-click on one of the edges and you should go into 'Edit Mode' inside that Group.
Now you are working within the Group so now any geometry you make won't 'interfere with the rest of the model.
Select the 'ridge'; if it's not a single edge then make sure nothing is selected [Ctrl+T]. With nothing selected use Move to relocate any 'intermediate' vertices in the 'ridge' to the ends.
Now you should have a 'ridge' line that is one edge.
Select the edge and right-click context-menu > 'Divide' and type 10 [] or whatever centers you want the rafters at [10 seems a good guess to me - but YOU are the designer!].
The edge is divided into 10 parts.***1
Repeat this for the ridge line.Now you have a group containing an eaves and a ridge line each divided into 10 bits.
You can now simply draw new lines between the corresponding ends of these 'bits'...
Toy now have a group containing the ridge and eaves lines, and several lines representing each rafter - this is on one roof plane - but since it's symmetrical we can copy/mirror the other side later...
You now need to extrude a 'rafter' cross-section-rectangle along each 'rafter' line...
This CAN be done by hand, changing axes, making rectangles etc but there are some Plugins to help...Once you have made the rafter lines post a skp and we'll advise on the next step............

-
Wow! It is amazing how much easier things are when you know what you are doing. I did not know about the group or divide tools. I have drawn the rafter center lines on one half of the roof. Here is the lasted version of the model.
UPDATE:
I just figured out how to use the Extrude to Fact tool. Very cool. I now have the rafters on one side of the roof. The next step is to copy them to the other side. I do not know how to do that or how to install the ridge and intersect everything. Once I get through with that, I will probably need some help painting on the roof.
Just getting this done makes me feel powerful. Once you figure out how to do these things they are very easy. Unfortunately for the newbie who has no clue the first few steps are kind of tough. Thanks for your patience.
Bob
-
Well done - I knew you could do it...
A couple of tips:
Always keep your active layer as 'Layer0' and model all of your 'raw' geometry on that layer: only use other layers for groups/components and use their visibility to switch things on/off in the view.
You can change the layer of selected objects using the 'Entity Info' dialog.
'Purge' your model under 'Model Info' > 'Statistics' - to remove unused stuff...Back to the issue...
You have now got some groups inside groups etc...
Let's tidy up...
Select and right-click context-menu 'Explode' the enclosing group so you now have the group containing all of the rafters.
Double-click that group so you are then Editing it.
The rafters are made as individual groups - in this situation it's best to Explode these too...
Select all and right-click context-menu 'Explode'.
Exit the Group Edit.Now you have Group containing the rafters as 'geometry'.
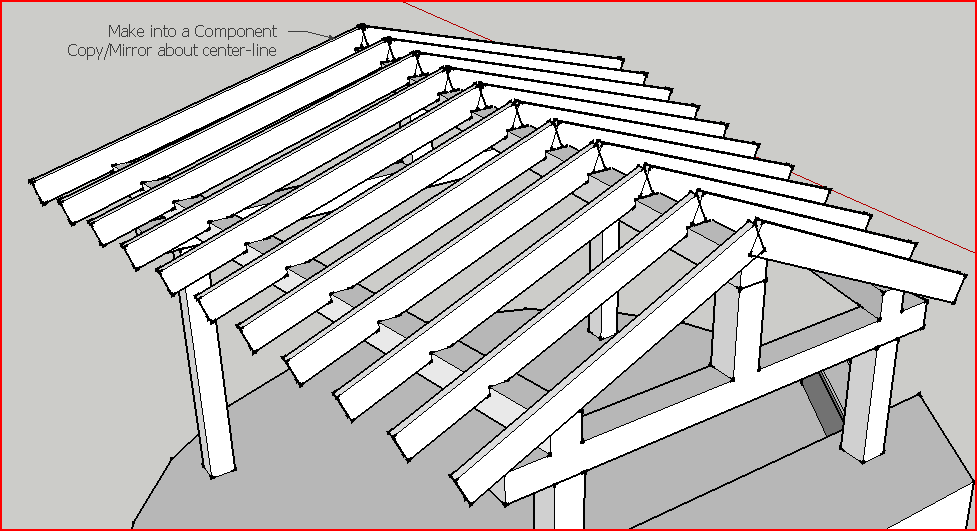
Now make it into a Component, because when you copy/mirror it later and then change one half of it the handed other-half will automatically adjust too.Select the Group.
Right-click context-menu 'Make Component'.
If you want to check that it's made open the Component Browser and click the model-tab [little-house-icon].
You might want to Edit it and rename it something logical like 'Rafters'...To make it easier to snap the yet-to-be-made other-half into place, make the notches in the rafters now.
Double-click to Edit the Rafters-Component.
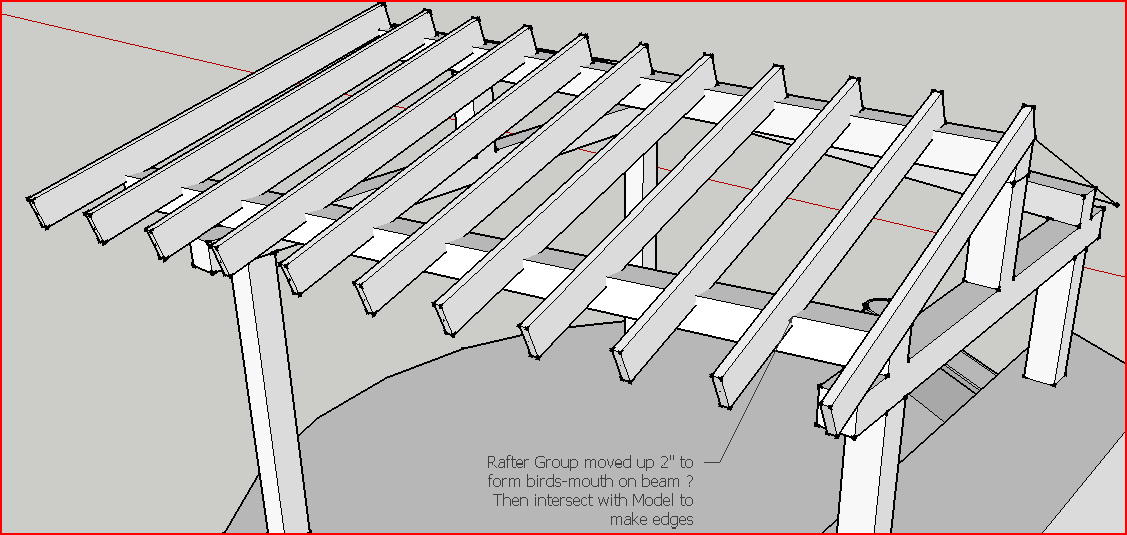
Select All and right-click context-menu Intersect > With Model
The faces that intersect with the supporting beams will now get lines drawn on them at the intersections.
Use menu item 'View' > 'Component Edit' > 'Hide Rest of Model' to hide everything else temporarily so you can see whats happened**.
If desired you can use the 'Eraser' tool to remove the unseen geometry - there is no need to have faces in the notches where they are not seen - it reduces the poly'count and makes your model more efficient and quicker to render etc.
Note that the outside-most rafters will need to have some extra lines drawing over them as the notches are only partial.
One edge-rafter is off the beams [**toggle to 'unhide' the rest of the model temporarily] - either select it and Move it or exit the edit briefly and move the beam ends to suit [PushPull].
Exit the Edit when you are done.[Tip: Remember to Save your model regularly!]
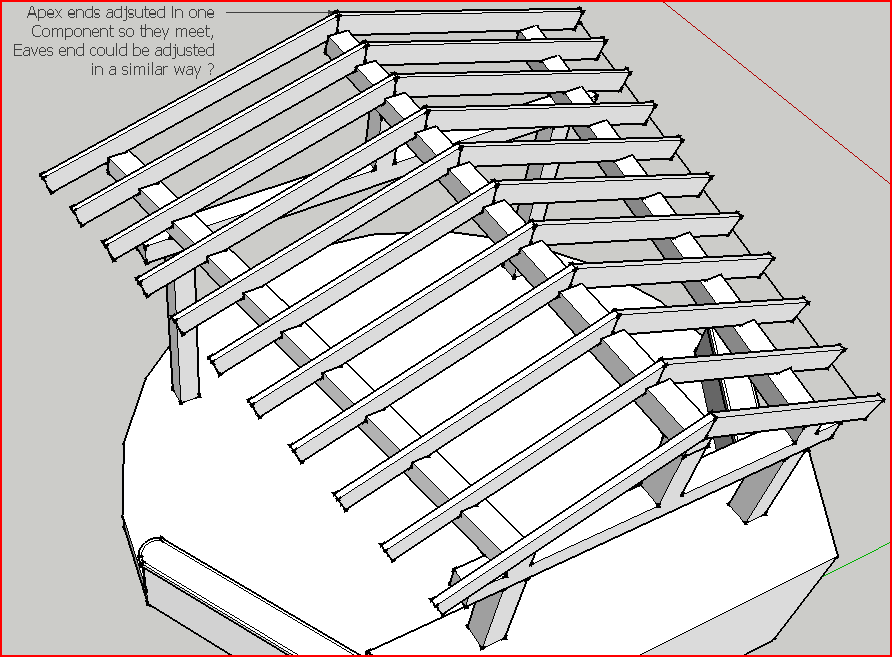
The ridge needs sorting...
Draw a line down the middle of the top of the ridge-beam.
At each of its end Draw a vertical line say 20" high [start to draw so that the inference turns blue then hold Shift down to lock it vertically]
Now draw a line from the verticals' top ends to make a temporary faced rectangle.
Edit the Rafter-Component [**toggle to hide the rest of the model].
Use PushPull on one rafter top end to extend it by say 20".
Repeat the PushPull of each rafter [Tip: a double-click will use the last PushPulled length so you don't need to type in a value each time].
Now all of the rafters will extend past the ridge line / temporary rectangle...
Select All, and use 'Intersect with mode'l again and the temporary rectangle will slice through the extended tops.
Use the 'Erase' tool to delete the unwanted top ends back to the vertical cut line.
Exit the Edit - the rafter ends in the component should now be correctly trimmed to the ridge.
Erase the edges forming the temporary intersecting rectangle to tidy up.If you want the eaves ends to have vertical cut ends repeat a similar process with a temporary intersecting vertical rectangle located there - perhaps extending the rafter bottom ends through it before the intersecting is done - in this case you will need to reform a face over the cut ends - simply draw over an edge and a face should form...
To copy/mirror the rafters to the other side...
[there is a 'Mirror.rb' plugin BUT I'll show you the manual method here]...
Select the Rafters-Component.
Pick Move and press Ctrl to toggle it to 'Copy'.
Make a copy off to one side.
Right-click context menu Flip > Green in this case to make the handed copy
You could have also Scaled it in the required direct and typed -1 to make the 'flip'.Now drag the copy into place on the support-beams...
IF the beams are symmetrical the notches should align as the original side did - I see that you haven't quite modeled it symmetrically - to fix it make the original sides eaves-beam a component too and then copy+flip that so it all matches on the two sides... Alternatively IF the difference were intentional [but it's so slight I suspect it isn't] you would have to model the rafters for the two sides separately...Now you have the rafters as required on both sides.

-
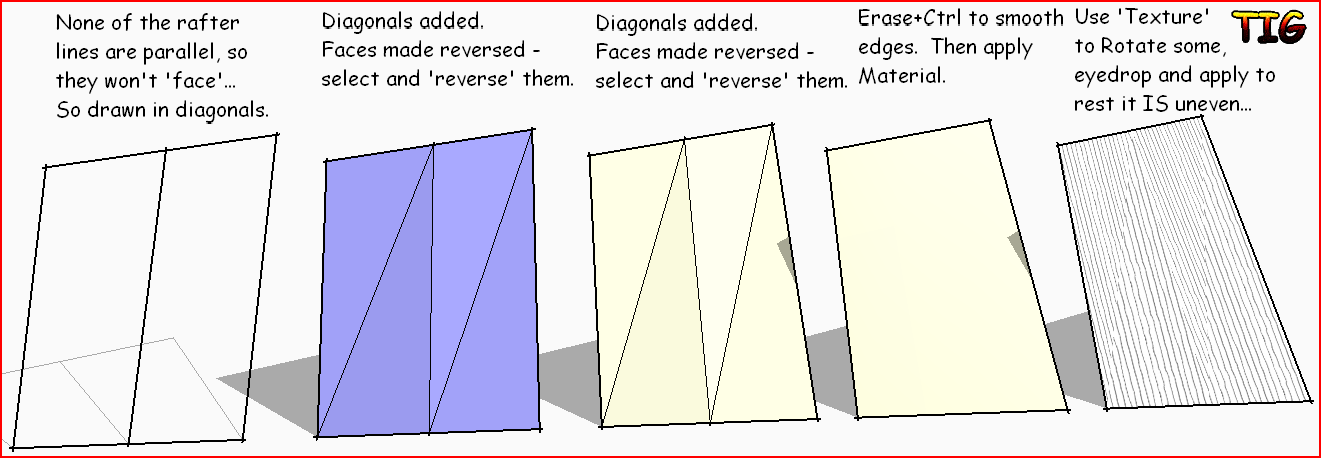
I have made a lot of progress. The rafters are drawn and I have added some planters and started working on the fireplace. My latest stumbling blocks are how to paint on the roof and how to fix the errors I have in some of the panels, (is panel the the right word?)
I am sure that making the roof will be easy once I understand how this is done. A little help please.
One of the biggest problems that I run into constantly is that I somehow inadvertently draw a line or place a marker in the wrong place which causes panels to not behave the way they are supposed to.
There are several places in this model that display this problem. Some panels are white, some are blue, why is this? One panel appears to be a curve when it should be straight. If someone could tell me what I am doing wrong to cause this and more importantly what I can do to fix the problems, I would appreciate the advice.
Once I get the roof on and the geometry fixed, I will be ready to start applying textures, (again, is this the correct word?). I am sure that I will again be asking for some more help when I start that part of this project.
I plan on using wood for the wooden things and rock every place else. The texture library that comes with this program is fairly limited. I am fairly certain that there is a vast library of textures out there that I should be able to download. I would appreciate it if someone would direct me to these resources.
Thanks again to all who are helping me with this project. Here is the latest model.
Bob
-
dsafety Model looking good

Sorry for jumping in the middle of TIG's help but did take a quick look at your model and thought these comments may help:
There are numerous stray lines which may give you trouble down stream with many along the ridge line ( 35 or so). There is a plugin called stray lines http://www.smustard.com/script/StrayLines which can help to ID and remove them;
It looks to me you are a little confused how layers are used in SU. Layers are used for visibility control and not isolation of geometry so all primitive geo , lines etc, should be on layer 0 and then components are assigned to layers for the visibility control. Keep layer 0 always as the active layer when you are drawing, ie select an edge and it shows layer 0 ( entity info) but select the component that edge is used in and it will show the layer for that component (If you have assigned it to a layer diff that 0 that is). Use of more components may help you ;
The roof is truly a warped plane because of the fixed rise and splaying of the beams(causing variable run of the rafters). TIG will have some thoughts here.
If you are planning on building this design, live in a locale that has code requirements for detached structures and are planning on pulling a permit then brief talk with the locale inspector may help just to get some input on the direction you are going. A couple of spans seem large to me and I wonder if long 8x8's($$$$$)vs 2x8 etc are required also. Some times they have printed cheat sheets they will give you. -
I have come along way on this model. I know it is not perfect but for a first attempt, I will take it. The main purpose of creating this model is to sell the idea to my wife and get some bids from potential builders.
The last things that I need to do are to put on the roof and decorate with some furniture. I am at a loss as to how to add the roof. I have not heard from Tig, (who has been extremely helpful), in a few days so have to assume that he is busy helping some one else. If anyone can tell me how to make the roof, I would really appreciate it.
As for the furniture, I have scoured the Warehouse and not found any suitable outdoor furniture. Are there any other sources for components where I might find these items?
As always, I really appreciate all the help.
Bob
-
Try this way...
-
dsafety
Yes you can put a zero thickness skin on that way to form a warped surface. I think each non zero thickness panel may have a compound miter cuts and make sure you ask the contractor about the details of his bid so you don't find your self in the situation of them claiming later that type of work is out of scope !! BTW I think each rafter is the same case. Also make sure you and the contractor understand what the code requirements are if any and that is factored into the cost. Many years ago I was a city inspector and a recent roofing contractor tried to play that game with me. Believe me they will in many cases unless you get all the understanding up front and written down. Attached is a rough idea of what your roof profile will look like
No reafters, soapa kin and bubble plugin ref the eaves and ridge beam edges
-
Thanks Mac1. Your solution appears to be flat while using Tig's method I ended up with several facits. How did you come up with your rendering?
Bob
Hello! It looks like you're interested in this conversation, but you don't have an account yet.
Getting fed up of having to scroll through the same posts each visit? When you register for an account, you'll always come back to exactly where you were before, and choose to be notified of new replies (either via email, or push notification). You'll also be able to save bookmarks and upvote posts to show your appreciation to other community members.
With your input, this post could be even better 💗
Register Login


Advertisement