Help Me Draw A Dome [TUTORIAL]
-
-
Hi Guys
Chris, thanks for the explanation using images. Understand it much better now. I’ll definitely keep those tips in mind.
Gaieus
Good luck with sorting your financial issues. They are the worst thing to resolve.
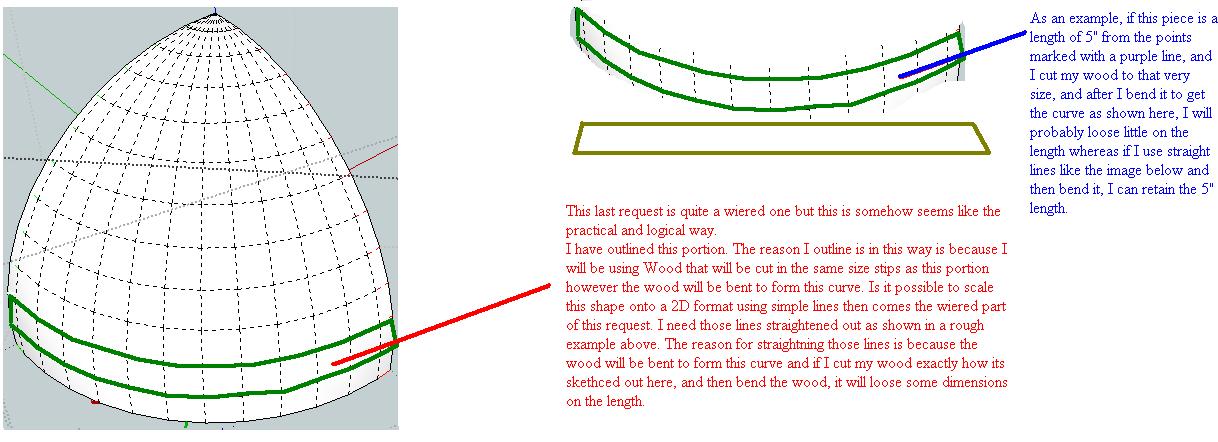
Whenever you can assist will be perfectly fine with me. No Rush.I thought, while we are trying to resolve this situation, we can start thinking about how to get this model printed to scale and more so, how we going to draw this model in simple 2D lines so I can easily make my guides. If there is need to redo my model, this shouldn’t be an issue as I am very familiar with how to do it in a short space of time thanks to you.
My explanations as usual don’t seem to make much sense but hope the images do. If you need me to clarify anything, let me know.
Thanks
-
The transition from model to construction data should not be like this. I would like some time to explain. This is an important part of my work. Can you give some time - like tomorrow or the next day?
-
@chrisglasier said:
The transition from model to construction data should not be like this. I would like some time to explain. This is an important part of my work. Can you give some time - like tomorrow or the next day?
Sure Chris. I'd love to hear your advice on how the transition should be done.
Your advice is always welcomed and I look forward to hearing it.Don't keep me in suspense for too long. I'm really anxious to compare your advice with the way I thought it should be done.
Take care
Regards
D0me -
Make the model to visualise how the real thing will work, how it will look and how it can be made. Then as far as possible use the dimensions you used to draw it in Sketchup to draw it on the plywood, bricks or whatever exists. I remember that, in your crusade to make things difficult (CMTD), that the arc of the dome is not regular, so you will have to make a template.
I am not against printing one. In fact I did that once for a bar canopy that was like part of an airplane wing. It took up to eight sheets of A0 paper for each truss. In those days I had all sorts of equipment including a plotter (and a joinery shop). But really I think the best thing for you is to lay a grid over a parallel projection of a standard view of the model, and then transpose the intersections onto a full scale grid on plywood to make the spinner. You won't need any other templates.
But you will need some 2" wire nails, twine, measuring tape, marker pen, shovel, broom, hawk and finishing trowel. You may find a wood float useful as well. Aim to make the d0me accurate to +- 10mm.
I have never used rapid hardening concrete but I understand it is only workable for 20 minutes or so. You really need to understand how to use the spinner and these tools before mixing the concrete. I don't understand why you want multiple d0mes (CMTD?) but I suggest 2" is a minimum thickness for any one casting. You should consider using a bonding agent.
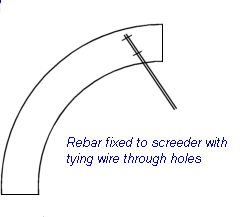
If you want to wire cut the segments make a plywood collar to slip over the pole and attach straining wires at its quadrant points. Lay out your brick base square so that there is a joint at each of the base quadrant points. (Not CMTD herringbone - which will never be appreciated anyway). After cutting and scooping out the bunghole, push the collar down the pole and align the wires in the brick joints. Cut the d0me like cheese.
I can only give you my opinion; please remember I have only experience making an adobe d0me.
When's the kickoff?
-
As for printing to scale in general, the method should be this:
- Make sure you are in Parallel projection mode (Camera menu).
- Also make sure you are in any of the Standard views (Camera menu again).
- Then set your print dialog (File menu > Print) like this below (I have set it to 1:5 now as that can still fit on an A4 page I "virtually" printed the model into a pdf file - see also attached).
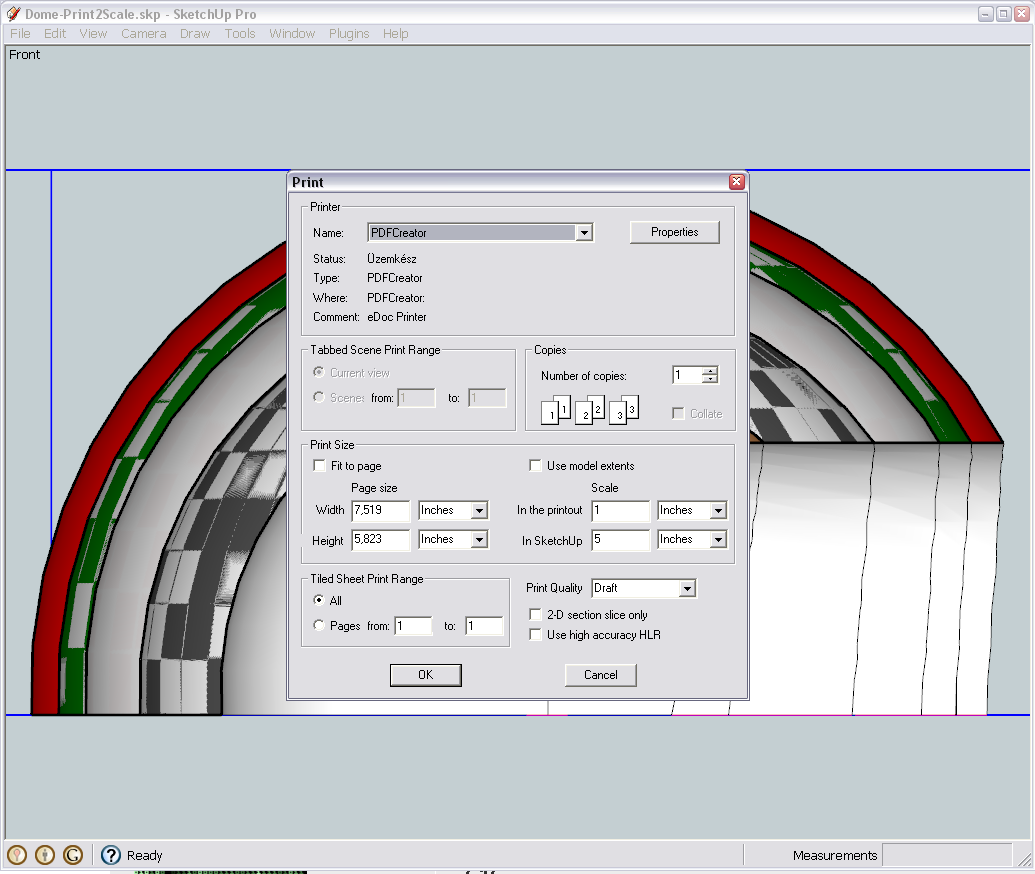
Now I also added a section plane to the model so that you can print the section cut to scale. If you had the Pro version, you could even export this cut into a vector format to use it in some external CAD software or such. Certainly the cut looks quite ugly this way but with some plugins we can easily fix that later - the theory will be the same.
-
Oh and you will need to make a tunnel for the door opening and a piece of pipe for the smoke outlet. This should be close to the top of the door so that the smoke swirls.
-
Hi Guys
Thanks so much for the replies.
Chris, I hear what you're saying and will surely implement the given advice wherever I can. I may have access to a Plotter but if not then I will Sketch the drawing using my dimensions. Because this is a first time for me, both Sketching and Building/Masonry, I will explore different methods and use the most accurate and not necessarily the most easiest. As a comparison, I will also print the model on A4 or larger paper and see where it leads to from there.
"Kick Off?" My planned date is Next Weekend. I have planned other dates before but it never went according to plan but this time I am a little more confident. I am actually of to the hardware store today to try and source material I will require.
Gaieus: Thanks for the step by step on how to print this model to scale. Always look forward to your tutorials.
Regarding the plugin you mentioned to sort out the ugly cut, where can I download it in the mean time so I can start playing around?
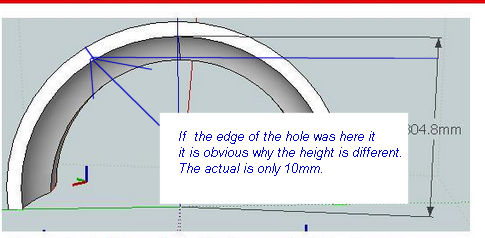
Did you get a chance to figure out how we going to resolve the problem with my Dome Height after creating the bung hole/bevel?
Thanks again
Regards
D0me -
Didn't you like my 'quick and dirty' solution? You know - to scale up everything by that bit. Oh well - you would have just a little bit thicker walls for your dome.

Edit: and here is TIG's SectionCutFace plugin.
-
@unknownuser said:
Did you get a chance to figure out how we going to resolve the problem with my Dome Height after creating the bung hole/bevel?
When you have taken out the spinner pipe (it needs to be pipe not a pole in order to rotate on the spigot), fill the void with sand and dome the top. Pour the bung. Your height will be same as before.
-
Ah good, thanks Chris. No wonder I did not suggest that - these technical details (even the whole process) is not my strength. I also thought that hole will have function later.
What is this "bevel" thing with the dome BTW?
-
@gaieus said:
What is this "bevel" thing with the dome BTW?
The hole is to accommodate the spinner pipe. (It also stubs the pointy bit of the segments, which could easily break if transported.) The bung is cast at a different time so there may be a slip plane at the joint. The beveled edges stop the bung falling through. The bung is an oculus shaped keystone if you know what I mean.
-
@chrisglasier said:
...The bung is an oculusshaped keystoneif you know what I mean.
Now we are speaking!

Why didn't you start with this???

-
@gaieus said:
@chrisglasier said:
Why didn't you start with this???
And take the mystery out of the topic? Notice I haven't asked why the d0me is in four segments. Another mystery yet to be revealed - eh!
And what's this got to do with anything:
-
@gaieus said:
Didn't you like my 'quick and dirty' solution? You know - to scale up everything by that bit. Oh well - you would have just a little bit thicker walls for your dome
Sorry Gaieus, I must have misunderstood you. In a previous post you mentioned this solution but didn't say how to do it. You did say you were rushing over to the bank and we'll figure something out when you get back.
Thicker walls should be fine but the important thing for me is to learn more about the power of SU.@chrisglasier said:
When you have taken out the spinner pipe (it needs to be pipe not a pole in order to rotate on the spigot), fill the void with sand and dome the top. Pour the bung. Your height will be same as before
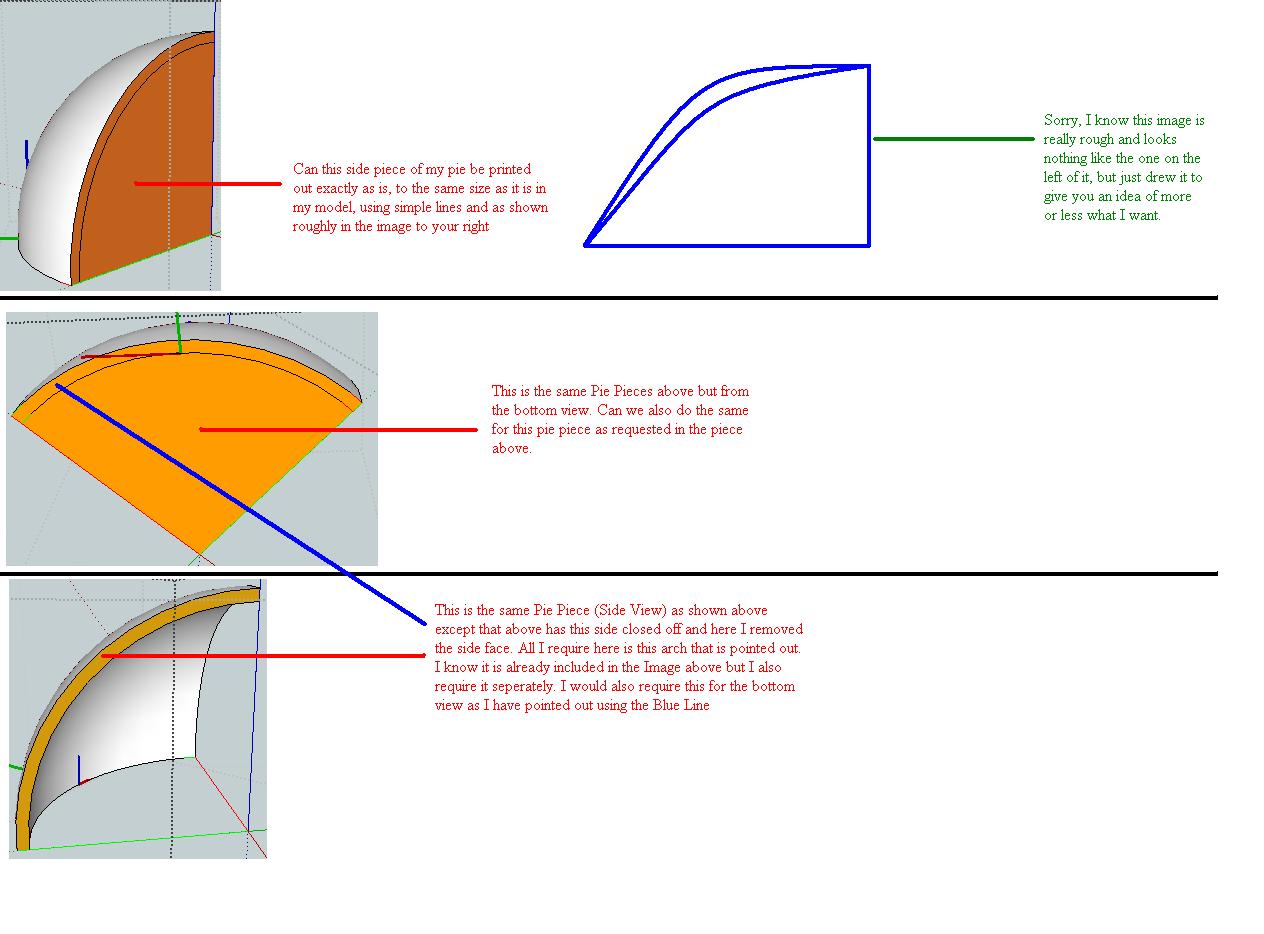
After my Sand Dome, I will add to it the Refractory Dome with the pipe still in place. The Refractory dome will be made in 4 Pieces. Because Refractory material is a quick hardening material, and this is a first time for me, I will cast 1 piece at a time. After all 4 pieces are casted, I will join them together. Because each piece will be casted with the pipe in place, this will automatically create the bunghole in the centre. I will just fill the centre with refractory cement to close it of thus creating the "Keystone".
I may be wrong but with the way I plan on doing things, the height of my inner refractory dome will decrease a little.@gaieus said:
Why didn't you start with this??
Really don't know why I'd didn't as I should have started with this first. Its not too late to do so. Any advice to make sure I do it right especially the height.
@chrisglasier said:
And what's this got to do with anything:
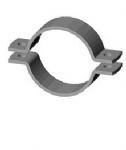
Chris, I guess the picture attached is what should be used as my spinner. I went to my Hardware store today and explained to the salesman what I require and how I will use it. Unfortunately he couldn't think of anything to supply me with that could help me create a spinner.
Also regarding the pipe, any pipe you recommend?
Lastly, how large of a diameter should my bunghole be and this will be the same diameter of my pipe.Thanks
Regards
D0me -
@d0me said:
@gaieus said:
Why didn't you start with this??
Really don't know why I'd didn't as I should have started with this first.
No, that was meant for Chris. He clarified it to me with the "oculus" term.
Then as he explained that you will fill the missing sand back anyway (and this way fix the height difference), my "quick and dirty" solution has become deprecated anyway.
Of course, we can still learn a few tricks if you are inclined - even if you do not need them for your current project.
-
@gaieus said:
@d0me said:
@gaieus said:
Why didn't you start with this??
Really don't know why I'd didn't as I should have started with this first.
No, that was meant for Chris. He clarified it to me with the "oculus" term.
Then as he explained that you will fill the missing sand back anyway (and this way fix the height difference), my "quick and dirty" solution has become deprecated anyway.
Of course, we can still learn a few tricks if you are inclined - even if you do not need them for your current project.
I'm leaning towards redoing this model and since I now know the pipe will be part of it, how do you suggest I implement it? In the begining before sketching my dome pieces or after the dome pieces are sketched?
-
I was confused at first and now I'm more confused.

-
@chrisglasier said:
And take the mystery out of the topic? Notice I haven't asked why the d0me is in four segments. Another mystery yet to be revealed - eh!
@d0me said:
The Refractory dome will be made in 4 Pieces. Because Refractory material is a quick hardening material, and this is a first time for me, I will cast 1 piece at a time. After all 4 pieces are casted, I will join them together. Because each piece will be casted with the pipe in place, this will automatically create the bunghole in the centre. I will just fill the centre with refractory cement [concrete] to close it of thus creating the "Keystone".
Ah ha!
As the angle at the top is now 90 degrees the acute angle problem has gone away and you don't need the bunghole for that reason. I think you can screed off the sand and lower domes by eye using lines drawn on the form. So you don't need the complication of spinner and so on.
Just make another screeder for the topmost layer with a curve the same as the largest diameter and 2" longer than the quadrant base.
Set up your panel assembly (form), place and compact the sand then carefully lay up the concrete layers evenly not to disturb the substrate using the hawk and steel trowel. Hold the top screeder horizontally to rule off the surplus concrete pressing against the side pieces going from bottom to top if casting vertically *. Of course fill any depressions and rule again. Just as the concrete is beginning to set use a wood float to dress the surface. After that you can use the steel trowel but be careful not to bring too much cement/water slurry up to the surface. (Try it out on the hidden surfaces).
- You might consider making a cradle to sit your form horizontally. Then you could use a slightly wetter mix.
@racer123246 said:
I was confused at first and now I'm more confused.
Just wait for D0me to post the WIP photos. All will be clear.
-
@chrisglasier said:
@chrisglasier said:
And take the mystery out of the topic? Notice I haven't asked why the d0me is in four segments. Another mystery yet to be revealed - eh!
@d0me said:
The Refractory dome will be made in 4 Pieces. Because Refractory material is a quick hardening material, and this is a first time for me, I will cast 1 piece at a time. After all 4 pieces are casted, I will join them together. Because each piece will be casted with the pipe in place, this will automatically create the bunghole in the centre. I will just fill the centre with refractory cement [concrete] to close it of thus creating the "Keystone".
Ah ha!
As the angle at the top is now 90 degrees the acute angle problem has gone away and you don't need the bunghole for that reason. I think you can screed off the sand and lower domes by eye using lines drawn on the form. So you don't need the complication of spinner and so on.
Just make another screeder for the topmost layer with a curve the same as the largest diameter and 2" longer than the quadrant base.
Set up your panel assembly (form), place and compact the sand then carefully lay up the concrete layers evenly not to disturb the substrate using the hawk and steel trowel. Hold the top screeder horizontally to rule off the surplus concrete pressing against the side pieces going from bottom to top if casting vertically *. Of course fill any depressions and rule again. Just as the concrete is beginning to set use a wood float to dress the surface. After that you can use the steel trowel but be careful not to bring too much cement/water slurry up to the surface. (Try it out on the hidden surfaces).
- You might consider making a cradle to sit your form horizontally. Then you could use a slightly wetter mix.
@racer123246 said:
I was confused at first and now I'm more confused.
Just wait for D0me to post the WIP photos. All will be clear.
Hi Chris
I've been reading your post over and over, trying to grip the important advice you have given. I am finding it a bit confusing so I'll take a few steps back.
Firstly, you mention that the angle at the top is now 90 degrees instead of being acute. Would you mind elaborating on you've come to thing conclusion. Sorry, my understanding on architecture jargon is limited to none.
I was always under the impression that a screeder and spinner was the same thing. I was obviously mistaken. Where can I see images of how the 2 work in their own way.
I more or less understand the rest of your advice and it will become even more clearer when I get more clarity on the above points.
As for pics on WIP, most definately. This post will not be complete without them.
Thanks
Regards
D0me
Hello! It looks like you're interested in this conversation, but you don't have an account yet.
Getting fed up of having to scroll through the same posts each visit? When you register for an account, you'll always come back to exactly where you were before, and choose to be notified of new replies (either via email, or push notification). You'll also be able to save bookmarks and upvote posts to show your appreciation to other community members.
With your input, this post could be even better 💗
Register Login


Advertisement