sketchucation logo sketchucation
    • Login
    Oops, your profile's looking a bit empty! To help us tailor your experience, please fill in key details like your SketchUp version, skill level, operating system, and more. Update and save your info on your profile page today!
    ⚠️ Important | Libfredo 15.6b introduces important bugfixes for Fredo's Extensions Update

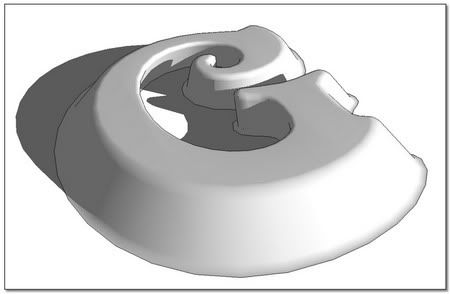
    How can I make a letter rounded?

    Scheduled Pinned Locked Moved SketchUp Discussions
    sketchup
    31 Posts 6 Posters 6.1k Views 6 Watching
    Loading More Posts
    • Oldest to Newest
    • Newest to Oldest
    • Most Votes
    Reply
    • Reply as topic
    Log in to reply
    This topic has been deleted. Only users with topic management privileges can see it.
    • pilouP Offline
      pilou
      last edited by

      @unknownuser said:

      My PC works hard to make SU running, and I can't even think to run a modeler on it

      Are you joking? 😮
      My Pc is a seven year old! And all works very fine on it! 😎
      I have just progs who don't ask too many things to the video card!
      Zbrush, Moi, Su, Blender 😉
      PS SU is also a modeler! ☀

      PS2 What happen when a render is made with these "horrible lines"?

      Frenchy Pilou
      Is beautiful that please without concept!
      My Little site :)

      1 Reply Last reply Reply Quote 0
      • simon le bonS Offline
        simon le bon
        last edited by

        Hey Hey Helisei,

        You show too much or you explain not enough 😛
        You are waiting I find by myself I suppose. Not a lot of time again for that these next days..

        You are right. S&S works well on the letter shape you have redraw.
        but:
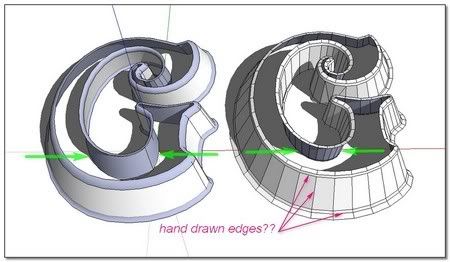
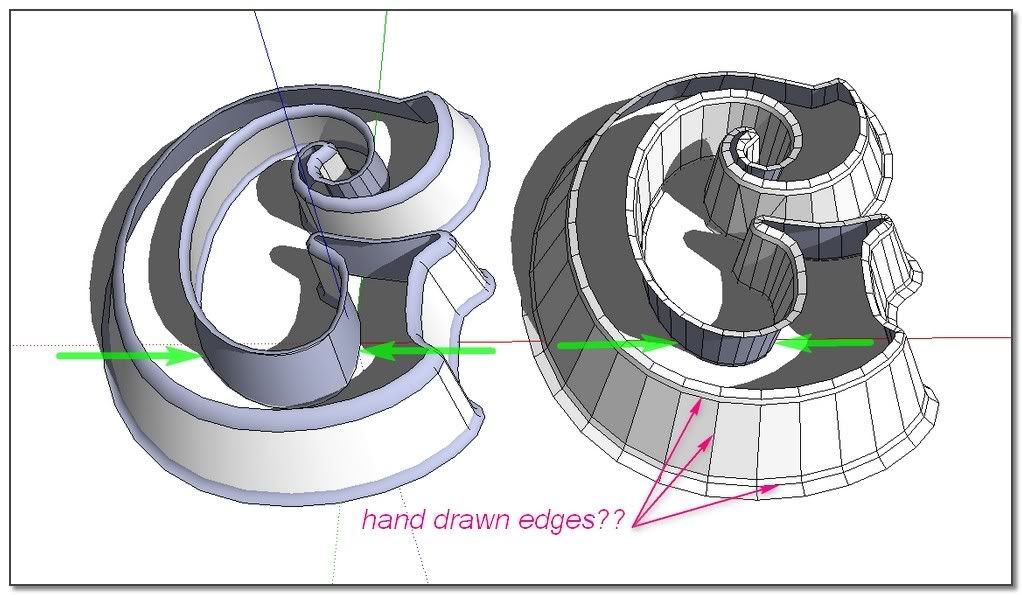
        1_ How did you do to make the base of the letter correctly flared ??
        2_ How did you do to redraw all the lines of the letter shape: by hand??


        http://i274.photobucket.com/albums/jj245/Spendauballet/SketchUp/ThickLabel_W_450.jpg

        I can see I have still a lot to learn on S&S. This another technic for exemple find me with the tong out of my mouth:Contest Winner: Modelling a Panton Chair with Subdivide and Smooth

        Thanks to participate,
        simon . . . . . .and theSlideshow(each link is the same updated one)

        PS: Your cars are crazy beautiful man 👍

        1 Reply Last reply Reply Quote 0
        • simon le bonS Offline
          simon le bon
          last edited by

          Hi ely862me

          @unknownuser said:

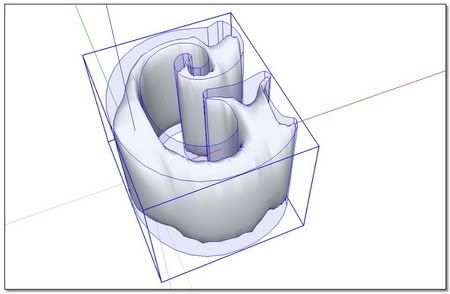
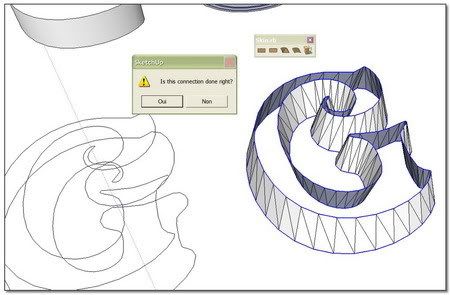
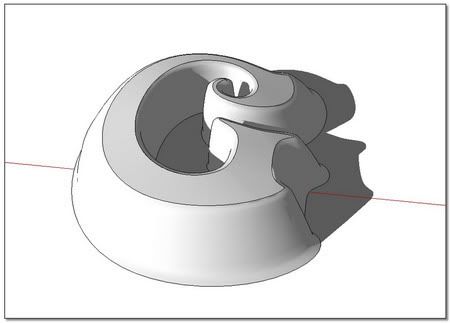
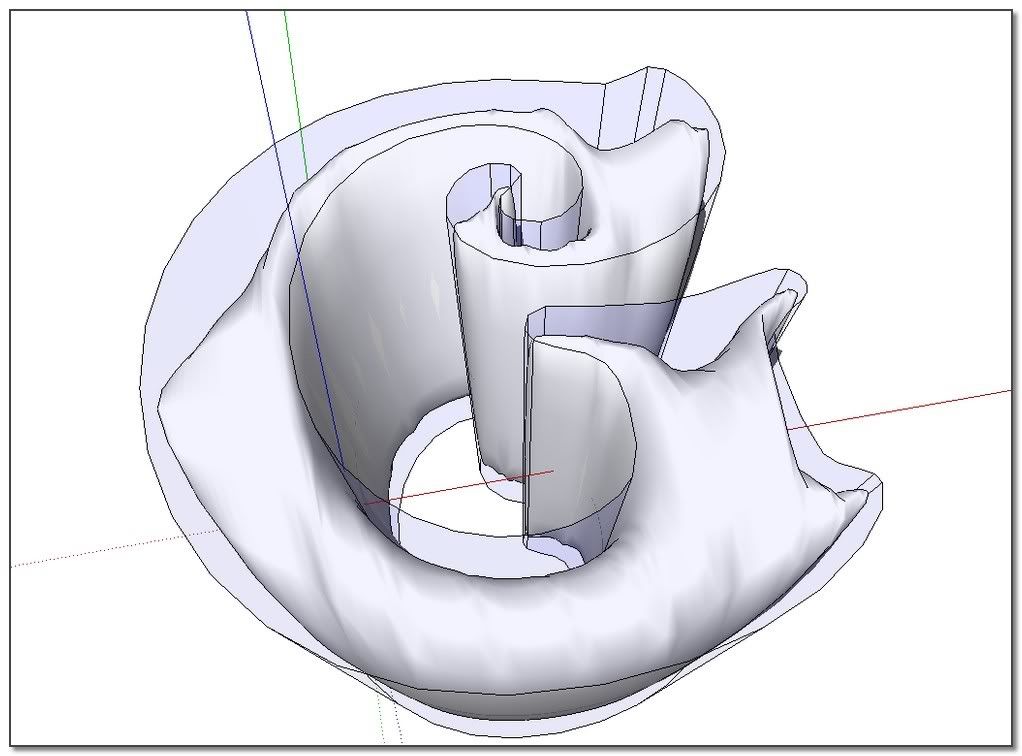
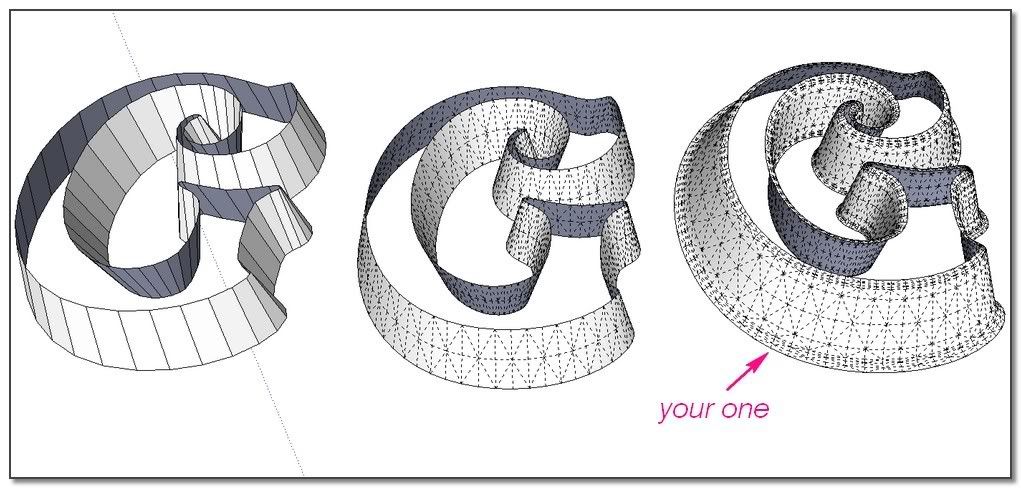
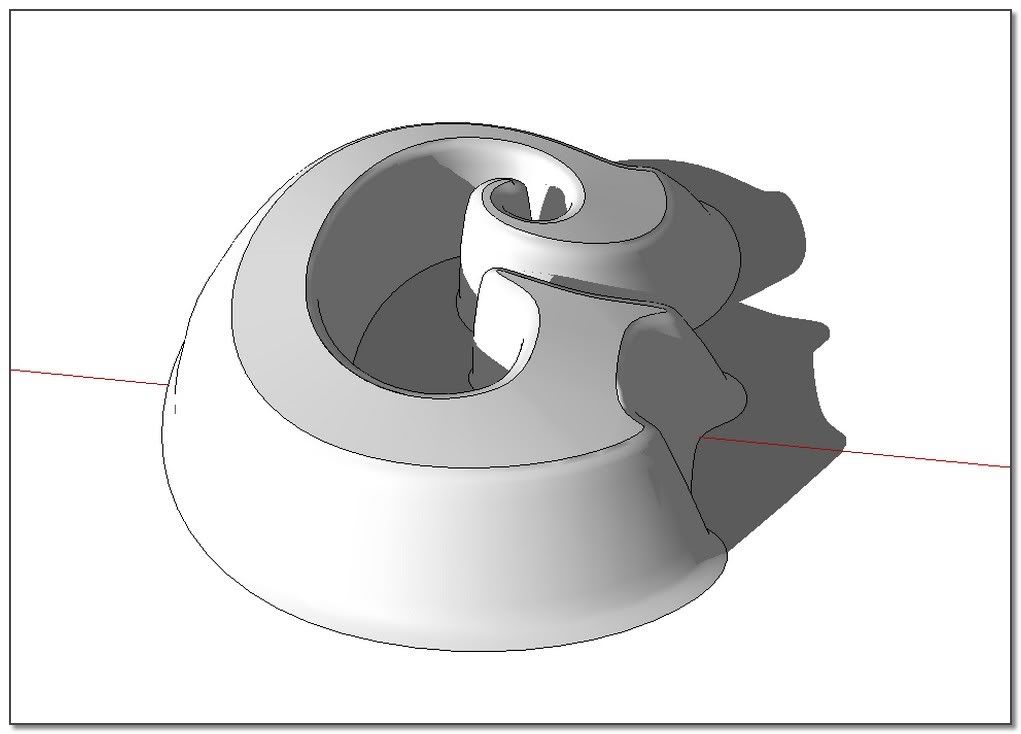
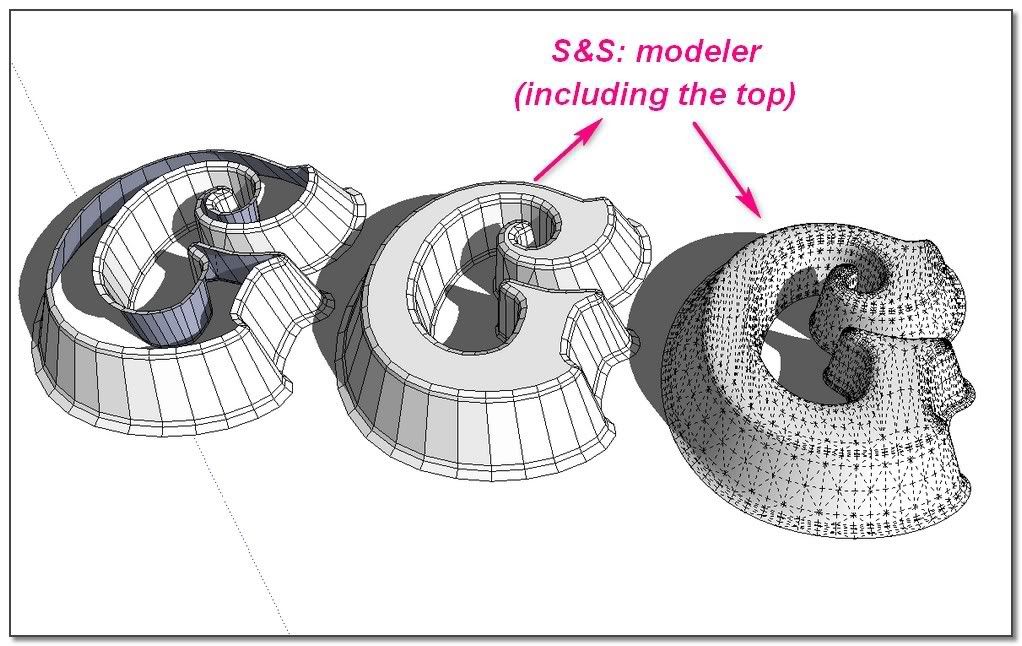
          Take the model as in image 3 or 4 and run Subdivide&Smooth on it..u ll get the desired result

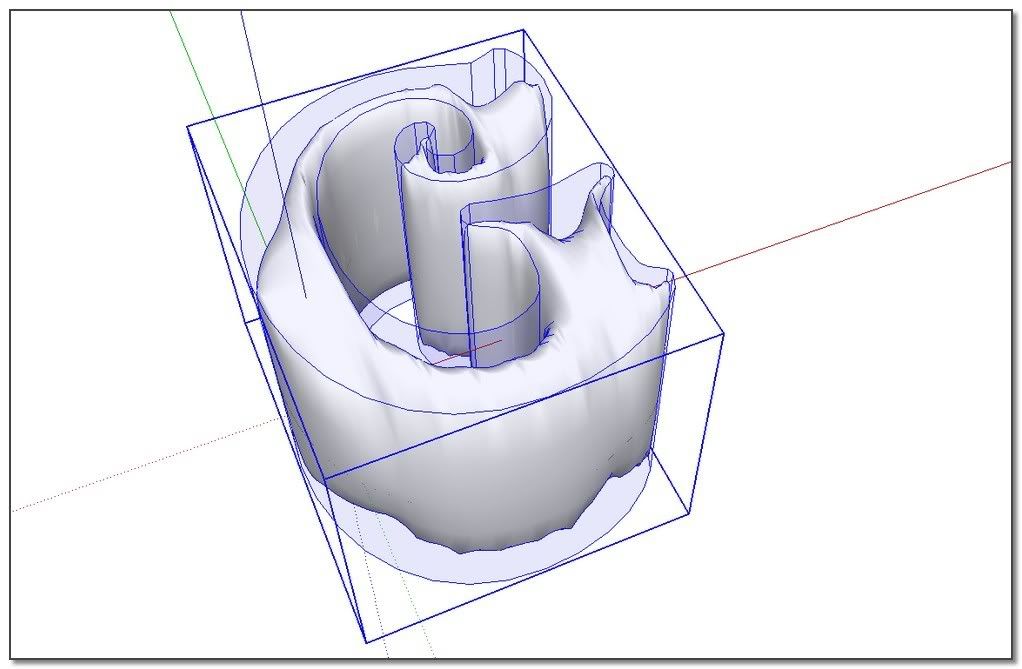
          I'm afraid I don't understand the way you think about!
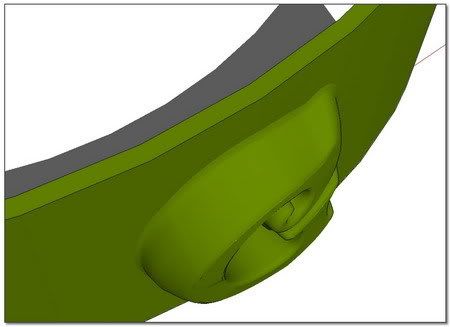
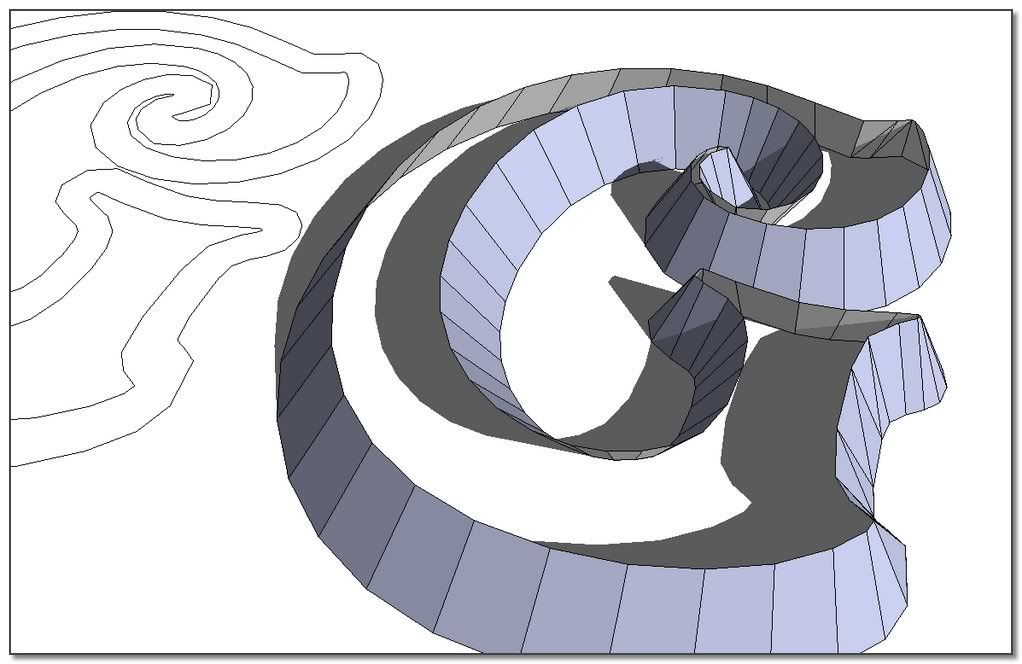
          I've tried this time, not the subdivide+smooth operations like before but the modeler operation as i can think you are talking about, and the result is the following, after what i can't go further.

          http://i274.photobucket.com/albums/jj245/Spendauballet/SketchUp/ThickLabel_P_450.jpg


          http://i274.photobucket.com/albums/jj245/Spendauballet/SketchUp/ThickLabel_Q_450.jpg

          /**

          Dear Gaieus,
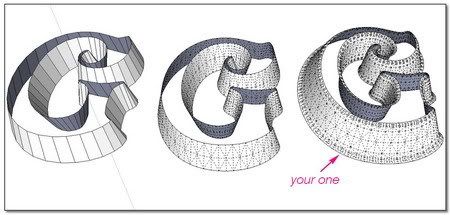
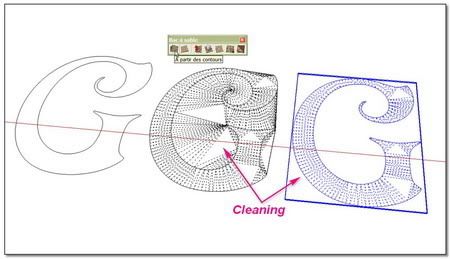
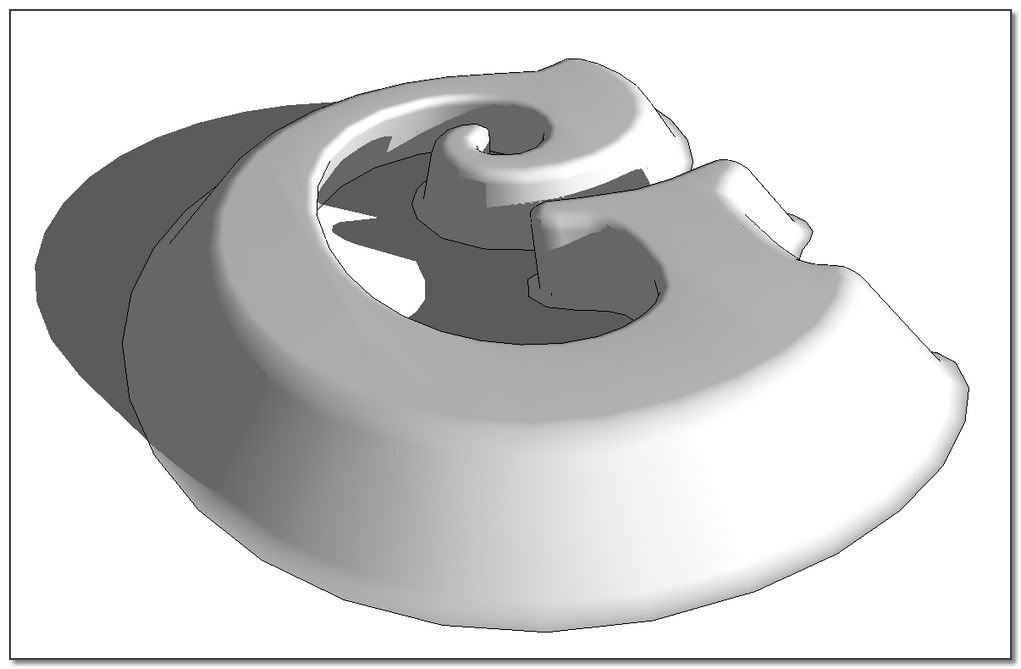
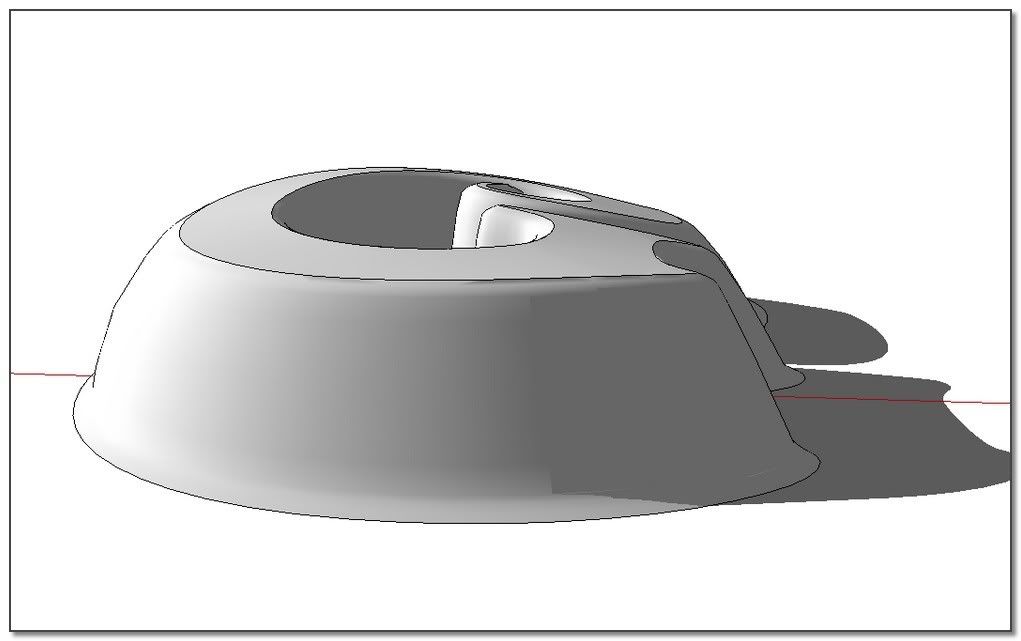
          One more time you're right! I can't say I didn't know what you're talking, about cleaning unwanted geometry. But i thought in this case that it was not necessary to clean because there was no faces joining. As we can see, I was wrong 😄
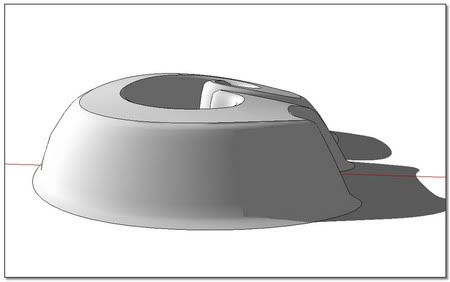
          Adendum about this subject:Creating a Hidden Seam in Google SketchUp by Eric Lay(Boofredlay).

          After cleaning:

          http://i274.photobucket.com/albums/jj245/Spendauballet/SketchUp/ThickLabel_R_450.jpg

          This time it looks ok 👍

          http://i274.photobucket.com/albums/jj245/Spendauballet/SketchUp/ThickLabel_S_450.jpg

          and i'm afraid this is my ultimate best

          http://i274.photobucket.com/albums/jj245/Spendauballet/SketchUp/ThickLabel_T_450.jpg

          Updated slideshow

          simon

          1 Reply Last reply Reply Quote 0
          • simon le bonS Offline
            simon le bon
            last edited by

            @ely862me said:

            :lol: actually is very simple..

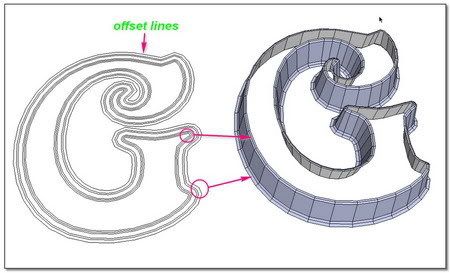
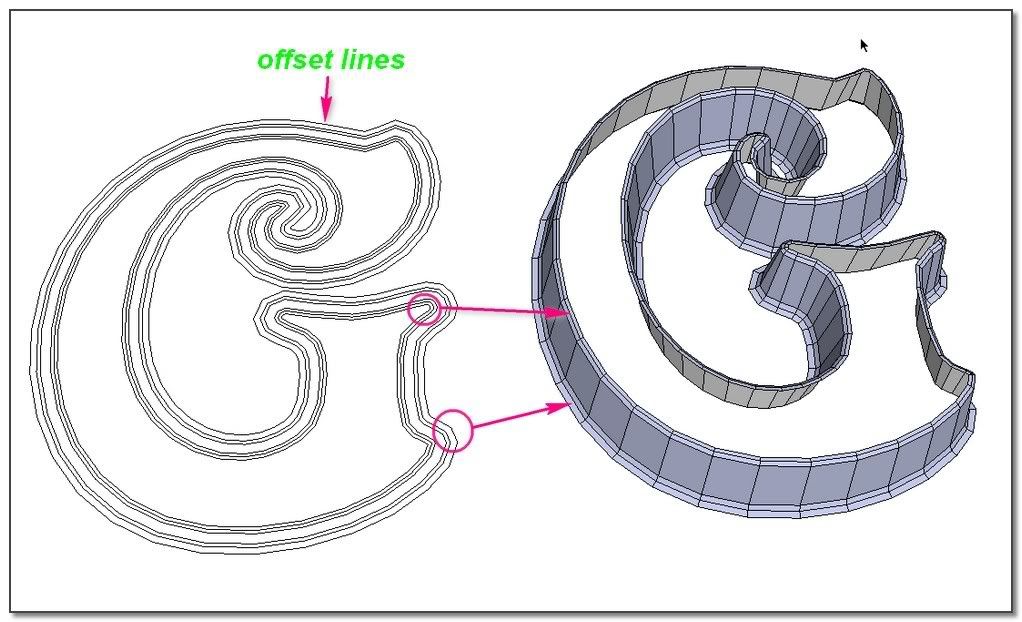
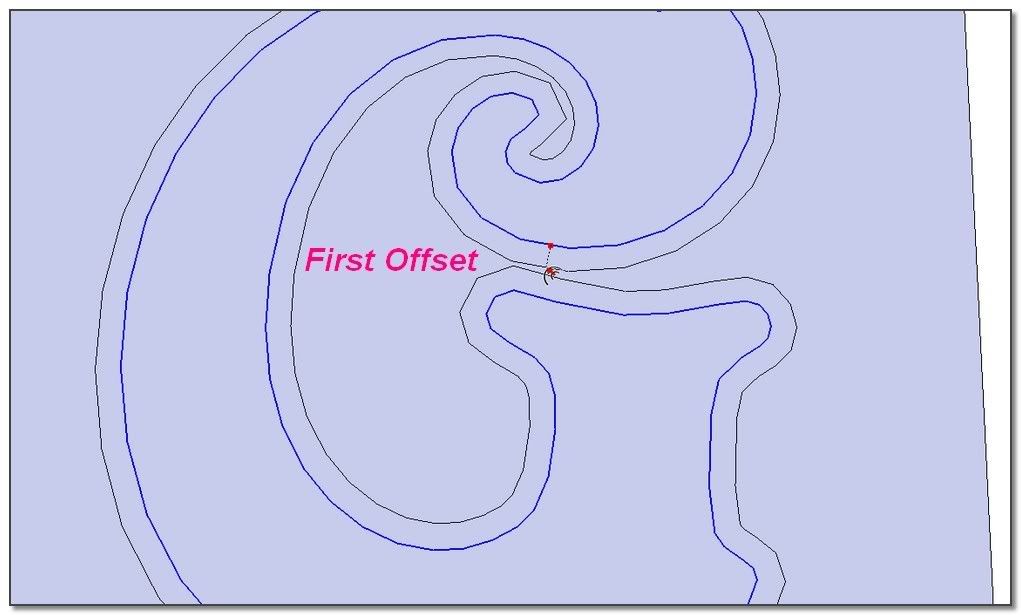
            i ll give u 3 hints: offset tool,skin tool and scale tool

            Very simple? No I wouldn't say that. In fact I haven't found how to make exactly the good flare I wanted (the same as yours). And I would have please (now I have searched 😉 ) more precisions from you on the way you've mastered it.

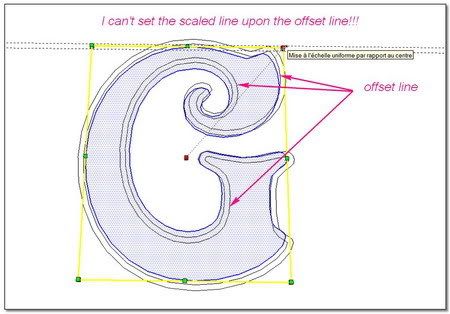
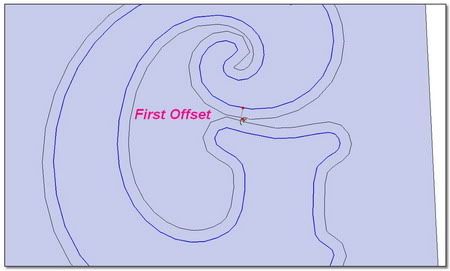
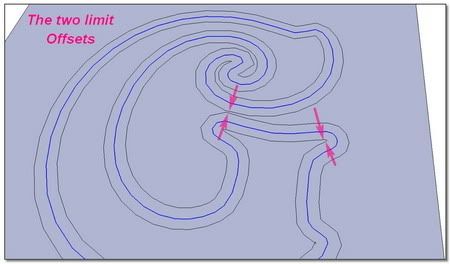
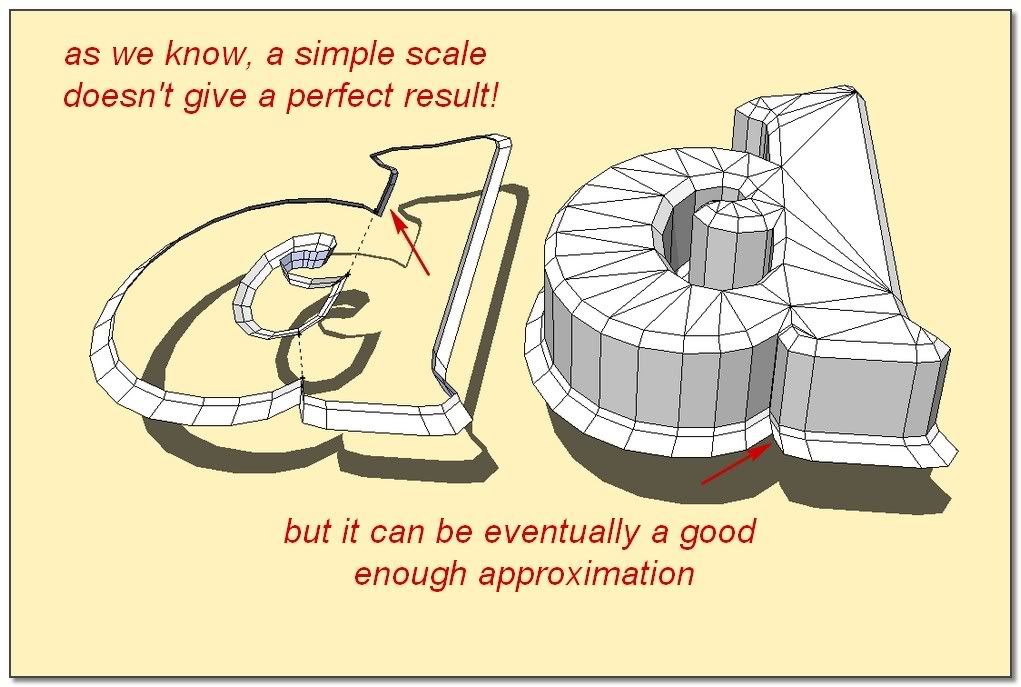
            • A very important thing I have learned here is that: an offset doesn't give the same outer edge than a scale??(really a surprise to me) this is the reason why I was not able to do the right flare using scale tool and FredoScale!!

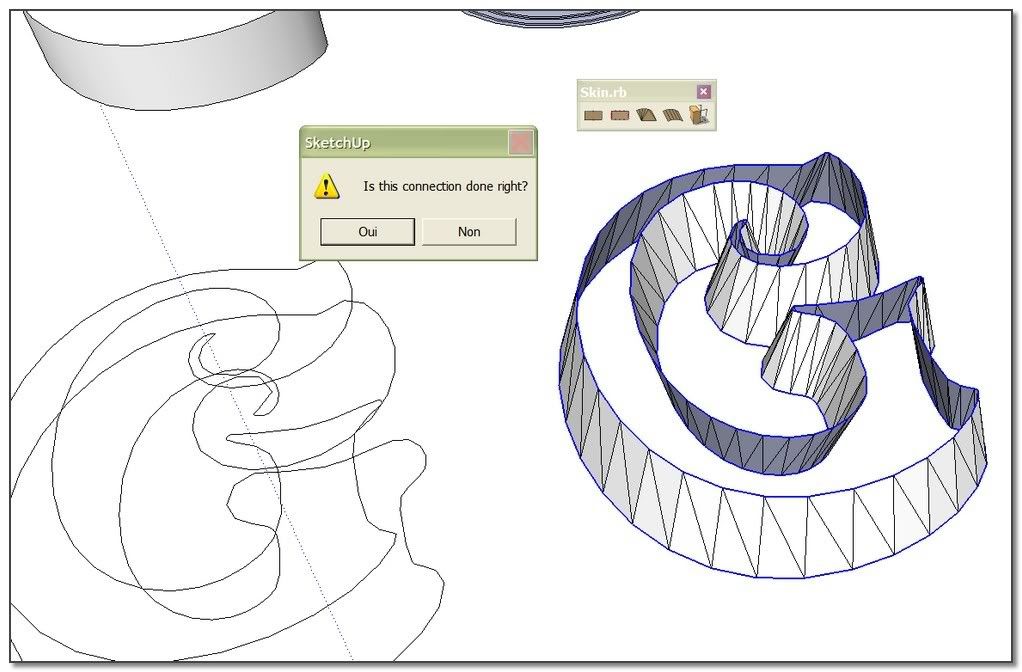
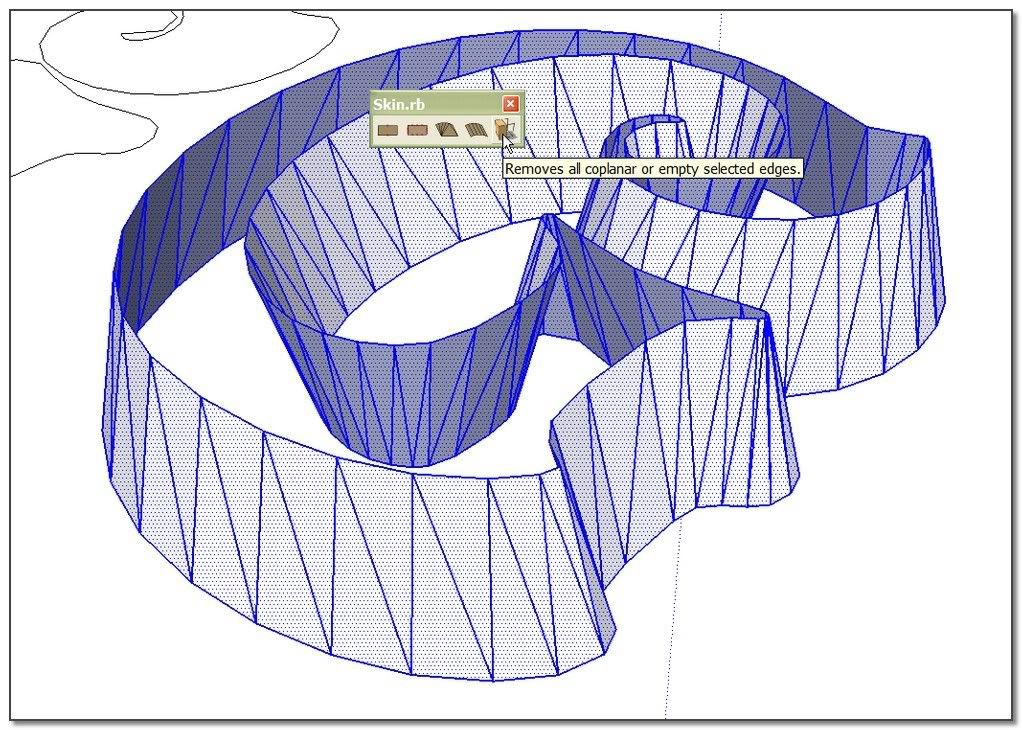
            • No need to redraw all the lines, there is a cleaning module in Skin.rb
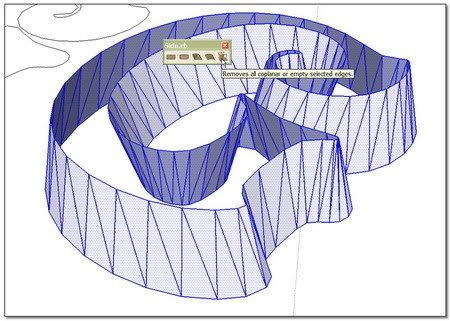

            http://i274.photobucket.com/albums/jj245/Spendauballet/SketchUp/ThickLabel_WA_450.jpg


            http://i274.photobucket.com/albums/jj245/Spendauballet/SketchUp/ThickLabel_WB_450.jpg

            A check with S&S

            http://i274.photobucket.com/albums/jj245/Spendauballet/SketchUp/ThickLabel_WC_450.jpg

            "Very important"

            http://i274.photobucket.com/albums/jj245/Spendauballet/SketchUp/ThickLabel_WD_450.jpg


            http://i274.photobucket.com/albums/jj245/Spendauballet/SketchUp/ThickLabel_WE_450.jpg


            http://i274.photobucket.com/albums/jj245/Spendauballet/SketchUp/ThickLabel_WF_450.jpg

            (I have let down momentarily what I had begun whith Gaieus and I will retake it soon.)

            simon

            1 Reply Last reply Reply Quote 0
            • simon le bonS Offline
              simon le bon
              last edited by

              Ok Elisei, you seem to be occupied. I can't wait you to follow my idea. (It would be great and friendly if you would give us a little step by step further explanation)

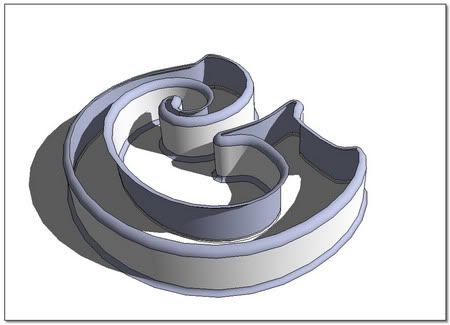
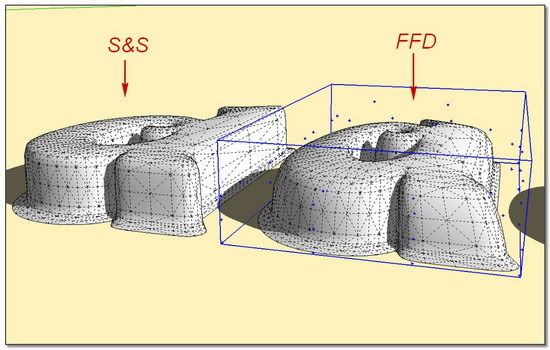
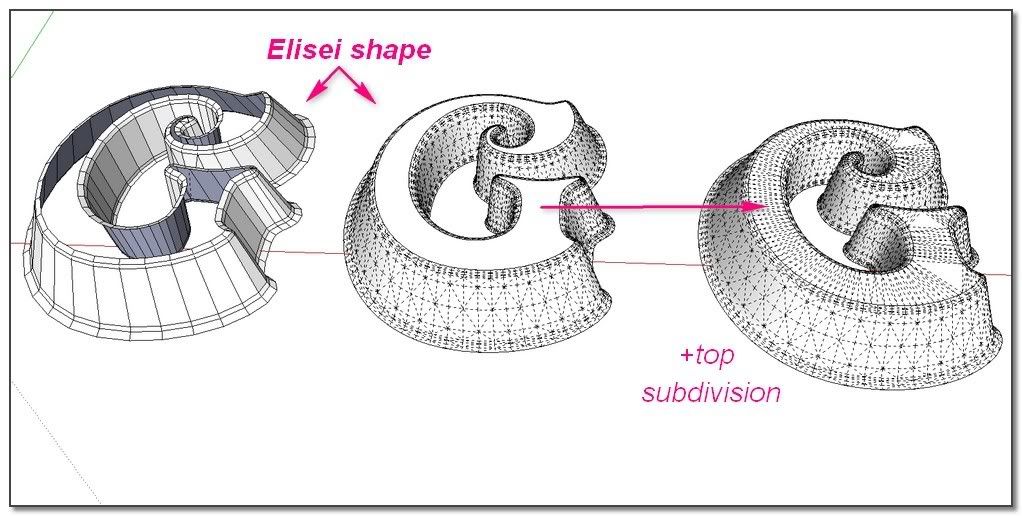
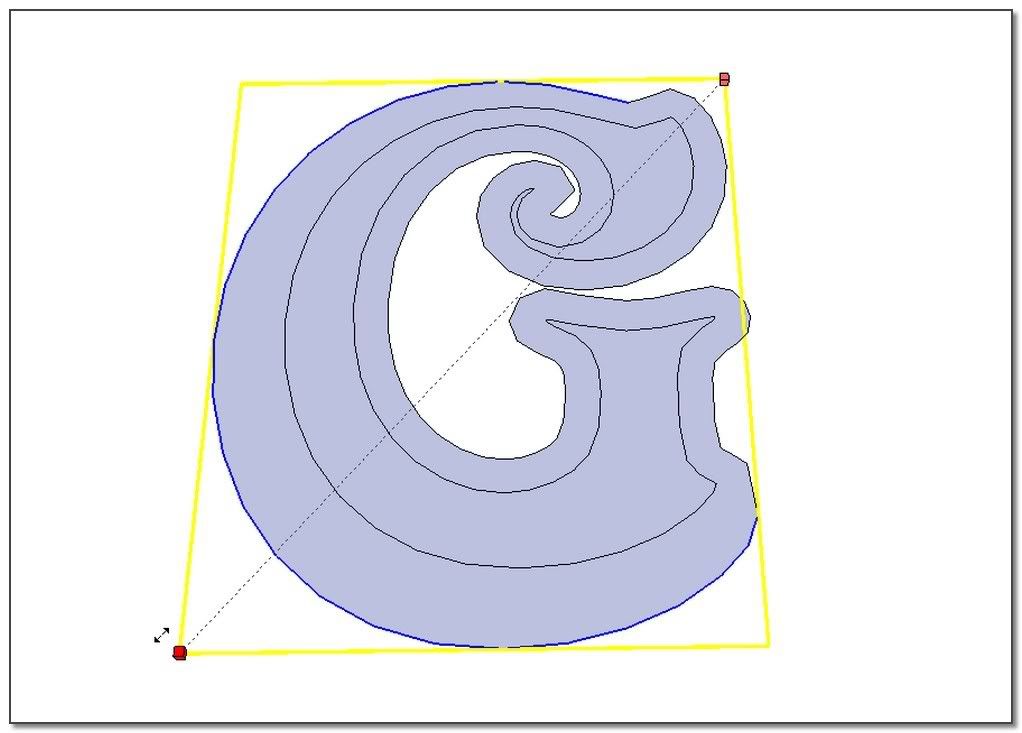
              I start from your shape.


              http://i274.photobucket.com/albums/jj245/Spendauballet/SketchUp/ThickLabel_WFB_450.jpg

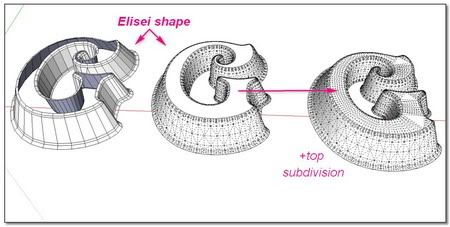
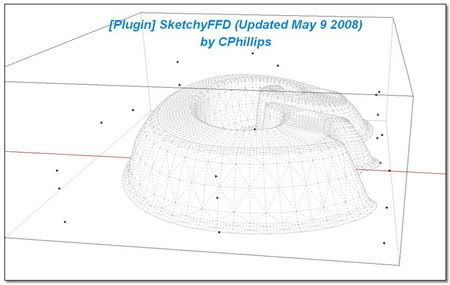
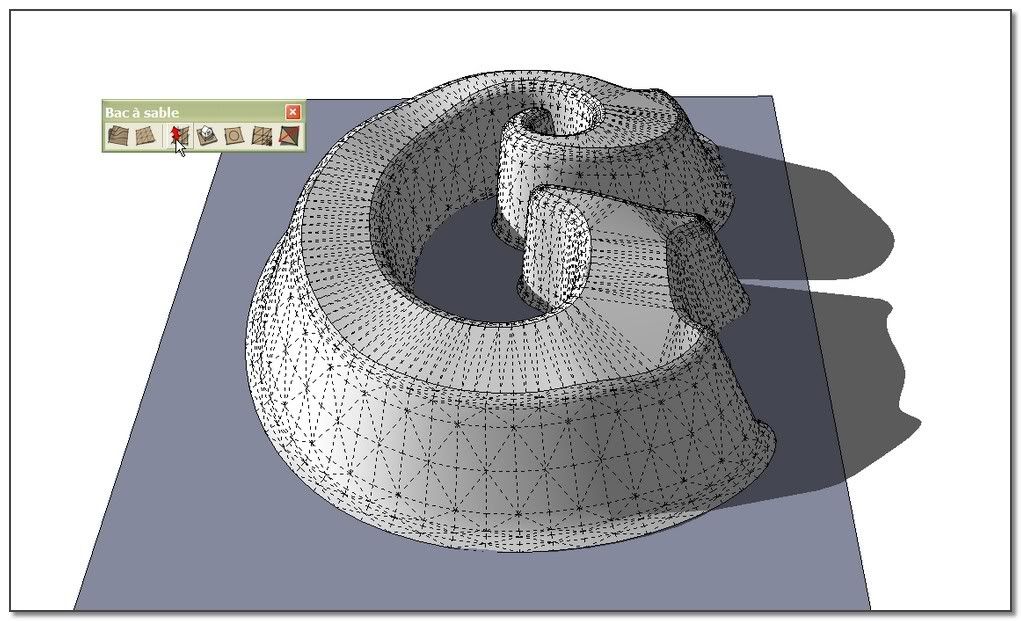
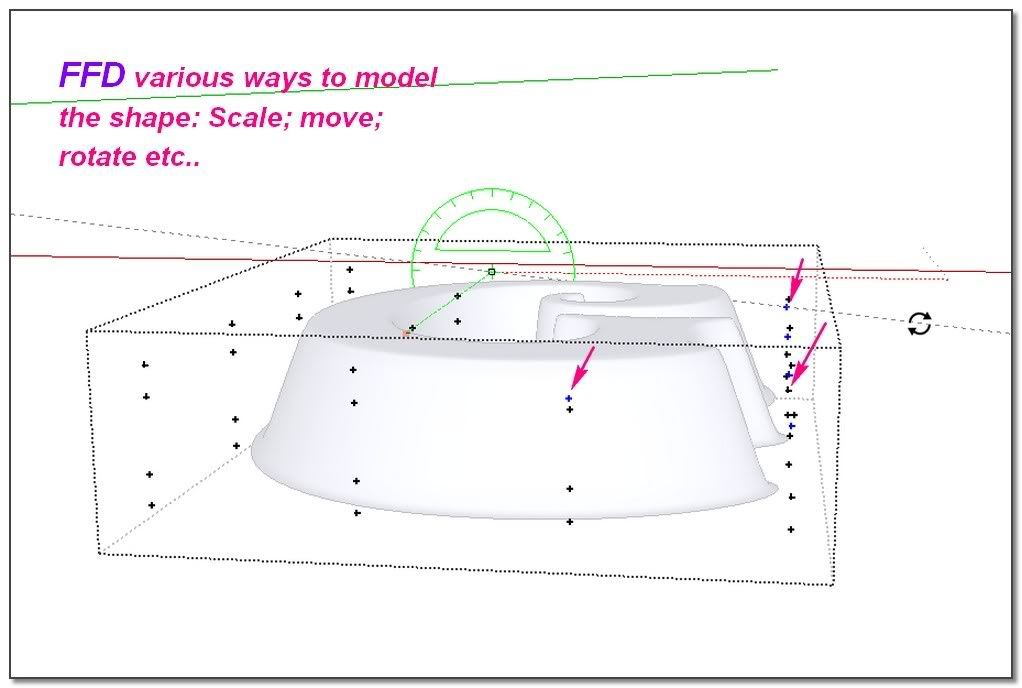
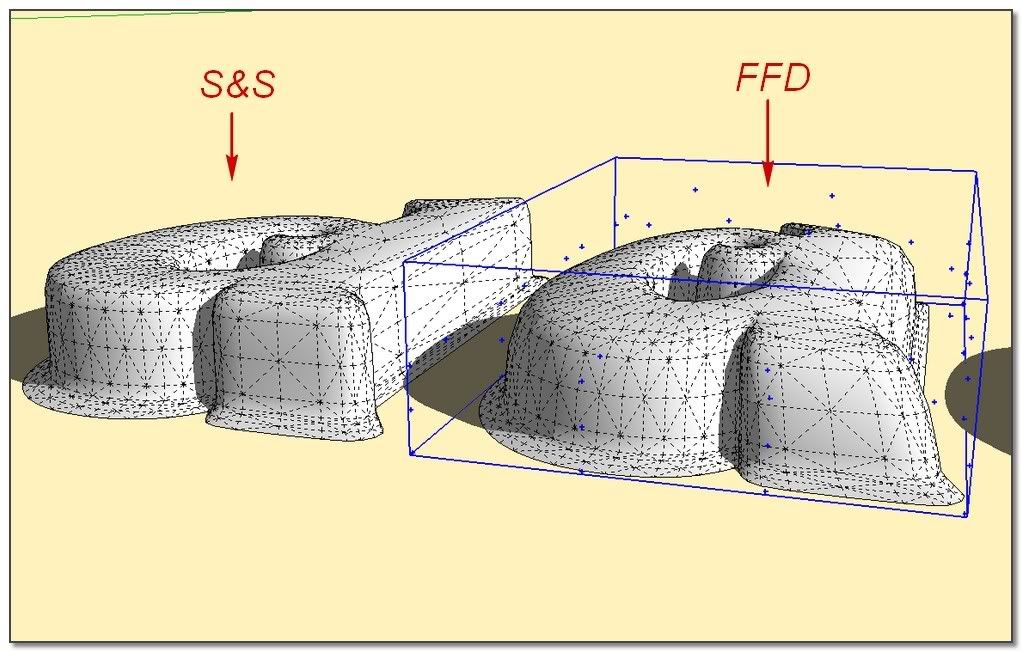
              I need to subdivide the top of the letter. I'm using SandBox tool: from contour.

              http://i274.photobucket.com/albums/jj245/Spendauballet/SketchUp/ThickLabel_WG_450.jpg

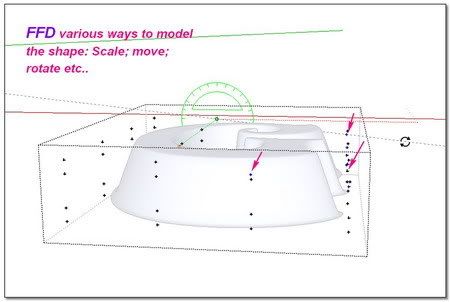
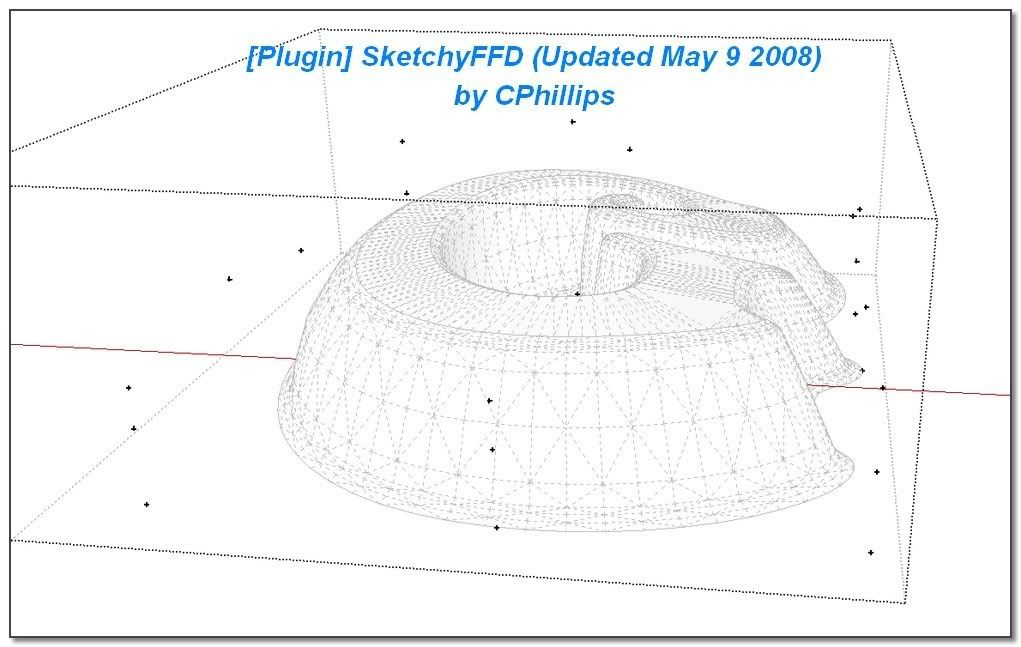
              Now using SkechyFFD to put some irregularity to the letter (I glue the bottom points)

              http://i274.photobucket.com/albums/jj245/Spendauballet/SketchUp/ThickLabel_WH_450.jpg


              http://i274.photobucket.com/albums/jj245/Spendauballet/SketchUp/ThickLabel_WI_450.jpg


              http://i274.photobucket.com/albums/jj245/Spendauballet/SketchUp/ThickLabel_WJ_450.jpg

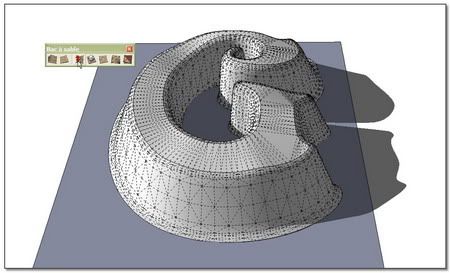
              (Note this other try with modeler from SandBox Tools.)

              http://i274.photobucket.com/albums/jj245/Spendauballet/SketchUp/ThickLabel_WK_450.jpg

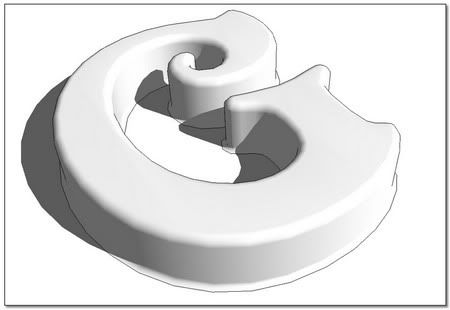
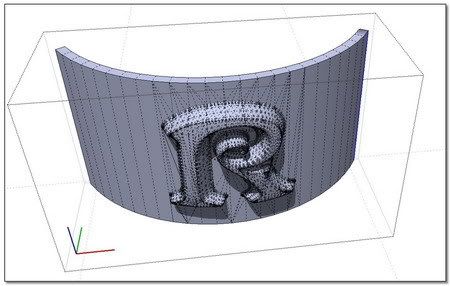
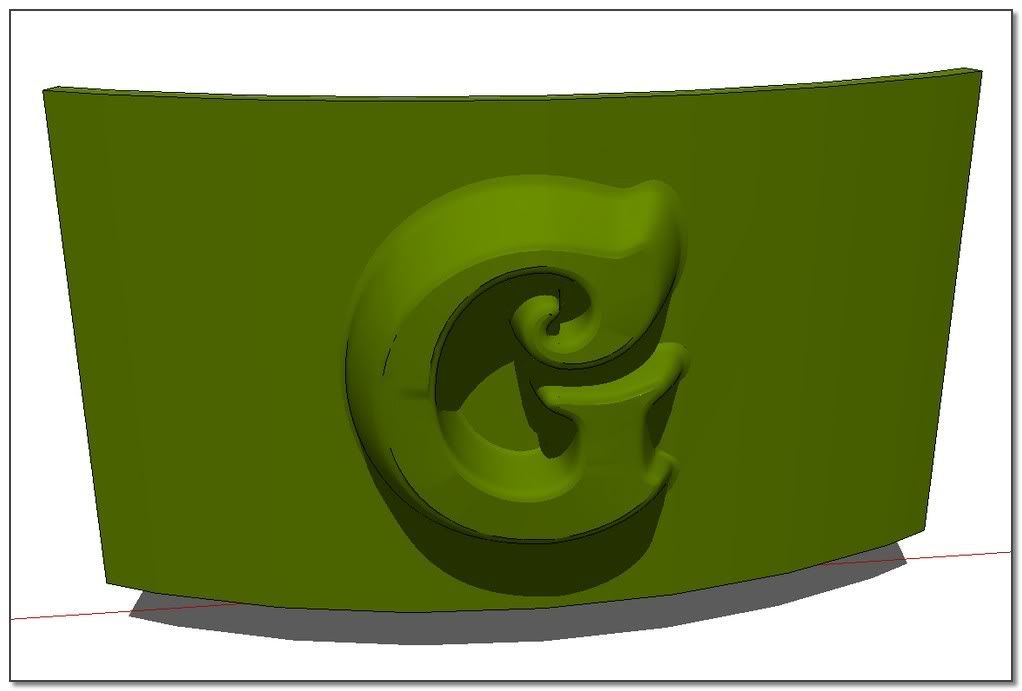
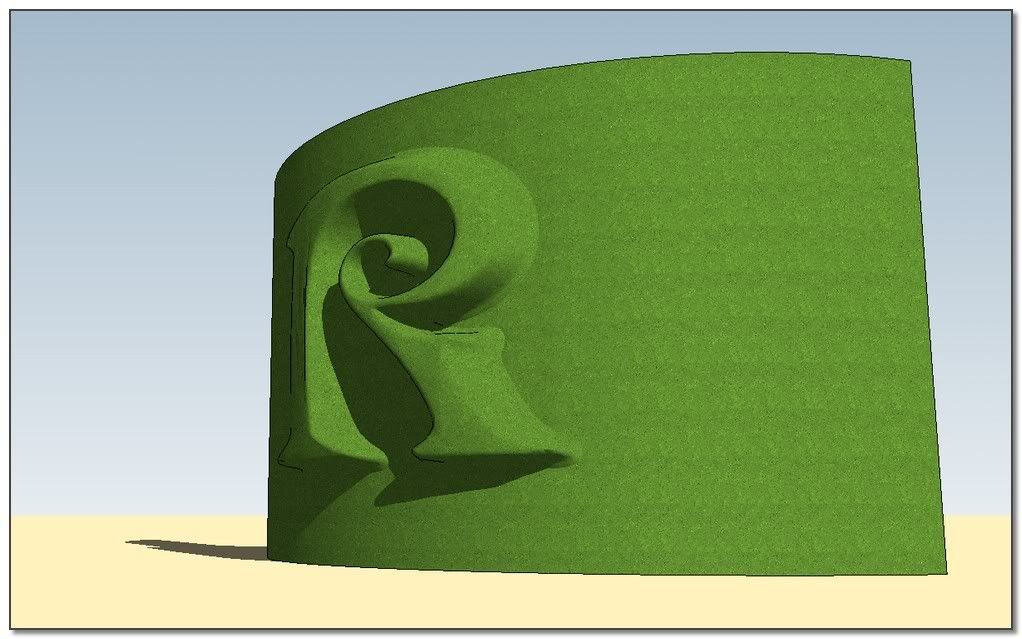
              Finally, with a ShapeBender treatment:

              http://i274.photobucket.com/albums/jj245/Spendauballet/SketchUp/ThickLabel_WL_450.jpg


              http://i274.photobucket.com/albums/jj245/Spendauballet/SketchUp/ThickLabel_WM_450.jpg


              http://i274.photobucket.com/albums/jj245/Spendauballet/SketchUp/ThickLabel_WN_450.jpg

              not to bad for me 😉

              Slideshow
              ___
              [Plugin] SketchyFFD by CPhillips
              [Plugin] Shape Bender by Chris Fullmer

              simon.

              1 Reply Last reply Reply Quote 0
              • ely862meE Offline
                ely862me
                last edited by

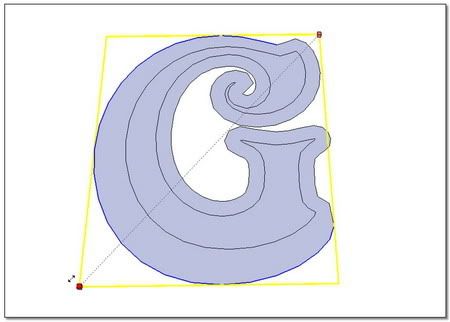
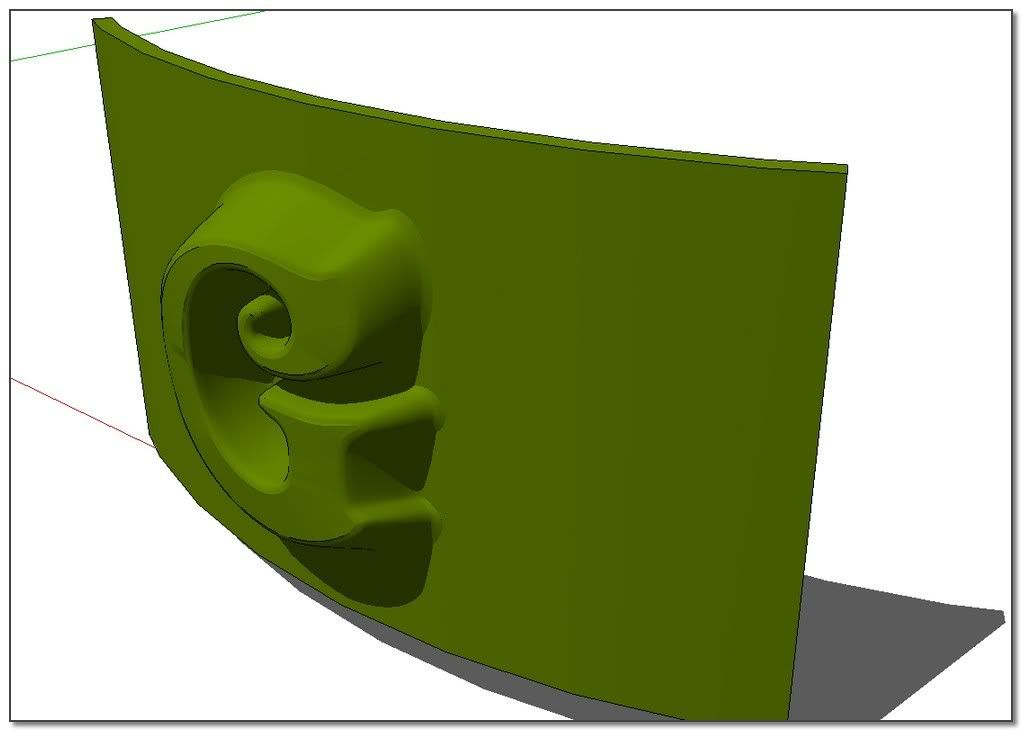
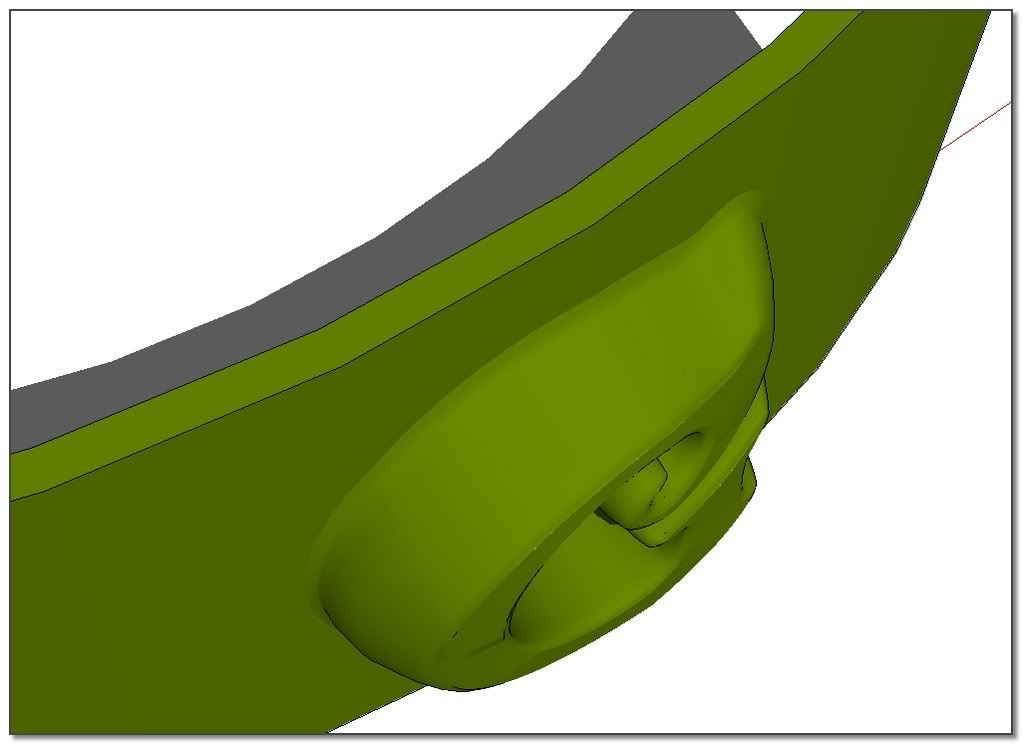
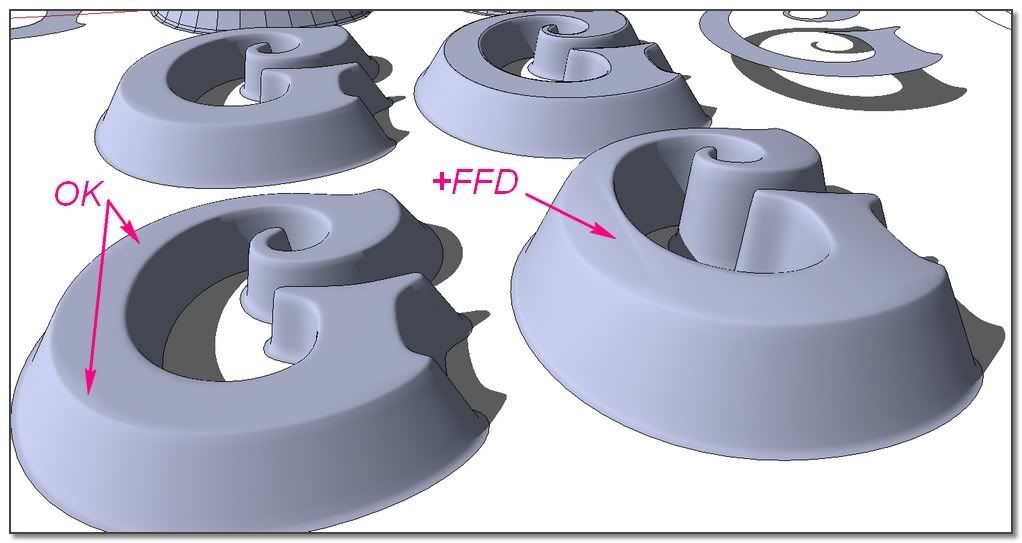
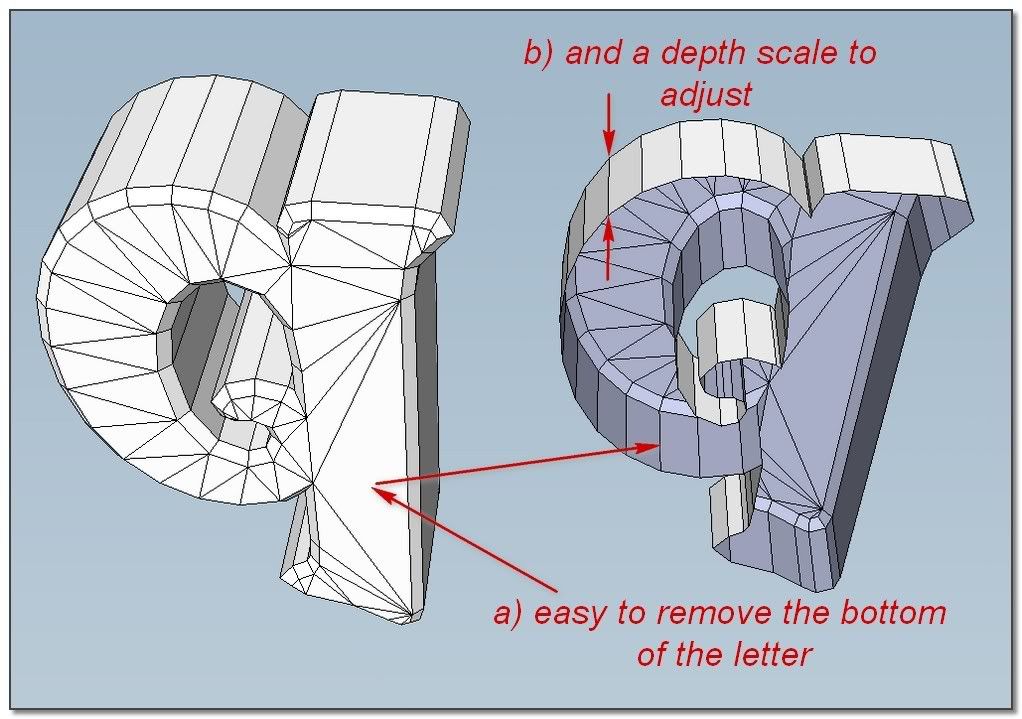
                after making the shape with offset and skin i scale it but not all, just the outer lower profile . When u scale all lower profile the inside part of the letter is scaled too, so ,u want it to be smaller but u get it bigger(so it becomes bigger than the up part of the letter), what u need is to scale just the outer lower part of the letter

                Elisei (sketchupper)


                Before no life was done on Earth it was THE LIFE ITSELF...GOD
                Come and See EliseiDesign

                1 Reply Last reply Reply Quote 0
                • simon le bonS Offline
                  simon le bon
                  last edited by

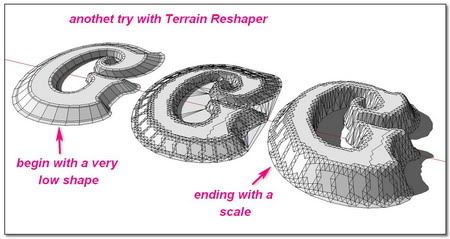
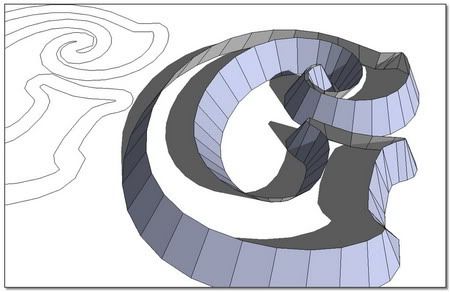
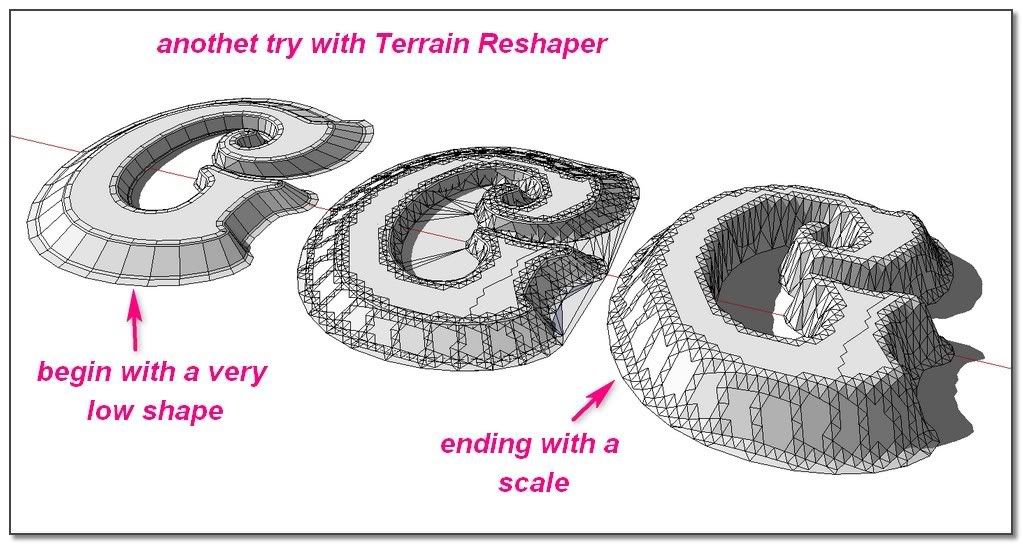
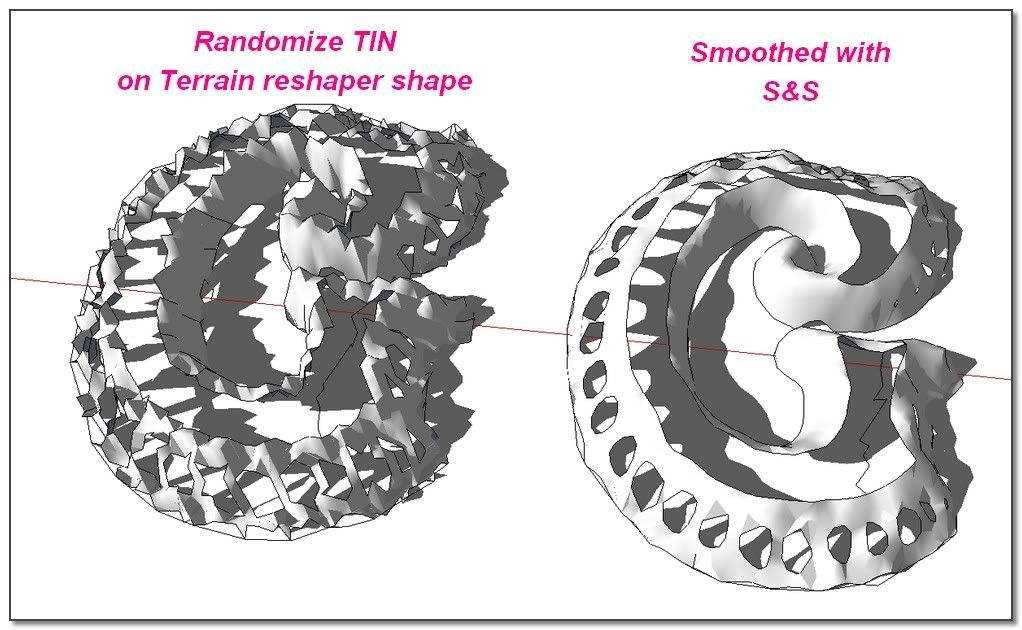
                  A last try for another method using Terrain Reshape and afterward Randomize TIN

                  The idea: apply the process on a very low shape and scale it after. I'm starting from the offseted and skined shape from Elisei. The result is not bad but S&S do very better. Its job isn't really for that kind of thing.

                  http://i274.photobucket.com/albums/jj245/Spendauballet/SketchUp/ThickLabel_XG_450.jpg

                  I still follow what was Planned:

                  http://i274.photobucket.com/albums/jj245/Spendauballet/SketchUp/ThickLabel_XH_450.jpg

                  The result is beautiful but far from what I expect. I keep it in mind... 😉

                  Slideshow

                  Re I shall update with a link as soon as I shall have made a tutorial with this 😉

                  I think: End of the topic!!! Thanks to all

                  😎 Simon

                  1 Reply Last reply Reply Quote 0
                  • ely862meE Offline
                    ely862me
                    last edited by

                    yet, u didn t get all the point..u need to make scale from center and select more geometry from the letter
                    Btw..i didn t subdivide the top and letter together because as u can see when u subdivide them together the top becomes messy ,if u look at it with hidden geometry off

                    Elisei


                    rl.jpg

                    Elisei (sketchupper)


                    Before no life was done on Earth it was THE LIFE ITSELF...GOD
                    Come and See EliseiDesign

                    1 Reply Last reply Reply Quote 0
                    • simon le bonS Offline
                      simon le bon
                      last edited by

                      Hi Elisei,

                      hey hey!! You don't give up so easily 👍
                      -) Allright I was a bit modest with the lines I was scaling. What you do certainly works well.

                      http://i274.photobucket.com/albums/jj245/Spendauballet/SketchUp/ThickLabel_XJ_450.jpg

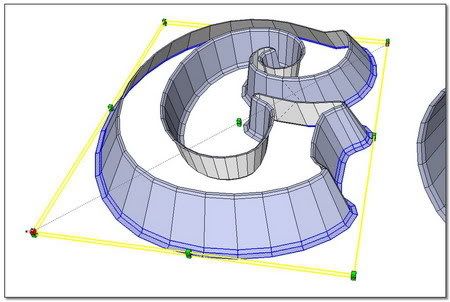
                      I put at the end My last "R" (in french "l'air de la plage": a pretty bad wordgame hi!) in which I have hardly scale, redraw, modify the outlines.

                      -) I prefer rather than you, doing all this job on the same plane before elevate and skin process.

                      @unknownuser said:

                      .i didn t subdivide the top and letter together because as u can see when u subdivide them together the top becomes messy

                      -)Messy, yes it is , but I don't understand you because:
                      1-with hidden geometry off, the look is perfect without any seam line remaining.
                      2-when I subdivide independantly the top, this one doesn't fit exactly well.

                      http://i274.photobucket.com/albums/jj245/Spendauballet/SketchUp/ThickLabel_XL_450.jpg

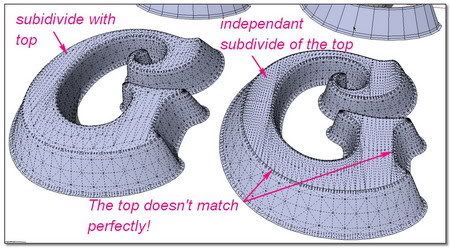
                      3-I haven't found one method which give not a "messy result".
                      4-the subivision is enough to use SketchyFFD pretty well.

                      http://i274.photobucket.com/albums/jj245/Spendauballet/SketchUp/ThickLabel_XK_450.jpg


                      http://i274.photobucket.com/albums/jj245/Spendauballet/SketchUp/ThickLabel_XM_450.jpg

                      Enough of the "G" Here is the "R"

                      http://i274.photobucket.com/albums/jj245/Spendauballet/SketchUp/ThickLabel_XN_450.jpg


                      http://i274.photobucket.com/albums/jj245/Spendauballet/SketchUp/ThickLabel_XO_450.jpg

                      .

                      ++simon

                      1 Reply Last reply Reply Quote 0
                      • simon le bonS Offline
                        simon le bon
                        last edited by

                        Hi Elisei,
                        I was not fool: Very simple but your hidden trick 😆
                        At the end the entire solution is from you!! Thanks and bravo: I have learned. I'm going to make a tutorial to simplify the process; shared with your name.


                        http://i274.photobucket.com/albums/jj245/Spendauballet/SketchUp/ThickLabel_XA_450.jpg


                        http://i274.photobucket.com/albums/jj245/Spendauballet/SketchUp/ThickLabel_XB_450.jpg

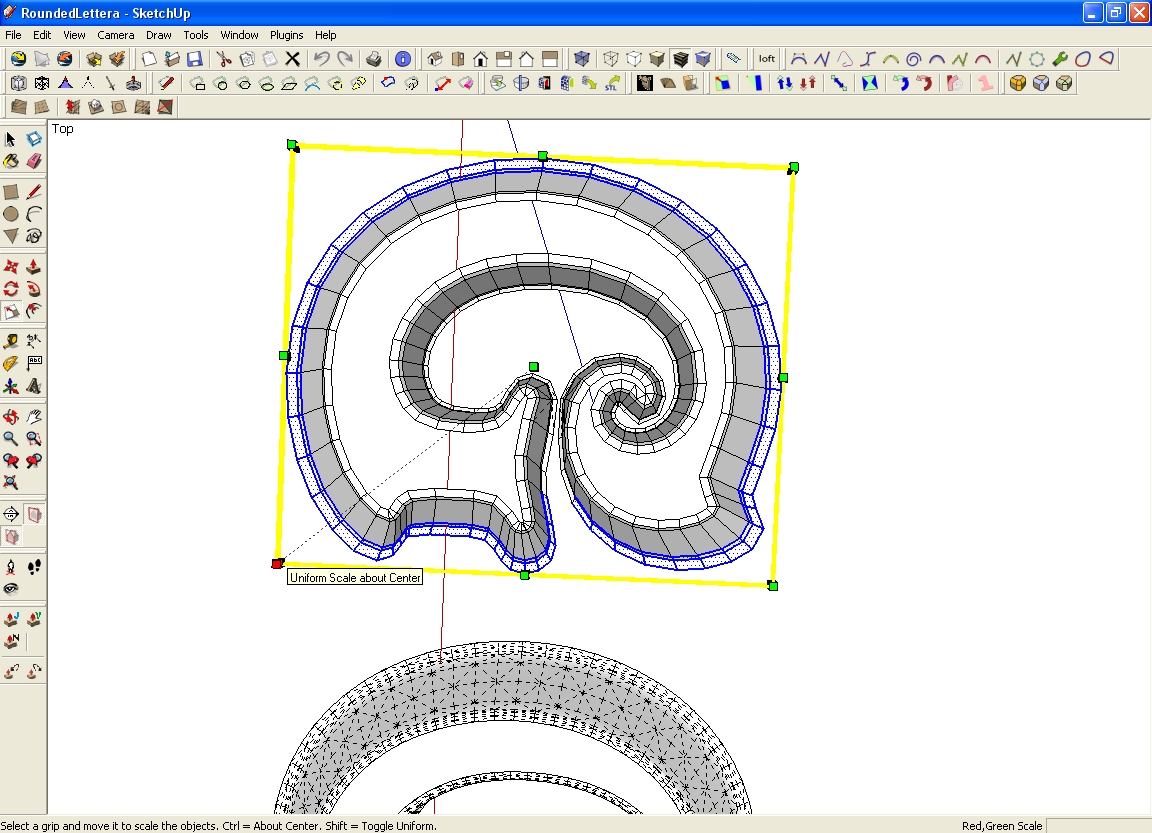
                        Partial Scale. Re: to simplify, I have removed the original letter's line

                        http://i274.photobucket.com/albums/jj245/Spendauballet/SketchUp/ThickLabel_XC_450.jpg

                        three scales. The yellow and blue figure is the basic one. I put it just to consider the scales ❗

                        http://i274.photobucket.com/albums/jj245/Spendauballet/SketchUp/ThickLabel_XD_450.jpg

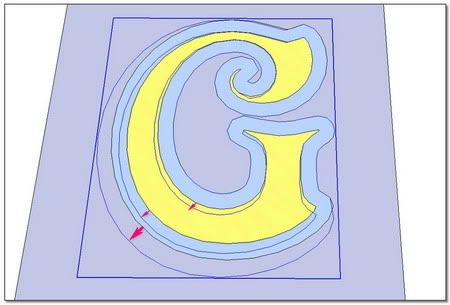
                        And now I get it Myself

                        http://i274.photobucket.com/albums/jj245/Spendauballet/SketchUp/ThickLabel_XE_450.jpg

                        I come back on my previous post. No need to subdivide independantly the top of the letter. Just integer it in S&S modeler's process 💭

                        http://i274.photobucket.com/albums/jj245/Spendauballet/SketchUp/ThickLabel_XF_450.jpg

                        simon

                        1 Reply Last reply Reply Quote 0
                        • simon le bonS Offline
                          simon le bon
                          last edited by

                          @alan fraser said:

                          I know that SU now has its own 3D text tool, but that tool is fairly basic. Don't forget the solution of choice before the built-in option (or the Smustard Ruby)
                          Elefont will automatically add a variety of bevels and chamfers that can be exported in dxf and brought into SU.
                          http://www.armanisoft.ch/webdesign/elefont/Elefont.html

                          Dear Alan,

                          I have found time to test this "Elefont" from "Ingenieurbüro" Armin Müller you were talking about.

                          http://i274.photobucket.com/albums/jj245/Spendauballet/SketchUp/Elephantroselunette.jpg

                          http://i274.photobucket.com/albums/jj245/Spendauballet/SketchUp/Elefont_001_550.jpg

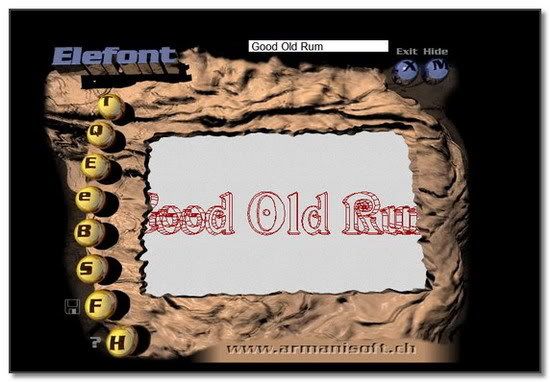
                          This last 1.4 version dated from 7July 1998 begin to be may be a little outdated 😕 . It is not too much handy because its display is very small and the previsu doesn't give a great control.
                          But in making small tries, we can do number of interesting variations. At the end the saving format in DXF is perfect to import in SketchUp. 👍

                          http://i274.photobucket.com/albums/jj245/Spendauballet/SketchUp/Elefont_002_550.jpg


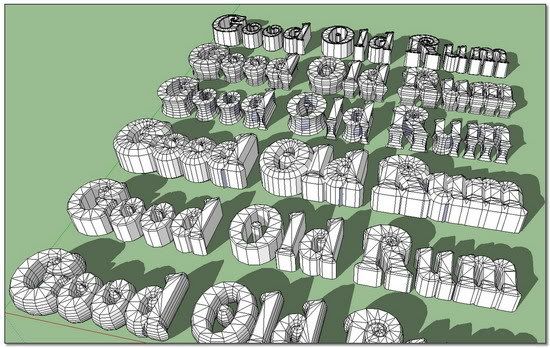
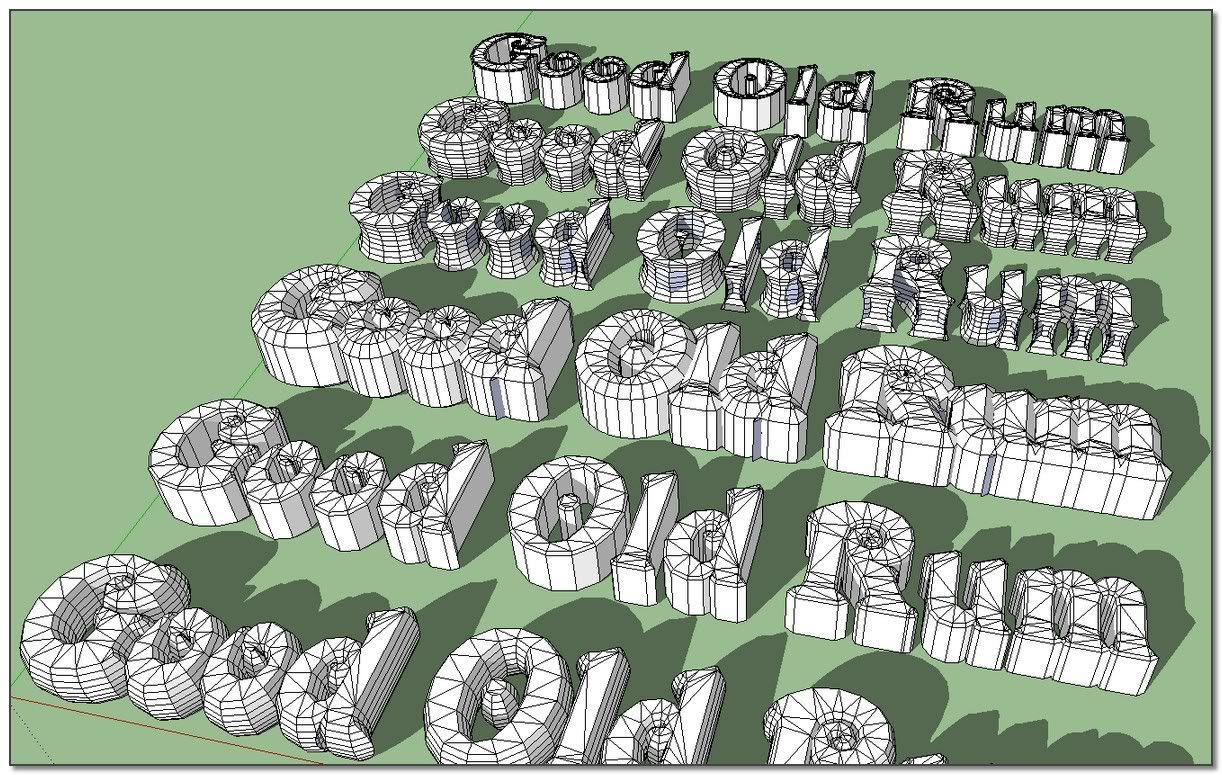
                          These subdivided letter shapes are perfect to use directly with S&S , avoiding the previous Offset, Scale and Skin stages 👍
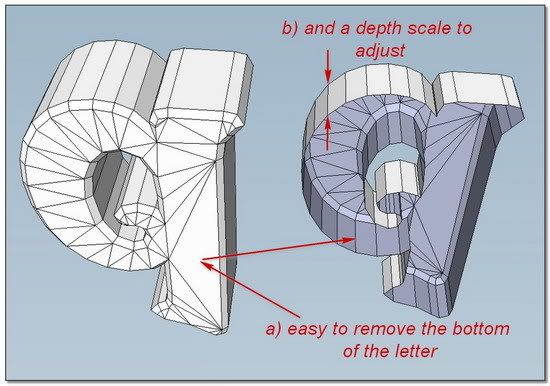
                          I have tried to reach my goal: the molted letter.
                          In taking the letter at this stage, making a real flare isn't possible (?) anymore. So if we satisfied with the approximative Scaled flare, it is OK.
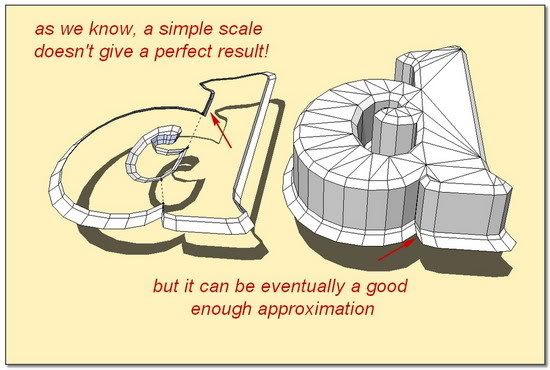
                          http://i274.photobucket.com/albums/jj245/Spendauballet/SketchUp/Elefont_003_550.jpg


                          http://i274.photobucket.com/albums/jj245/Spendauballet/SketchUp/Elefont_004_550.jpg


                          http://i274.photobucket.com/albums/jj245/Spendauballet/SketchUp/Elefont_005_550.jpg

                          😉simon

                          1 Reply Last reply Reply Quote 0
                          • 1
                          • 2
                          • 2 / 2
                          • First post
                            Last post
                          Buy SketchPlus
                          Buy SUbD
                          Buy WrapR
                          Buy eBook
                          Buy Modelur
                          Buy Vertex Tools
                          Buy SketchCuisine
                          Buy FormFonts

                          Advertisement