How to permanently anchor textures?
-
I've got an angle sensitive texture that I apply to lumber that requires me to position it so grain runs the correct way. And as long as I make the lumber piece a component afterwards, everything is fine. I can rotate or otherwise reposition the component and the texture stays put. (and by making them dynamic, I can change the length without editing)
However, if I need to "cut" the lumber (for a bird's mouth, for instance), or edit the shape, and I explode the component to do so, the textures all reset to their original orientation. This is especially maddening when creating roof framing drawings, which have many pieces of lumber cut at different angles at each end.
Is there some super secret Sketchup workaround that someone can share?

-
The textures should have been applied to the lumbers faces. Don't explode the component-instance. Select it, right-click and 'make unique'. This will make it another component with say #1 on the end of its name. Everything in it will stay as the main one. Double click it to edit its contents. New faces might have wayward textures - these you can rotate to match etc using right-click 'texture' tools... The main faces should keep their textures as you originally set them up...
-
Thanks TIG. This has been the only technique I've found that works, however tedious it might be. It gets REAL tedious when trying to paint hundreds of custom groups of cut lumber created by the rafter plugin. I have to edit each group and rotate textures on all lumber faces.
(next time, I'm going to find a non-linear wood texture)

-
I share your frustration.
I make stairs and making changes to the design inevitably screws up the grain direction. I find the Texture / Position tool to be very difficult to use without a lot of concentration. Rotating the texture map without also enlarging or reducing the tile size is very difficult.
I really wish there was a better way to do this.
I'm teaching myself some basic rendering and I'm hoping that textures could be applied in the rendering package in a better way than this.
Hope you find an answer
-
Hi guys,
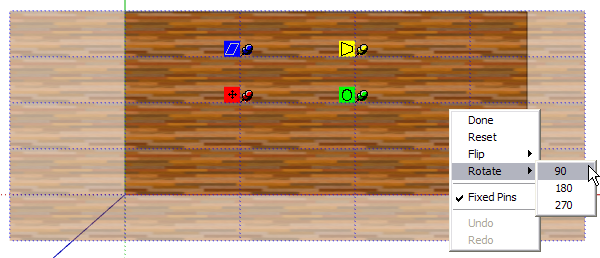
When you are in the texture positioning mode (and generally try to rotate the texture around the red pin and with the green pin), note that if you right lick on the texture, there is a rotate item in the context menu. Often it is easier and quicker to rotate with that rather than the green pin.
It works with the "cardinal" (90/180/270) degrees only.

-
Well, that's an item for the Duh! thread! Thanks for that little tip.
Textures seem to be a weakness for Sketchup. I'd love to see the Sketchup guys add a "remember texture position" or "Align texture to axis" option for materials. This would save so much time when rotating or editing a component. I'm drawing hundreds of lumber images and the texture issue is a real pain.
One thing that helps with vertical and horizontal textures are the dynamic components. What a lifesaver! I've built a set of dynamic lumber components with woodgrain textures aligned and nominal sizes in dropdown lists. This works wonders because each of the components can have separate dynamic values, even when they are copies of the same parent component. As long as I alter dimensions through the dynamic menu, textures stay aligned. I can use one "smart lumber" component and build an entire drawing with several different lumber sizes.
I only wish the dynamic components had a "rotate material" & "scale material" behavior. That would allow automation of a lot of this.
-
@gaieus said:
note that if you right lick on the texture, there is a rotate item in the context menu.
Doh!

I've actually been sitting here for some hours now texturing a model. Never noticed them items. Makes me realise that I'm working pretty much automatically with SU.@kent l said:
Textures seem to be a weakness for Sketchup. I'd love to see the Sketchup guys add a "remember texture position" or "Align texture to axis" option for materials.
Mapping Gizmos! This is what I want for SU. Being able to select an object and say that it has a cubical mapping gizmo, or spherical, or cylindrical, like most modelling tools out there.
-
@gaieus said:
...note that if you right **lick**on the texture...

I've just noticed... Interesting typo
-
I've done that typo so many times. Every time I notice it I imagine someone atually trying to "right lick".

-
Working with hundreds of lumber components shouldn't be any more troublesome than me applying correctly applied textures to thousands of groups in every model I work on. Reading your posts I'm picking up on what might be at the core of your problems with texture positioning: you never mention "groups", always "components".
I really wish Google would make this more obvious in their tutorials and literature: groups should be your default method of organizing geometry into separate elements which can be moved around independantly, not components. It doesn't help that when you install SU it has "Make Component" set up as a shortcut/hotkey- I'd get rid of this asap and replace it with "Make Group" (besides "Make Component" is in the right-click context menu so it's dead easy to access when you need it). "Components" are a special type of group which, as you know are created as instances of the same entity, so multiple instances can be edited simultaneously. In short, if you're creating 50 rafters which may all require further editing like bird's mouth cuts later, then making the first one into a component and then copy/arraying it at the correct centres would be the thing to do. If you're making the ridge board, i.e. a one-off element then just make it a group. Either way, you can always turn a group into a component at a later date so everything in a skp model should be grouped, but only special repeating elements should be made into components.
Although SU's UV mapping tool (right-click context menu Texture Position editor) is great, as you know it takes around a minute just to edit the UV mapping on the six faces of a 2 by 4, especially frustrating if all you want to do is change the grain from running across the timber to lengthwise. Quickest way is to explode the group, rotate it 90° vertically (which will align the texture correctly), regroup it again (which will "fix" the texture position) and now no matter where you move or rotate the group its texture and grain will be correct (unless you explode it again of course).
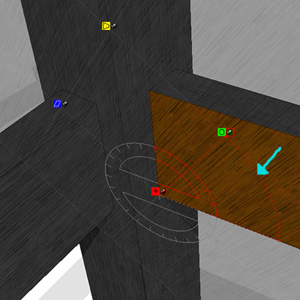
Re: SU's texture position editor, it took me a couple of tries before I realised how to keep the same scale that when using the green rotate pin. As soon as you start rotating the green pin you'll notice a circular construction line appear (the only time you'll see one in SU!
 ) to which, if you follow it reasonably closely, the green pin will magnetically infer, allowing you to rotate as much as you like, but to keep the current texture scale- see attachment. I've desaturated the other faces so it's obvious which face is being edited.
Another (and AFAIK undocumented) tip is that SU's eye dropper material tool records UV mapping scale and rotation, not just the material type. So say you've already created your rafter component with the correct texture position, arrayed it 50 times, but now you need to make one trimmed rafter where a flue comes though. Rather than having to position the texture manually on the one-off, just use the eye dropper tool, click once on one of the existing rafters and then click on the new trimmed one- it'll copy the material with exactly the same scale and rotation. It even works on individual faces from the outside of groups and components- it's a real time saver for modelling timber structures.
As for SU's utter lack of UV mapping tools for organic and curved forms, don't even get me started- it really should've been addressed in SU7 IMO.


-
Jackson,
Many thanks for the detailed description. It helped me a lot to pull several concepts together. I've become much better at handling textures after a few duh! moments.
The first thing I realized is that textures are aligned (initially) to the axis of the group or component. I didn't realize this about groups at first, because you can't see the axis alignment with them like you can when right clicking and choosing "edit component/change axes."
One duh! thing I realized, is that the groups created by the rafter plugin have their x axis aligned with the long end of the rafter. (as it should be) So all I had to do to properly apply textures was to rotate my texture to horizontal. (a big DUH) My woodgrain texture was originally a vertical texture. Now, I generate horizontal and vertical versions of my lumber textures right from the start and use them where appropriate.
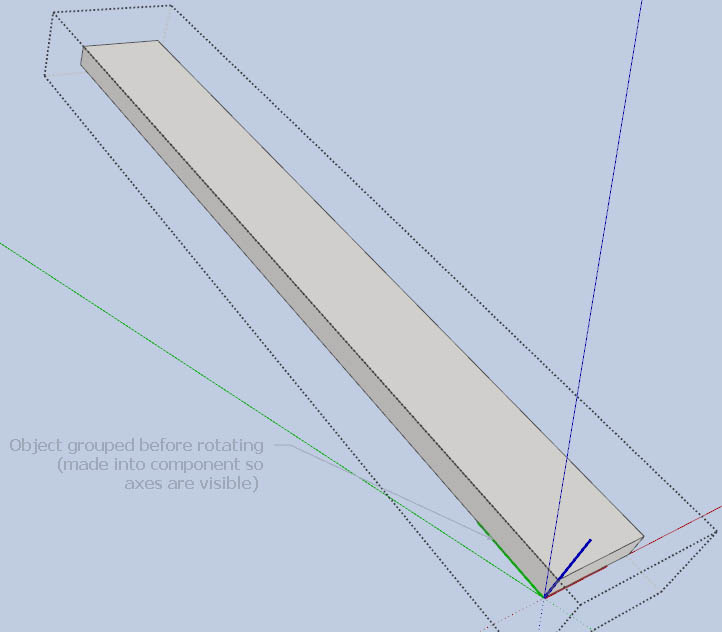
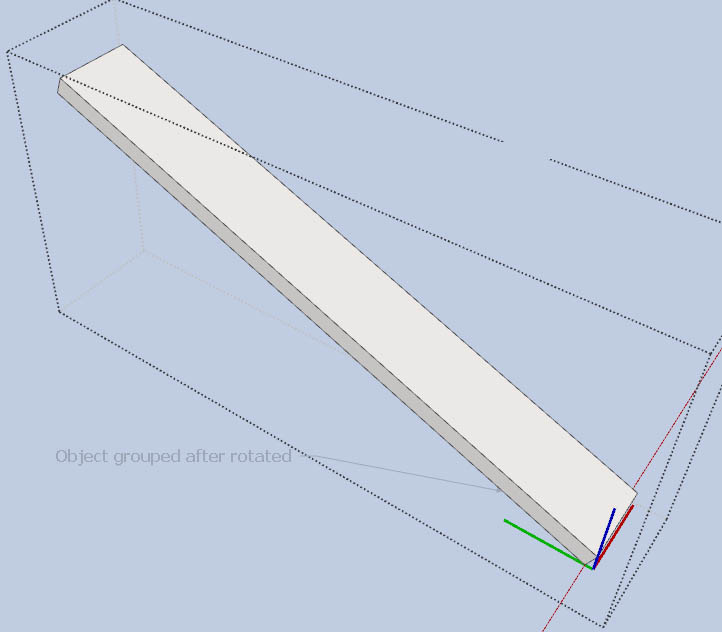
I also learned that an object inherits the current axis orientation at the moment you group or make a component. If you group a lumber object while it's laying flat, then rotate it, the x/y axis will correctly follow the bottom of the object. However, if you rotate the object first, THEN group it, the x/y axis will be at the angle of the rotation. This subtle behavior drove me crazy at first, because sometimes I'd explode an object after rotating and the texture alignment would change, because after grouping again, the axes would be different.
NOTE: it's important that the x axis (the red) is aligned along the length of the rafter! (not the green) So, to make this easy, whenever making a lumber piece to either be grouped or made into a component, build the length along the red axis (I always defaulted to building along the green axis) When grouped, the alignment will then be correct for placing a horizontal wood texture automatically. For vertical textures, draw the lumber length along the blue z axis. (In this case, you'll want your z axis to follow the rafter length when changing axes.) No more manual aligning of textures!
(one more thing, I realized after uploading these two images, that I instinctively built them along the green axis as I always used to, so please disregard that!)


-
One subtle and frustrating anomaly of Sketchup that applies to textures, is the behavior of custom axes. If you build a rafter on a roof plane and then group it or make a component, its axes will align with the default axes, which means the axes will not follow the "length" of the rafter. However, if you use the axes tool to change the axes to follow the roof plane BEFORE grouping or making the component, then that component or group will inherit the new custom axes when it is created. This is good.
HOWEVER, textures do not seem to honor the custom axes. You would expect that if you changed the axes and then applied a texture, that the texture would be aligned to the new axes. IT WILL NOT. It will still align to the default axes.
This makes for a very confusing behavior. Components honor custom axes when being created, but textures do not. However, textures will honor the COMPONENT's axes, but only if applied after the component (or group) is created. This can lead to some maddening behavior when editing, applying, and anchoring textures on components that have been rotated. It's hard to explain in a post, but I will try to build a sketchup file that demonstrates this weird behavior and post it later.
Hello! It looks like you're interested in this conversation, but you don't have an account yet.
Getting fed up of having to scroll through the same posts each visit? When you register for an account, you'll always come back to exactly where you were before, and choose to be notified of new replies (either via email, or push notification). You'll also be able to save bookmarks and upvote posts to show your appreciation to other community members.
With your input, this post could be even better 💗
Register LoginAdvertisement


