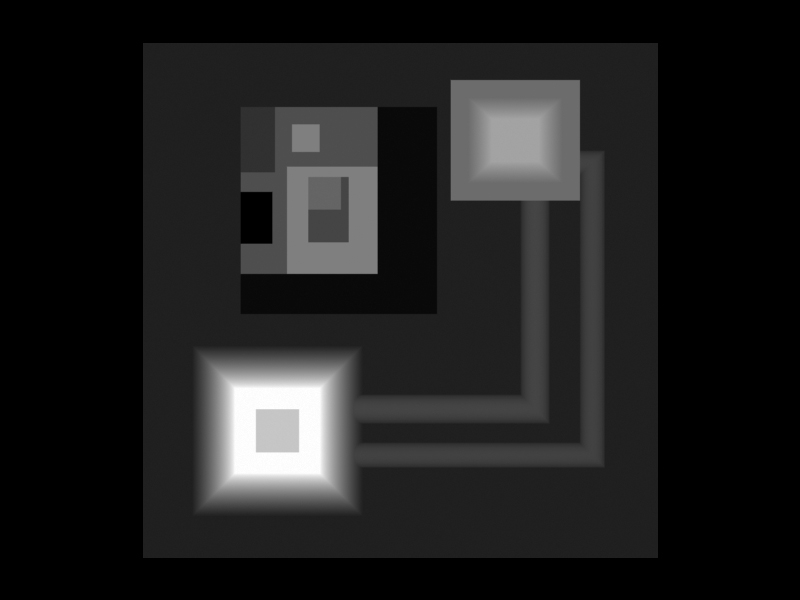
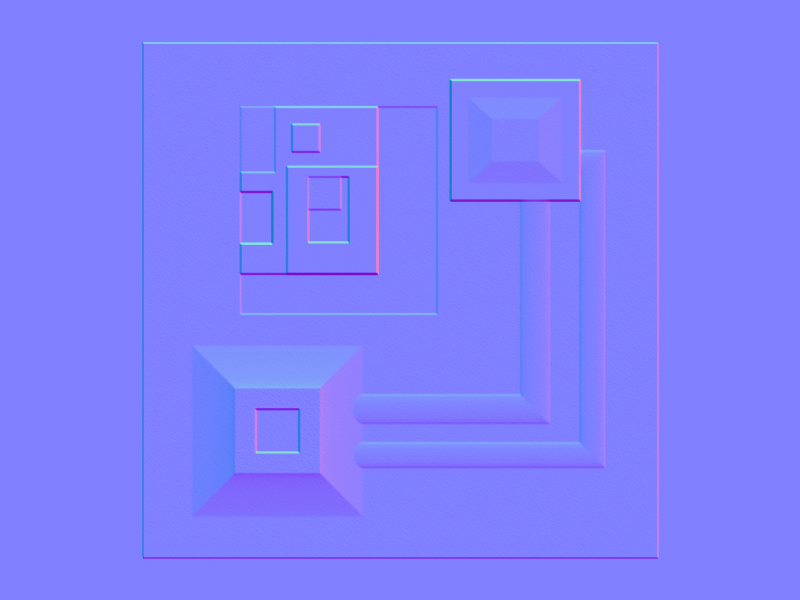
Idea for plugin: Bump Map From Geometry
-
Maybe its not such a good idea for people who good with textures. But I have some difficulty creating good bumpmaps in the right locations in the right shapes and such.
I was thinking if it would be possible to create a bumpmap FROM a Sketchup model. Basically, the idea came from another plugin posted here, which painted in different shades the model to create a kind of height map from a tin sandbox.
Lets say I want to create an engine texture to post on the side of a spaceship.
With this plugin idea you would MODEL the engine and texture it the way you want. Then you would render a 2d image from it, seen from above (in parallel projection?). Ok, you have the image of the engine, that you now can apply to the spaceship surface and render it. QUITE FLAT uh?
You would need to apply bumpmaps to avoid that flat look. But how to create a bump map that follows the subtle shapes of the engine? The round pipes, etc?
Well, thats where my idea comes in hand. If ITS USEFULL or POSSIBLE, I will leave it open to discussion.
Take that same engine model. CUT it in many different layers (number set by user? Higher number, more detail?) from bottom to up.
To each layer, from bottom to up, the plugin assigns a different material color, in GRAYSCALE. Dark grey for the bottom layers, white to upper layers. Then the plugin automatically renders a 2D image, seen from the top. There you have it! A grayscale bumpmap image that perfectly fits the engine!
-
I may be missing something here but if you already have the model in order to get the original image why would you need to render a 2d image to apply to the 3d mesh?, unless you are trying to fake the engine using images instead of geometry in order to keep the poly's low.
-
Someone who knows about ruby correct me if im wrong, but i think it's very hard to manipulate images using ruby.
-
@solo said:
I may be missing something here but if you already have the model in order to get the original image why would you need to render a 2d image to apply to the 3d mesh?, unless you are trying to fake the engine using images instead of geometry in order to keep the poly's low.
exactly.
for example... imagine you want to create an old building. The building has tiles that are carved with intrincate shapes and you cant find those on the internet.
You do a 3d model of the carved bricks/tiles. Pasting those all over the building would make the model REALLY heavy. Even today games have poly limits and will use bumpmaps for things like detailed engines, crevices among the metal plates of the hull, etc.
You could for example get a bitmap of a ship hull plate on the internet, set it over a square on Sketchup and model the square to fit that bitmap (the crevices among the plates, etc). And then use that geometry to create a bumpmap. (since obviously no game will have models so detailed as to show with GEOMETRY the plates divisions)
-
@remus said:
Someone who knows about ruby correct me if im wrong, but i think it's very hard to manipulate images using ruby.
Yea, no truly good libraries to create/edit images.

-
@remus said:
Someone who knows about ruby correct me if im wrong, but i think it's very hard to manipulate images using ruby.
you do not need to manipulate images.
the modelling is done by the user. What the plugin does is divide the model in MANY HEIGHT LAYERS (like using zorro)... probably about 256 layers (usual numbers of colors in a bumpmap?), and to each layer, set a different shade of grey... white on the topmost layer, black on the lowest layer.
Then the plugin sets the model to be seen from the top on a parallel projection camera, and renders it as a 2D image with black background. One important thing would be to avoid the shading that Sketchup uses on models (that is, if you paint something WHITE, it should be seen as PURE WHITE from all angles... probably just some application of SKETCHUP STYLES?)
-
you guys are telling me that plugins cant influence STYLES nor tell Sketchup to export a 2D image?
well... in that case, the plugin should divide and paint the layers, and the user installs himself a STYLE that avoids the Sketchup Shading (Gouraud Shading?) so the faces are seen in Sketchup EXACTLY with the color they were painted (independent of depth, sun position, etc). And the user himself sets the model to parallel projection, seen from the top, and exports it to a 2d image.
-
I see what you mean.
basically creating a mesh then rendering that mesh to create what's known as a Displacement Map as you do from ZBrush. the technique's used for programs like Maya, Lightwave, Poser, etc.
-
@aceshigh said:
you guys are telling me that plugins cant influence STYLES nor tell Sketchup to export a 2D image?
well... in that case, the plugin should divide and paint the layers, and the user installs himself a STYLE that avoids the Sketchup Shading (Gouraud Shading?) so the faces are seen in Sketchup EXACTLY with the color they were painted (independent of depth, sun position, etc). And the user himself sets the model to parallel projection, seen from the top, and exports it to a 2d image.
Ruby can change the SU styles and export the SU viewport yes. I was referring to creating new bitmaps. Didn't understand your intentions to begin with.
I'm wondering, could you use this technique for what you're talking about? http://www.youtube.com/watch?v=fDzNJYi6Bok
-
@thomthom said:
I'm wondering, could you use this technique for what you're talking about? http://www.youtube.com/watch?v=fDzNJYi6Bok
hmmm... I am not sure... for example, it seems some edges on the excavator "shovel" are darker than some features which are farther away from the camera. Also, I guess you need to render the image in parallel projection. I wonder if the fog would work in parallel projection.
-
similar to that videos method you can make bump maps with SU and kerkythea. First off model your detailed piece of engine or hull plating etc, then make a scene right above it in SU with parallel projection on. Export the model to kerkythea and turn parallel projection on in kerky. Then when you render use setting 24, depth render. Save your image and then open it in photoshop, and invert it. That will be your bump map. Also you could then run the Nvidia normal map filter with invert y box checked if you need a normal map. Heres a quick example of the little test panel i did and the bump and normal maps obtained from the aforementioned method.
hope this helps

the nvidia normal map filter is available freely from the nvidia website as well


-
Didier's http://www.crai.archi.fr/RubyLibraryDepot/Ruby/EM/heightfield_gen_v6.rb makes the mesh from the image so it should be possible to reverse engineer...
-
what renderers accept normal maps? I think VRAY only works with bumpmaps right?
anyway, the Kerky idea above is quite good... with that, I can say its almost useless to create a plugin for the same effect... of course, unless you dont want to have Kerkythea installed on your computer.
-
found another use for this...
CREATING TERRAIN ELEVATION MAPS, taken from GoogleEarth.
basically, Terrain Elevation Maps are only easily available to USA.
You can import GoogleEarth elevation data into Sketchup, but you cant export it as Terrain Data... and you cant export it directly from GoogleEarth either (and Ive found no plugin to do that in GoogleEarth).
If you could export from GoogleEarth to Sketchup, and from Sketchup to bitmap 256 colors heightmap, you could then import it into Terragen for example, and then create realistic panoramas, that can be imported back into Sketchup/VRAY.
-
Rick
The Height field Image is a great idea - works quick and easy
Insert it a Model bounds min Z rather than zero - otherwise weird effects ?
I can see how to automate all of the steps in Ruby except for the projected texture - eyedropper bit... To use the new 'raw' texture won't project it ? Texture.size doesn't seem to fit ? -
@rickw said:
A non-ruby workaround (and perhaps the functional basis for the ruby script) would be to have a graded image (black to white) that you insert into your model in the XZ or YZ plane, at zero Z.
Scale it so the height of the image is the max height of your model, then scale it again to 1.001 (to make sure any flat faces at the top of the model are white).
When you explode the image, the resulting texture is set to "projected". You can then eyedropper the texture and paint it onto your model for a perfect grayscale heightfield indicator.
Go to a non-perspective orthagonal view and export the image, then crop it in your photo editor.
[attachment=1:2s7p1am7]<!-- ia1 -->heightfield image.png<!-- ia1 -->[/attachment:2s7p1am7]
haha, thats awesome simply! And quite smart!
I wont have time to test this weekend, but next week I will try to import a GoogleEarth image into Sketchup, apply your technique and export a heighfield image into Terragen to generate a terrain. Lets see if the generated terrain keeps the same geometry from the GoogleEarth image.
-
A non-ruby workaround (and perhaps the functional basis for the ruby script) would be to have a graded image (black to white) that you insert into your model in the XZ or YZ plane, at the model's lowest Z point.
Scale it so the height of the image is the max height of your model, then scale it again to 1.001 (to make sure any flat faces at the top of the model are white).
When you explode the image, the resulting texture is set to "projected". You can then eyedropper the texture and paint it onto your model for a perfect grayscale heightfield indicator.
Go to a non-perspective orthagonal view and export the image, then crop it in your photo editor.

-
I've made a color by z plugin that is also helpful.
It does run into problems though because it determines what color to paint a face based on the center point of the face. So faces that are very tall get only a single color, even though it might run the whole z distance of the model. The plugin could be update to slice the model 256 times horizontally to make sure that all faces get the right z color.
Also, since this was one of my first scripts, I'm sure theres lots of room for improvement in the script
 Also, its a bit slow because it takes SU a long time to create each new material.
Chris
-
@tig said:
Insert it at Model bounds min Z rather than zero - otherwise weird effects ?
That's true. I did make a bad assumption that models don't go below zero, and that's just not necessarily true. I'll adjust my instructions.

EDIT: One also needs to adjust the shadow settings: Either turn on shadows or turn on "Use sun for shading", and set both the light & dark sliders to 100. It also helps to use noon on 3/21 (or 9/21) at a location near the equator.
-
The brilliance of Rick's method is that there's only one new material added and that's scaled to the model extents in the Z. The only stumble is how to use it as a projected texture...
To 'colour' things in the Z you could have a texture that's 'spectral' in the Z, rather than a black-to-white gradient...
If you get the facemade by exploding the imported/transformed image and then mat=face.material, does this then work as projected when used for all other faces faces.each{|face| face.material=mat} ?
Advertisement


