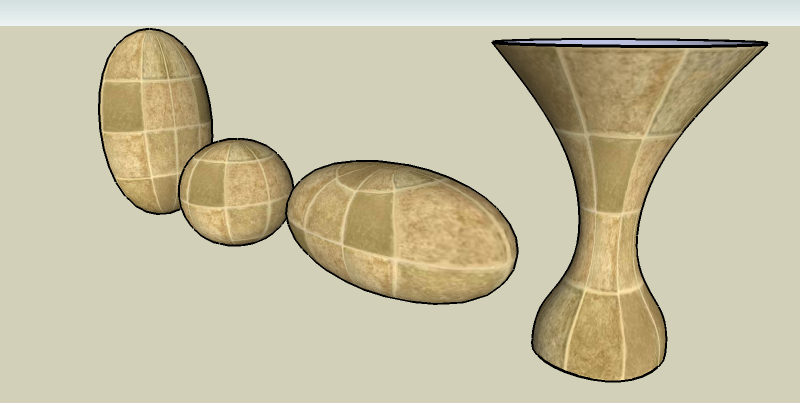
[Plugin] UVTools v0.1
-
This plugin is a work in progress. There is much functionality yet to be added but it is still quite useful in it's current state so I am releasing it.
Installation:
- Copy to SketchUp/Plugins folder
Usage:
- The plugin will create a context menu called 'UVTools'
- Select the faces that you want to project. The faces should all have the same texture applied to them.
- Select 'Spherical' or 'Cylindrical' from the context menu. The axis of the sphere or cylinder will be parallel to the SketchUp Z-axis and will be located at the center of the all the selected faces. There is currently no option to change this.
- After performing the projection, you can change the amount of tiling by changing the texture size in the SU Paint Bucket.
Known Issues:
- Texture position is messed up at the 'poles' of the spherical projection.
- The plugin may fail due to certain types of faces. No error message will be displayed to the user. (I'll try to fix this, soon.)
Enjoy!
Whaat

-
Very nice - very useful - very promising !
Thanks for sharing those gems, Whaat! -
Whaat Thank You!
lately i'm not even sure what program i'm working on!

-
 fanks man!
-
Much obliged.

-
Cheers, i look forward to trying this plugin out.
-
all hail the whaat machine!


-
Cool, I shall go and play with this now - Thanks

-
Thanks, Whaat. It's perfect!

-
Yeah
 ....Thank god you didn't leave for Basecamp and stuck with us to deliver some goodies.
Better news over here than @Boulder ?.....
Thank you very much Whaat!
-
Thank you so much..!!

I read somewhere that people are calling you WhaatUp... No wonder why..!!
-
Whaat, you ROCK!


-
I thought it was Whaat'sUp

-
You're right, Chris...

Of course it's Whaat'sUp...
(I actually wrote that to begin with, but got unsure... )
) -
No you are both wrong... it's:
WhaatzzzUp!
With your tongue sticking out...
Thanks again for another nice plugin!
-
Tip: trying this plugin on an untextured object causes the fastest splat you've ever seen. Zappp - and SU's gone.

-
@unknownuser said:
Tip: trying this plugin on an untextured object causes the fastest splat you've ever seen. Zappp - and SU's gone.

Thanks for the comment. This is an easy fix.
-
Cool. Been fiddling with this baby - works pretty well! Well-integrated too.

-
Dear Dale,
I have very little experience of rendering and I tend not to texture my models, so I am not too sure how to use a UV tool. By the way, what does UV stand for? If I understand your post correctly, the tool 'wraps' a texture around a curved object by projecting the texture from a plane positioned over and/or under the object. Further, the plane should be positioned so that its normal is along the centreline of the curved object which is itself aligned with the z-axis. Is this correct?
Can one project/wrap textures from a plane over and a plane under an object by dividing the surface area of the object into two along an x-y plane? I imagine a vase with different designs on the upper and lower halves.
Sorry for being so dense.
Kind regards,
Bob -
Theres a good illustration of spherical UV mapping there.
And i tihnk UV is just he coordinaet system thats used when applying textures in this way, so thats where the name comes from.
Advertisement


