Wanting to "Bend" Objects
-
Mark,
I made a little video here that explains the process. It may take a few seconds to download.
Fred
-
Darn Fred, what the heck is that- some kind of a brassiere? Cool!
-
-
Hey Fred,
Finally had a chance to go through the video you created and had great success... Thank you SO much for creating that tutorial for me...
I am going to keep practicing this...
My next desire is to create curves and circles on the TIN surface and "bend" those...
Thanks again,
Mark -
Mark,
Here is one method to mix shapes (circles, stars, whatever) on a TIN along with raised bars, as shown in this image:
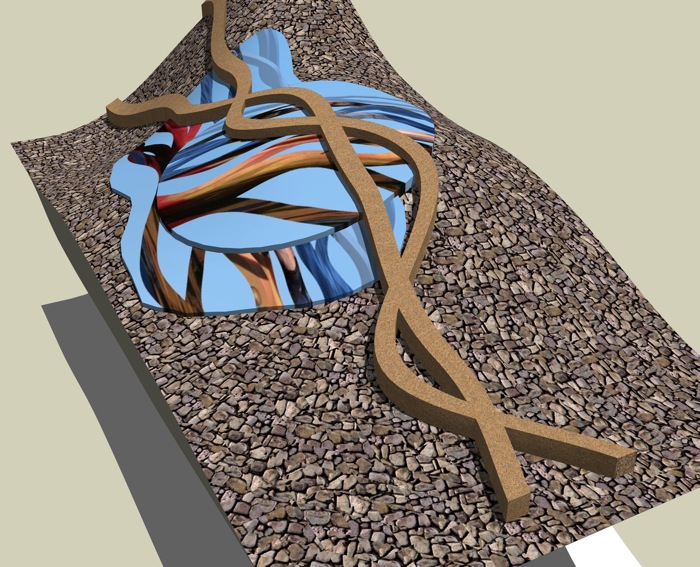
- Prepare a TIN with bars or curved bars as described in the tutorial and previous posts.
- Before ungrouping the objects duplicate just the "base" TIN directly down. You don't need to move it down too far, just far enough so that when you smoove the original the curves don't bump into the duplicate.
- Ungroup all the objects.
- Draw a vertical line from a corner of the original TIN to the matching corner of the duplicate TIN. This connects the TINs so that anything you do with Smoove to one will be done to the other.
- Do your smooving.
- Now select the duplicate TIN, copy it, open a new file, and choose Paste In Place.
- In the new file, duplicate the TIN again, but this time moving the copy directly up. Move it up as far as you want the vertical thickness of the new object to be.
- On a flat surface directly above the TINs draw the outline of the shape you want. Make sure it is a closed shape.
- Using Push/Pull push the shape down through both TINs.
- Intersect the two TINs and the shape, remove all the geometry you don't want, select the resulting shape, group it, copy it, then use paste in place to get it back into the original model.
- Move the new object directly up until it sits on the original TIN.
-
Wow, it seems I still have to learn a lot about modeling even when I am using sketchup for almost 5 years now.
Sorry for the biggest Noob question of all time: What does TIN stands for? -
Triangulated Irregular Network
-
That's beautiful. If I ever have a daughther, I'm gonna call her that.
-
Thanks again Fred for your continued support on my question...
I am hopefully going to spend some time this weekend processing all that you have written and try to get some test files created...
Thanks again,
Mark -
@mlammert said:
My next desire is to create curves and circles on the TIN surface and "bend" those...
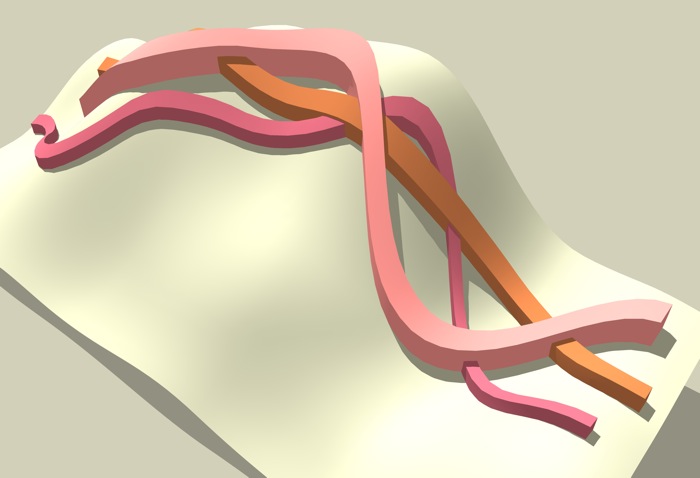
MarkThis was done quickly with a low-poly count so the curves are not as smooth as they could easily be. It was made by placing TIN beams on a vertical TIN surface and then using Smoove to curve the beams in the vertical plane. When I had the curves I wanted I rotated everything together back to the horizontal plane... did the various other steps in the tutorial, etc.. For other shapes you could either build them from TINs or use intersect as described in Alan Fraser's original response. Good luck!

Hello! It looks like you're interested in this conversation, but you don't have an account yet.
Getting fed up of having to scroll through the same posts each visit? When you register for an account, you'll always come back to exactly where you were before, and choose to be notified of new replies (either via email, or push notification). You'll also be able to save bookmarks and upvote posts to show your appreciation to other community members.
With your input, this post could be even better 💗
Register Login


Advertisement