sketchucation logo sketchucation
    • Login
    πŸ€‘ SketchPlus 1.3 | 44 Tools for $15 until June 20th Buy Now

    How can I model a twisting / looping arrow?

    Scheduled Pinned Locked Moved Newbie Forum
    sketchup
    19 Posts 6 Posters 1.9k Views 6 Watching
    Loading More Posts
    • Oldest to Newest
    • Newest to Oldest
    • Most Votes
    Reply
    • Reply as topic
    Log in to reply
    This topic has been deleted. Only users with topic management privileges can see it.
    • A Offline
      Ampa
      last edited by

      Hello experts,

      I would like to model a series of 3D arrows (ie. they have thickness) that show a twist or loop in 3D space. I've attached an example that was put together in 3D Studio Max.

      I can't think how to go about modeling this shape in SketchUp.

      I would ultimately like to have a variety of arrow shapes with features such as loop-the-loop, barrel roll and other types of aerial maneuver.

      Any help greatly appreciated πŸ˜„

      Ampa


      Arrow with a twist!

      1 Reply Last reply Reply Quote 0
      • A Offline
        Ampa
        last edited by

        Here is my best attempt so far...

        I drew a rectangle. Created a copy which I rotated by 3.6 degrees. I then stitched the two together by hand and softened all the lines.

        Finally I used the Grow.rb plugin to create 100 copies, rotating each by 3.6 degrees.

        Issues: The twist is very stripy, perhaps because each box is a seperate object that is not actually joined to its neighbours?

        Ampa


        Grow.rb rendered with Podium.

        1 Reply Last reply Reply Quote 0
        • P Offline
          pmiller
          last edited by

          If you used grow on a group you would need to select all, explode the all (at once) and then maybe use smooth.

          1 Reply Last reply Reply Quote 0
          • pilouP Offline
            pilou
            last edited by

            Draw helix script + Rectangle + "Follow me" tool ?
            Some variations possible πŸ˜„


            Arrow.jpg

            Frenchy Pilou
            Is beautiful that please without concept!
            My Little site :)

            1 Reply Last reply Reply Quote 0
            • A Offline
              Ampa
              last edited by

              PMiller: Thanks for the input. I thought that I had tried ungrouping and softening all the edges, but I was holding the wrong key (shift instead of control) and therefore hiding, rather than softening, the edges. I'll try again.

              UPDATE: Softening didn't make a great deal of difference. I am sure that theis is because the individual sections remain discrete, they have not glued themselves together. So there are hard edges which can be softened between each section.

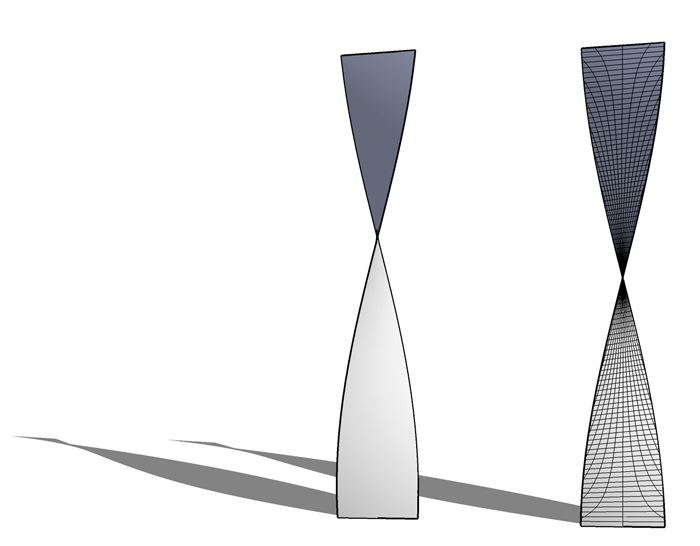
              Pilou: Using your suggestion I find a problem - the cross section shape twists as it climbs the spiral. Take a look at the attachment to see what I mean.

              Thanks for the help so far. Any more suggestions gratefully received.

              Ampa


              4 steps showing the unwanted twist effect.


              The unwanted twist.

              1 Reply Last reply Reply Quote 0
              • A Offline
                Ampa
                last edited by

                Tried again using helix.rb (rather than drawhelix.rb) but get the same kind of results.

                Where is the twist coming from?


                Same problem with helix.rb

                1 Reply Last reply Reply Quote 0
                • R Offline
                  remus
                  last edited by

                  try modifying the shape fo the helix before you use folow me, probably go for sometihng long and thin. the easiest way to do this would probably be with the scale tool. Probably worth messing aroud with how you orient the rectangle as well, as i imagine this wil make a large difference on the end result.

                  http://remusrendering.wordpress.com/

                  1 Reply Last reply Reply Quote 0
                  • Alan FraserA Offline
                    Alan Fraser
                    last edited by

                    This was done in less than 5 minutes without resorting to any rubies...just the Move and Rotate tools. You just need to use a bit of lateral thinking. πŸ˜‰


                    helix.skp


                    helix.jpg

                    3D Figures
                    Were you required to walk 500 miles? Were you advised to walk 500 more?
                    You could be entitled to compensation. Call the Pro Claimers now!

                    1 Reply Last reply Reply Quote 0
                    • R Offline
                      remus
                      last edited by

                      was it just a case of move a copy up, rotate it, stitch between the two, make it acomponent, copy up rotate, etc. ?

                      http://remusrendering.wordpress.com/

                      1 Reply Last reply Reply Quote 0
                      • Alan FraserA Offline
                        Alan Fraser
                        last edited by

                        I just made a box then rotated the top surface by 5 degrees, using autofold. I then removed the top and bottom surfaces and copied it upwards, snapping two appropriate corners, then rotated into position....again inferencing a snap into position.

                        It doesn't take very long at all, because you can then copy two boxes then 4, then 8 etc, before smoothing the sides.

                        3D Figures
                        Were you required to walk 500 miles? Were you advised to walk 500 more?
                        You could be entitled to compensation. Call the Pro Claimers now!

                        1 Reply Last reply Reply Quote 0
                        • A Offline
                          Ampa
                          last edited by

                          Thanks Alan for the idea.

                          I tried your method: it is indeed pretty simple and no slower than fiddling with the rubies.

                          When I render the model (and indeed it is visible in native SketchUp) the bottom 6 segments are not as smooth as the rest.

                          Why is this? Is there anything that I can do about it?

                          As before, your help is appreciated. Thanks for taking the time to share your knowledge.


                          Mine on the left, Alan's on the right.

                          1 Reply Last reply Reply Quote 0
                          • R Offline
                            remus
                            last edited by

                            If you push pull the rectangle in smaller increments, it should minimise the effect, altohguh i cant think of a way of completely eliminating it.

                            http://remusrendering.wordpress.com/

                            1 Reply Last reply Reply Quote 0
                            • Alan FraserA Offline
                              Alan Fraser
                              last edited by

                              If you mean by "not as smooth", the fact that you can see some triangulation shadows at the base, then that's just the way that SU handles shadows...they are vector-based and none too subtle. You can see this by moving the time slider...they will run up and down the column.
                              Flipping the triangulation lines won't do any good either...it'll just shade the other way around.

                              As Remus says, you can alleviate it with smaller increments...like not rotating as much as 5 degrees, but I doubt you'll get rid of it altogether.

                              3D Figures
                              Were you required to walk 500 miles? Were you advised to walk 500 more?
                              You could be entitled to compensation. Call the Pro Claimers now!

                              1 Reply Last reply Reply Quote 0
                              • jeff hammondJ Offline
                                jeff hammond
                                last edited by

                                you could mess around with the soap skin bubble and drawhelix... the triangulation will still be present but you can get it pretty small..


                                twisting.jpg


                                twisted.skp.zip

                                dotdotdot

                                1 Reply Last reply Reply Quote 0
                                • jeff hammondJ Offline
                                  jeff hammond
                                  last edited by

                                  similar technique for the loop...


                                  loop.jpg

                                  dotdotdot

                                  1 Reply Last reply Reply Quote 0
                                  • A Offline
                                    Ampa
                                    last edited by

                                    Thanks for the lates round of ideas.

                                    Alan / Remus: Yep smaller increments seems to help. I have a nice smooth barrel roll, and loop the loop πŸ˜„

                                    Jeff: Soap Skin is an interesting idea, I'll toy with that too πŸ˜„

                                    Next issue: Both examples so far use rotation about 1 axis, and in the case of the loop a displacement along a second axis. But I'd also like to try an arrow with rotation about two axies, such as a loop with a roll.

                                    I've tried this a couple of times using the rectangle > push-pull > rotate > copy > rotate into place technique BUT I can't seem to make the copy match perfectly with the original. I am sure it is possible. I am obviously rotating in the wrong order, or about the wrong point. Perhaps someone can show me the way?

                                    Thanks again, Ampa.


                                    Twist around Y (1 degree per segment)


                                    Loop-the-Loop (Rotation about X with lateral displacement)

                                    1 Reply Last reply Reply Quote 0
                                    • jeff hammondJ Offline
                                      jeff hammond
                                      last edited by

                                      i did the corkscrew in a similar manner as the twist.. the only difference is the point at which the face is rotated around.. i used big segments with 15 deg rotation but i'm sure you can spend some more time with it and get the results you're getting with the other shapes..

                                      (note - i had to use the scale tool to flip the thing around once i was finished in order to get the orientation right.. i think i did green axis and blue axis at -1)


                                      corkscrew.jpg


                                      corkscrew.skp

                                      dotdotdot

                                      1 Reply Last reply Reply Quote 0
                                      • jeff hammondJ Offline
                                        jeff hammond
                                        last edited by

                                        for anyone curious...
                                        just messing around with a new screen capture app and that corkscrew posted above... those mouse click things are kind of weird i guess but i can turn them off in the future.. i think it'd be cool if the keyboard keys would show up so the shortcuts are visible.. you can still see which tools are being used by looking at the toolbox.. i shrunk the window so the VCB is visible..


                                        corkscrew_su.mov.zip

                                        dotdotdot

                                        1 Reply Last reply Reply Quote 0
                                        • A Offline
                                          Ampa
                                          last edited by

                                          Jeff: Your corkscrew is great, the video really shows just how quick it should be. I agree with you that the 'red shockwave' click animation is a bit over the top, though it does make it very clear when yu have clicked!

                                          I think the idea that I've not yet addopted is adding dummy geometry to act as a rotation point / guide for my model.

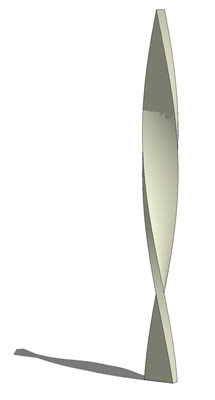
                                          Here is a render of a similar corkscrew (not as pretty as yours though, too compact!)

                                          Thanks for taking the time out, to help a relative noob!


                                          Corkscrew (5 degree twist per segment - not quite smooth)

                                          1 Reply Last reply Reply Quote 0
                                          • 1 / 1
                                          • First post
                                            Last post
                                          Buy SketchPlus
                                          Buy SUbD
                                          Buy WrapR
                                          Buy eBook
                                          Buy Modelur
                                          Buy Vertex Tools
                                          Buy SketchCuisine
                                          Buy FormFonts

                                          Advertisement