Medeek Wall Plugin
-
Haven't look at the Shearwall Module in some time and I think it would be important to have it at least able to insert shearwall panels into the wall panels even if the engineering portion is not yet complete.
After some thought and reviewing my AWC literature and my own Shearwall Calculator (Spreadsheet), here are my preliminary list of parameters for a shearwall panel (there can be multiple panels within a given wall).
Basic Options:
Name: Initially set by auto-increment value but can be modified by user.
Start Location:
End Location:
Length: Determined by start and end location
Description: Custom comments or notes by userLeft Post:
Left SW Post: 2x4, 2x6, (2) 2x6, 4x6, 6x6 etc...
Quantity: 1,2,3,4
Species: DF, HF, SP, SPFLeft Holdown: YES/NO
Holdown Type:
Holdown Vert. Offset: in/mm
Holdown AB:
Threaded Rod Length: in/mm
Strap Placement:Right Post:
Right SW Post: 2x4, 2x6, (2) 2x6, 4x6, 6x6 etc...
Quantity: 1,2,3,4
Species: DF, HF, SP, SPFRight Holdown: YES/NO
Holdown Type:
Holdown Vert. Offset: in/mm
Holdown AB:
Threaded Rod Length: in/mm
Strap Placement:Sheathing Exterior:
Ext. Sheathing Material: Ply, OSB, Gypsum, NONE
Sheathing Thickness: 0.4375"
Sheathing Fastener: 8d Common, 6d Common, 10d Common, 8d Galv Casing, 10d Galv Casing
Field O/C Spacing: 6", 12"
Edge O/C Spacing: 2", 3", 4", 6"Sheathing Interior:
Int. Sheathing Material: Ply, OSB, Gypsum, NONE
Sheathing Thickness: 0.4375"
Sheathing Fastener: 8d Common, 6d Common, 10d Common, 8d Galv Casing, 10d Galv Casing
Field O/C Spacing: 6", 12"
Edge O/C Spacing: 2", 3", 4", 6"Sole Plate Fasteners:
Sole Plt. Fasteners: YES/NO
Fastener Size: 16d,SDS25412
Fastener O/C Spacing: in/mmAnchor Bolts (Sill Plate Fasteners):
Anchor Bolts: YES/NO
Anchor Bolt Length: 10,12,14
Anchor Bolt Dia: 1/2", 5/8"
Washer: 2x2,3x3
Bolt O/C Spacing: in/mm
Edge Distance: in/mm
Vertical Offset (default is zero)Blocking:
Install Blocking: YES/NO
Blocking Size: Single 2X, Single 3X, Double 2X
Heights: 48|96|144 (allow the user to specify the exact height of each blocking line - in/mm)Top Plate Clips:
Framing Clips: YES/NO
Clip Type: A35, A34,LTP4, LTP5
Cllip O/C Spacing: in/mm** Let me know if you think I am missing anything.
-
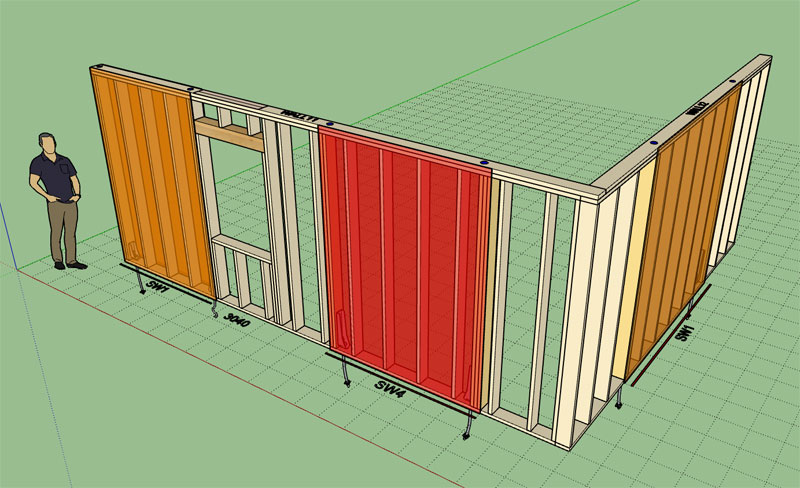
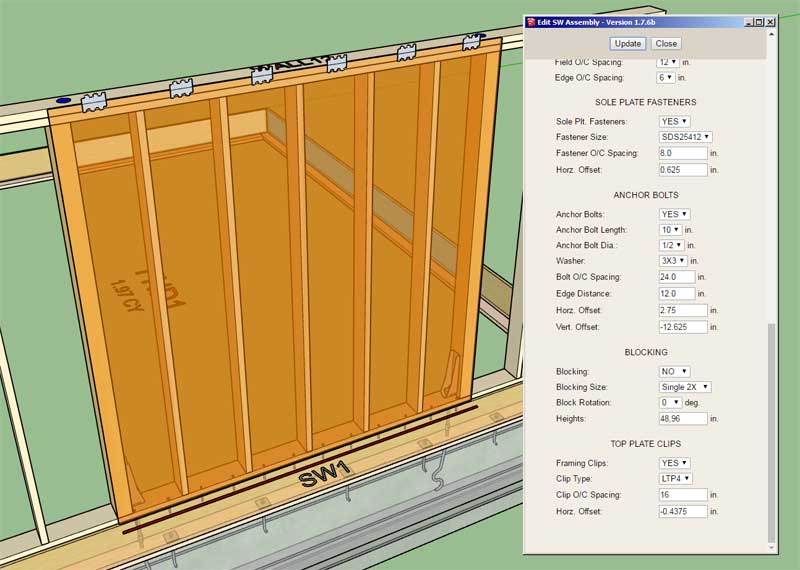
First look at some shearwall panels (notice the absence of the shearwall posts/studs and holdowns, that is coming next) and the shearwall edit menu:

I had to take a little break from the programming over the holidays but in a space of a few hours I've mostly got the basic code for the shearwall module put together. Now I just need to sort out a few of the details.
I've also decided to make the shearwall panel sheathing with variable opacity since they are primarily visual in their representation of the actual shearwall sheathing. The color and opacity will be customizable within the global settings (Materials tab).
Initially there will be three shearwall sheathing materials (OSB, Plywood and Gypsum). Each material type will have its own unique color and opacity, all of which can be customized. This will allow the user to visually determine the shearwall sheathing material very quickly within the model.
-
Version 1.7.7 - 12.28.2020
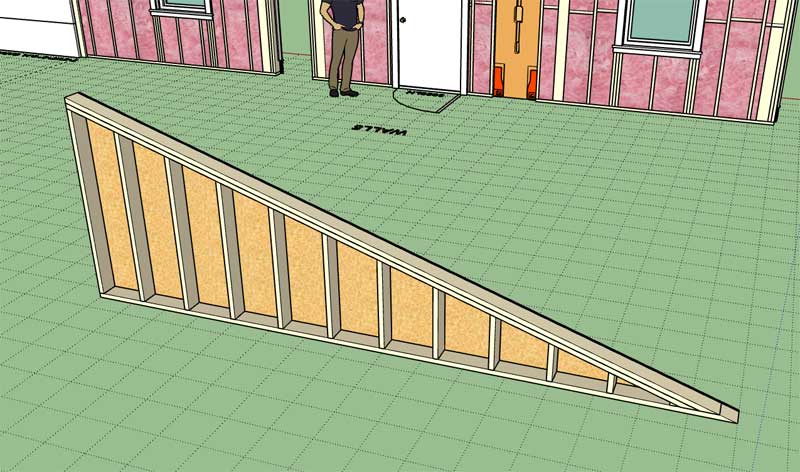
- Enabled Draw, Edit, Move and Delete shearwall tools for all rectangular walls.
- Added four additional parameters to the Materials tab of the Global Settings pertaining to shearwalls.
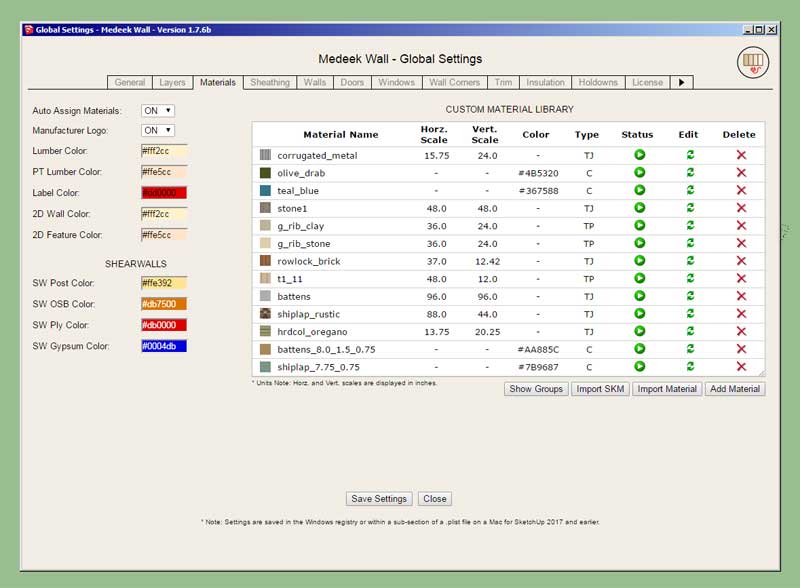
Note, that the shearwall tools will only work with rectangular walls currently. I will enable them for gable, shed and hip walls but that may be a few more days since it gets a bit more complicated.
Also note that the four items within the shearwall module are currently not active yet and are still in development (probably a couple more days):
Sole Plate Fasteners, Anchor Bolts (Sill Plate Fasteners, SW Blocking, Top Plate Clips
View model here:

3D Warehouse
3D Warehouse is a website of searchable, pre-made 3D models that works seamlessly with SketchUp.
(3dwarehouse.sketchup.com)
As this module is completely brand new I expect there will be a few bugs and items that need to be addressed or corrected moving forward. Your beta testing of this new feature and any feedback is highly appreciated.
-
Impressive! Do you end up with a list of shear walls and identification by type and length?
-
@pbacot said:
Impressive! Do you end up with a list of shear walls and identification by type and length?
That would be the next step.
It would be nice if there was a function which created a Shearwall schedule, like I make on my own structural sheets.
-
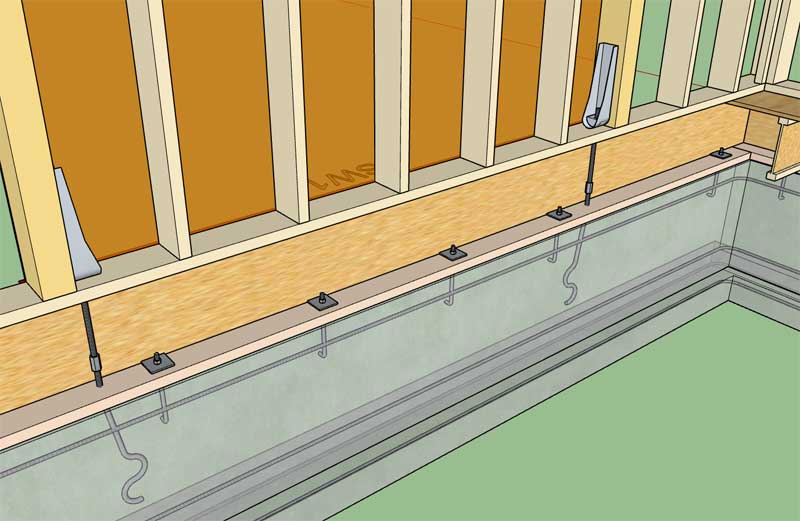
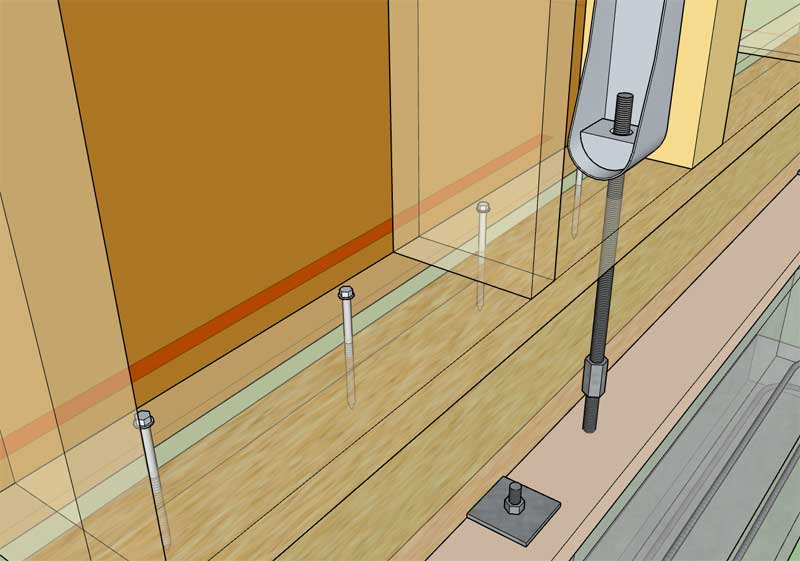
Working on the shearwall (panel) anchor bolts and sole plate fasteners.
First look at some anchor bolts associated with a shear wall:

When a shearwall rests directly on a slab-on-grade then the anchor bolts are typically connected directly to the sole plate of the shearwall, however when the wall rests on a floor as shown then the anchor bolts will anchor the sill plate below the wall and threaded rods with coupler nuts are utilized to extend the holdown bolts up to the HDU holdowns. In this situation the engineer will also typically call out the size and spacing of fasteners that connect the sole plate of the shearwall to the rim joist below it.
To facilitate various wall/floor configurations the vertical and horizontal offset parameters for shearwall anchor bolts are made available for each shearwall, and can be adjusted independently.
P.S.
Looking at this image it immediately jumps out at me that a critical component within this shearwall assembly is missing. Note that I am not showing fasteners, they are too small to model for the most part. Let's see if anyone can pick it out.
-
Version 1.7.7b - 12.28.2020
- Enabled anchor bolts within the shearwall module.
- Enabled sole plate fasteners within the shearwall module.
- Enabled top plate clips within the shearwall module.
All that is left is the specialized blocking for shearwalls.
-
I've seen both ways of handling stacked shearwall panels, however the strap method would make more sense from an economic standpoint:


The main point here is that you have either option at your disposal with the new shearwall module.
Notice the inclusion of the top plate clips on the lower shearwall and the 16d Common fasteners in the sole plate of the upper shearwall. Both of these items are optional however if that degree of detail is required or desired it is also readily available to the designer or engineer.
See model here:
3D Warehouse
3D Warehouse is a website of searchable, pre-made 3D models that works seamlessly with SketchUp.
(3dwarehouse.sketchup.com)
P.S.
Some of you may be scratching your head looking at all of this hardware that goes into a wall especially at a shear panel... I know, Simpson Strong-Tie isn't a multi-million dollar company for nothing. A lot of old time contractors really dislike us engineers.Bottom line, when the wind blows really hard or you just happen to be lucky enough to be in a major earthquake, these construction methods will prevent your house from toppling over and potentially killing you.
Engineers like myself are entrusted with making sure the built environment around you is safe and secure.
-
Wow, interesting video put out just yesterday:
-
@medeek said:
Version 1.5.6 - 07.16.2020
- Updated the gable wall module to allow for zero wall height shed walls.
- Added triple single hung windows to the window module.
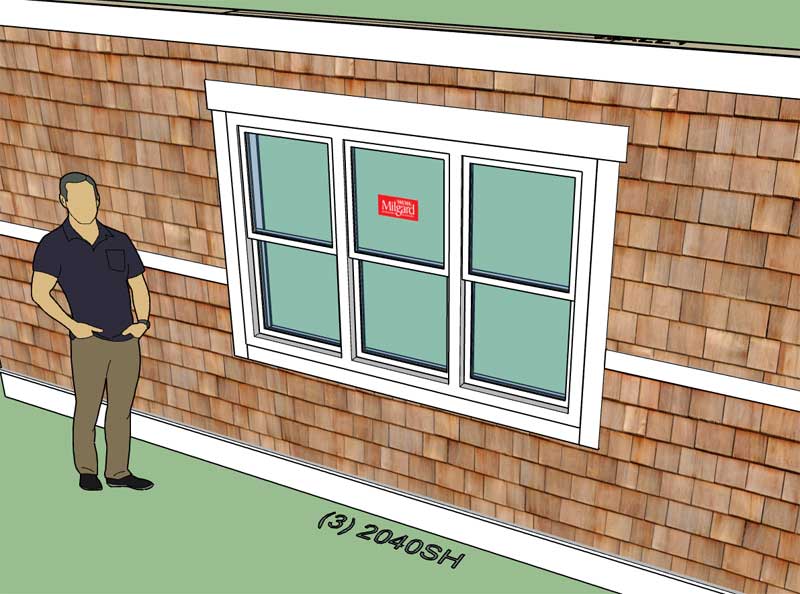
Thanks! I just made great use of BOTH of these new features and they worked beautifully.

Q: if I wanted to add triple 'picture' (fixed) windows, is that something I could do by adding to the Medeek plugin library folder?
-
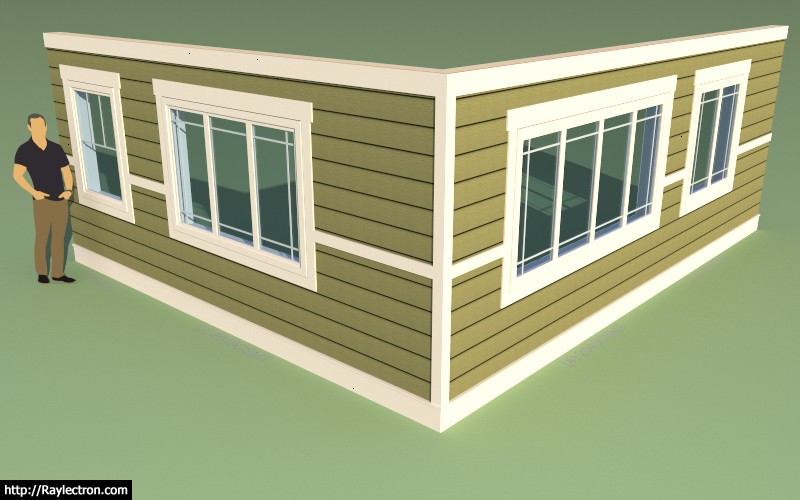
The casement window option is probably what you are looking for:
-
@medeek said:
The Triple Casement window option is probably what you are looking for...
Thanks for the quick response. I didn't think of using the Triple Casement option because we would not actually be ordering casement windows (this is for a set of windows that are very high on the wall and completely inaccessible to operating). However, it does the trick in terms of getting the look. Thanks for the tip!
PS. We are going with Andersen 100 Series. For some reason it appears that the picture window frame is significantly larger than the hung sash frame, for some reason? The Triple Casement match the hung frame size, which will be totally fine for our purposes. Thanks for the tip!
-
The casement style window is very similar (identical) to the picture style window in geometry. I guess I probably should add an option for multi-picture windows.
-
@medeek said:
The casement style window is very similar (identical) to the picture style window in geometry. I guess I probably should add an option for multi-picture windows.
Thanks. I think I should clarify my statement... I was stating that Andersen shows a different glass size for Picture and Casement at the same window width. However, after reviewing their size chart documents, it appears that was just a perception of mine. Andersen size charts show both Picture and Casement windows have the SAME unobstructed glass size of...
Width = window width − 6.250".
Height = window height − 6.250".So the Triple Casement will be totally fine at representing Triple Picture. Thanks for the information and clarification.
-
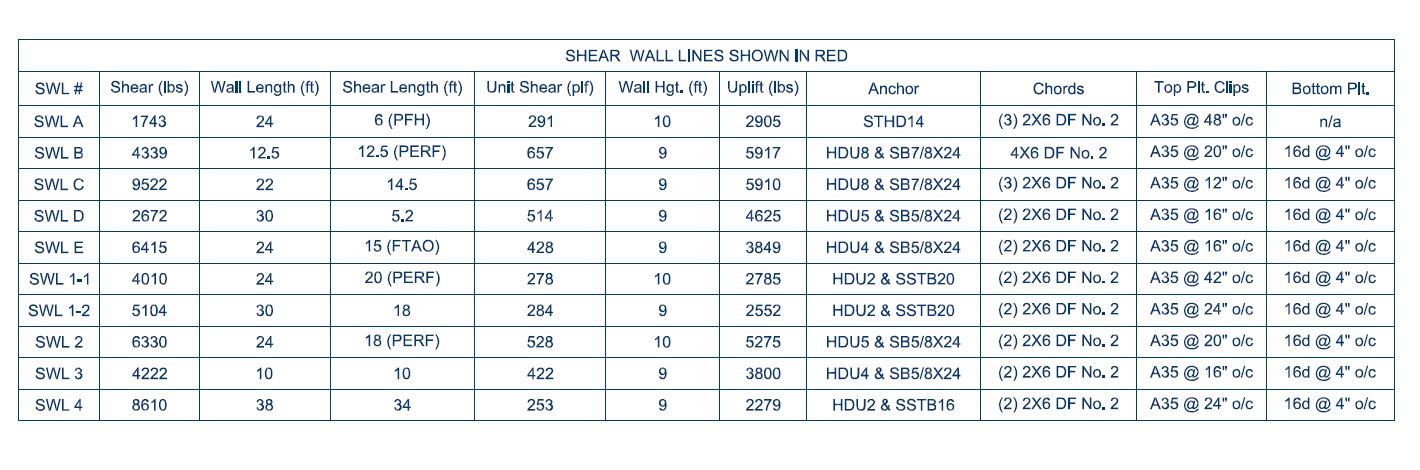
I wouldn't exactly call this a schedule as much as a CSV or spread sheet with all of the shearwall data contained within it. Regardless here is a first look at the Shearwall Schedule tool (preview menu):

Note that the preview (or HTML menu) only shows limited information. The CSV output is much more comprehensive, listing all of the parameters for the shearwall (ie. holdowns, anchor bolts, clips, blocking etc...)
I still have not ironed out all of the details I want to show or present within this schedule tool so additional feedback will be key as to how this evolves. I will probably dig into my original shearwall calculator and figure out how to best incorporate some engineering into this tool. I think it would be useful for the tool to calculate the shear capacity of the SW given its dimensions, sheathing and nail patterns. I also think additional parameter(s) for the actual applied shear load (wind and seismic) might be useful as well, I will need to give this some more thought.
Note that the tool is smart enough to detect if there are windows or doors within the bounds of a shearwall panel and correctly labels it with a "PERF" designation, which signifies it is a perforated shearwall.
-
@medeek said:
Wow, interesting video put out just yesterday:
Wow, this is a bit of a crossover for me. I am VERY familiar with Matt Petrowsky from his EXTENSIVE set of FileMaker database development videos on FileMakerMagazine.com. Very interesting to see that he now also has an interest in SketchUp and particularly Medeek. Pretty cool.
-
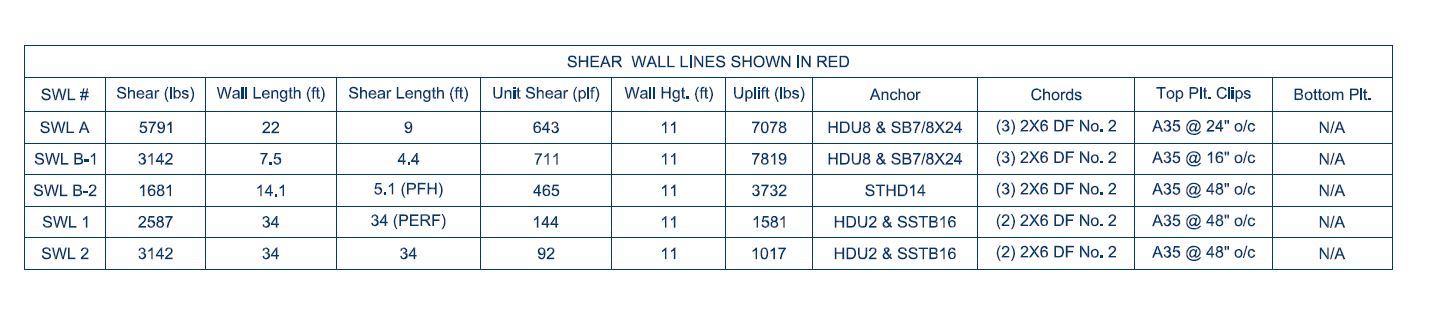
An example of the CVS output loaded into Excel:

Notice that have switched the order of some of the parameters to a more logical order.
-
Version 1.7.8 - 01.03.2021
- Added the Shearwall Schedule tool to the SW toolbar.

-
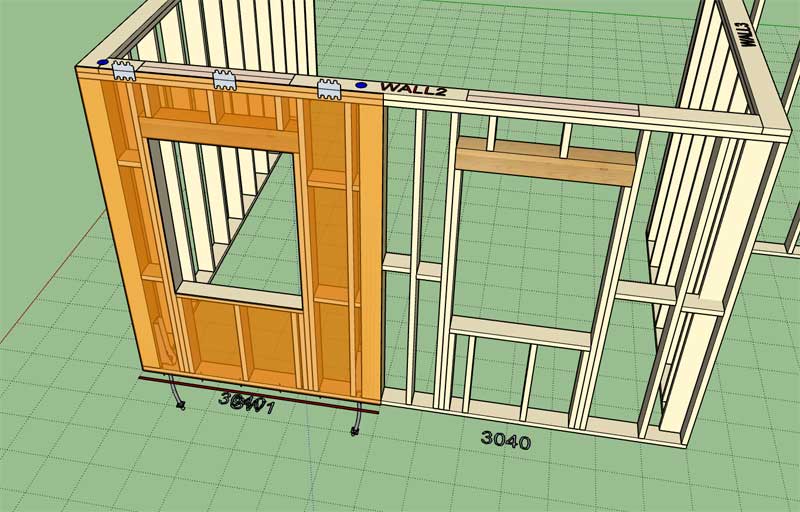
First look at shearwall blocking:

Note that in this example the blocking has been rotated 90 degrees. The rotation parameter allow for zero or 90 deg. rotation. Also note that any number of rows of blocks can be specified. In this case I had a 12' wall so I went with blocking at 4' and 8' (48,96).
Each shearwall panel can have its own blocking which is independent from other shearwalls and is also independent of any general wall blocking.
-
Version 1.7.9 - 01.05.2021
- Enabled blocking within the shearwall module.
The blocking module algorithm for shearwalls was a bit more of hassle than I had hoped but after about 16 hours of scratching my head I managed to cobble it together. I'm fairly happy and confident with the results but I am sure there will be a few cases where it may need further refinement. The true debugging process really only starts now as I hand it over to the customer to use in real design situations.
I've beaten the Shearwall "horse" for about a week now (Dec. 27th - Jan. 5th), I do have more engineering work that can be done but I think I will probably give it a rest for a while and move on to other hot items within the Truss plugin.
If you have additional items that you would like to see added to this module please feel free to send me an email. I am much more likely to address follow up items when the programming is still fresh on my mind. A month from now it will take more effort to dig back into the shearwall module and add or improve existing features.
Hello! It looks like you're interested in this conversation, but you don't have an account yet.
Getting fed up of having to scroll through the same posts each visit? When you register for an account, you'll always come back to exactly where you were before, and choose to be notified of new replies (either via email, or push notification). You'll also be able to save bookmarks and upvote posts to show your appreciation to other community members.
With your input, this post could be even better 💗
Register Login


Advertisement