• Login
sketchucation logo sketchucation
  • Login
๐Ÿค‘ SketchPlus 1.3 | 44 Tools for $15 until June 20th Buy Now

[Plugin] Shape Bender Beta

Scheduled Pinned Locked Moved Plugins
1.3k Posts 331 Posters 1.7m Views
Loading More Posts
  • Oldest to Newest
  • Newest to Oldest
  • Most Votes
Reply
  • Reply as topic
Log in to reply
This topic has been deleted. Only users with topic management privileges can see it.
  • C Offline
    Christopher Steffy
    last edited by 18 Jun 2014, 16:05

    I have shape bender plugin on my computer and it works perfectly on Sketchup Pro 2013.

    When I open Sketchup Pro 2014 I get the following message:
    Error Loading File clf_shape_bender_loader.rb
    Error: #<LoadError: cannot load such file -- progressbar.rb>
    /Applications/SketchUp 2014/SketchUp.app/Contents/Frameworks/Ruby.framework/Versions/2.0/lib/ruby/2.0.0/rubygems/core_ext/kernel_require.rb:45:in require' /Applications/SketchUp 2014/SketchUp.app/Contents/Frameworks/Ruby.framework/Versions/2.0/lib/ruby/2.0.0/rubygems/core_ext/kernel_require.rb:45:in require'
    /Users/myname/Library/Application Support/SketchUp 2014/SketchUp/Plugins/clf_shape_bender_loader.rb:22:in `<top (required)>'

    I am using a 2012 MAC, Software OS X 10.9.3
    I am not computer savvy and do not want to mess things up. I would greatly appreciate any help or direction on who would be able to fix. Thanks.

    1 Reply Last reply Reply Quote 0
    • D Offline
      Dave R
      last edited by 18 Jun 2014, 17:40

      I'm guessing you copied the plugin from the SU2013 Plugins folder. Is that correct? The error is telling you that you haven't installed Prgressbar.rb. The current version of the plugin doesn't need Progressbar.rb so the best thing would be to delete the existing old version from the SU2014 Plugins folder and install the current version via the Extension Warehouse.

      Etaoin Shrdlu

      %

      (THERE'S NO PLACE LIKE)

      G28 X0.0 Y0.0 Z0.0

      M30

      %

      1 Reply Last reply Reply Quote 0
      • P Offline
        Polynechramorph
        last edited by 19 Jun 2014, 15:02

        Hi,
        Thanks for this great plugin.
        it worked well on 2013 pro running windows 8.
        I've since moved onto 2014 pro and for some strange reason I can't seem to get the plugin to even load.

        I've dopwnloaded the newest .rbz file and placed in the plugin folder for 2014. yes I know about the location change to user/roaming....

        So I fire up 2014 pro and nothing, nowhere to be found, no error message.

        I sure it's something really stupid and simple I've missed but I am at my wits end. any help would be greatly appreciated.

        1 Reply Last reply Reply Quote 0
        • D Offline
          Dave R
          last edited by 19 Jun 2014, 15:12

          Well, you say you put the RBZ file in the Plugins folder. That isn't installing it so it's no wonder it doesn't work. ๐Ÿ˜’

          Move the RBZ file to the desktop or somewhere. Then use Install Extension from Preferences>Extensions and navigate to the RBZ file. Open it and follow the prompts. Or better yet, install it automatically from the Extension Warehouse.

          By the way, where did you get the "newest version" of Shape Bender?

          Etaoin Shrdlu

          %

          (THERE'S NO PLACE LIKE)

          G28 X0.0 Y0.0 Z0.0

          M30

          %

          1 Reply Last reply Reply Quote 0
          • P Offline
            Polynechramorph
            last edited by 19 Jun 2014, 15:15

            Ok Thanks I'll try that. I normaly would instal it directly from the warehouse but for some reason the plugin doesn't download I just get stuck in a "Please wait" infinity loop... ๐Ÿ˜ž

            1 Reply Last reply Reply Quote 0
            • R Offline
              Refka
              last edited by 24 Jun 2014, 10:45

              @chris fullmer said:

              Name: Shape Bender
              Version: 0.55 Beta
              Description: This script will bend an existing group to match a curved line or series of connected lines.
              Usage: See videos below ๐Ÿ˜„
              Requires: Progressbar.rb
              SketchUp Compatibility: Its not compatible with version 5 or earlier.

              Download Shape Bender

              Here is a list of known bugs and planned improvements:

              • The first and last angles of the bend curve are actually not accurate. Its not very noticeable, but it is inaccurate.
              • Every once in a while the grids don't display.
              • Every once in a while I notice small deviations in the bending that are incorrect.

              The video is a little bit outdated. I need to remake it with the new features.
              [flash=696,601:280rguhn]http://www.chrisfullmer.com/forums/shape_bender_beta1.swf[/flash:280rguhn]

              Video #2
              [flash=696,601:280rguhn]http://www.chrisfullmer.com/chrisfullmer/forums/shape_bender_double_bend.swf[/flash:280rguhn]

              A new video Dec-03-2009
              [flash=790,600:280rguhn]http://www.youtube.com/v/tGHTIOMm_34&hd=1&fs=1[/flash:280rguhn]

              Thanks for checking it out!

              Also, please check out my newest script Repeat Copy at smustard.com.

              NEW! Shape bender en Francais, thanks to c.plaissais (Christophe). Download it HERE!

              Chris

              Requires: Progressbar.rb

              Download Shape Bender

              5856,1184

              thank a lot sir.. it's work

              1 Reply Last reply Reply Quote 0
              • R Offline
                rjsutton
                last edited by 5 Jul 2014, 00:52

                Hi
                I have a relatively easy rectangle to add a curve to but no matter what i do i cant make it work. can someone out there help me please.
                basically i need the CURVE as shown added to the rectangular part to produce a curved part as per drawing "curve" but it will have the internals of the original rectangle ( sorry for the novel)
                thanks in anticipation๏ปฟ
                Richard


                Part A+B final redraw11.skp


                CURVE DESIGN.skp

                1 Reply Last reply Reply Quote 0
                • D Offline
                  Dave R
                  last edited by 5 Jul 2014, 14:14

                  I don't follow what you're trying to do. Do you have an image that shows the desired final result?

                  Etaoin Shrdlu

                  %

                  (THERE'S NO PLACE LIKE)

                  G28 X0.0 Y0.0 Z0.0

                  M30

                  %

                  1 Reply Last reply Reply Quote 0
                  • TIGT Offline
                    TIG Moderator
                    last edited by 5 Jul 2014, 14:26

                    Your Z blue axis should be 'up'.
                    Your example SKPs shown it 'downwards'.
                    This might not be an issue here, but needs correction.

                    You object is only ~70mm long ?
                    And it has many small facets which might not react well to bending - e.g. if they produce edges < ~1/1000th".
                    Perhaps Scaling up x10 or x100, bending and scaling down would help ?

                    But as Dave says... can you show what it should look like...
                    We are both a bit bamboozled by your description thus far...

                    Perhaps a simple FollowMe with subsequent tweaks to the ends would suffice ?

                    TIG

                    1 Reply Last reply Reply Quote 0
                    • R Offline
                      rjsutton
                      last edited by 6 Jul 2014, 00:32

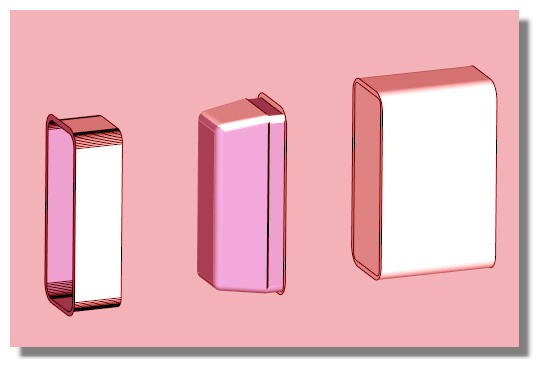
                      Hi Sorry for the BAD description. Attached is a final view of the" mark 1" product. I have adjusted the o/a size and adjusted the shape slightly to achieve the current product. the final item is a compound of part a and b. see attached please.
                      Thanks
                      Richard


                      Assem1.SLDASM.pdf


                      Part A Complete.pdf


                      Part B Complete.pdf

                      1 Reply Last reply Reply Quote 0
                      • D Offline
                        Dave R
                        last edited by 6 Jul 2014, 11:56

                        Couldn't you just upload images instead of forcing us to download your PDF files? ๐Ÿ˜’

                        Etaoin Shrdlu

                        %

                        (THERE'S NO PLACE LIKE)

                        G28 X0.0 Y0.0 Z0.0

                        M30

                        %

                        1 Reply Last reply Reply Quote 0
                        • R Offline
                          rjsutton
                          last edited by 7 Jul 2014, 01:14

                          Hi
                          My original draftsman only sent me EPRT and SLDASM files which has the "curve" applied. I sent him the files in my first post BUT he sent me back in these formats . This forum wont allow me to download these types of files so im sorry the only way to "show" you was in pdf form.I Think its so easy but my comp gets to about 7-15 % and reboots. Have tried reloading prog.but no success. It is a very small item but i did get successful models produced by cnc off the EPRT files. Thanks Richard

                          1 Reply Last reply Reply Quote 0
                          • R Offline
                            rjsutton
                            last edited by 7 Jul 2014, 01:50

                            Hi all again
                            attached is as far as i can get you can see the 3 items needed for shape bender
                            computer crashes all the time......
                            If you can help Can you also "undock " the 2 parts so they move apart from each other. i seem to have got them connected as one piece.
                            Thanks for any help
                            Richard


                            part for review.skp

                            1 Reply Last reply Reply Quote 0
                            • TIGT Offline
                              TIG Moderator
                              last edited by 7 Jul 2014, 09:46

                              Make the 2 parts as separate groups ?
                              Then re-join them after the bending / extruding...

                              You have not heeded my advice about 'scaling'.
                              The small facets around the curved parts are only ~0.7mm across.
                              When you start to bend them you might find that edges < 1/1000th" are required.
                              SketchUp cannot make these because it assumes that the start/end points are coincident.
                              As a result the tiny facet[s] needing that edge are also not created.

                              I suggest you Scale up the model x10 or x100.
                              Do the bending/extruding and scale down x0.1 or x0.01

                              These tiny facets can exist after they are reduced by in the scaling-down, but cannot be created that size initially...

                              Having thousands of tiny facets will mean a slow bend, but it should complete eventually...

                              TIG

                              1 Reply Last reply Reply Quote 0
                              • R Offline
                                rjsutton
                                last edited by 7 Jul 2014, 21:52

                                Hi
                                have tried scaling to 10 and x 100 and still freezes mid calc.
                                dont understand comment about making separate groups. From what in can see i have inadvertently joined both halves together BUT now i need to separate. They must be "touching" somewhere i would imagine to form " one component"
                                My ? is is there an easy way to separate apart from a complete redraw ?
                                thanks

                                1 Reply Last reply Reply Quote 0
                                • TIGT Offline
                                  TIG Moderator
                                  last edited by 7 Jul 2014, 22:47

                                  Work on a copy of the SKP.

                                  Make a copy of this 'joined' object.

                                  If it's a component use the context-menu item 'make-unique' on one of the instances - otherwise editing one would change the other!
                                  But there's no need for that step if it's a group, because editing a copy makes it unique automatically.

                                  Now Edit these two parts in turn.
                                  Use a fence to Select the unwanted parts and <delete> them.
                                  Use Erase tool to remove other parts as you need...

                                  Now you have two separate pieces... ๐Ÿ˜•

                                  TIG

                                  1 Reply Last reply Reply Quote 0
                                  • R Offline
                                    rjsutton
                                    last edited by 8 Jul 2014, 00:14

                                    Hi Make unique is not available. also comment "use a FENCE"....
                                    I am an absolute newbie at this and i dont think you re understanding what i need. The SKP is made of 2 halves 1 is a male form and 1 is a female form. at the moment they are supposed to be together with just a .3mm gap between them. This keeps them separate. Somewhere i have made a mistake and they became joined which to me means they MUST have a connecting point somewhere.
                                    This i cannot find. The two parts are to be machined complete with the curve that i cant get to work so that they fit tight together when finished.I cant separate so i cant edit!!!!
                                    its doing my head in.

                                    1 Reply Last reply Reply Quote 0
                                    • pilouP Offline
                                      pilou
                                      last edited by 8 Jul 2014, 00:48

                                      Make some copy, explode and kill on some copy that you don't want
                                      Like this you can rebuild some parts that you wish ๐Ÿ˜„

                                      coque.jpg

                                      Frenchy Pilou
                                      Is beautiful that please without concept!
                                      My Little site :)

                                      1 Reply Last reply Reply Quote 0
                                      • BoxB Offline
                                        Box
                                        last edited by 8 Jul 2014, 03:15

                                        You have quite a few problems in your modelling which are standard beginner error.
                                        You need to understand how to make groups and components so that your geometry doesn't stick together. You need to understand front and back faces, the default front face is white and back face is a blue/grey.
                                        Scale as Tig has mentioned several times is critical to tiny faces, there are already small faces missing in your model before bending it.
                                        You need to be able to see what you are working on so learn about hiding faces or section cuts so you can get inside.

                                        All of this discussion isn't really suited to this thread, shape bender isn't making the problem, your model needs to be corrected and you would do better getting into the newbie forum to learn more about the basics.
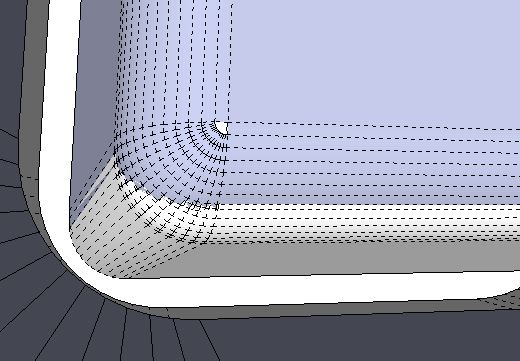
                                        In the image I have shown you one place where the two sections overlap. You need to get in there and make the model correctly.


                                        overlap.JPG

                                        1 Reply Last reply Reply Quote 0
                                        • TIGT Offline
                                          TIG Moderator
                                          last edited by 8 Jul 2014, 10:17

                                          If make unique is not available then presumably Entity Info reports it as being a Group.
                                          Then follow the steps outlined to copy the Group. and Edit those into the two parts...

                                          To Edit a Group double click it or select it and use the context-menu...

                                          When you Select things you can pick them individually, adding to the selection by holding Ctrl or removing them from the selection by holding Ctrl+Shift etc...
                                          Single click selects the picked object [e.g. an edge or a face], double clicking selects the picked object and everything immediately connected to it [e.g. a face and its bounding edges], treble clicking selects the picked object and everything thing connected to it [e.g. a face, its bounding edges AND all other geometry (edges and faces) which are connected to that face].

                                          You can also Select 'by fence'.
                                          Active the Select tool [from the menu or toolbar or by pressing <spacebar>]
                                          Then press the mouse button to the side of what you want to 'fence', and hold it down, then drag the cursor to one side and a dotted 'fence' appears.
                                          Finally release the button and everything in side the fence will be selected.
                                          Like other CAD programs the direction of the 'drag' affects the selection.
                                          Dragging Right to Left will select only objects that fall wholly within the fence, so any that straddle the fence are ignored.
                                          BUT dragging Left to Right will select all object that have some part within the fence, so even partial inclusion adds objects to the selection.
                                          Using the different drag directions is useful in making partial selections of some geometry, e.g. when deleting...

                                          This is SketchUp 101 ๐Ÿ˜•

                                          TIG

                                          1 Reply Last reply Reply Quote 0
                                          • 1
                                          • 2
                                          • 58
                                          • 59
                                          • 60
                                          • 61
                                          • 62
                                          • 63
                                          • 64
                                          • 60 / 64
                                          • First post
                                            Last post
                                          Buy SketchPlus
                                          Buy SUbD
                                          Buy WrapR
                                          Buy eBook
                                          Buy Modelur
                                          Buy Vertex Tools
                                          Buy SketchCuisine
                                          Buy FormFonts

                                          Advertisement