Cannot split a face, pls help
-
In case that last reply was confusing, the problem was that the line I was copying had broken into some tiny parts that I was unable to see, but the gap allowed the faces to connect. looking now for any advice on preventing issues with curved lines/faces in the future
-
I think I have seen what you are getting, but now I cannot make such a curve break up--even by drawing lines over it! The opposite problem! How was the original curved set of lines created? (P.S.: I don't know how it looks on your screen, but it would be easier to follow your images if you set the style on default material, as the materials are so dark in this case.)
-
There are a couple of strategies I use when I have exploded curves I need to weld. One of them is to use the recurve plugin but sometimes it doesn't work. If it doesn't, I double click on the face to select all of its bounding edges. Then I deselect face and edges at the ends that aren't part of the desired curve and run TIG-weld. It will weld one or the other of the curves but not both. I repeat the process to weld the other curve after deselecting the face, end edges and the welded curve. It's a multi step process but it is faster than selecting every single segment in the curve one at a time.
-
-
I appreciate all the replies!
Pbcot- I made the curve by making an arc. I took that arc, copied it, connected by lines, making a 2d parenthesis, then push/pulled to create a solid curved roof. I made large planes, and chopped the solid roof up, intersected faces, then deleted to make skylights in the roof. now I've got lots of lines that wont erase without taking a chunk of the roof face with it.
Dave, Pilou- I guess I'm gonna have to get some new plugins, I guess. I've heard of recurve, but also that it interferes with other tools, so I haven't dl'ed it. that curvizard tool looks awesome! Do you think if I get all the curves in the shape to weld, that I will be able to clean all the lines without losing geometry, or is that just something we have to deal with?I added illustration of the issue. Changed the framing color to contrast better, and painted the inner faces gray for clarity. I can safely delete the other 3 lines making up the square in the center without losing any faces, but they keep the effect from spreading when the offender is erased


-
Lines on a curved face cannot be deleted without losing parts of the face, they can be hidden or smoothed. You can use the eraser tool combined with ctrl to smooth them or with shift to hide them.
-
View > Hidden Geometry ON
You will see the offending 'hidden' line.
I suspect you have overlaid not-quite-coplanar faces ?
It might be hidden and/or soft/smooth - they have a different dot pattern?
Select it in Entity Info and change it as desired...
The right-hand part of the bottom of that frame must not be coplanar with the left-hand part.
Otherwise you would be able to delete the coplanar edge and the two faces would merge.
To fix the issue try selecting the 'hidden' line and Move it over the top of the one at the 'crux' which causes the face to vanish when deleted...
If that change makes the faces coplanar you should be able to delete the edge and the faces will merge.
It it's still flaky use Eraser+Shift to Hide the Edge, of Eraser+Ctrl to smooth it - although that second option might produce unexpected weird visual affects... -
For clean all lines not needed on a same plane of faces use CleanUp by Thomthom!

-
%(#008000)[
@box said:Lines on a curved face cannot be deleted without losing parts of the face, they can be hidden or smoothed. You can use the eraser tool combined with ctrl to smooth them or with shift to hide them.
]That stinks, but somewhat expected. So, given that each face will represent a texture differently, will smoothing or hiding cause the faces to render as one, or will they still, for instance, reflect light differently? And is there a diff btw smooth or hide, or will they render the same?
%(#008000)[
@tig said:View > Hidden Geometry ON
You will see the offending 'hidden' line.
I suspect you have overlaid not-quite-coplanar faces ?
It might be hidden and/or soft/smooth - they have a different dot pattern?
Select it in Entity Info and change it as desired...
The right-hand part of the bottom of that frame must not be coplanar with the left-hand part.
Otherwise you would be able to delete the coplanar edge and the two faces would merge.
To fix the issue try selecting the 'hidden' line and Move it over the top of the one at the 'crux' which causes the face to vanish when deleted...
If that change makes the faces coplanar you should be able to delete the edge and the faces will merge.
It it's still flaky use Eraser+Shift to Hide the Edge, of Eraser+Ctrl to smooth it - although that second option might produce unexpected weird visual affects...
]upon unhiding lines, I saw that it was dotted, while the offender is solid, entity shows smooth and soft. Tried moving it, but that just ruined the curve and I still couldn't delete it w.o losing (even more) face. Ctrl or shift with eraser both turn the solid line into a dotted line, can't tell the difference without ent. info, so not sure which is better
%(#008000)[
@unknownuser said:For clean all lines not needed on a same plane of faces use CleanUp by Thomthom!
]As you guys can see from the attached, I've got LOTS of lines to play with/weld to get this thing right, so if TT has a one shot cure-all, then I guess that's what I need for this
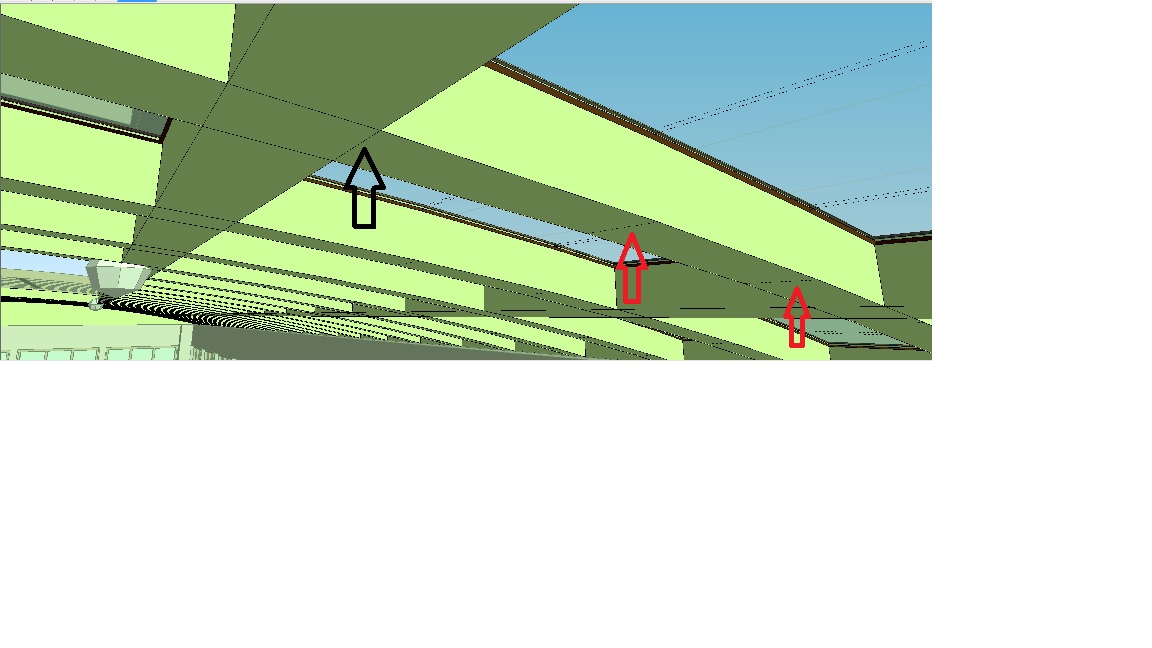
attached is the view of the original line (blk), and the two smooth lines (red) making up the curve spanning this window. I've got 120 skylights in this roof lol.
-
TT cleanup to remove coplanar (unnecessary) edges. Then smooth all with soften-smooth window--adjusting the setting to keep sharp edges sharp. I don't see a problem with texturing etc. What is the purpose of welding at this point?
-
Now we see the 'bigger picture'...

If an edge [solid/hidden/soft/smooth] is between two coplanar faces which are using the same material, then you can remove these 'Coplanar Edges' by using the Eraser tool on them [you need View > Hidden Geometry is ON to affect non-solid edges].
However, the bottom [and top] facets of your curved beams must have dividing edges between them to maintain the associated faces which have slightly different 'normals'.
These facets can be 'hidden' giving a sharp differentiation between the two face planes [like the facets of a gemstone] or 'soft/smooth' to give a graduated appearance [like the surface of a sphere].
Non-solid edges are no visible, and therefore not readily editable if View > Hidden Geometry is OFF.
You can change edges to be 'hidden' by wiping over them with the Eraser+Shift, or by selecting them and using the context-menu 'Hide' or ticking the equivalent Entity Info check-box.
If View > Hidden Geometry is ON you will see their appearance change to be 'dotted'.
To 'unhide' such an edge you must select it and use the context-menu 'Hide' or untick the equivalent 'Entity Info' check-box.To make edges 'soft/smooth' wipe over them with the Eraser+Ctrl, or by selecting them and ticking the equivalent Entity Info check-boxes [soft and smooth are usually used together, but used separately they give slightly different appearances].
If View > Hidden Geometry is ON you will see their appearance change to be 'dotted' [pattern differs from 'hidden edges'].
To 'unsoften/unsmooth' such an edge you can use the Eraser+Ctrl+Shift, or select it and untick the equivalent 'Entity Info' check-boxes: OR select the geometry [faces/edges] or a 'container' [Group/Component-Instance] and use the context-menu 'Smooth' dialog - this affects all edges forming two faces, and gives you control over applying to them soft/smooth, affecting coplanar-edges [i.e. angle between faces is 0º] and also the degree of 'smoothing' - you can use the slider to only affect edges between faces up to a certain limit so if it's ~60º solid edges are kept between clearly different angled faces, but those between edges with slight variation in their faces' 'normal-angles' are smoothed... -
%(#008000)[
@tig said:However, the bottom [and top] facets of your curved beams must have dividing edges between them to maintain the associated faces which have slightly different 'normals'.
you can use the slider to only affect edges between faces up to a certain limit so if it's ~60º solid edges are kept between clearly different angled faces, but those between edges with slight variation in their faces' 'normal-angles' are smoothed...
]Ok, I'll have to pay closer attention when moving the smooth slider, I've just been putting it all the way up and checking every thing. I see that I have very limited understanding of how most of what I do is accomplished, I'm surprised I've even gotten this far!
%(#008000)[
@pbacot said:TT cleanup to remove coplanar (unnecessary) edges. Then smooth all with soften-smooth window--adjusting the setting to keep sharp edges sharp. I don't see a problem with texturing etc. What is the purpose of welding at this point?
]I have an issue that's been driving me crazy when rendering, that the faces don't reflect the light how I want bc the faces have hard lines separating them. I want the roof to reflect like a curve, not a faceted diamond. I thought welding would stabalize the structure, allowing me to erase the offending lines. I tried welding the whole roof face, but that caused more problems, as whole squares welded together, not allowing me to select one edge, but a whole window opening on one click- not wjhat I want in this case, but an awesome plugin! Cleanup fixed tons of probs, and cleaned out tons of unused materials, but I think it also purged some mats that were in use on a small scale- this was well worth it to me, as there were so many trash materials that twilight wouldn't even attempt to list them!
I've gotten great info from you guys, but I think I've gotten far enough off the original topic for now, I guess it makes more sense to start a new thread relevant to my next question or issue. Thanks for all the helpful replies!
Hello! It looks like you're interested in this conversation, but you don't have an account yet.
Getting fed up of having to scroll through the same posts each visit? When you register for an account, you'll always come back to exactly where you were before, and choose to be notified of new replies (either via email, or push notification). You'll also be able to save bookmarks and upvote posts to show your appreciation to other community members.
With your input, this post could be even better 💗
Register Login


Advertisement