Adding thickness to a curviloft skin
-
Hi Dukejaz,
Thank you for the speedy reply.
No I don't think its a volume yet, its just a skin/surface with no thickness.
I will try the copy, scale method you explained (I'm on a Mac) and see if that works.
I assume from what you said that scaleGroupFloat_dj Ver 1.6.5 wont work on the mac OS.
Here is the skp file. One thing I didn't mention in my first post was that I have already scaled the whole thing up by a factor of 10 as I was trying to use Soapskin Bubble at first and was getting strange results when working at actual size.
As such I am in fact looking to make it 20mm thick in the current file.Thanks again.
Nick
-
A couple of quick notes, your model is huge for what it is.
Basically too many segments in your curves. Simplify the curves and many problems will be solved.
Secondly even though you have scaled up by a factor of 10 it is too small. Go up another ten and it's easier to work with.I have taken the various groups from half of your shape,reversed the faces as neccessary so the are all white one side and blueish on the inside, exploded them and softened the edges thus creating half of your shape as one piece. This then will joint push pull happily (at the 10x scale) producing a thickened component that you can copy and mirror.
I have then reduced it back to you size although I think you want to go down another factor of ten.
I have attached it, but it isn't what you want. I didn't do the thickening to your specific size, just what it would do as it brought my computer to it's knees. You need to create the curves of your mesh better, less segments and more uniform so that curviloft produces a better shape. I prefer Tig's extrusion tools but that is beside the point.It's worthwhile posting an image of what you want to achieve if you have one, as sometimes what we see isn't what you get. ie: there is more than one way to skin a cat.
-
-
I was bored, and the, shall we say, less than spectacular, Huge sketucation banner ads drew my attention and I thought I'd play with the icon. I can happily animate all the versions I created if you want, might need a seizure warning tho.
Edit: A quick chop of my blurry av to snip. Build the text in 3D and a nice ribbon, it's all about showing the goods of going premium isn't it.

-
And don't forget to switch to thickening method (tab -> options) ...
-
Hi Box,
Thank you for taking the time to have a look at my problem. This is all great advice and will help me learn how to approach this sort of thing the right way. I guess the reason my curves were too complex was because I added in too many point to try and create the shape I was after. I ended up using bezier curves to do this. Once you have the shape you want is there a way to combine the segments into a simpler curve?
Interesting point about needing to scale it up by another factor of ten, I will try that.
I originally built it as a half of the whole shell, the same way you have done, and then mirrored it and joined it. I also tried to explode and soften all the edges but when I tried it it seemed I had to select each tiny line one at a time to get the soften action to have an effect (the line went from solid to dashed) I couldn't select multiple lines and soften them together, at least, they didn't go dashed if i did it that way.
I tried to turn it into one face by erasing the formers but it just ended up erasing a whole panel. I thought that to join two separate faces you simply removed the joining line. The idea being that if it was one face I could apply the Joint Push Pull to it in one go and not get the gap problem shown.
As for the reversing the faces to make the colours white on the inside, blue on the outside, you have shed light on another thing that was puzzling me. I had no idea why some were one colour and some another, thanks.
I will have another go and apply all the point you have raised.
Once again many thanks for your time and help.
Nick
-
-
 Quick look at using TIGs extrude tool and offset for thickness.
Don't know which is best for your effort.
TIG has a new smart off set tool which maybe better than default one since it is problematic at times. -
Hi Mac1,
Thanks for that, will see how I get on but might take a look at TIG anyway. There seem to be so many plugins out there, its sometimes hard to find the right one first time.
Thanks again to everyone for your help and advice. Much appreciated.
Nick
-
I didn't see this post till just now, it's one of those first 3 spam post oddities, when it's been reviewed and allowed by a mod it slips in quietly.
@nickjguy said:
Hi Box,
Once you have the shape you want is there a way to combine the segments into a simpler curve?You can specify the number of points a few ways. One easy one since you have the bezier plugin, right click and select "convert to" - "Polyline Segmentor" and choose a number there. This can be quite handy for making lines more uniform. You want the plug in "weld", it fuses lines together making them one Curve, even if they aren't a curve in the traditional sense. Eg; 1 straight line, right click and divide it into two then weld it and it will be recognised as a curve. http://www.smustard.com/script/Weld Often plugins need curves and this way you can have a straight line curve.
@unknownuser said:
Interesting point about needing to scale it up by another factor of ten, I will try that.
The reason for this is SU has problems creating tiny faces, once created they work fine so you can scale back with no problems. But if you are working down the small end, snap to and accuracy settings need to be changed to get the best results. I find it's easy to simply work with things on the bigger side and scale down when finished. Easy to use 1m instead of 1mm or 1cm. Of course the reverse is true when you are working with KMs, it doesn't handle huge faces well either.
@unknownuser said:
I also tried to explode and soften all the edges but when I tried it it seemed I had to select each tiny line one at a time to get the soften action to have an effect (the line went from solid to dashed) I couldn't select multiple lines and soften them together, at least, they didn't go dashed if i did it that way.
There are several ways, one is to select all and right click, soften. Then adjust the settings in the softening window. and a tip, use the eraser and ctrl to soften lines and shift to hide lines.
@unknownuser said:
I thought that to join two separate faces you simply removed the joining line.
If it's not planar you need to soften/hide it rather than remove it.
@unknownuser said:
As for the reversing the faces to make the colours white on the inside, blue on the outside, you have shed light on another thing that was puzzling me. I had no idea why some were one colour and some another, thanks.
You can change the default colours but standard is white outside blue inside. It does make a difference, so make it a standard practice and you'll avoid many of the problems others need to solve.
-
Thanks for answering all my points Box .
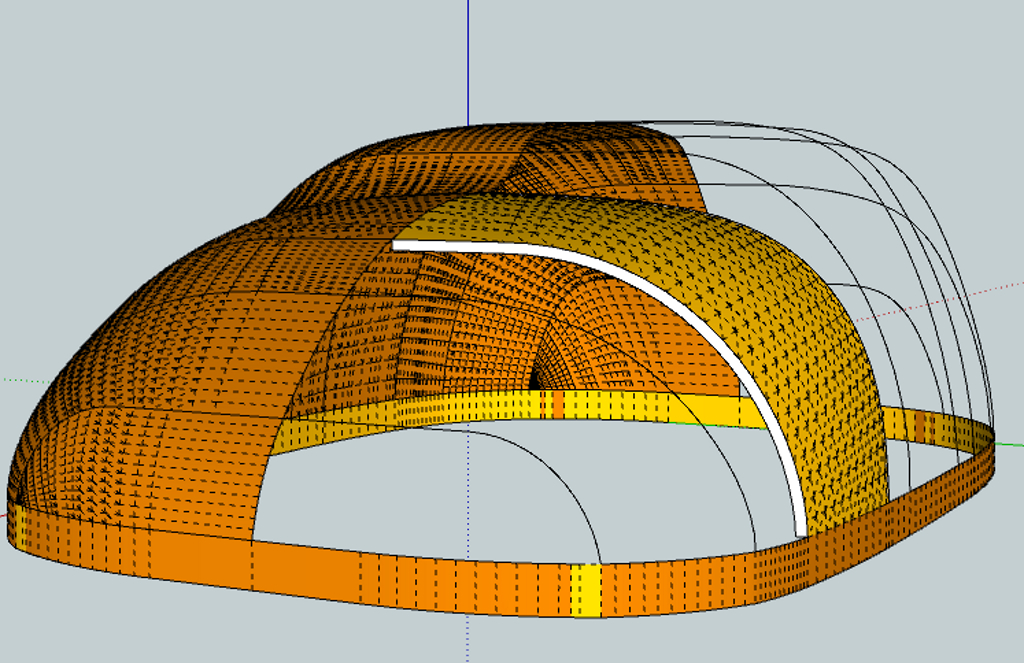
I had managed to use the method suggested by Dukejazz of copy and then scaling (that was before I had seen your first post). The next problem was that I needed to add a lip all the way round the inside and ultimately fuse the two together. However, What I have created just doesn't seem to want to be a solid. I have Softened/smoothed all the lines and it seems to select as one surface now. There seems to be a surface closing the gap between the two shells. I have selected the whole thing and made it a Group but still get the message about one or more components not being solid.
Any tips or ideas on what might be going on here?
Think I might go back a few steps and re draw the shell with simplified curves as per your suggestion and see if I can get it looking a bit better. Be nice to smooth out some of those ridges...


-
Solids can be problematic and I rarely work with them myself.
There are a couple of plugins to help find problems with them.
Solid solver is one that springs to mind, but there are others.Just looking at your image the bottom surface looks blue, is it? I think if you have faces the wrong way around it won't create a solid.
Change your view to monochrome and make sure it's all the right way round. And see if you can spot any holes or loose geometry. It could be something as simple as a tiny line.

Hello! It looks like you're interested in this conversation, but you don't have an account yet.
Getting fed up of having to scroll through the same posts each visit? When you register for an account, you'll always come back to exactly where you were before, and choose to be notified of new replies (either via email, or push notification). You'll also be able to save bookmarks and upvote posts to show your appreciation to other community members.
With your input, this post could be even better 💗
Register Login


Advertisement