How to Turn Non-Coplanar Lines Into Surface
-
Hi,
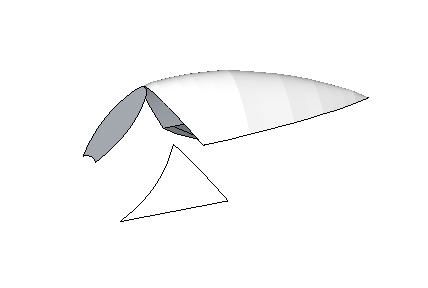
I'm in the process of building an airplane canopy, as shown in the picture below:
As shown, I've created a non-coplanar wedge that so far is just lines. It and a mirror copy on the other side are intended to fit between the canopy and the flat windshield piece.
My question is, what is the best (easiest) way to convert a non-coplanar set of lines like this into a surface that can be painted to simulate transparent glass?
I have the set of extrusion-tool plug-ins but haven't quite figured out how to use them for this application. Any other plugins that I would want for this?
Thanks,
Bill -
There are several plugins but you will need to fill in the missing 3d info in some way or accept what they may be able to generate for you, or edit it later. I have not tried the bubble inflating one. Look for it in the visual index http://forums.sketchucation.com/viewtopic.php?f=323&t=16909 and also in the 'must have' thread. Fredo's curviloft has several routines that you may have a go with. http://forums.sketchucation.com/viewtopic.php?t=28586
-
Thanks, Brookefox. The Must-Have thread, with its animations, is great.
I'll give some of them a try.
I'm a little nervous about Curviloft because of its beta status and warnings about potential crashes. But I suppose I can always uninstall it if problems occur.
Bill
-
Fredo is ever cautious...
His CurviLoft is in some respects superior to some of my EEby... tools.
I recommend you try it...
If you save before trying any such tool [ALWAYS recommended], then the worst you'll get is a crash and having to reopen the saved SKP to try again... -
Well, I successfully installed and opened Curviloft.
While trying various options in the Skinning mode (I assume that's the one I should be using), I did get it to apply a mesh once, although the mesh it applied misinterpeted what I was trying to do. More importantly, I haven't been able to replicate making the program work. That is, I go through the steps, described below, but nothing happens. (The one time it did work, I was trying all sorts of things, and I don't know exactly what made it work.)
So, I have a few newbie questions. The first general one: Is there a well-documented set of instructions or tutorial for the Skinning feature somewhere?
Then, more specific questions:
I tried to apply the brief author guidelines but generally without success. Working on the wedge shown in my initial post, I:
-
Clicked on the Skinning of Shapes icon.
-
Clicked on the <--> button.
-
Selected the three edges, one at a time. Each time, the edge turned to a yellowish color. After that, the mouseover popup said, "Click to validate contours." When I left-clicked, the edges turned from yellow to blue.
-
After the lines changed color, the mouseover popup message was "Transition." Next, following the author's direction--"Then click again in the empty space to generate the preview shape"--I did that, left-clicking. That action didn't appear to do anything. What does "Transition" mean.
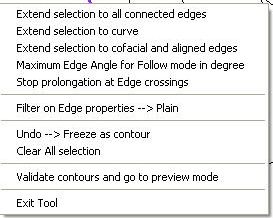
Of course, right-clicking opens a contextual menu with many options (see below). I haven't seen these explained anywhere. Are they? If so, where?

Could someone suggest which of these options I should use?
And what am I doing wrong that is not generating the mesh?
I went through the same steps selecting the button that has arrows going four different ways, instead of the <--> one. Still nothing. I tried clicking on various options on the contextual menu. Nothing.
Thanks for any help you can give.
Bill
-
-
@unknownuser said:
My question is, what is the best (easiest) way to convert a non-coplanar set of lines like this into a surface that can be painted to simulate transparent glass?
This is such a small area. Have you tried filling in the base arc with lines or curves then drawing in the rest by hand? for "easy"
I also tried use Sandbox, use contours, but I can't say the shape is great with only 3 sides. If you add a middle vertical arc rib perhaps. After From Contours you have to turn on hidden geometry and erase excess edges. Then use Flip edge to rearrange the stitching. Doesn't take that long and easier, compared to fussing with a plugin, if you don't need the improved geometry. Or maybe you just want to use this to learn the plugin.
Whatever it looks like a narrow space at the top and more detail (points) may be needed to get a smooth finish there.
-
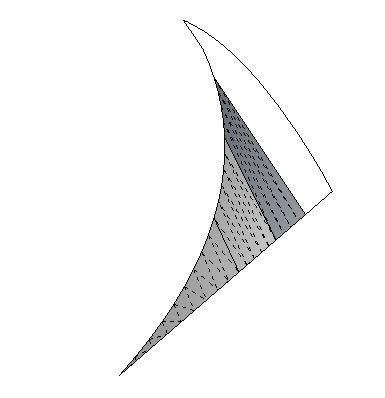
Update: So, I drew lines to divide the wedge into four zones. Then, I tried to apply the skinning feature to each zone individually. It worked great on the first three zones (see below). I turned on View Hidden Geometry to better show the shape:

But it wouldn't work on the fourth zone. Any thoughts as to why? Is the curve too extreme at that point? Is there a setting I need to change?
(Just for the fun of it, I tried adding another section onto the uncooperative zone, to see if that would help. It didn't.)
Further Update: P.S. to this post: I added another line, making another zone. The final segment still didn't work. So, I traced lines over the final segment, and that tracing did convert. So, I think I have something I can use. Still would like any thoughts on why that last segment kept refusing to convert.
Thanks,
Bill -
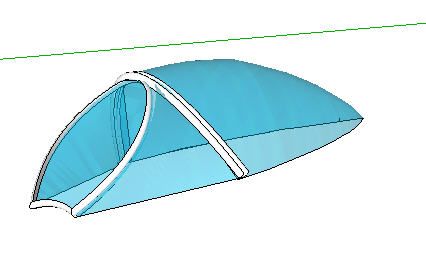
Thanks to everyone's kind assistance, I've been able to build a serviceable canopy for the '50s era F-80 jet fighter that I'm building. I wanted to share the results:

The framework is courtesy of the Extrude Edges by Face plugin.
I'm building the jet as a static-display model to export to X-Plane. I chose SketchUp over other CAD options because I am new to 3D modeling and was told SketchUp was easier to learn than programs like Blender. I was also told it isn't as powerful as some other CAD programs, but I have to say that the core program plus all the plugins plus the excellent support on these forums was more than I had expected.
After working with Adobe Illustrator for several years, moving from 2D to 3D is like going from Kansas to Oz.
Thanks again for all your help. This project, my first 3D effort--I've been at it all of a week--has been a remarkable adventure.
Bill
-
Sorry, double post--
For some reason I have lost the "delete post" function, but I can edit it.
-
Can't say for sure without the model, but it seems like there was just a tiny gap, since tracing over made it close. There are occasions faces will not form and the cause is indiscernible. If you use a setting sometimes for modeling that shows dots at the endpoints, it can be helpful in finding and inspecting or using intersections. It looks like some of your canopy has hidden lines not smoothed, where you see a break in the shading. You should smooth those lines for a better effect.
Good job. If you look at posts where wire frame (or hidden geometry) is shown for organic modeling (like cars) you will see examples of how the edges within the smooth forms are laid out (often by plugin, but also by "hand"). The Speed modeling competition always shows wire frames, also the "Artisan" examples.
Hello! It looks like you're interested in this conversation, but you don't have an account yet.
Getting fed up of having to scroll through the same posts each visit? When you register for an account, you'll always come back to exactly where you were before, and choose to be notified of new replies (either via email, or push notification). You'll also be able to save bookmarks and upvote posts to show your appreciation to other community members.
With your input, this post could be even better 💗
Register LoginAdvertisement


