[Plugin] Honeycomber
-
Copyright 2012 - 2017 TIG (c)
Permission to use, copy, modify, and distribute this software for
any purpose and without fee is hereby granted, provided something the
above copyright notice appear in all copies.
THIS SOFTWARE IS PROVIDED "AS IS" AND WITHOUT ANY EXPRESS OR
IMPLIED WARRANTIES, INCLUDING, WITHOUT LIMITATION, THE IMPLIED
WARRANTIES OF MERCHANTABILITY AND FITNESS FOR A PARTICULAR PURPOSE.TIG-Honeycomber.rb
Makes a new Extension which loads TIG-Honeycomber/TIG-Honeycomber.rb
Requires the subfolder 'TIG-Honeycomber' to be in the same folder as this
.rb file, with its contents, which are used to create the main toolset, to
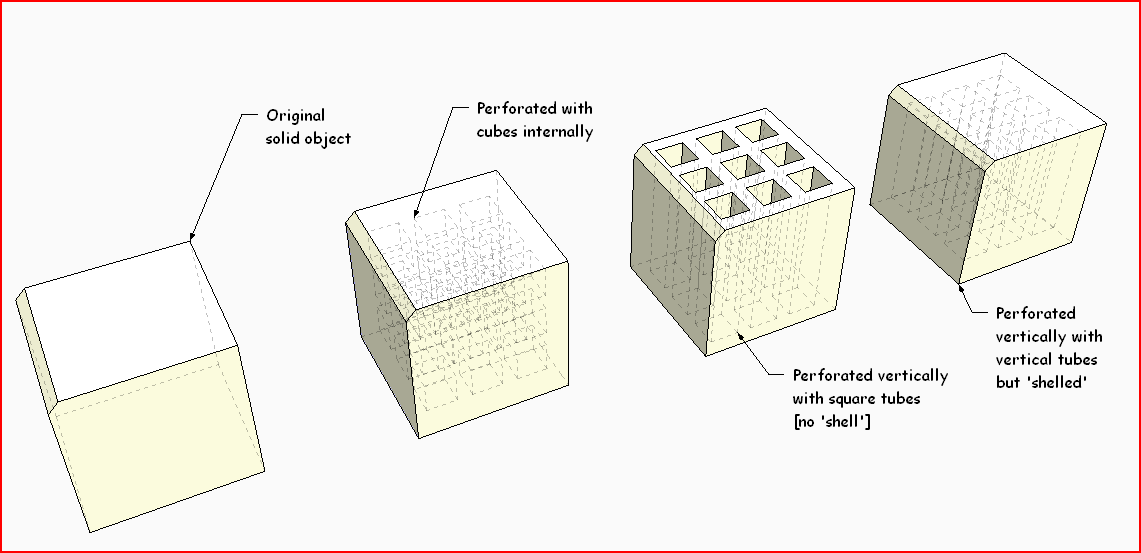
make perforations, add the toolbar etc.Perforates a selected 'solid' group/instance in various ways.
It is for >= v8-Pro users only.
It perforates a selected 'solid' group/instance in various ways.
Useful when working with solid 3d objects that are to be 3d-printed.
Removing unneeded internal volumes will reduce the amount of material
used and lower the cost. The strength can be maintained by leaving some
internal structure in place to support the outer 'shell'.
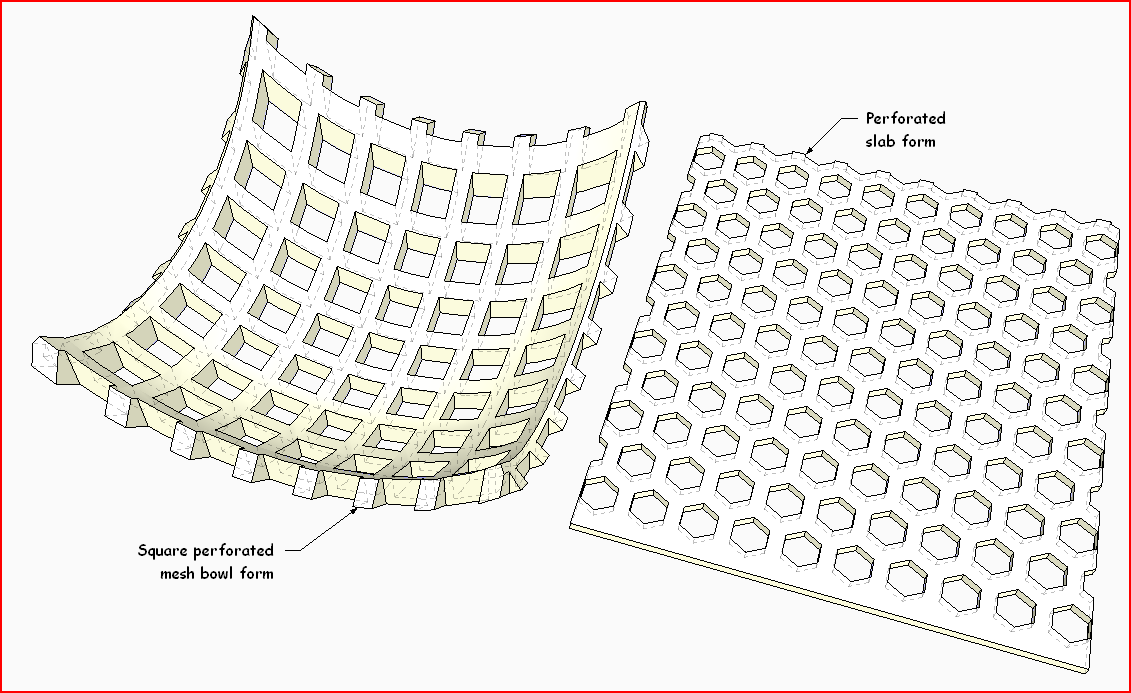
You may also want to perforate objects for special effects, like a
honeycomb or mesh, or a pierced bowl etc...
The minimum allowed dimensions match those used by most 3d-printers.Usage:
Preselect one Solid Group or Component-Instance.Ruby Console: TIG::Honeycomber.new()
Tool Menu: TIG::Honeycomber
View Toolbar: TIG::HoneycomberIf the selection is unsuitable or a non-solid there are error messages.
Otherwise a Dialog asks for the:
"Structure:"
This determines the 'structure' of the perforations.
"Comb"
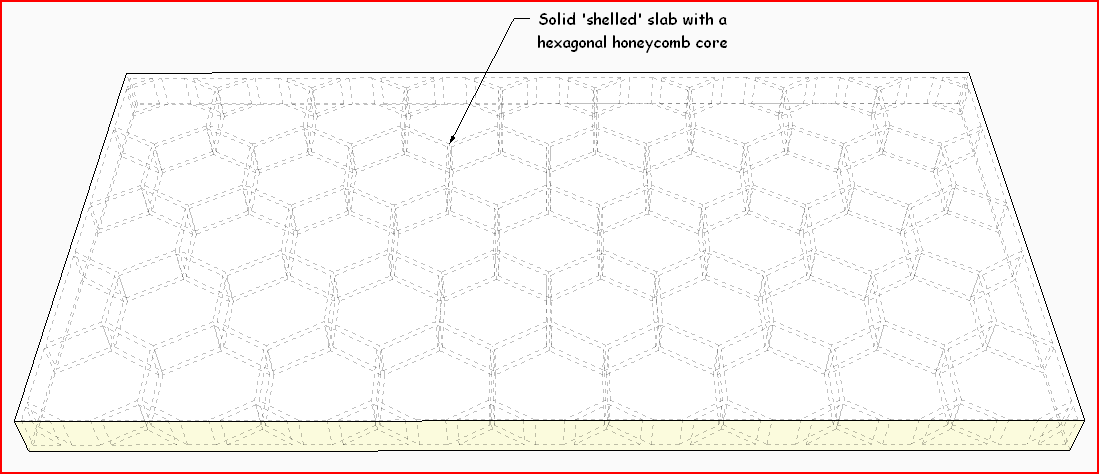
= A set of 'honeycomb'-like cells extending throughout the height of the
object, constrained by the chosen 'Type' and other settings..."Foam"
= A matrix of 'bubbles' in 3d, extending throughout the object,
spaced evenly, constrained by the chosen 'Type' and other settings...#######
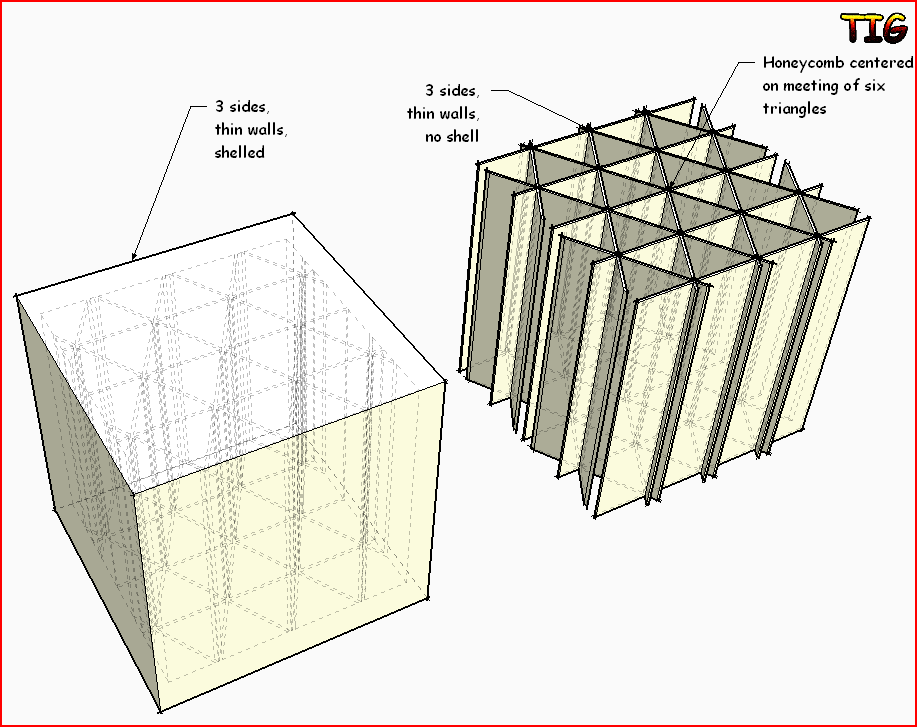
"Sides"
3 = Equilateral Triangular Prism
4 = Square Cube - initial default
6 = Hexagonal PrismNote that other shapes like Pentagons [5] will not tessellate at all,
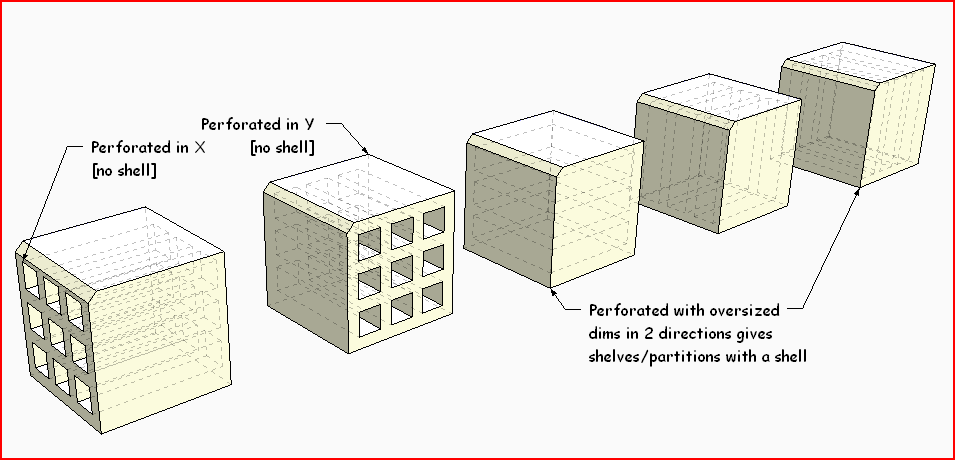
and so they are not included as options."Size X"
"Size Y"
"Size Z"These are the overall sizes of the perforating form in 3d [X, Y and Z];
in current units; they initially defaults to 1"/25mm; the minimums are
0.025"/1mm [to suit the miminums for most 3d-printers], adjust to suit.
Normally you will want the values to be the same.
of the triangle's enclosing bounds in plan,
the depth [y] of the triangle's enclosing bounds in plan,
which is the entered valuesqrt(3) to account for the
triangular honeycomb having 'staggered' cells.
the height [z] of the hexagon's enclosing bounds.
When Sides=4 = the x/y/z sides of the rectangle/square in 3d.
of the hexagon's enclosing bounds in plan,
the depth [y] of the hexagon's enclosing bounds in plan,
which is the entered valuesqrt(3) to account for the
honeycombs having 'staggered' cells.
the height [z] of the hexagon's enclosing bounds."Wall X"
"Wall Y"
"Wall Z"These are the thicknesses of the 'solid' walls between the perforations.
They cannot be less than 0.005"/0.5mm [to suit the miminums for most 3d-printers]- initial default is 0.025"/1mm.
Normally you will want the values to be the same.
If the 'Sides' = 3 the Y value applies to walls aligned with X axis and
the X value applies to all other non=X-axis angled walls.
If the 'Sides' = 6 the X value applies to walls aligned with Y axis and
the Y value applies to all other non=Y-axis vertical walls.
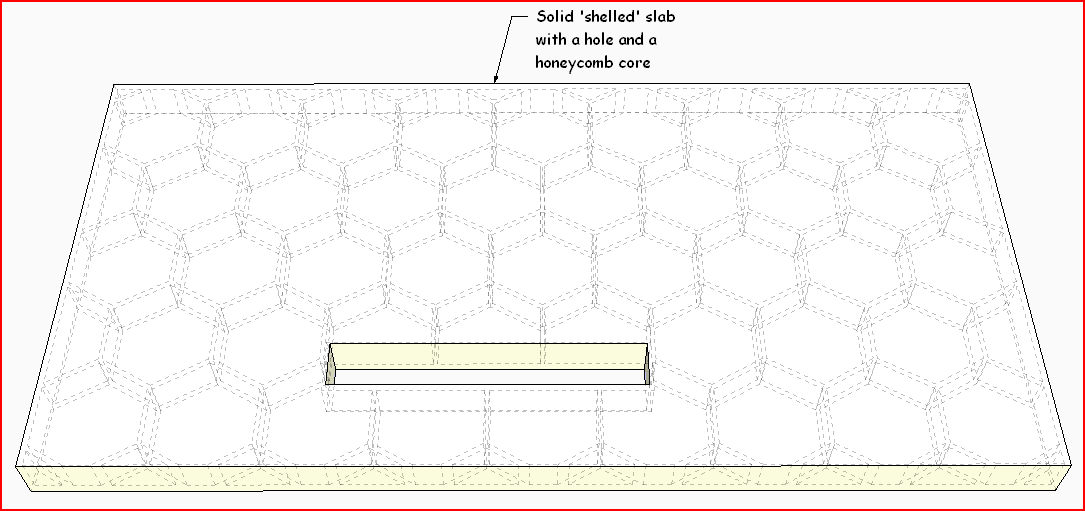
"Shell"
0 [the initial default '0' gives NO SHELL]
= Perforated across the whole object, includes partial 'scoops' out over
the object's surfaces.
Making a 'perforator' which is greater than the object's X or Y or Z
bounds in that axis will 'Punch' any surfaces intersected in that axis, but
it may leave a partial 'shell' or 'scoops' on other axes.
With 3 or 6 'Sides' the 'bubbles' are more likely to result in 'scoops'
because they have a staggered offset in their rows.OR
= 0.005"/0.5mm [sizes smaller than this [but NOT 0] will default to this
minimum value - set to suit the miminums for most
3d-printers]= Perforated across the object, BUT leaving a full 'Shell' in 3d around it:
so there are no 'scoops' on the original object's surfaces.Making the perforating 'bubble' dimensions bigger than the object's X or Y
or Z bounds for just one or two dimensions will make elongated perforated
forms where the 'bubbles' leave internal beams/struts or plates/walls
within the Shell.
Using a Shell thickness that is greater than half the object's bounds will
result in no Shell being made, and perhaps result in errors.
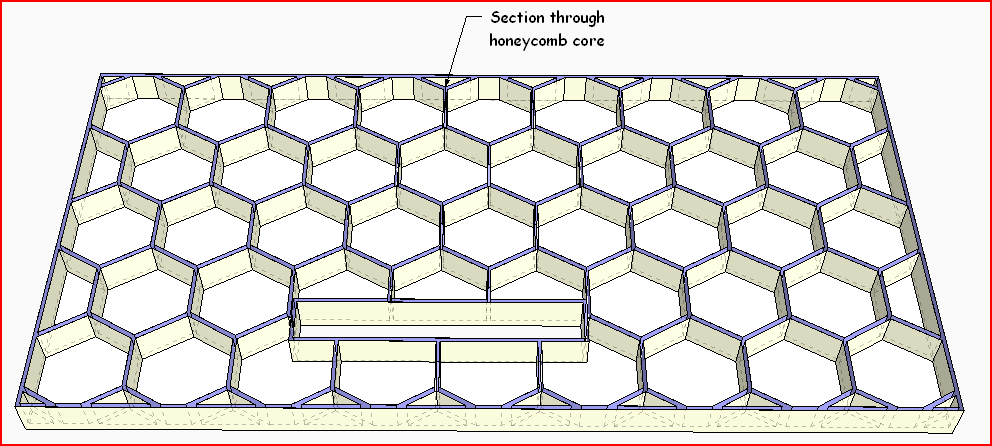
The Shell should be formed reproducing 'holes' in the original form.
Tiny chamfered edges etc in the original form that would produce a twisted
shell-form with reversed faces etc are trapped in the Shell's formation.
For simple cubic forms the Shell's thickness will be as you have specified.
However, because of the limitations in making complex planar offset
geometry internally, with convoluted forms the Shell's thickness can be
considerably less than the specified thickness - but if so, you can always
'undo' and rerun the tool with a greater thickness, that approximates to
your requirements.If you set the Shell > 0, with 'XYZ Sizes' ALL larger than the object's
overall size, then the result will be made into a simple hollowed 'Shell''###########
NOTES/TIPS:
Xray mode is automatically activated when the tool runs.
View in Xray mode or cut a Section or Back-Faces ON to see any internal
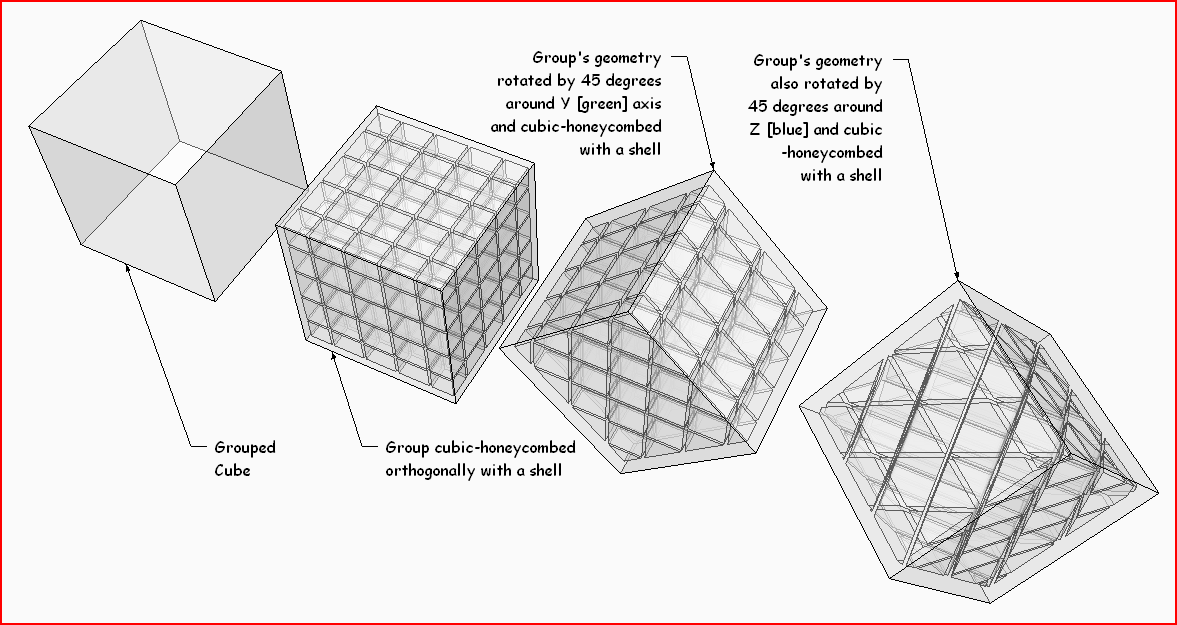
perforations of 'shell' structure...'Cubic' perforations can be sized in any axis; however, all other [3 or 6
sided] perforations are made oriented in the Z/blue axis.
The perforations' matrix is centered on the object's bounding-box.
The setting-out point for 3 sides is the notional point where six triangles
meet; with other numbers of sides it's the center of the perforator shape.
The perforations are arranged orthogonally to the object's bounding-box,
If angled arrangements are desired then rotate the object around the Z/blue
axis before using the tool.The tool Scales the object up by x100, processes it and scales back down
afterwards to avoid 'small facets' issues that could lead to non-solidity.With some objects certain permutations of dimensions etc can result in
failures to intersect parts of the form and produce a 'non-solid' result.
If so you are told in an error dialog. The entire operation is aborted.
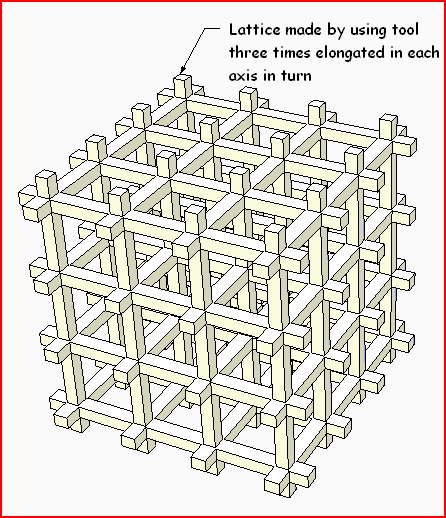
Using slightly different values will usually give a satisfactory result.To make a 'latticework' of beams and posts in the 3 axes punch 4-sised
forms bigger than each axis, repeated three times. Note that you should
make the hole size say 1mm smaller and the wall size 1mm bigger for the Z
punching because intersecting forms makings a 3d-cross will often fail to
work satisfactorily.Please use sensible dimensions for the perforations - thousands of very
small holes in a very large object will take a looooooong time to process.Be patient: a lot of perforations take a lot of time to intersect...
Save the SKP before using the tool in case there's a rare Bugsplat!
Donations:
By PayPal.com to info @ revitrev.orgVersion:
1.0 20120330 First issue.
1.1 20120411 Undo glitch fixed.
1.2 20120411 3-sided option added.
1.3 20120415 Speed improve by ~4x; minor glitches fixed.
2.0 20170514 Updated for newer versions...Plese always use the latest RBZ available from the PluginStore
https://sketchucation.com/pluginstore?pln=TIG_Honeycomber - initial default is 0.025"/1mm.
-
Here are some examples

-
oh.. I can see uses.. but.. can you make it Quad the Ngons between cells as an option? I can really use this, but I'd have to fill those edges in for export...
-
I think this plugin is the ultimate answer to my question in this topic, so I am especially grateful!

-
-
Cool for the beekeepers!

-
After installation, can not find the location of the plug-in, the menu does not show
-
It's an Extension...
You must activate it [once] from the Window > Preferences dialog.
Once activated it has a toolbar activated from View > ToolBars.
Its menu item is then also found under the 'Tools' menu.

-
@tig said:
It's an Extension...
You must activate it [once] from the Window > Preferences dialog.
Once activated it has a toolbar activated from View > ToolBars.
Its menu item is then also found under the 'Tools' menu.
View --- the window did not
-
-
@guanjin said:
@tig said:
It's an Extension...
You must activate it [once] from the Window > Preferences dialog.
Once activated it has a toolbar activated from View > ToolBars.
Its menu item is then also found under the 'Tools' menu.
View --- the window did not
Your translator is too cryptic!
the Sketchup menu Window > Preferences dialog... is there an item for TIG::Honeycomber?, if so 'tick' it...
If not then check that you have these...
TIG-Honeycomber_loader.rbfile in the Plugins folder, and a subfolder named
TIG-Honeycomberin the Plugins folder, containing the main file
TIG-Honeycomber.rband several 'fret' .SKP and .PNG files, which are needed to make the tool work...

-
Thank you, TIG, the problem has been solved, thanks again
-
@tig said:
@guanjin said:
@tig said:
It's an Extension...
You must activate it [once] from the Window > Preferences dialog.
Once activated it has a toolbar activated from View > ToolBars.
Its menu item is then also found under the 'Tools' menu.
View --- the window did not
Your translator is too cryptic!
the Sketchup menu Window > Preferences dialog... is there an item for TIG::Honeycomber?, if so 'tick' it...
If not then check that you have these...
TIG-Honeycomber_loader.rbfile in the Plugins folder, and a subfolder named
TIG-Honeycomberin the Plugins folder, containing the main file
TIG-Honeycomber.rband several 'fret' .SKP and .PNG files, which are needed to make the tool work...
TIG:
I tried your plugin loaded exactly as described above (Mac OSX SU
but it would not load properly. It 'partially' loads by placing both TIG-Honeycomber_loader.rb and TIG-Honeycomber.rb outisde of the TIG-Honeycomber subfolder ... however the toolbar shows no icon. When activated, I get a pop-up window with this message:"TIG::Honeycomber:
SKP missing from folder 'TIG-Honeycomber'!
Exiting..."
Dragging the four (4) .skp files and the two (2) .png files outside of the TIG-Honeycomber subfolder, allows the tool to load properly. However once activated, the tool does not seem to work properly.
-
SUFractal
You have totally mis-installed the tool.If you upZIP and move the files exactly as explained in the usage notes [keeping files in their subfolder] OR even better use the new RBZ automatic installer [or Thomthom's even easier SimpleInstaller that's based on it] then it should work faultlessly.
Remove all of the files and the subfolder you've currently messed up
/TIG-Honeycomber TIG-Honeycomber_loader.rb TIG-Honeycomber.rb fret_4b.skp fret_4r.skp fret_6b.skp fret_6r.skp fret-16.png fret-24.pngNow reinstall the toolset properly, as the download page clearly instructs...
You MUST end up with ONE .rb file in the Plugins folder, named
TIG-Honeycomber_loader.rb
and a subfolder inside the Plugins folder, named
/TIG-Honeycomber
which contains ALL of the other files -
TIG-Honeycomber.rb fret_4b.skp fret_4r.skp fret_6b.skp fret_6r.skp fret-16.png fret-24.png
The 'loader' makes the Extension which in turn refers to the main .rb file inside the subfolder.
When the tool's Extension is activated from Preferences it loads and makes the 'Tools' menu item for that tool, and a 'Toolbar' for it that will probably also needs activating...Please make sure you install any set of scripts carefully, completely as instructed...
Ignoring the advice is a sure fired way to break Sketchup.If you do mess up you must always remove the files from the wrong places as they will continue to do weird things too...
The new Preferences > Extensions 'installer' button for v8M2 automatically extracts files from the .RBZ archive and puts them into the right places inside the Plugins folder, keeping subfolders intact etc... It was specifically designed to avoid these basic errors some users, such as yourself, seem to be able to conjure up... Because it's a v8pro only tool and v8M2 is a improvement I can't see why you aren't using it already - although looking at the download numbers many are still opting for the olde ZIP archive and manual install...
-
Hi TIG,
I'm testing the plugin on Mac OSX 10.6.8 & SU 8 and the plugin doesn't work, it appears this error in Ruby Console window

-
Hello TIG
Thanks again for another amazing plugin. Seems I haven't been able to get this one working.
I followed the install instructions. Activated the extension. I can see "TIG::Honeycomber" on the tools menu, but can't see nothing on the toolbar.
Issues: When I run the tool, (select a group or component) it just prompts the main parameters dialog. It does not prompt what you say on the tool description
(structure, foam, comb menus). I kinda runs (turns to xray mode and the shell parameter does works) but it doesn't do anything else... no geometry population, nothing.also i noticed that i don't have any file called "honeyFOAMER" as you describe... all the files in the installer folder refer to "honeyCOMBER" not FOAMER
(i am using skp8 on bootcamp but i've never had any trouble with your plugins before)
i'd really appreciate your help because i'd rally like to play with this jewell
and THANKS AGAIN for such great workbest regards
-
@oxer said:
Hi TIG,
I'm testing the plugin on Mac OSX 10.6.8 & SU 8 and the plugin doesn't work, it appears this error in Ruby Console window
[attachment=0:h2gpf8qe]<!-- ia0 -->Error.jpg<!-- ia0 -->[/attachment:h2gpf8qe]
Oxer !
The correct path for MAC Plugins is in the Root Library tree, NOT the User one...Something is seriously adrift here.
Line #599 reads
rayt=@model.raytest([zcent, Z_AXIS], true)
where
zcentis a point3d
Z_AXISis a vector
truesays to ignore hidden objects.
Where's the 'float' issue arising...
Try reinstalling it properly.
Do not edit it etc before installing in case it's been corrupted in some way...
I suspect that something is up with your SUp installation otherwise. -
@juanjo said:
Hello TIG
Thanks again for another amazing plugin. Seems I haven't been able to get this one working.
I followed the install instructions. Activated the extension. I can see "TIG::Honeycomber" on the tools menu, but can't see nothing on the toolbar.
Issues: When I run the tool, (select a group or component) it just prompts the main parameters dialog. It does not prompt what you say on the tool description
(structure, foam, comb menus). I kinda runs (turns to xray mode and the shell parameter does works) but it doesn't do anything else... no geometry population, nothing.also i noticed that i don't have any file called "honeyFOAMER" as you describe... all the files in the installer folder refer to "honeyCOMBER" not FOAMER
(i am using skp8 on bootcamp but i've never had any trouble with your plugins before)
i'd really appreciate your help because i'd rally like to play with this jewell
and THANKS AGAIN for such great workbest regards
Sorry about my typo - of course I meant "Honeycomber" [I've corrected the original post!] - during development this tool has been called 'Fret', 'Honeyfoamer' and eventually 'Honeycomber' - so I'm easily confused... the 'fret' name remains for the subfolder's skp/png files...
TheTIG::Honeycombertoolbar is in the View > Toolbars menu...
Make sure you only have the 'loader' file in Plugins and everything else inside the subfolder...
Do you have a TIG-Honeycomber folder in the Plugins folder containing two png files - these are needed for the toolbar creation, and the four skp files loaded as objects to be subtracted from the selected thing...
IF you make the size of the 'perforators' bigger than the original object then, as explained in the notes, the object is NOT honeycombed as there is nothing to 'boolean', if you included a 'shell' dimension then that is done [provided that is not dimensioned so large that nothing can be 'booleaned' either].
How large is the xyz of the object to be honeycombed?
What are the xyz sizes/walls specified?
To test it, make a 4" cube, with a thin shell, and 1" perforator cubes [with thin walls in xyz]...
You should get this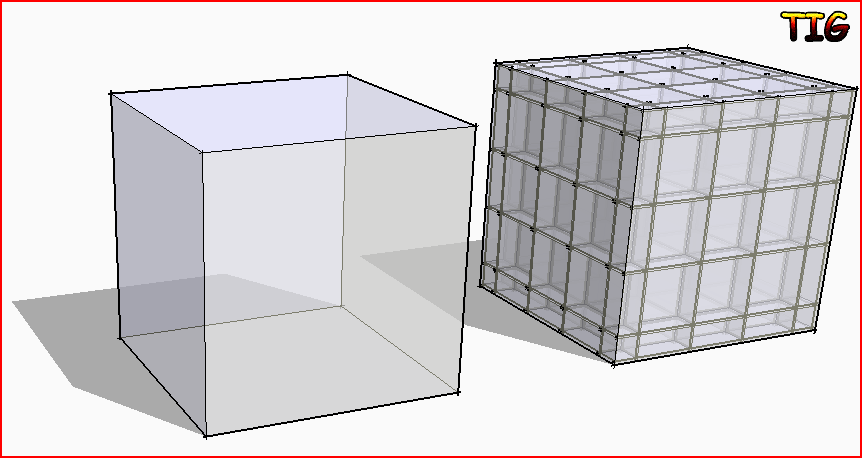 Do you get any messages in the Ruby Console etc... ?
 -
Hi again,
I have downloaded the plugin again and i reinstalled it in the Root Library, the same ruby console error. I probed to uninstall the rest of the plugins, perhaps it had some conflict and the same error. -
Oxer
There's a list of files in a post a few back, remove all and ensure you only have the required ones in the correct folder/subfolder...


Hello! It looks like you're interested in this conversation, but you don't have an account yet.
Getting fed up of having to scroll through the same posts each visit? When you register for an account, you'll always come back to exactly where you were before, and choose to be notified of new replies (either via email, or push notification). You'll also be able to save bookmarks and upvote posts to show your appreciation to other community members.
With your input, this post could be even better 💗
Register Login


Advertisement