Extremely Newbie Question
-
If you really do need to see the beading, I'd suggest making very abbreviated spheres like the ones in this model. They not only have far fewer faces, but I've even deleted the ones around the back and top that can't be seen. The result is less than 10% of the faces in the original example. You also need to make each sphere a component rather than a group...which will also reduce the file size still further.
The moulding still looks acceptable even at this reduced resolution. I mean how often do you view a bathroom from a vantage point of a few cms off the ceiling?
-
As the model is that of a bathroom, how much detail does the molding have to have? Do you need to draw individual tiles, the door hinges, tracks on the shower doors, etc.? At the scale of the room, maybe a reasonable facsimile can be managed with a texture.
-
Best would be to make each a component. More exactly make just one and array it (as I understand, they are all alike).
-
Thank you everyone for your patience.
After reading TIG's response, I went back and followed the directions and came up with what I think Alan Fraiser came up with. The original sphere said "24" in the dimensional window, which fits with the 12 for the half that TIG said. I missed that part that he had been speaking of half of the sphere, and so entered 6 in the box and got something that didn't look much like a sphere. I did it again with 8 and ended up with a passable sphere that when put together looked like Alan Fraiser's example. (I'm still using SU7, so I couldn't check that yet, and I'm not ready to go to a new version of SU in the middle of this project.) Then I reread TIG's response and did it with 6 for the half, or 12 in the box, and that looks very much like a sphere.
With both revisions, I did the intersections and trimmed away all the extra bits, then also intersected 3 of the beads and trimmed away the place where they overlapped as well. I think the 8 (4 for the half) will be sufficient.

I missed the part about making my final result into a component, so I will go back to do that, but I will have to remember to make the bead that will be sliced by my corner slicer (yea! I actually understood that part!) a different component before I trim it away, or won't it trim all of them?
(I love my corner slicer)
I also went back and changed the little coved part from a 12-sided arch to a 6-sided arch, and I've been softening up everything.
As to why I want to put all the little beads into it in the first place, I know it seems very silly and that I am putting in so much more work than necessary, I just feel more comfortable with it that way right now. This is my second project ever, and I am not used to how things turn out in the end yet. You guys are soooo good at this, and have had a lot of experience, and know just how much detail is needed. I'm not quite there yet. I need to make things hard first and then back off of them. Thank you for trying to help and get me there sooner, and thank you for being patient with me.
And I actually have put in many of the little details (hinges, tracks for the shower doors, floor tiles, etc.) as I have gone along because it helps me work through the process of how everything goes together. For example, when I did the shower tile, I put in every single one and accounted for the grout lines. Now that the tile is in, I have removed all that detail from the current model, but know for certain sure what the facsimile means that I put in its place. But it was very useful for me when it did it to see what kind of situations might arise before the tile guys got there, so I knew what I wanted for sure.
I also was able to print out many many views of the tile work (there were many different components) and tape them up to the walls for the tile guys to use. I want to be sure there were no misunderstandings as they worked. I was able to go over each one ahead of time and make the very few adjustments then, before they began mixing things, and they really liked being able to refer to the diagrams as they went. I was very pleased with how the tile came out.
Once I see that the beads are going to give the effect I am hoping for, then I can use something more vague if I want to, or I can leave them in and use close-up views for reference if needed.
Big Smile
So now I'm off to tweak my moulding and change the beads into components. Should each one be a component? or should I do them in groups of three or so?
-
I'd first make one a component ant then I'd array them, so you have just one component repeated like 300 times. That way if you want to change something, you will change it just once and you will have a lighter file.
I don't find silly to model all those details in a moulding if you want to make close ups. When you make a final render they will stand out.
But then I read something about modeling individual tiles then, well, with all those fantastic reder engines I just find it too much. -
@bantymom said:
...The moulding has beading on it, which I managed to make, spacing it out evenly with just a bit of overlap to look like the real thing. Problem now is that all my hundreds (perhaps a thousand when I am done with it) of tiny spheres will all their faces and edges, are bogging things down..............
Thank you very much for your time and help. sets out brownies as a bribeAre you ever going to see the back sides of the beads? Only when looking up but even then you can delete large part of the bead component and make it a 'Face Me' component.
I've even tried with just a circular face 'Face Me' component. The result is better than expected, although not from all view points.
Try the front of a sphere and a little extra for when viewing from underneath. All of it in a 'Face Me' component.
(are the brownies still there?)
-
Thank you again for the time you are taking to help me. Things are slowly coming along.
Some responses:
The individual tiles are no longer part of the current version of the model. I did that when I was working on the layout of the tile, but that is finished now. I took pictures of the finished tub and shower surround and used the one for the front of the tub on the model (plus just the bottom row of tile as one long piece with no grout lines as I want to be sure things work out with the base moulding) so I can see how my choices for moulding go with it, but otherwise the walls of the surround are now blank, though the thickness of the mud bed and the tile is accounted for.You should also know that my rendering skill is about as unadvanced as my SU skills (I have the free version of Podium). I didn't plan to make an official render of my bathroom, but your comments have made me consider it and have given me things to keep in mind. I am sure there will be more questions from me if I decide to try.
I'm afraid I can't open the attached example of the "Face Me" component because I still have SU v.7 (I don't want to dl the new one in the middle of this. I am slow enough and I want to keep working with what is familiar to me). I have cut away all the backs and tops of the beads that go up against the moulding, so I hope that helps. As soon as I finish this post, however, I will go find information about it in a video.
I must seem a very poor student, slow in learning. Thank you again for all your patience and the time everyone has taken and continues to take to explain things so clearly too me. I must tell you that being able to do that is a skill in and of itself that is very rare to find among people who are already good at at the thing they are trying to explain. Not everyone can teach, but here I find there are many who can.
And, yes, there are more brownies! Some with walnuts and some without.
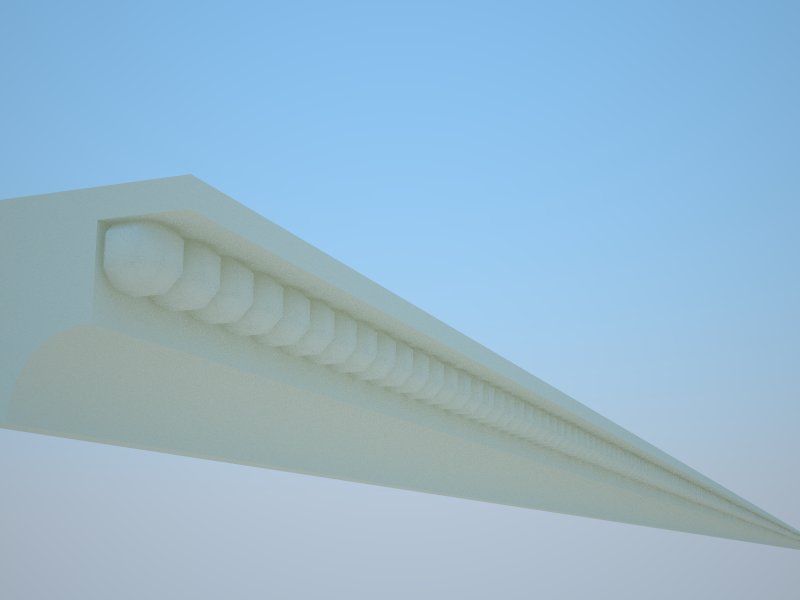
The attached file is of the three versions of the beaded moulding:
24 is the original, not cleaned up
8 is the first one I did, cleaned up, backs, tops, and sides removed, made into components.
12 is the second one I did, cleaned up, backs, tops, and sides removed, made into components.Above the 24 is another moulding that I went back and redid, reducing all the curves and arcs to fewer segments. I now have only the chair rail and base moulding to do now.
-
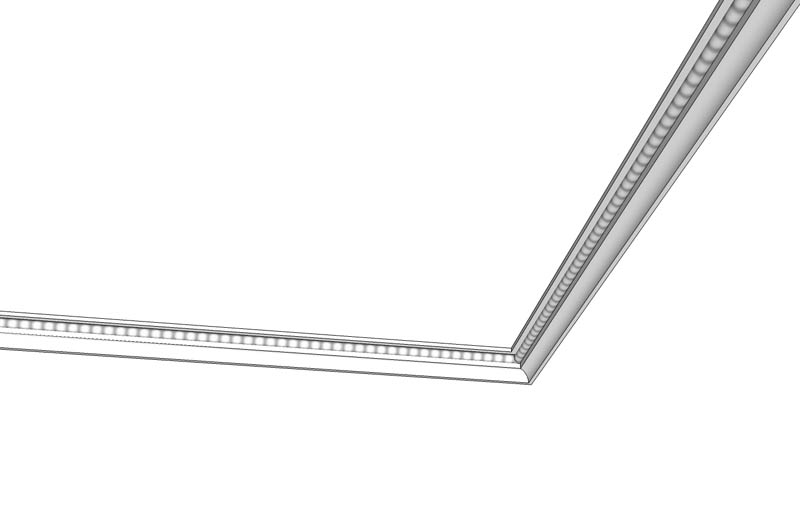
....Not forgetting, of course, that you can get a perfectly satisfactory result simply by using image mapping. In this V7 file the moulding has been taken right around a nominal 12' x 12' wall. The total number of faces for the entire thing is 111...as opposed to the 70,000 in the original single length.
-
@bantymom said:
...I'm afraid I can't open the attached example of the "Face Me" component because I still have SU v.7 ......
Sorry about that. attached is an SU7 version of the model.
-
@alan fraser said:
....Not forgetting, of course, that you can get a perfectly satisfactory result simply by using image mapping. In this V7 file the moulding has been taken right around a nominal 12' x 12' wall. The total number of faces for the entire thing is 111...as opposed to the 70,000 in the original single length.
Very nice Alan,I would not have thought to make the beaded image with a thick, blurred circle. It even looks OK at an angle to the viewer.
Hello! It looks like you're interested in this conversation, but you don't have an account yet.
Getting fed up of having to scroll through the same posts each visit? When you register for an account, you'll always come back to exactly where you were before, and choose to be notified of new replies (either via email, or push notification). You'll also be able to save bookmarks and upvote posts to show your appreciation to other community members.
With your input, this post could be even better 💗
Register Login


Advertisement