TUT: Creating and Hatching in LayOut
-
From a PM to explain how to create and use hatch patterns in LO I thought I would share this simple process.
I’ll example as a straight square tile hatch.
CREATING HATCH (SEE HATCH.LAYOUT ATTACHED)
- Open a new LayOut document – Set page size to 200mm x 200mm / no margins / set grid 10mm / grid snap on / object snap off
- Using the line tool draw a line (1px wide) down one side and copy across each grid interval,
- Now turn snap to objects on, select all and rotate + crtl to copy rotate through 90deg,
4.Export image as PNG say 500 x 500 pixels to keep it clean, note the larger the image the more LO will struggle when this is imported back in.
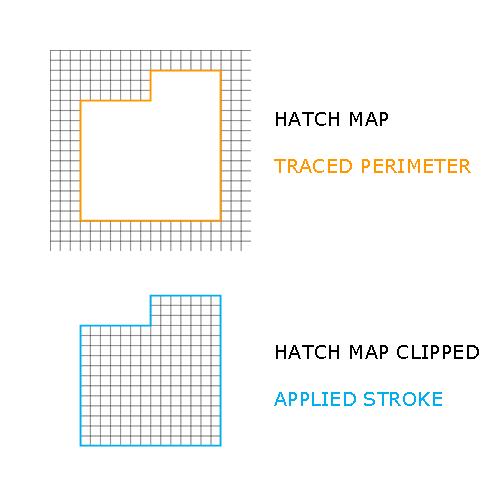
USING HATCH (SEE IMAGE BELOW - HATCH USE)
- Open you working doc (the one you want to apply hatch to) drag and drop the PNG hatch image in,
- Place it where you wish to hatch and scale appropriately, and push it backward so it is behind the rest of the work,
- Now draw a line around the perimeter of the area you want hatched (I will assume this is less than the size of the hatch map – more later) and ensure this perimeter closes,
- Select both this traced perimeter and the hatch map, right click on then and from the context menu select “create clipping mask” – DONE!!!
AREAS TO BE FILLED LARGER THAN THE HATCH MAP
- DO NOT try to duplicate the hatch map multiple times and then clip with one perimeter clip map! This will work first time yes BUT if you try to edit it later well ALL SHIT will break loose!
- To fill areas larger than the map, break the area up with multiple copies of the map and multiple clipping masks!!
NOTE
- If you want a border around the hatched area simply select the clipped item and assign a stroke,
- If you have used multiple maps and clips and want the whole area to have a border select all clipped items, turn off and stroke and then trace around the whole perimeter, assign a stroke with no fill. These can then all be grouped – again DO NOT try to clip multiple copies of the map – you have been warned!
CREATING A SCRAPBOOK LIBRARY OF HATCHING
- Open a new LO doc,
- Drag in all your hatch patterns and arrange as suits,
- Save doc as scrapbook – name file as wished!
HOPE THIS HELPS!


-
Thanks Richard! This tutorial is excellent and much appreciated.
-
Me too, Richard. nice work around...!

-
You welcome mate! The beauty of LO is it produces GREAT clean exports in both image formats and PDF so it's own exports make for very suitable content when bought back in!
Did I say I love layout!
-
I am a big fan of LO as well; I am glad that Google has continued development.
-
Mate if many or even a few of the many requests that I know Andrew and myself have been pushing for through beta as additional functions are ever included Layout will become a serious app. Mind you I think the Googies have their own plans and IMHO they are pretty cluey guys and gals - so although we put up ideas they tend to run with some pretty funky ways to incorporate such functionality.
For this reason I certain future builds will hold some VERY cool features!
-
-
Googies are eggs here

-
@unknownuser said:
Googies are eggs here

same here, Rich; just depends how you say it.
Pronouncing double 'O' as in 'Good' gives you eggs.
Pronouncing double 'O' as in 'Google' gives you; well, nose stuff.
-
thanks, richard! much appreciated.

-
If we can fill sections of su model easily,that's must be a nice day.Sections are always complex,so we cann't draw alone them with pencil tool in LO.Hope that day coming soon......
-
Excellent work Richard, thank you for your work.
Kalu.
PS. I will put my hands on it!
-
Спасибо Richard !

-
Thank you Richard:
This tutorial is excellent and much appreciated.
regards
Pedro
Advertisement


