A new use for FEMA trailers. I know that does not translate to Dutch. Don't worry, it is not even funny in the US.
Posts
-
RE: Festival terrain
-
RE: WIRED MAGAZINE 3D COVER PRINT
What do you think the differential cost would have been between printing and making in a wood shop? And even better why not create a virtual model and PhotoShop into the chefs hand. That would have been the easiest approach. I am very much for using SU for virtual illustrations so I am just interested in your approach to the problem.
-
RE: Swiss Panoramic Images + Urban Lines
Gai, the way I read it is that Michal wants to capture views of existing rooms and spaces as setting for his interesting sculptures. I think he would rather not model the room and with teh complexity of his forms he would rather not have the additional weight of the setting. Additionally the photo would provide the scenes lighting.
-
RE: Swiss Panoramic Images + Urban Lines
Must modern DSLRs will have a set up for automatic bracketing. You set it for a under exposure, correct exposure and over exposure. You press the shutter once and it will make all three exposures.
-
RE: Swiss Panoramic Images + Urban Lines

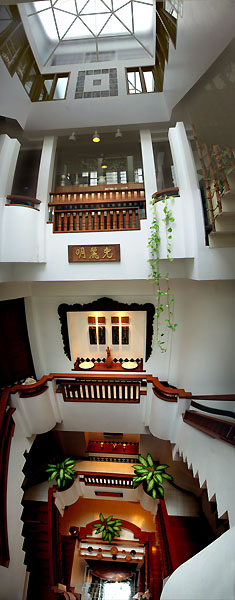
A vertical pano/HDRI showing seven floors of a Thai shop house.
-
RE: Swiss Panoramic Images + Urban Lines
@michaliszissiou said:
Anyway, I tried with ipad. Lot of noise but some success.
A pure blender sculpt in my home, with some help of additional lighting (I admit it). But environment requirectangular panoramic worked. (some stretching still there, and lot of noise[attachment=0:25yr8u6a]<!-- ia0 -->testingequirect.jpg<!-- ia0 -->[/attachment:25yr8u6a]
So, you are aware of Paul Debevic's work with light probes? I see from your sculpt that you want your pano to serve as both light source and background image. I think I would use the pano as light source and do a small HRI image Photoshopped behind the head. In regard to my panos, had I continued shooting around the nodal point in all directions, the result would have been an equirectangular 1x2 after it had been stitched. You can set up your camera and a gigapan system to do HDRIs and the pano at the same time. The robot will bracket exposures at each camera position befor advancing to the next position.
-
RE: Swiss Panoramic Images + Urban Lines

This is also a handheld 180 degree pano composed of 18 vertical frames and shot with a 300mm lens. At full resolution you can almost read the license plates on cars. This is the town of Galera (in the heart of Andalucia), Spain which is famous for its cave houses. As I hobbled around the town we passed a street called Calle Quijote just as an old lady threw a bucket of wash water into the street. I asked, "?Donde esta el ingenioso hidalgo?" I got a blank stare and assumed she was not much for literary references. -
RE: Swiss Panoramic Images + Urban Lines
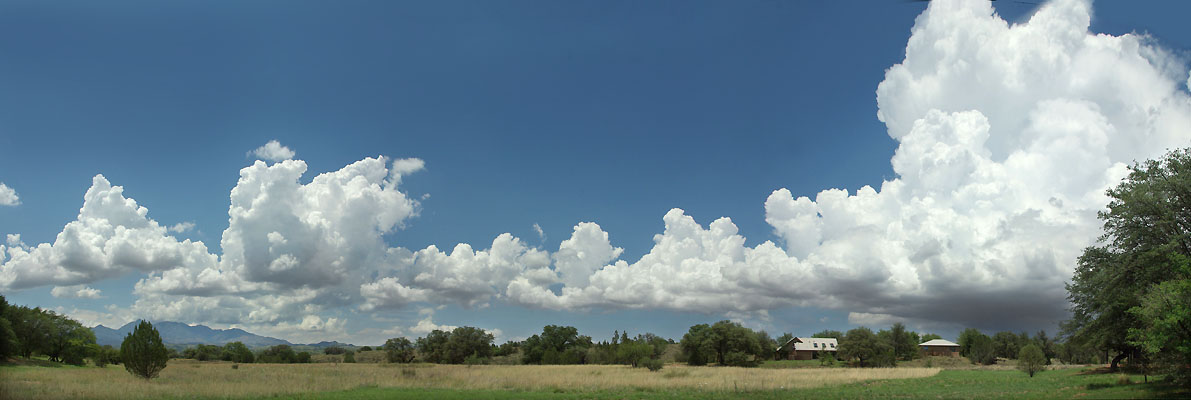
 By the way for anyone who is interested Microsoft ICE (Image Composite Editor) is robust, free and easy to use. This is a handheld pano done without a tripod.
 -
RE: Swiss Panoramic Images + Urban Lines
The ultimate M1 will let you go to a 200 MM lens. With Pano photography this really translates to more resolution and the rotator can be et to fixed intervals without actually reading the scale. Your other choice says the longest lens to be used is a 100 mm and the rotator has not fixed detents so you will have to read and lock the device for each camera move. Consider my last post and if you really need, want and can afford the device go for the M1. For most situations you can get away with 40 cents of string and washers. If you are going to do repeated high end work and lugging fragile and expensive equipment then go nodal ninja or a robotic system.
-
RE: Swiss Panoramic Images + Urban Lines
@olishea said:
Hi Roger and thank you for your help. This is the technical information I need, I still have lots to learn.
I am looking to buy the nodal ninja tripod below: Which of the two would be most practical for my needs?

I am looking at either NN4:

Or the Ultimate M1:
Also this camera:
And this lens:
Oliver, a great question. A simple question but hard to answer because it branches out in many directions. But I will try.
We need to analyze your goals. Do you want to use a DLSR to make prints with more resolution than an 11x14 camera? Or do you want to take fish eye photos that serve as virtual environments for renderings? Are you going to be shooting in bright sun or at night under available starlight? Do you want to travel light or are prepared to lug around whatever it takes? Will you be placing a single story building in a broad landscape shot from a distance or will you be shooting the Sears Tower from across the street? For most uses you don't need any sophisticated equipment and for extreme cases you do. If lenses were perfect and if film/sensors had infinite resolution all cameras would come with just one fisheye lens an you just crop into the image to get the composition you want. Wide angle distortion DOES NOT exist. Wide angle perspective does exist and we call it distortion. The eye only takes sharp pictures across perhaps 10 degrees of vision. If I stare at this screen without moving my head or eyeballs, I can only see the words "perhaps 10" sharply. However that is not my normal visual perception because my eyes constantly scan the area in front of me and "stitch together" a perception. And that is not all that happens. We live with a lot of rectilinear shapes so we know about straight lines and right angles. Because we "know about these things" the mind takes the curves we actually see and straightens the edges. So if you want to make a print 9ft long and 1ft high for your bed room wall with a very wide perspective, you cant get by with the fisheye as the picture would look soft and blurry at that magnification. To get around that limitation you can stitch together 10 or 12 photos with a normal lens and have a file of 100 to 200 megapixels that will be sharp as a tack at 9ft x 1ft. Now if you want to use a fisheye you can have a 5 megapixel or lower file if you want to use the scene as a light source and a rendering background. You can get away with this because any low res blur will be perceived as depth of field effect. So you only need stitched photos to increase the resolution limit of your camera or to get a wider angle shot than your lens would normally allow. If you are creating a 9ft x 1ft photo, nodal point probably won't be an issue because you won't have much foreground or foresky because the format is too narrow for either one to show. So one row panos rarely have a problem with photo alignment when you do the stitching. But lets say you want to stitch super high res photo that will print sharply at 9x12 feet. Now, instead of one row of photos, you will need a lot more photos arrayed in multiple rows. Because of the more rectangular photo you will have much more foreground and sky and the tile floor just in front of you will be much closer than buildings on the horizon. In this case if the nodal point is off the tile floor will simply not stitch together. It is here that you must have something to stabilize your nodal point. The more stuff on the groundplane in the foreground the more you need to control the nodal point. Cell phones are forgiving because they are only a couple mm thick and it is hard to get too far from the nodal point. With a big telephoto, the nodal point can get way off from where you are rotating the camera, maybe more than a foot. This can become unstitchable. For a one row pano of fairly flat land I can go fairly freehand with most lenses. If I want super resolution wide angle image consisting of many telephoto shots I can use the method described in the previous post to determine my lenses nodal point. I have to keep the nodal point fixed relative to a fixed point on the ground. How can I do that? One way is to buy an expensive nodal ninja at $300 to $400. Another way is throw a coin on the ground to mark my fixed point that I will rotate the camera about. Then I can put a loop of string around my long lens at the position of the nodal point and hang a plumb bob (a 20 cent washer) on a string that almost reaches the coin on the ground. Now with no tripod and under 20 cents of equipment I can do a really detailed one row pano and spend the $400 on a really nice lunch. Let me diverge for a moment to introduce another complication - time. The worst Pano I ever saw was was taken on a really windy day and the same cloud kept reappearing again and again and again ad infinitum all across the pano. The problem was not nodal point but the cloud was moving across the scene at the same rate the photographer was panning and reframing the shots that would make up the pano. So here, the ultimate tool is anything that thing reduces the speed at which you can take your shots and keep the nodal point consistent. Gigapan systems make robotic tripod heads. With this you point the camera to the bottom left of your final scene and punch a button to record the position then you do this again to mark the position for the upper right exposure. Next you figure out the time for your camera to record the scene and write the info to the data card. You key the resulting interval between exposures into the camera. You also key in the desired overlap between frames (30% is a good rule of thumb. When you finally press the go button the robot takes you input and precalculates the precise position of every shot before machine gunning through the entire picture array as fast as you input data will let it go. This tool will set you back $800 to $1200 dollars. Photos of Obama's inauguration showed 10,000 people on the capitol mall and you can still zoom in with enough resolution to see Joe Biden's cuff links. Now for general daylight lighting simulation lighting and rendering backgrounds, I would go with the string and the washer. If you are going to make giant display prints in hostile environments for high res interactive virtual environments or games, you might want the gigapan. For me, if I was doing really high end display prints of architectural interiors for picky clients paying big bucks for the result, one of the nodal Ninja devices might be just the ticket. I will look at the two units a little more and get back to you.
-
RE: Swiss Panoramic Images + Urban Lines
An easy and accurate way to find a nodal point:
1 Put your camera on a tripod
2 Take two light stands and line them up in the middle of your frame with one behind the other.
3 Rotate your camera left and right until the light stands touch the edge of the frame.
4 If the light stands remain aligned, one behind the other, you have found the nodal point.
5 If one light stands pops out from behind the other you must move the camera back and forth relative to the rotation axis of the tripod until the light stands remain aligned.
6 To move the camera relative to the rotational axis of the tripod you need a pano head that lets you slide the camera back and forth while you search for the nodal point. You need to mark this sliding stage to show the nodal point of each of your prime lenses. (a prime lenses is a lens with only one focal length i.e. a non zoom lens.)
7 With telephoto lenses imaging subjects at a distance the correct nodal point will have little significance to your final image. With wide angle lenses imaging prominent foregrounds, you have to place the nodal point accurately or the images will not stitch.Hope this helps and am glad to answer any questions.
-
RE: Let there be light and there was a lamp
I just found some info on rigorous testing of the limits of 123d Sketch accuracy. It indicated that accuracy or inaccuracy if you prefer is about 1:600. Not bad considering the ease and cost effectiveness of the system. I also suspect there are some simple methods to correct the inaccuracy both before and after the data collection. If you are measuring a rectilinear object, then you can rescale along all the major axes and this should pull increase the accuracy of the model. In fact, your model has no scale until you give it one. So if you pick a line with a known dimension of 10 inches and set the line to 10 inches then at least than that one line has a precise value in your model. The question then becomes how accurate are all other lines in relation to your reference line. Also the test was done with a zoom lens so we don't know the accuracy of the calibration or the accuracy of the exif data regarding focal length along the entire range of the zoom. Camera base captures are also often done with very random camera positions (the array of picture taking positions). If the array is very regular and systematized I suspect accuracy goes up and perhaps dramatically. Also before stitching of the photos for the model you can intervene manually to set any number of know distances. This can be problematic as the control points you set manually are dependent on your own manual and visual dexterity (you can do as much harm as you do good. I suspect you could write a whole thesis paper on the limits to the systems accuracy. And, of course, we know SU curves are approximations which means that a randomly chosen point on a SU curve can be on dimension, over dimension or under dimension and the differences will vary with the number of segments in your curve and the size of the curve. I think it is safe to say that a $30,000 Leica laser point cloud generater will be more accurate for most applications. But, I also think you can say for many or most applications so what? And, I am certain you can raise the accuracy of 123d catch data significantly by using a carefully calibrated prime lens, many control points, regularly and accurately spaced camera positions. Of course as you force the accuracy up, cost and effort also go up. Anyhow tomorrow I will be trying to survey a small vacant hill at my new house and use the terrain model data as the basis for conceptualization of a small studio building.
-
RE: How do I import terrain
@gaieus said:
The terrain (geometrical) resolution is also just as approximate as the snapshot image detailed. In some places, it's okay while it's better in others.
Are you sure you are toggling between (flat) snapshot and (3D) terrain though?
The overall hill I live on shows, but the mound on my second lot show dead flat. Its just a matter of distance between contour lines. I need to get a smale scale topo map of the area. Or I may try to expand my experiments with 123dCatch to capturing topography.
-
RE: How do I import terrain
After all this I find that either the vertical resolution is not great enough or suddenly my property has become much flatter.
-
RE: A Thread for Fine Design
@dale said:
These are great, but I think there is a fortune to be made by someone coming up with a card that unties the not for divorces

Knot, not "not" is it not? -
RE: How do I import terrain
Yes, Gai thanks for pointing me in the right direction. Always good to have someone who can interpret the oracles that live in the dialog boxes.
-
RE: How do I import terrain
@gaieus said:
What you have to make sure is to let SU communicate with the Internet. Under the firewall settings (or what) there is a possibility to allow or disallow certain apps.
SU needs internet connection to communicate with the 3D Warehouse (upload/download), the maps servers (location and street view imagery for texturing), for building maker - I think that's all.
You only need to log in to your Google account if you want to upload something to the 3D Warehouse (and maybe for BM, too).
Thanks to all. I now have my firewall settings straightened out.
-
RE: Let there be light and there was a lamp

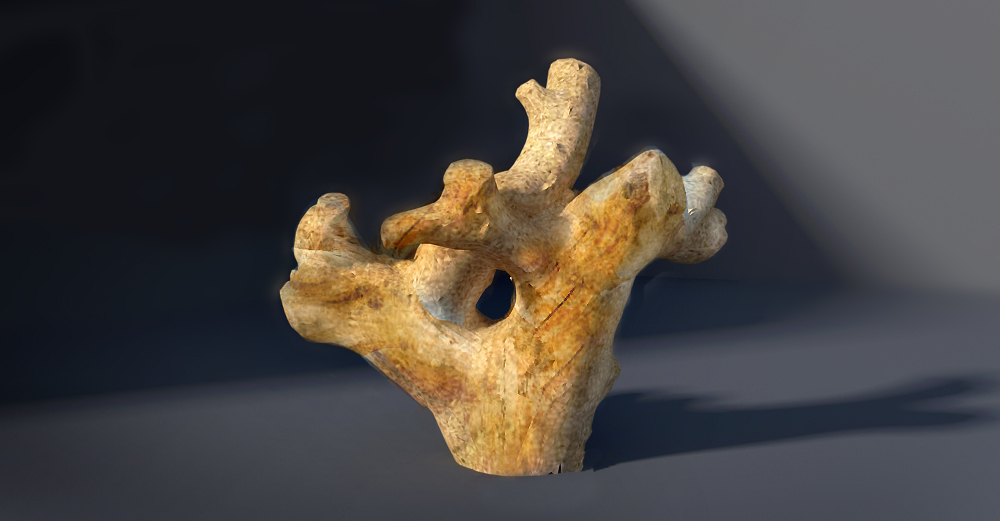
After converting my series of photos into 3D data in AutoDesk's 123dCatch, I exported an object file into sketchup. Since the photos have no absolute scale info in them, I took a ruler and measured the two most widely separated points in this branch. Then I made a computer measurement between those points and overwrote it with the real world measurement. When I do this, the computer asked me if I wanted to rescale the model. I responded "yes." Then I measured separation between various points on the physical branch and compared that to corresponding points on the computer model. They matched with surprising accuracy. I would say the accuracy was good enough for a wood shop but not good enough for a machine shop if that gives you any frame of reference. For most of my uses this is good enough. Later I will push myself to give a better measure of accuracy, but for now, I am impressed.When I rescaled I used the two most widely points I could conveniently measure with a ruler (a distance of 43CM. After calibrating the model with this measurement I took a computer measurement across two identifiable points on the cutoff face of one of the branches on the virtual model. This measurement on the virtual model was 7.5CM. In the real world the cut off face also showed 7.5CM. Other computer measurements corresponded very closely to the measurements from the physical object. I won't go into all the possible issues surrounding hyper accuracy, but since I am encouraged by the utility and accuracy of this tool I will do further research on the subject of computer aided measurement.
-
RE: How do I import terrain
@sdmitch said:
Roger, I dont remember ever haveing to set up "paths" to Google Earth or 3DWarehouse. At most you only needed to be logged in using your Goggle ID and password. Normally, if you are not already logged in and click on either "Add location" or "Get Models" on the Google toolbar, the login window would pop-up. Perhaps some screen-shots of what when you attempt these actions would help solve the mystery.

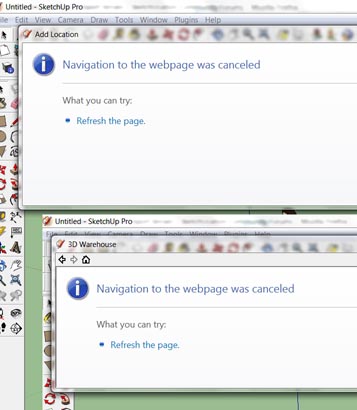
Here are the dialogs I get from "set location" and "3D warehouse". It does not tell you much. Hope this helps.