Nice detail: mineral stain on the roof flashing, and the overhead electrics, and even the cat door (?) on the roof.
Posts
-
RE: Rosedale
-
Civil war field artillery
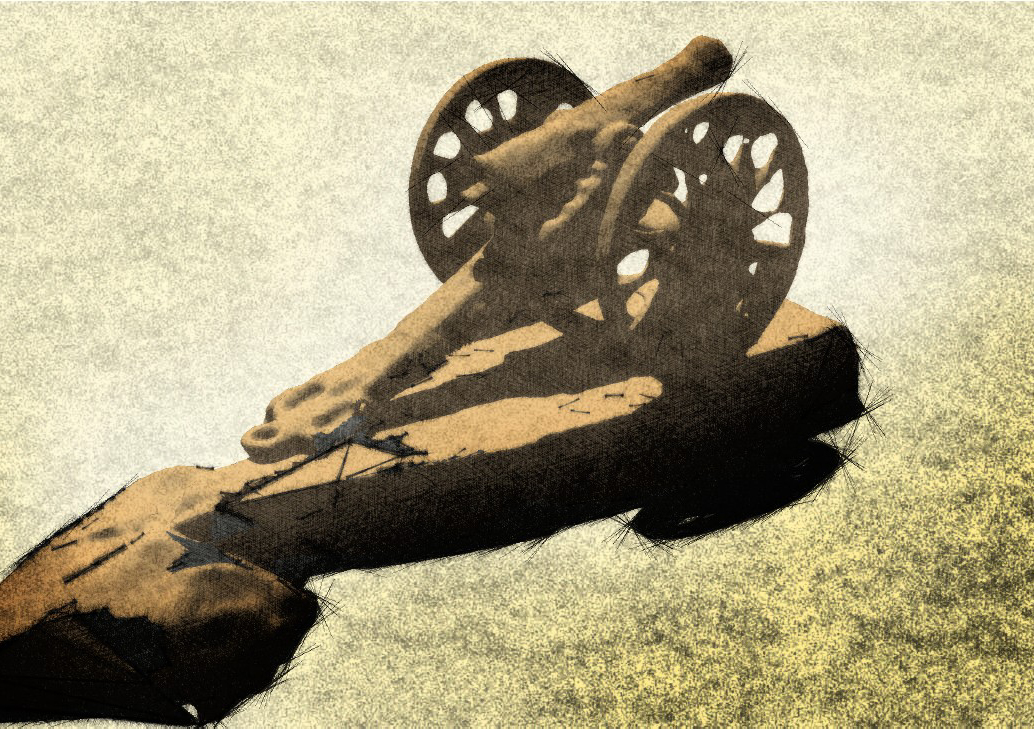
I have been playing with 123d Catch and am somewhat intrigued by its possibilities. This started with a large set of photos of a 2 to 3 inch brass cannon model. I then exported an OBJ from 123D Catch and imported it into SU which almost choked on the file size. Then I applied some styles and composed my shot. From there I took it to PhotoShop to dust it with a little moodiness. Lastly I used FotoSketcher to add more textures and and profile lines.
Lessons learned:
- Always use flat light when making your photo sets.
- Go for 40 to 70 photos.
- Avoid deep shadows.
- Use single focal length prime lenses.
- Keep distance from camera to cent of object as close to the same as possible unless you want to do a lot of tedious manual photo stitching.
- 123 can be used in a very impressionistic manner and under certain conditions it can be used for photogrametry.
- It reveals its capabilities slowly
-
RE: Happy Birthday Gaieus
There aren't enough Xs in my Scrabble game to spell out your birthday in Roman numerals, but Happy birthday anyhow.
-
RE: Sample Model for Rendering - Loft w Telescope
@al hart said:
@roger said:
[attachment=0:6kvfnt10]<!-- ia0 -->telescope_room.jpg<!-- ia0 -->[/attachment:6kvfnt10]
Here is how I would visualize that scene. Keep in mind you could never have a view like that unless the moon was about 10 times closer and then the tidal forces on earth would be wreaking all kinds of havoc.Do you want to mention which rendering engine you used so I can put the result on SketchUpRendering.com?
I did not use a rendering engine. All were Post Production modifications of your render done in PhotoShop.
-
RE: Sample Model for Rendering - Loft w Telescope
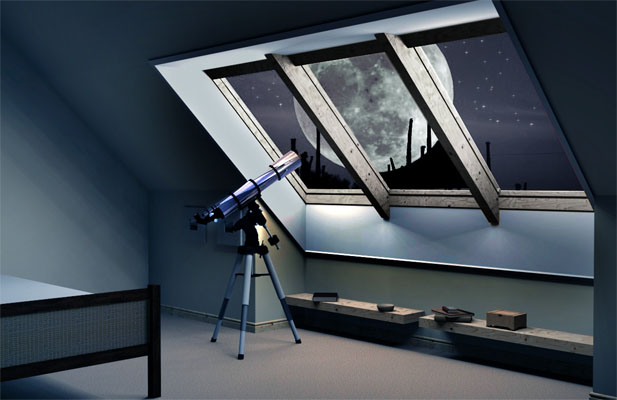
Here is how I would visualize that scene. Keep in mind you could never have a view like that unless the moon was about 10 times closer and then the tidal forces on earth would be wreaking all kinds of havoc. -
RE: Sample Model for Rendering - Loft w Telescope
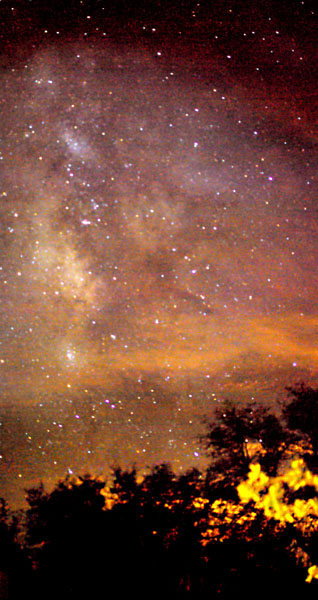
Here is a night sky photo I took in Sonoita, Arizona. You are welcome to use it as a sky source. Let me know if you need a larger image.
-
RE: Screen room for summer sleeping
Liam, Sonoita has many good things, but some consider it a one horse town. Technically this is not true. It only has one major intersection (major meaning it has a set of stop signs on both sides of the road), but a lot of horses. It was also the subject of an Alfred Hitchcock film called "Escape to Sonoita." The problem with the Hitchcock portrayal is that Hitchcock couldn't find the town in Arizona so he shot the film in California. The other problem is that in his intro to the film he mispronounces the name of the town calling it Sono-ita as if it were a Spanish word. Locals also get the name wrong, calling it Sah-noyta. However the name is really from the native Tohono O'Odham language and is pronounced Son noy tac (with a glottal stop on the "Tac" and means "where the corn grows." On the bad side, the town isn't big enough to support a real grocery store and if you do want corn or any other fresh edible you have to make an 80 mile round trip. On the good side and a reason for having a nap room is that we have about 12 wineries between Sonoita and Elgin which comprise the greater metropolitan Sonoita/Elgin metropolitan area. Elgin is a bit smaller. Now as small as the place is, it does have some history. The Americans sent about 8,000 troops and the Mexicans sent about 2,000 troops to capture about 39 Apache Indians and after about 10 years trapped the famous chief Cochise in an Army tent using the guise of treaty talks. But Cochise took out a knife and cut through the back of the tent and ran back into the hills. I can see that location from my house. So as you can imagine, day naps are a major activity here (well technically a non-active activity and we are proud of our naps and the accessories that make them enjoyable.
-
RE: Screen room for summer sleeping
@chedda said:
Roger take a look at the Kaufmann House by Richard Neutra. It features an upper lounging area with adjustable metal fins.I think it's called a gloriette.
The Kaufmann house's vertical persian blinds, when open, always offer an interior view from some and angle but not others. The Bahamian meta1 shutters have a fixed angle and when the shutters are down the only inward view is to lay on the ground and look up to the ceiling. When the shutters are propped up, the blades are edge on to both the view and the breeze and will not admit direct sun until just before sunset. My goal is to cut energy usage to a minimum. At 4,800 feet even Arizona summer temps are tolerable outdoors in the shade and at night it is exquisite. In winter, we will move the bed inside, and the sitting room outside. And in the winter I will replace the bug screens with plastic glazing and run passive solar heat into the porch. That is the plan.
-
RE: The "Duh!" thread (aka the Doh! thread)
Boggles the imagination!
-
RE: The "Duh!" thread (aka the Doh! thread)
@unknownuser said:
Super cool never thought to bend a 2D image with the Fredo Scale!


[attachment=0:39d35j95]<!-- ia0 -->cool.jpg<!-- ia0 -->[/attachment:39d35j95]
You bent over backward to discover that function.
 (Does not translate easily to French)
 -
RE: Screen room for summer sleeping
When the space is enclosed, I want to do Bahamian hurricane shutters. That might seem a strange choice for Arizona, but it actually gives the security, shade, and a breeze catching functions I need. Since our main fear is grass fires I will do them in metal, however the cost may be a deal killer.
-
RE: New Cards - Feedback
If you want a clean white on colored stock, you need to go to foil stamping, but you pay a premium for that. Also a tag line or differentiator is a good thing to set in your audience's mind. IE BUILT - Architecture that endures.
-
RE: New Cards - Feedback
When you approach a woman in a saloon, do you slap your card on the bar and circle "built" with a marker?
I like "1" the best, but with the black back, a potential client can't make a note on the back of the card.
-
RE: Screen room for summer sleeping
Now, that I have a chance to study what I have done, I realize the 2D person is about the size of Yao Ming, the basketball player from China. Also I should have deleted myself from the glass reflection as there is no person seated on the wall to be reflected in the glass. Or perhaps I am a werewolf and cast no reflections.
It will be for night time sleeping during the summer months when night temps are in the 75-90F range. We are at 4,800ft so we are comfortable in the summer even though nighttime temps up north in Phoenix can get to 105F.
This is the guest bedroom so we will wait to see if anyone is eaten by bear or Mt. lion. If not, we will extend the screen to our own master bedroom.
-
Screen room for summer sleeping
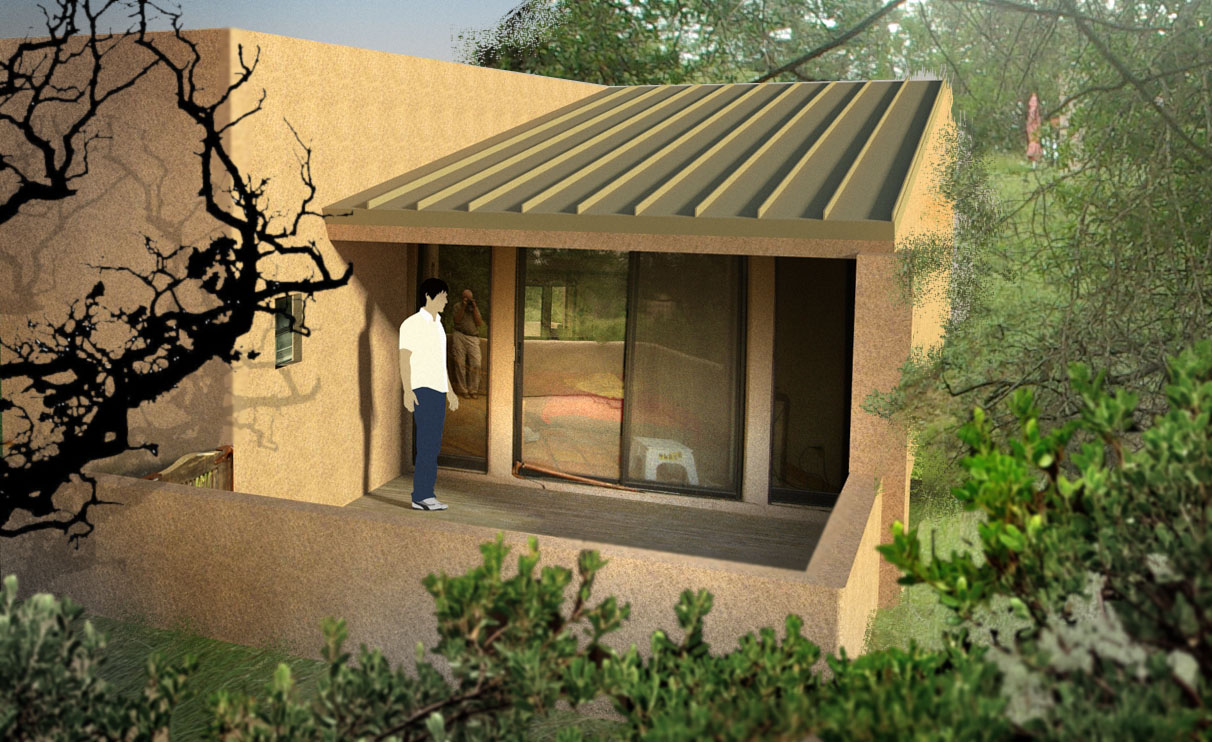
I want to make the porch of this room into a screen room for summer sleeping. I was getting ready to fiddle with the structural possibilities when the need to render overwhelmed me.
-
RE: Coat Room Render
You know a render is good when you can hear the clock on the wall ticking.
-
Panoramic photography for SU backgrounds and environments
Panoramic photography lesson 1: Panoramic Pivot Point or PPP (Not Nodal Point)
To consistently stitch together multiple photos into a single panorama you need to understand PPPs.
Let me show you what happens when you ignore the subject of PPP.

Click on the picture above and see what happens when the PPP is not aligned directly above your tripods center column. Look at the numbered call outs that show multiple floating and extended roof sections. Then go to point four and look at the discontinuity in the window frame. It is in shadow and fairly small so I have provided you with a cropped and enlarged section of the panorama taken from the area around point 4.
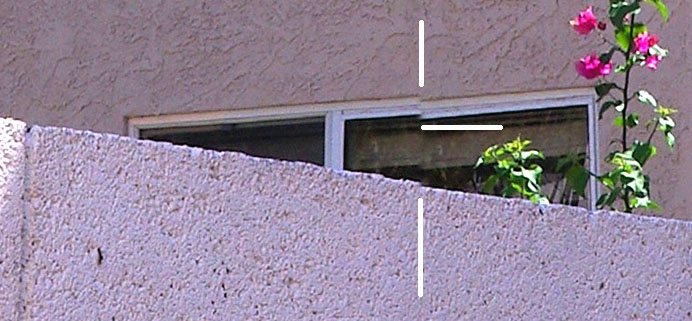
Notice the break in the wall and the jog in the window frame. This is the result of a misaligned PPP.I will demonstrate an easy way to properly align a PPP so you can produce panoramas minus the annoying artifacts. The tripod screw on your camera is never at the PPP. Sometimes you will see large telephoto lenses with their own tripod screws. Those attachment pints are to balance the physical weight of the lens over the tripod so it does not tip over or put undue strain on the point where the lens enters the camera. That tripod screw on the lens is also not likely to be at the PPP.
What you need at a minimum is an xy stage. The photo below shows an xy stage mounted on my tripod. When I mount my camera on top of this stage, I can move camera and lens left to right and back and forth until the PPP is directly over the center column of the tripod. When this is done you can produce the perfectly aligned stitched panorama.
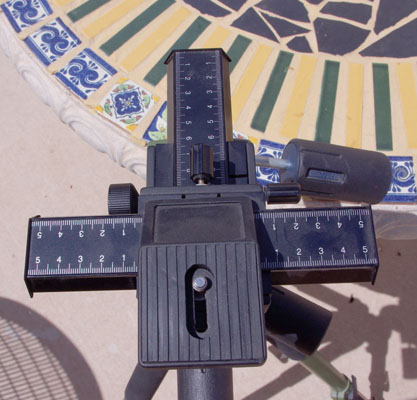
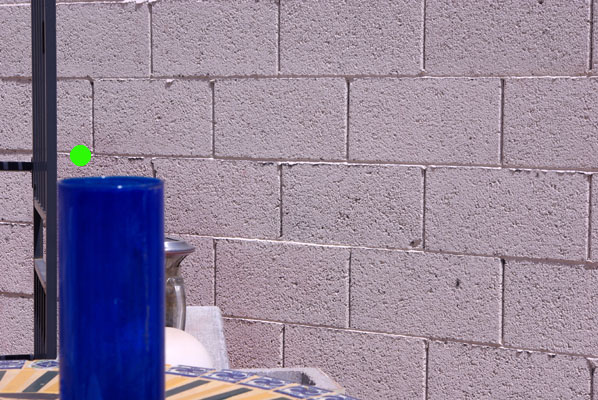
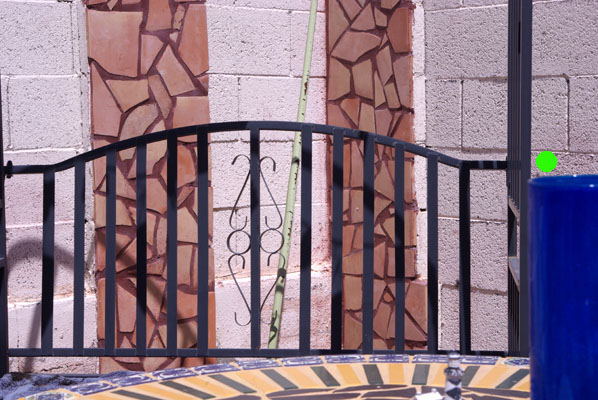
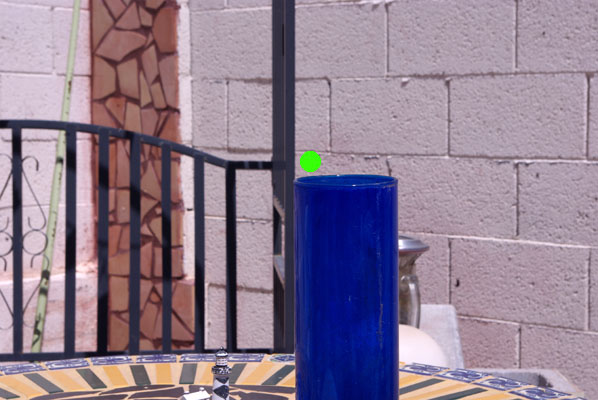
You may be wondering how do you align the PPP since you don't know where it is and it is not marked on the lens. In the photos below you will see what happens with a misaligned PPP.Looking through the camera I will show you what a misaligned PPP looks like.
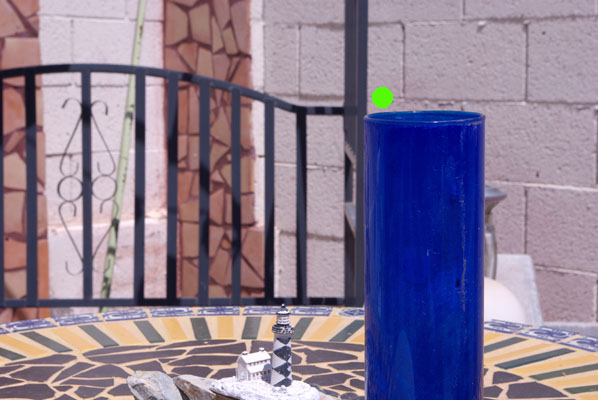 See how the blue glass and the black metal rod line up at the green dot? Now I swing my camera left and right on the tripod and the near and far objects should line up but they don't. As the camera swings to the side a gap opens at the orange dot between the black rod and the blue glass? This is what you do not want.
To fix this problem you first shift the lens laterally along the x axis so the center of the lens barrel passes directly over the center of the tripod head. Now you again align two objects in the center of your view finder. Using trial and error you move your camera/lens system back and forth along y. And after each move you swing the lens left and right to see if the black bar move apart. When you finally find the place where they stay together as you swing the lens back and forth, you have found the PPP. As you can see below, I have fond the proper front/back position for the PPP because as I rotate the the camera on the tripod, the blue glass in the foreground and the black post in the background stay aligned.
Image centered
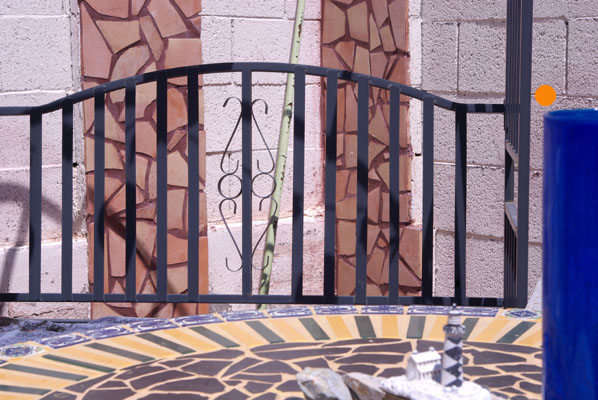
Objects stay aligned as you sing the camera left to right Swing the camera left and right around the tripod head.
I like prime lenses (non zoom) for this kind of work as a change in focal length changes the placement of the PPP. Mark the position of the x/y stage for each of your lenses and you will only have to do this once for each lens. If you are going to add extra rows of pictures above or below the horizontal you will also need a cradle, for the camera and stage, whose pivot axis goes horizontally through the PPP of the lens.
Once you master this kind of camera work, you will be able to photograph spherical environments that provide both backgrounds and lighting for your renders.
I welcome comments that would improve this tutorial.
-
RE: Mahogany Nightstands
@dave r said:

Just a little something I've been playing with. I forgot a couple of legs for the second stand.Thank God that virtual mahogany is cheaper than real mahogany.