Duhhh is the only response that seem appropriate. I should have been able to figure that out.
Well, thanks though. On to the next phase.
I am sure i won't have anymore questions as it is all super clear to me now ;>)
Duhhh is the only response that seem appropriate. I should have been able to figure that out.
Well, thanks though. On to the next phase.
I am sure i won't have anymore questions as it is all super clear to me now ;>)
Hi Gaieus,
I am able to edit the component and push the faces away as you have instructed thanks. As my goal is twofold, however, to learn as well as model, I have another question.
super simple as well but I have to ask it as I can't make the circle. My circle is not hollow as yours is, but is a solid circle. I then have no idea how to cut out a piece that is 19" wide.
As I said, these seem like simple things but I don't know how you did them.
Thanks for getting me this far.
Jim
I have managed to lay out the floor with your help. Thanks.
Now I need to trim it, and that, again, is not obvious to me. Also complicated to explain but I will try.
I want to take the included circle and lay it on the floor and cut away the surrounding bricks with the following exception.
There will be a vent floor that is 19" wide at the point that it touches the circle. Basically lopping off the section of the circle that is defined by a chord 19" long.
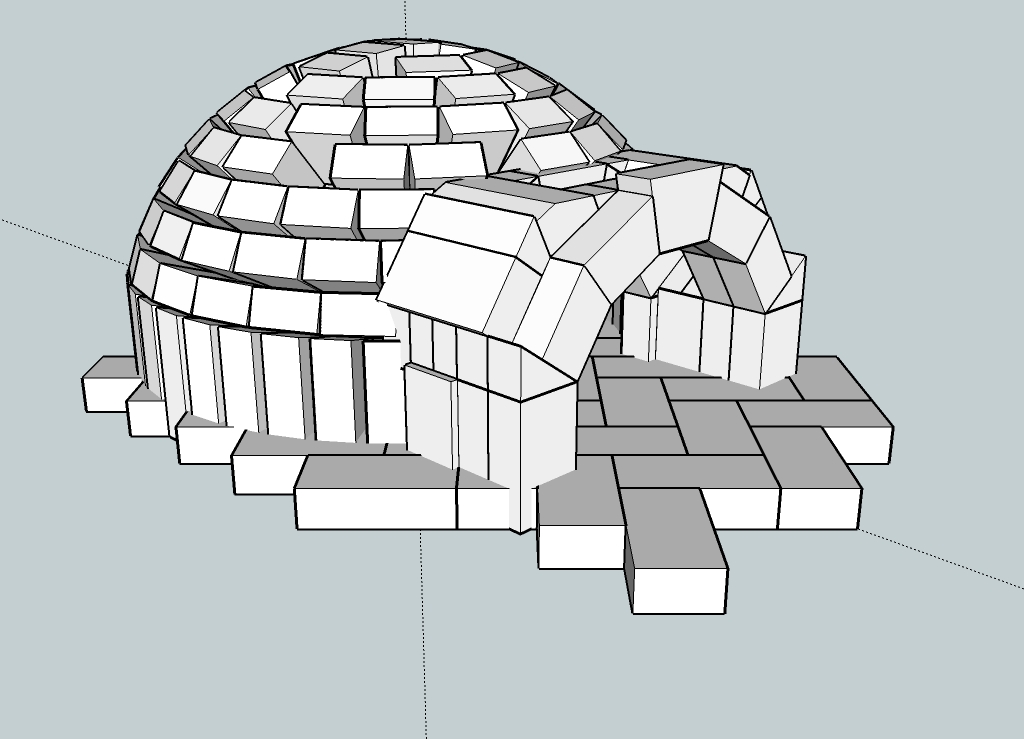
That floor will be 23" wide at the outside edge and will be 16" deep. the final form should be something like a keyhole shape. See the first photo in this thread.
Obviously possible but not easy to figure out. I laid the circle onto the bricks and thought that I would be able to push them away, but the only surface that is push/pullable is the full set of bricks contained by the circle. that I don;t understand at all but think it must have something to do with the fact that the bricks are components.
Again, looking for advice. I was thinking of making the courses of bricks on different layers. Would that be a good idea? I don't know if that will cause registration issues later.
Thanks,
Jim
Gaieus,
Woo Hoo! I got the inference part, thanks loads for that! I just wasn't moving in close enough to pay that much attention to the cursor change and the endpoint color changes.
That is nice. I can now clean up my floor bricks, much appreciated.
Now, truly, all for tonight for me.
Jim
I will digest what you have so kindly posted, no need to move to newbie forum if others don't mind.
You are posting as I am posting and the answers magically appear, whew.
I will practice what you have posted and get back to this tomorrow. The dog is snoring so I should probably think about it as well.
Many thanks for your help so far. i fear there will be many more questions, but I promise not to overwhelm too much in one day :>)
Jim
PS. Glad to have found this forum. I am also looking forward to the newletter. I saw it referenced in your signature so will definitely be reading it. Will most likely be above my head for a while but, like Photoshop, I am sure it takes time, practice, and some patience.
Gaieus,
I can handle the number of segments as I know how to do that. What I cannot do is align anything at this point. I created a brick. It aligns to the axes, snaps to them. My arc is more than a semicircle so the brick does not line up with a segment of arc when I pull it, the arc that it.
I am on my Mac, which is new to me, so I don't know how to capture a window to post so I will have to save the sketchup file itself. (Would take that bit of knowledge too, if you knew how). Easy on my PC buy am learning the mac as i go.
If you can tell me how to get the brick to line up with a segment it would be most appreciated. it may also help me solve other alignment issue that I seem to have as well.
Thanks,
Gaieus,
I don't think that my mortar joints will look as good as those that you have placed into your arch. I am a newbie at that part as well :>)
Obviously if one gets familiar with sketchup it can be a useful powerful tool. You seem to have a bit of experience with it.
I don't have those aspirations but do hope to become more conversant over time. I am in no rush as this project is scheduled to be started after my porch is completed. I was able to make a simple model of our home and the new attached porch with just some simple scanning of the forum. this oven, however, is a completely different animal.
You can see that I struggled with the porcha s there are several solids making up what should be one surface but hey, It helped me see the structure, which was my goal.
Helpful as well, as we modified the design based on what we saw here and got rid of the center post. i haven't modeled the final design as I'm now onto this oven project. the builders can worry about the porch at this point. I will build the oven so figured it was a better place to spend my time.
Oh well, again, baby steps will suffice for now.
Thanks again for the help. i am going to try a radial array now, no color, no mortar, just a simple array ;>)
Jim
Wow, Thanks Gaieus. I have not been able to figure that array tool out. This should help greatly. I can simply rotate the plane and build the array in the horizontal plane, as opposed to the vertical. i need to figure out how to tilt the bricks prior to arranging them in an array but one step at a time.
Thanks. Once I get that figured out I'll post the results. Still trying to figure out how to get all the floor bricks onto the same plane. This is a recurring problem for me. Once one gets off I can't get it back in plane.
jim
I have been going through the newbie forum. Probably should have posted this there i guess, sorry.
Anyway, having some luck and have actually started to lay out a floor but am having the same problems I always do, registration on the axes. note how my bricks don't all line up in the same plane. And I am working on the flat surface. Once I start on a curved surface I can't imagine what I'll end up with.
How can I get these bricks to touch each other, and also to be on the same plane?
Well, at least now I know that this is possible.
Someone has already done this for their own WFO build. It is also in the sketchup 3-d warehouse. Now if I can just figure out how it was done I'll be a happy camper.
This is what I am trying to accomplish, but with an internal floor modeled as well. In other words, the floor is 1/4" away from the internal edge of the soldier course of bricks that are the lowest row.
My hope is to play with the angles here so that I have some idea as to how to cut the bricks to get a good fit when I start cutting them. Might save me some money in bricks, and also give me a chance to learn how to use sketchup better than my rudimentary skills at present.
Jim