How to "build" with bricks in sketchup - Newbie
-
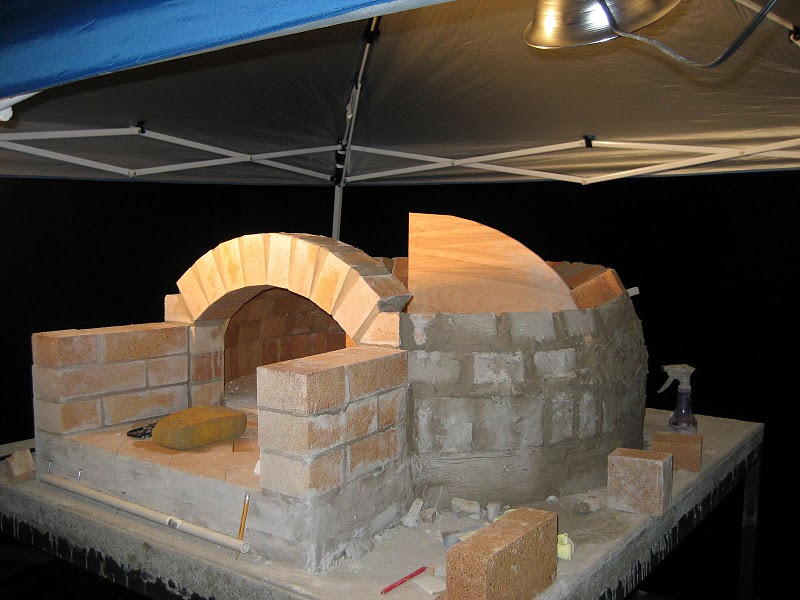
I am trying to model a brick oven that I am about to build. It is purely a personal project all in the quest for great pizza :>)
I am not sure that I understand the methodology to use with sketchup to accomplish this. I am guessing that there are several possible ways to do this but I am looking for advice.
I don't know if I should build a "pile" of these bricks and then try and place them individually, or if there is a better way to do it. I will have to cut some bricks but that part is easy. My problem is moving bricks around for placement.
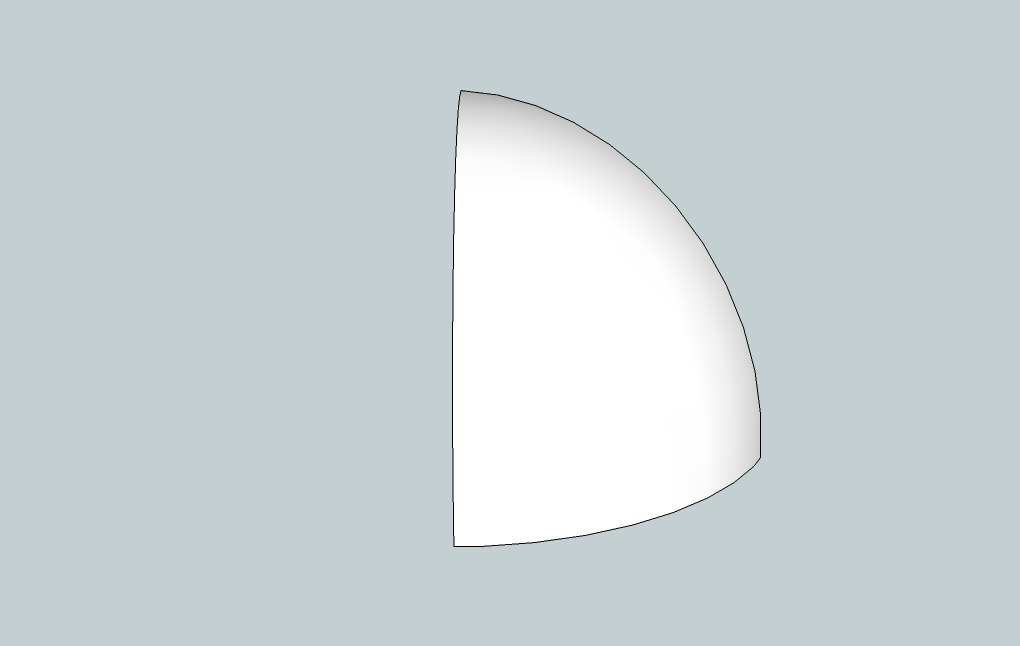
The basic model is a squashed hemisphere. Circular around the base but not in cross section. The cross section is a bit compressed from the top, if I am describing it right.
The floor of this oven is a herring bone pattern.
I don't know how to easily move these bricks around in all three dimensions. I also don't know how to distribute them radially, although I know it is possible because one of the tutorials incorporates this in an automated video. It all happens too fast for me to follow though.
I have included a couple of photos of an example of what I am trying to model.
Any help or advice with regards to laying out brickwork in sketchup would be greatly appreciated. Alternatively, if there is a good tutorial that describes how to do this I would love to read it.
Thanks in advance,
Jim

-
See this recent thread & the tut

-
Hi Pilou,
Thanks for the links. That stove is cast refractory, mine will be brick. I will go through the tutorial, though, as I am bound to learn something.
Still looking for the best way to distribute bricks around an arc, and then follow that up with a row of tilted cut bricks, several times over.
Thanks,
Jim
-
@jagizzi said:
Still looking for the best way to distribute bricks around an arc, and then follow that up with a row of tilted cut bricks, several times over.
Thanks,
Jim
You will still need a "DOme" as construction lines in Sketchup or sand mold support when building it.
-
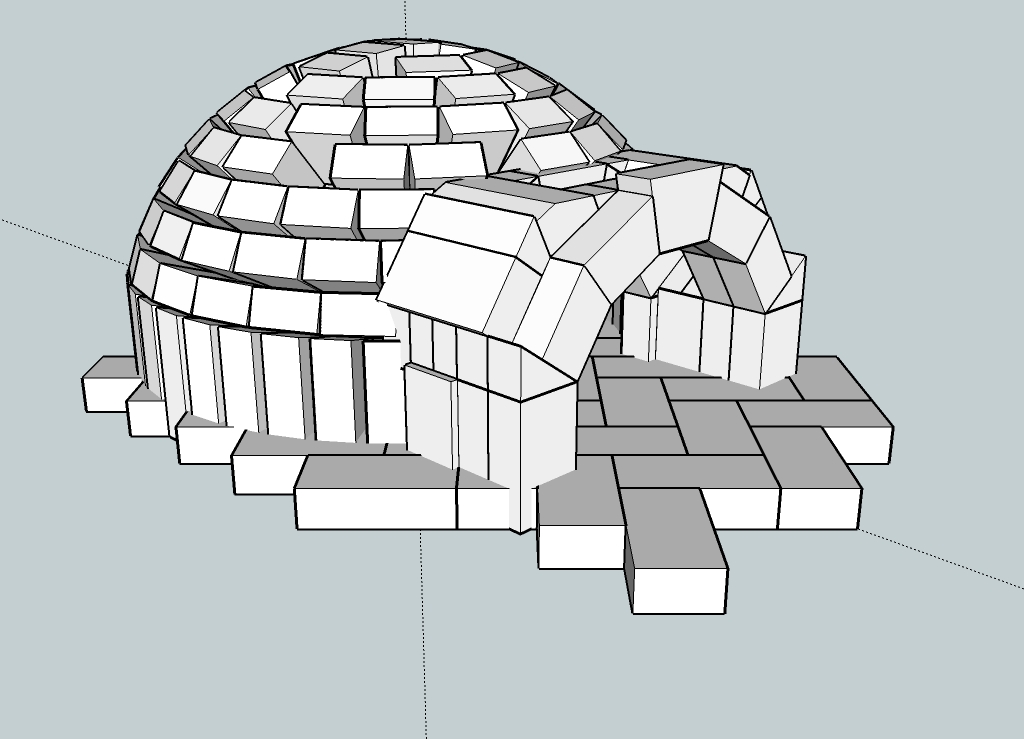
Well, at least now I know that this is possible.
Someone has already done this for their own WFO build. It is also in the sketchup 3-d warehouse. Now if I can just figure out how it was done I'll be a happy camper.
This is what I am trying to accomplish, but with an internal floor modeled as well. In other words, the floor is 1/4" away from the internal edge of the soldier course of bricks that are the lowest row.
My hope is to play with the angles here so that I have some idea as to how to cut the bricks to get a good fit when I start cutting them. Might save me some money in bricks, and also give me a chance to learn how to use sketchup better than my rudimentary skills at present.
Jim
-
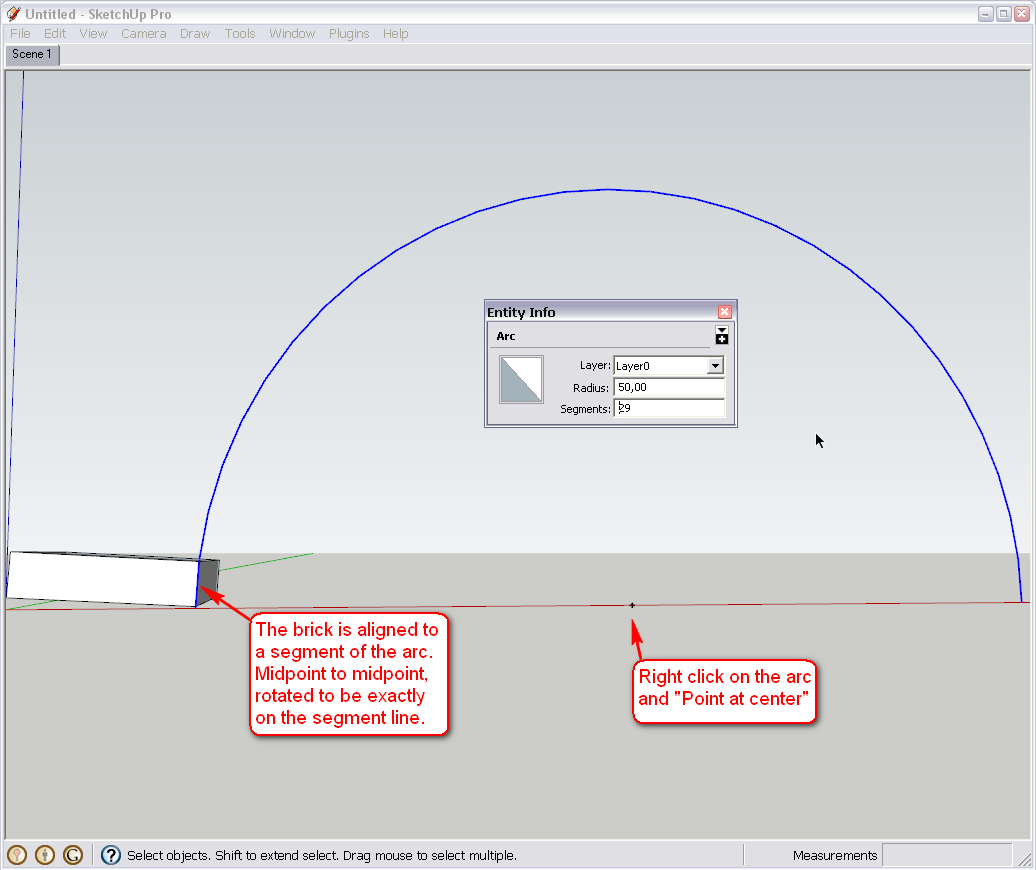
The simplest and most accurate way would be to use a radial array. In the image below I made a piece of brick that it 5 cm thick in my example. The arc has 100 cm span (diameter) also again just for an example.
You will need to adjust the segment count of the arc so that one segment will be just as longer than the brick thickness as much mortar you plan to leave between - also, I made it an odd number as for an arch it is always nicer to have a single brock for a "keystone" at the top.
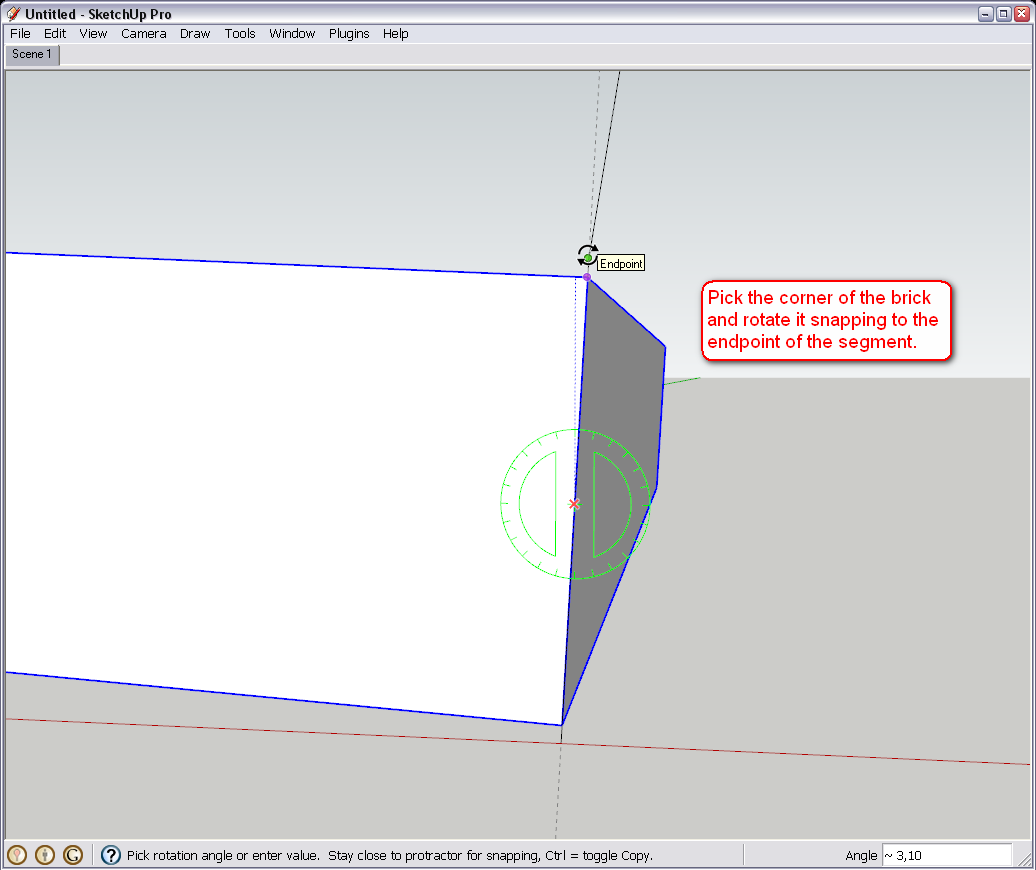
Align the brick to the first segment of the arc so that its midpoint matches that of the segment and also rotate the brick slightly so that its edge will also be perfectly aligned on the segment. We also need a centerpoint for our arc - this will be the center of rotation.
Now select the brick then pick the Rotate tool, place it into the center, press Ctrl so that we will make copies, pick any endpoint on the arc (for convenience, to avoid snapping to it, it is better not even to pick one near the brick) and make your first copy: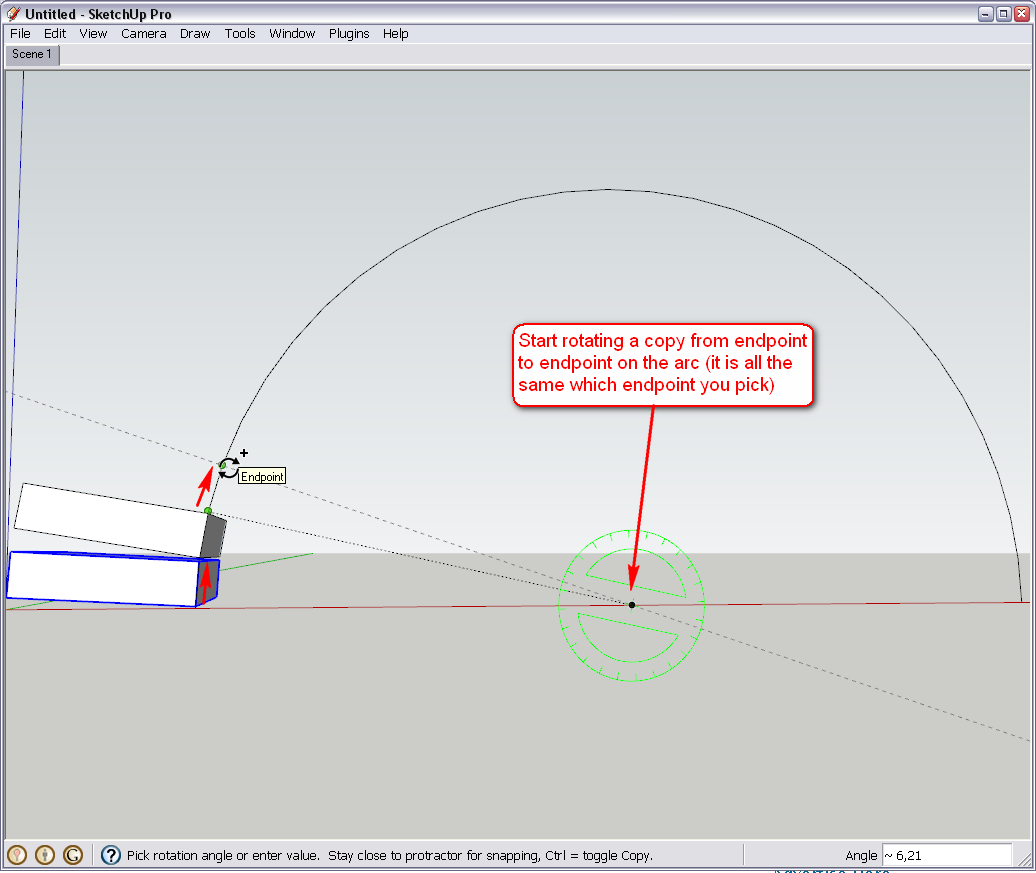
Then simply type 28x (28 only for my example as we have 29 segments in our arc) and press Enter: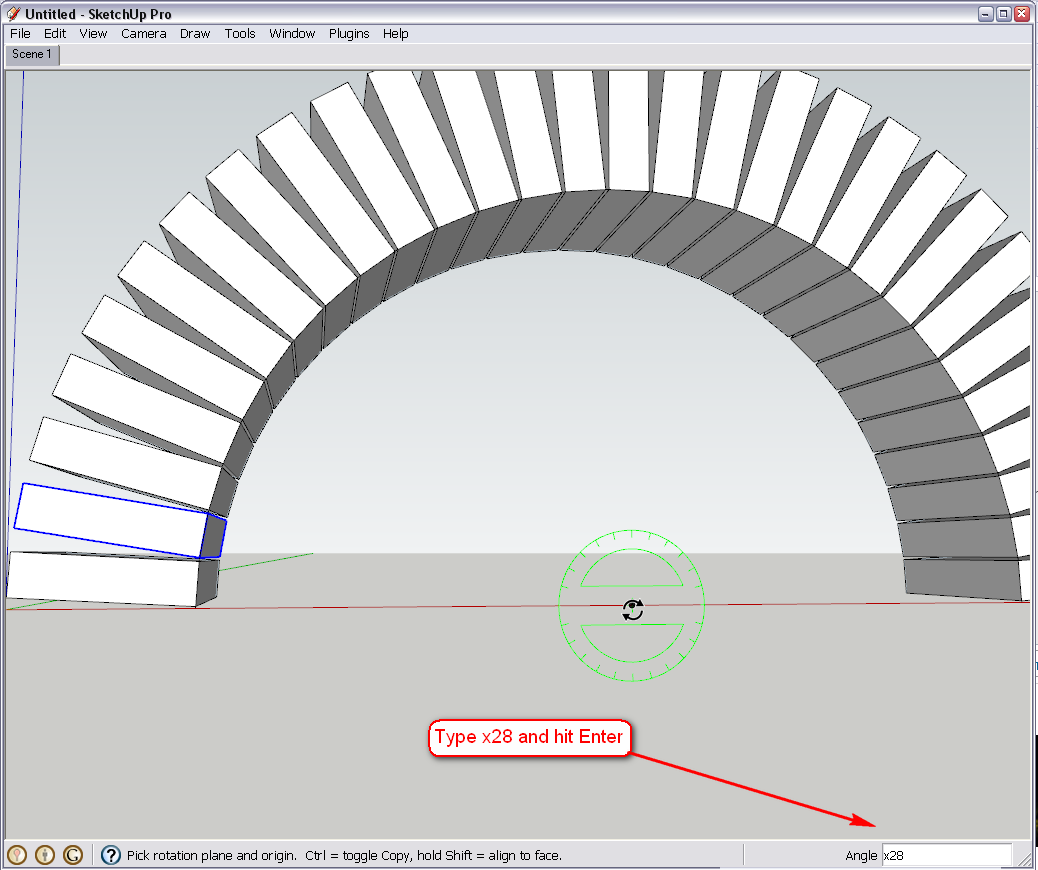
A bit of filling out with the mortar and colouring our bricks...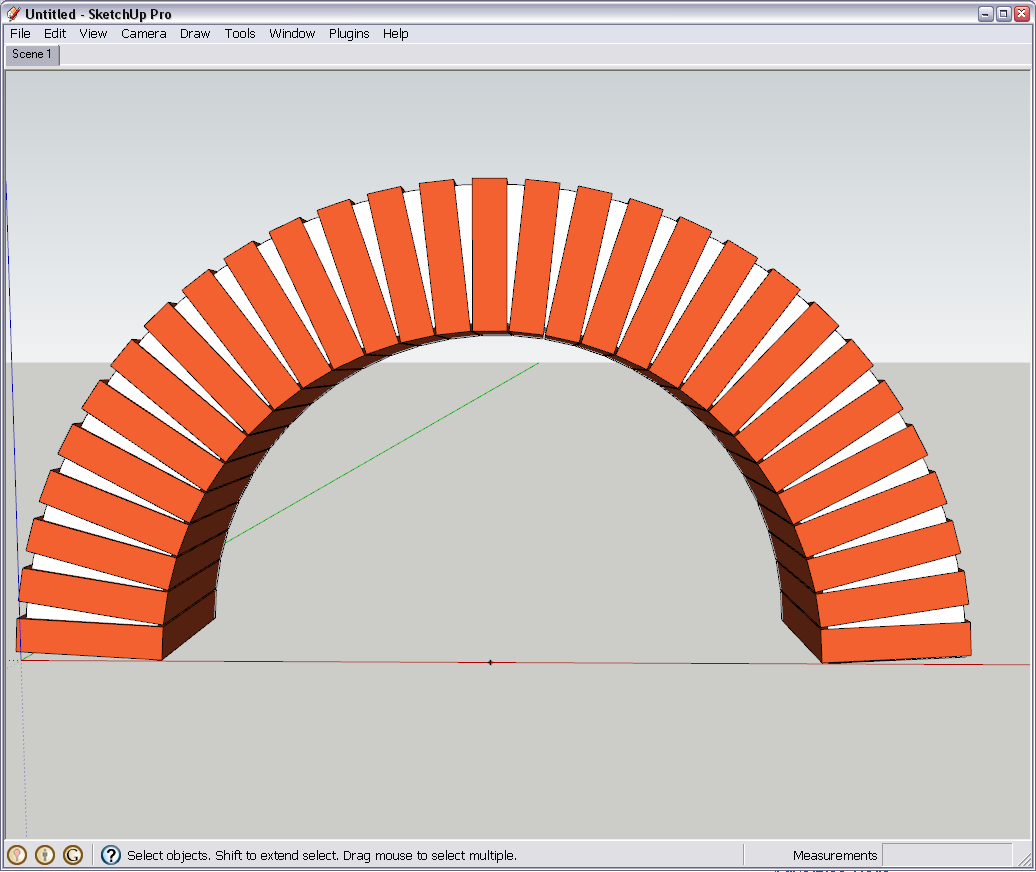
And of course, the "D0me" will be a bit bigger challenge but can be done with radial arrays, too. -
I have been going through the newbie forum. Probably should have posted this there i guess, sorry.
Anyway, having some luck and have actually started to lay out a floor but am having the same problems I always do, registration on the axes. note how my bricks don't all line up in the same plane. And I am working on the flat surface. Once I start on a curved surface I can't imagine what I'll end up with.
How can I get these bricks to touch each other, and also to be on the same plane?
-
Wow, Thanks Gaieus. I have not been able to figure that array tool out. This should help greatly. I can simply rotate the plane and build the array in the horizontal plane, as opposed to the vertical. i need to figure out how to tilt the bricks prior to arranging them in an array but one step at a time.
Thanks. Once I get that figured out I'll post the results. Still trying to figure out how to get all the floor bricks onto the same plane. This is a recurring problem for me. Once one gets off I can't get it back in plane.
jim
-
Gaieus,
I don't think that my mortar joints will look as good as those that you have placed into your arch. I am a newbie at that part as well :>)
Obviously if one gets familiar with sketchup it can be a useful powerful tool. You seem to have a bit of experience with it.
I don't have those aspirations but do hope to become more conversant over time. I am in no rush as this project is scheduled to be started after my porch is completed. I was able to make a simple model of our home and the new attached porch with just some simple scanning of the forum. this oven, however, is a completely different animal.
You can see that I struggled with the porcha s there are several solids making up what should be one surface but hey, It helped me see the structure, which was my goal.
Helpful as well, as we modified the design based on what we saw here and got rid of the center post. i haven't modeled the final design as I'm now onto this oven project. the builders can worry about the porch at this point. I will build the oven so figured it was a better place to spend my time.
Oh well, again, baby steps will suffice for now.
Thanks again for the help. i am going to try a radial array now, no color, no mortar, just a simple array ;>)
Jim
-
@jagizzi said:
I have been going through the newbie forum. Probably should have posted this there i guess, sorry.
If you felt it were more comfortable there, I can always move your topic there and we can continue there.
We have the newbie forum so that anyone can feel more comfortable when asking "embarrassingly newbie" questions but we never force anyone to use it with even the most basic questions.@jagizzi said:
How can I get these bricks to touch each other, and also to be on the same plane?
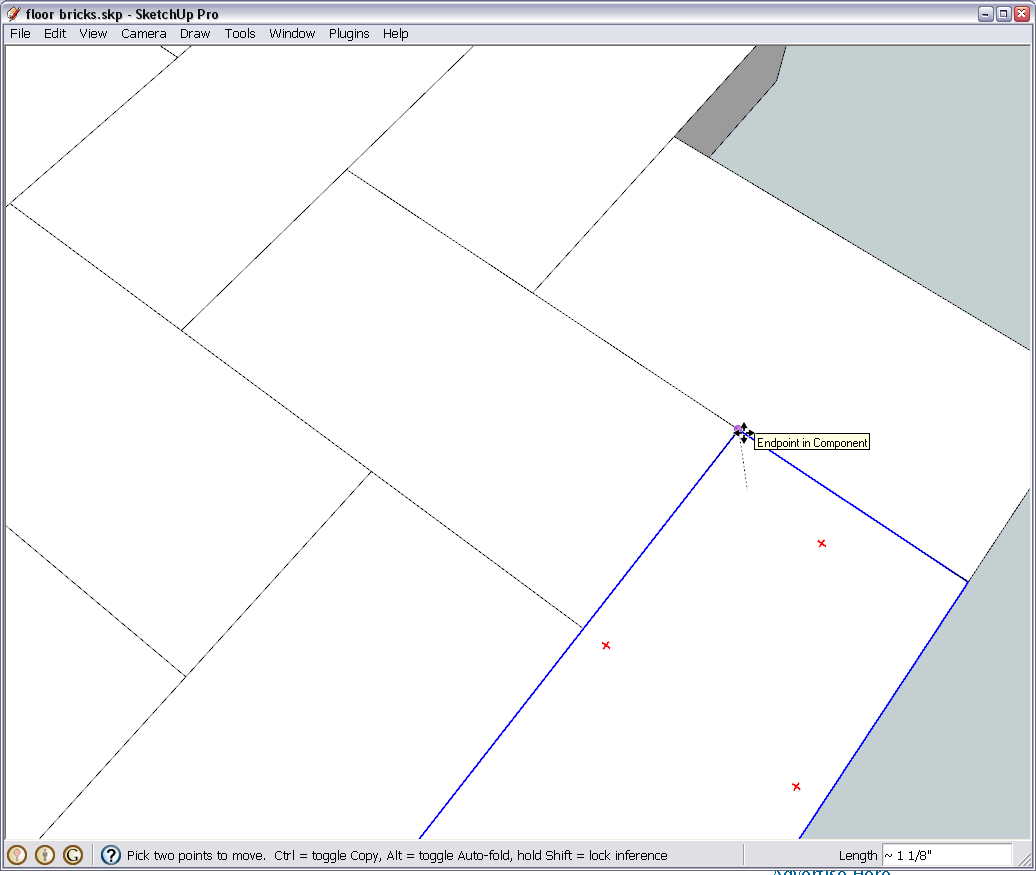
What you haven't probably learnt yet is how to utilize, exploit and harness all the potentials of the inference engine in SU. It will always help you align object perfectly - in fact, some people wish they could turn it off in certain cases instead. Simply picking a component's endpoint with the move tool:
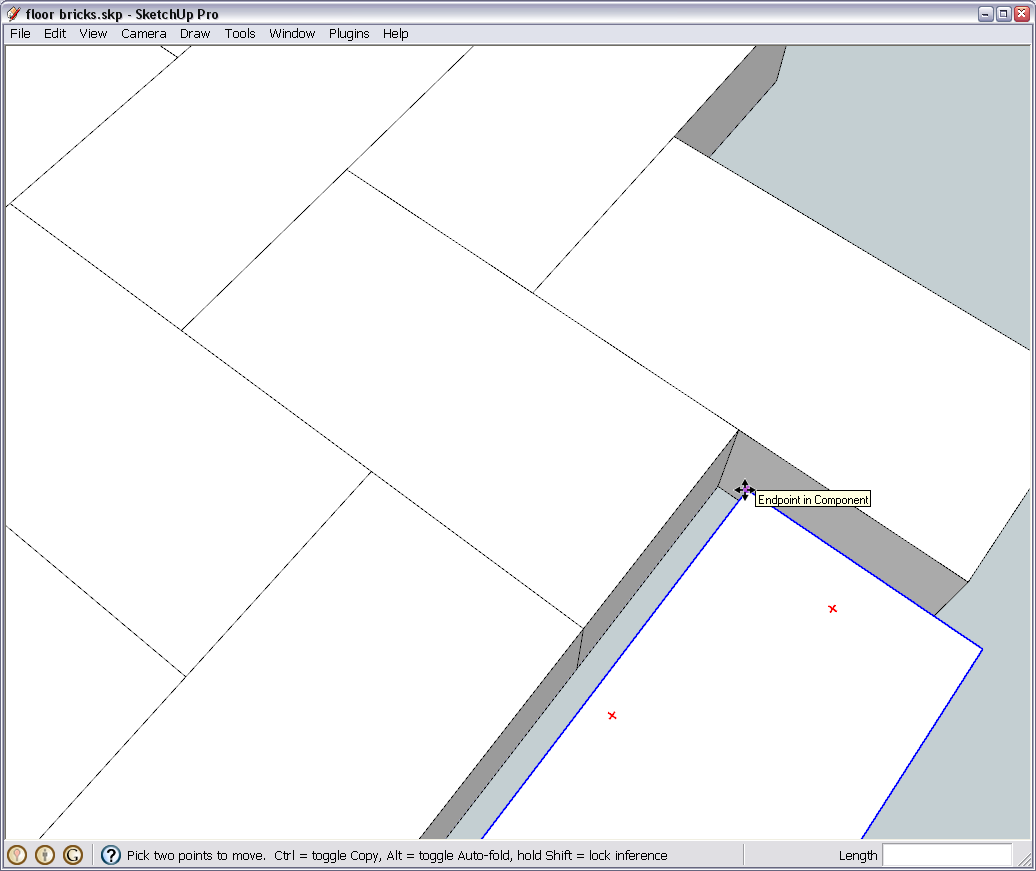
Then move it snapping to the endpoint of the other brick:@jagizzi said:
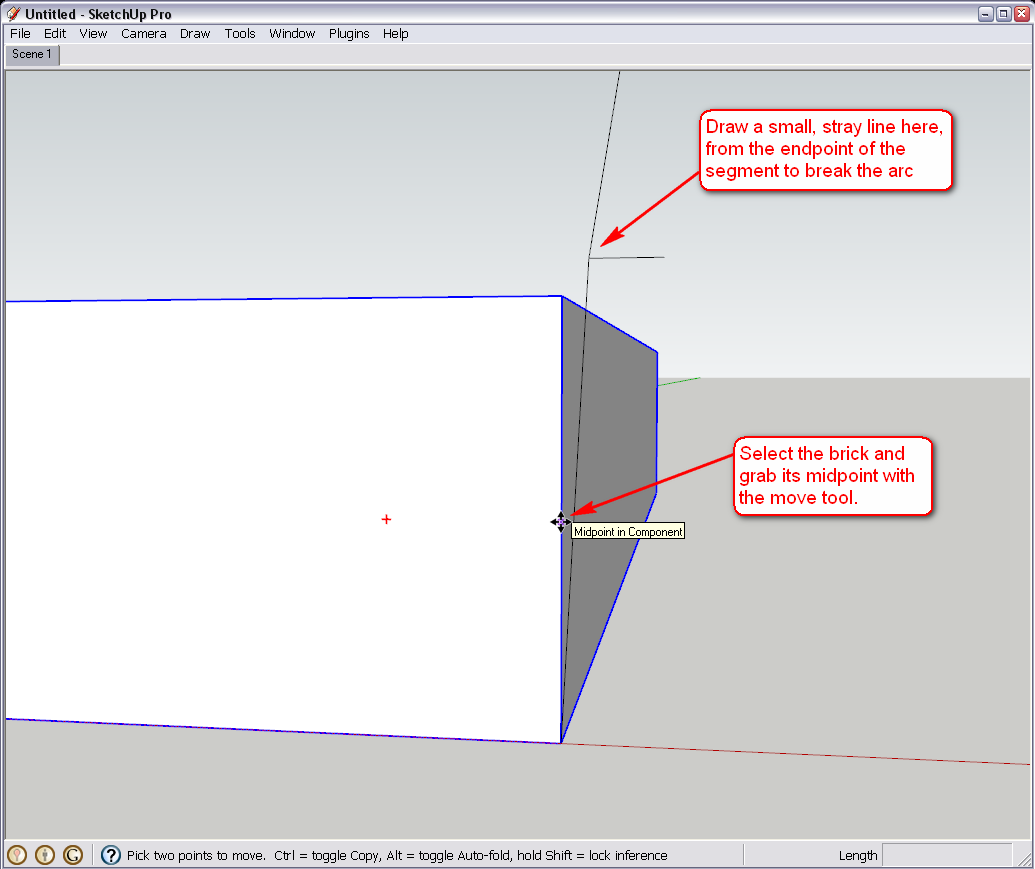
i need to figure out how to tilt the bricks prior to arranging them in an array but one step at a time.
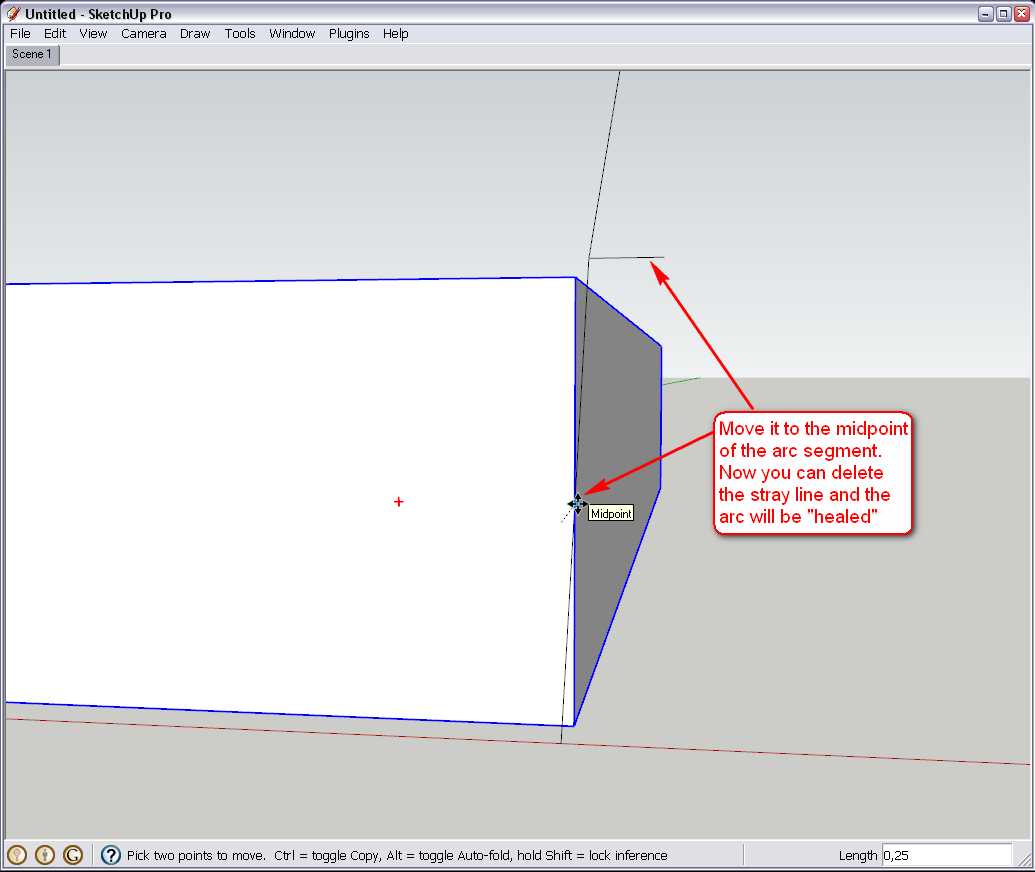
As for the alignment of the brick piece, it is the same (we need to draw the stray line below in order to break the arc entity otherwise we never get the midpoint inference on the segment. Erasing it in a later step will "heal" the arc back).
Without talking too much, see the steps:

As for your other file you have just posted while I was writing this, I'll have a look (one step for me at a time, too )
) -
Gaieus,
I can handle the number of segments as I know how to do that. What I cannot do is align anything at this point. I created a brick. It aligns to the axes, snaps to them. My arc is more than a semicircle so the brick does not line up with a segment of arc when I pull it, the arc that it.
I am on my Mac, which is new to me, so I don't know how to capture a window to post so I will have to save the sketchup file itself. (Would take that bit of knowledge too, if you knew how). Easy on my PC buy am learning the mac as i go.
If you can tell me how to get the brick to line up with a segment it would be most appreciated. it may also help me solve other alignment issue that I seem to have as well.
Thanks,
-
I will digest what you have so kindly posted, no need to move to newbie forum if others don't mind.
You are posting as I am posting and the answers magically appear, whew.
I will practice what you have posted and get back to this tomorrow. The dog is snoring so I should probably think about it as well.
Many thanks for your help so far. i fear there will be many more questions, but I promise not to overwhelm too much in one day :>)
Jim
PS. Glad to have found this forum. I am also looking forward to the newletter. I saw it referenced in your signature so will definitely be reading it. Will most likely be above my head for a while but, like Photoshop, I am sure it takes time, practice, and some patience.
-
@jagizzi said:
Gaieus,
I don't think that my mortar joints will look as good as those that you have placed into your arch. I am a newbie at that part as well :>)
It's a kind of "cheat" actually - I simply made an arch of the original arc (a bit offset and recessed with the PushPull tool on the front and back). See attached model - go through the "scenes"
Arch.skp@unknownuser said:
You can see that I struggled with the porcha s there are several solids making up what should be one surface but hey, It helped me see the structure, which was my goal.
So I have lloked into that file, too. You could actually erase most of those edges dividing the roof of the porch.
@unknownuser said:
What I cannot do is align anything at this point. I created a brick. It aligns to the axes, snaps to them. My arc is more than a semicircle so the brick does not line up with a segment of arc when I pull it, the arc that it.
This should be solved exactly the way I showed in my last post. But make sure to make the brick a component first. Now, as you have built it on top of the arc, it intersects with it and if you look at it from below, it has chopped off a bit of the last segment. You will end up with errors this way.
@unknownuser said:
You are posting as I am posting and the answers magically appear, whew.
Yeah, I keep turning my head, too...

-
Gaieus,
Woo Hoo! I got the inference part, thanks loads for that! I just wasn't moving in close enough to pay that much attention to the cursor change and the endpoint color changes.
That is nice. I can now clean up my floor bricks, much appreciated.
Now, truly, all for tonight for me.
Jim
-
How about getting hold of one of DOme's segments and "cut" it up into bricks?
-
@unknownuser said:
@unknownuser said:
How about getting hold of one of DOme's segments and "cut" it up into bricks?
If you don't want absolute precision just aspect
(briks will be not separate objects)
Call hidden Geometry
Select faces you want and Apply Joint Push Pull by Fredo6I think he wants accuracy. So why can't he trace appropriate hidden lines, create a brick using the geometry and then print the front + top face full size as templates for plywood templates?
Every home needs a DOme ...
PS don't forget the bunghole problem
-
I have managed to lay out the floor with your help. Thanks.
Now I need to trim it, and that, again, is not obvious to me. Also complicated to explain but I will try.
I want to take the included circle and lay it on the floor and cut away the surrounding bricks with the following exception.
There will be a vent floor that is 19" wide at the point that it touches the circle. Basically lopping off the section of the circle that is defined by a chord 19" long.
That floor will be 23" wide at the outside edge and will be 16" deep. the final form should be something like a keyhole shape. See the first photo in this thread.
Obviously possible but not easy to figure out. I laid the circle onto the bricks and thought that I would be able to push them away, but the only surface that is push/pullable is the full set of bricks contained by the circle. that I don;t understand at all but think it must have something to do with the fact that the bricks are components.
Again, looking for advice. I was thinking of making the courses of bricks on different layers. Would that be a good idea? I don't know if that will cause registration issues later.
Thanks,
Jim
-
Right, you cannot PushPull only "raw", flat, coplanar faces. So no components, groups, curved surfaces or image entities (and whatever I now forget). So in order to be able to PushPull a face in a component, you have to edit it to enter its editing context - then you can access the face inside.
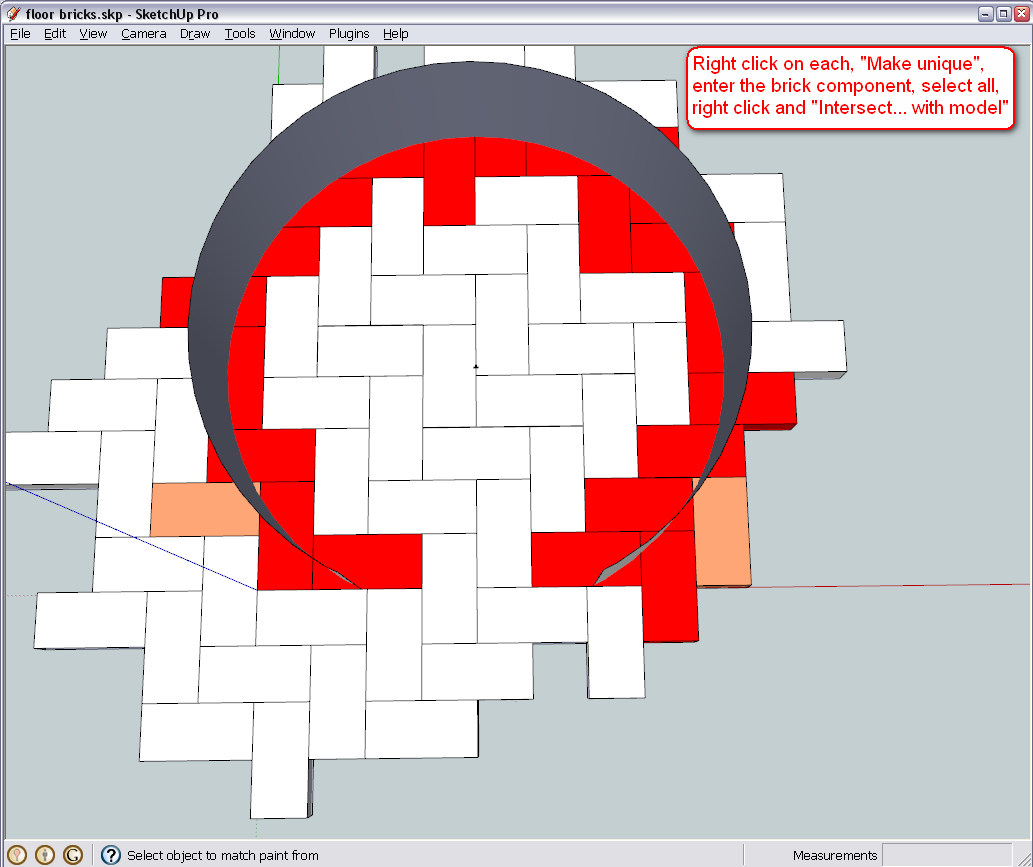
Note however that if you edit one instance of the same component definition, all the other instances will be affected, too, so you need to make some of those bricks "unique" components (in which case the idea of being a component is somewhat redundant but we can live with that).
First you have to position your circle on top of the bricks, PushPull it into a cylinder (you will only need the side of the cylinder), delete a 19" part in its front, make the affected bricks (quite a lot) unique one-by-one (I painted them in the model), edit each, intersect with the model and then you will find the intersection lines appearing - along which you can PushPull and lose the parts that are outside of your cylinder.
If you wish, you can play around with finding symmetrically similar pieces and spare some bits of memory using parts that are cut similarly as instances of the same (but already unique) component (see two, probably similar pieces painted differently) but that would be more hassle than finishing with each one by one.
This is actually the same as in real life - you need to cut those pieces one by one while the whole ones inside or outside can come from the factory.
-
Hi Gaieus,
I am able to edit the component and push the faces away as you have instructed thanks. As my goal is twofold, however, to learn as well as model, I have another question.
super simple as well but I have to ask it as I can't make the circle. My circle is not hollow as yours is, but is a solid circle. I then have no idea how to cut out a piece that is 19" wide.
As I said, these seem like simple things but I don't know how you did them.
Thanks for getting me this far.
Jim
-
You can always select a face/surface and delete it. I pulled the circle up to be a cylinder and deleted the top.
As for the opening - I made a cube with 19" sides, made it a group, poked it into the cylinder, entered the cylinder group (I believe I made it a group), selected the sides and right click > Intersect with model. Then deleted the useless geometry and there is the opening.
In SU you keep adding/subtracting until your model is done.
Hello! It looks like you're interested in this conversation, but you don't have an account yet.
Getting fed up of having to scroll through the same posts each visit? When you register for an account, you'll always come back to exactly where you were before, and choose to be notified of new replies (either via email, or push notification). You'll also be able to save bookmarks and upvote posts to show your appreciation to other community members.
With your input, this post could be even better 💗
Register Login


Advertisement