Medeek Wall Plugin
-
@bob james said:
@medeek said:
@bob james said:
Really great progress.
When drawing in 2D the wall intersections are not the same (just dual overlap) as when that 2D is changed to 3D.When you are in 2D mode the wall is represented by the outline of the bottom wall plate. When in 3D you will see the top most wall plate which will probably lap the corner if you are using double top plates.
I understand that: but the bottom wall plates would butt up against each other, not overlap as shown.
You are correct. I am still working on the auto-configuration for the corners.
Basically when you create a new wall segment if auto-config or auto-connect is turned on then the plugin will look at the wall corners you are connecting to and adjust the corner start and corner end appropriately.
-
After reviewing a suggestion by Steven Dorst (Sjdorst) and giving it some more thought I've decided the additional tools of the second toolbar can be consolidated.
There will be an icon to add a new window or door but the icon(s) to move, edit or delete one of these openings can be the same icon.
The second toolbar will be:
- Split Wall
- Move Wall
- Edit Opening
- Move Opening
- Delete Opening
-
A quick preview of the Window Tool (locating only):
-
Exterior trim can get very elaborate based on some work I've seen and also some recent renderings sent me of some exceptional architectural work.
That being said I'm wanting to start off simple with the exterior trim and then as things progress keep adding more options and layers of complexity as required.
For doors and windows I've come up with the following basic trim parameters based on my own observations and also suggestions from you, please review and comment:
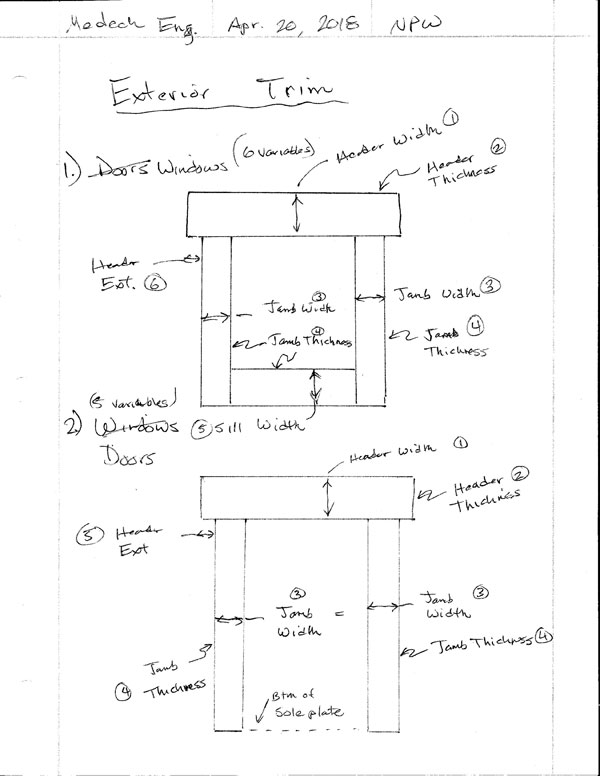
I typically don't see any sill trim at the bottom of doors, but that may be an option if necessary.
I am planning on placing the trim flush to the framed opening unless someone thinks I should add an additional parameter for a reveal.
I like the idea of having the header, jamb and sill all independent widths for total flexibility. Each of these 11 parameters can be set to a default value in the global settings, but adjusted for each door or window.
As for color (material) and layers, those both can be set in the global settings as well. The layer cannot be adjusted in either the wall or opening edit menus however the material will be allowed to be adjusted in the window or door edit menus.
If the cladding or sheathing is not enabled for a wall then the trim will not be drawn, however the parameters will be stored in the library for that opening if they are entered (ie. trim enabled).
-
I've been looking at some screen shots from Chief Architect and giving some thought to framed opening headers and their trimmers.
Beyond the myriad of options I am already providing for window and door headers I may need to extend the list to a few others.
The current list is:
4X4
4X6
4X8
4X10
4X12
6X4
6X6
6X8
6X10
6X12
(2) 2X4
(2) 2X6
(2) 2X8
(2) 2X10
(2) 2X12
(3) 2X8
(3) 2X10
(3) 2X12
1-3/4X7-1/4 LSL
1-3/4X9-1/4 LSL
(2) 1-3/4X7-1/4 LSL
(2) 1-3/4X9-1/4 LSLFor larger doors (garage doors) glulams are fairly typical in my neck of the woods. If the designer selects glulam an additional menu will pop up that allow for the selection of the exact glulam size. I've already implemented a similar feature in the Truss Plugin for glulam rafter roofs.
I think it might also be interesting to provide an auto calculate feature based on the width of the framed opening:
- AUTO GLULAM
- AUTO 2X
- AUTO 4X
- AUTO 6X
- AUTO LSL
This is not an exact engineering solution since we don't know the loads on the header but it could at least get it ball park. Future releases of the plugin will have more engineering capabilities added so that one can actually run the actual numbers on a header (I'm think Forte type software here, one that I commonly use in my own practice).
Along the same lines another parameter should be added into the global settings to allows for auto-calculation of the door/window trimmer qty., again this would be based off of the width of the framed opening and also factor in whether the wall is an interior or exterior wall.
-
Another preview showing the insertion of windows and some other features:
View model here:

3D Warehouse
3D Warehouse is a website of searchable, pre-made 3D models that works seamlessly with SketchUp.
(3dwarehouse.sketchup.com)
-
It's looking really good — great progress!
I hope once you have all of the functionality coded, you will consider (in a future version) a second input method for generating walls and their openings: from the faces of massed walls.
It would fit more easily into our workflow, since we always have a massed model before elaborating structural and finish detail, so that walls and windows are already fully defined in size, position and orientation.
As is, it is definitely a huge step forward and I'm looking forward to your finished version one.
-
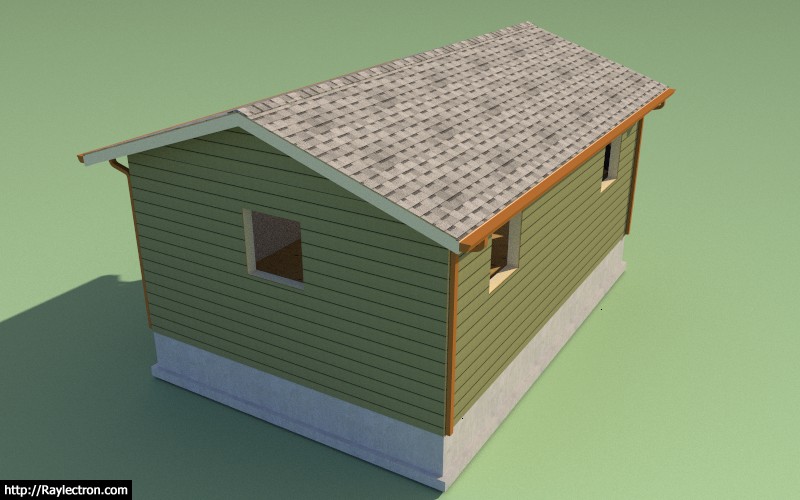
I'm only about 2-1/2 weeks into the actual development of this plugin so realize that I've only just scratched the surface. With the latest preview video I am getting a lot of questions about other wall systems. Initially I will release the plugin with the conventional light wood framing but subsequent developments will also look at steel framing, CMU, brick and other more exotic methods as the demand arises.
The framing option will currently be:
- Yes/No/2D
This will probably be expanded to (or some other variation):
- Lumber/Steel/CMU/None/2D/etc...
I still have a lot of work to do before I can release this even to the beta testers.
The current pre-release "todo" list is:
1.) Wall and Window edit, move and delete functions/Tools.
2.) Global Setting tabs for Window and Door settings.
3.) Rudimentary Door and Window plugin that integrates with this plugin tightly.
4.) Wall Move and Split Tool.
5.) Add air gap parameter for the cladding (ie. brick fascia).
6.) Auto corner configuration
7.) Polyline Wall Tool and Face Wall Tool (right now all you can do is create a single segment at a time).
8.) Final clean and addition of any additional parameters to the Global Settings.
9.) Further refinements to the Add Window and Add Door Tools.
10.) Gable/Shed Wall Tool.
11.) Add glulam beams to Window and Door header options.
12.) Update Wall Plugin web page.I'm sure there are other items that are probably missing from this list but those seem to be the major items right now.
I probably should have just left them but the blocking and insulation algorithms were complex and so it took me a couple of days to figure them out and then commit them to code. At one point I just had to start over since my initial algorithm was too inefficient and the code quickly got out of control and became an ugly bowl of spaghetti for lack of a better word.
Please keep sending me your suggestions, they do not get lost. I am compiling another post-release "todo" list where all of these other items will be considered and hopefully the majority implemented.
-
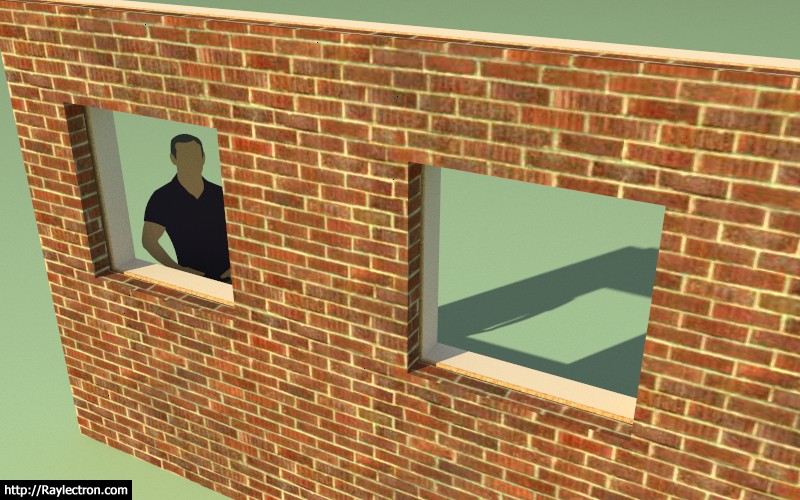
An additional parameter for cladding will added to the advanced wall options:
Cladding Corners: Flush/Lap/Miter
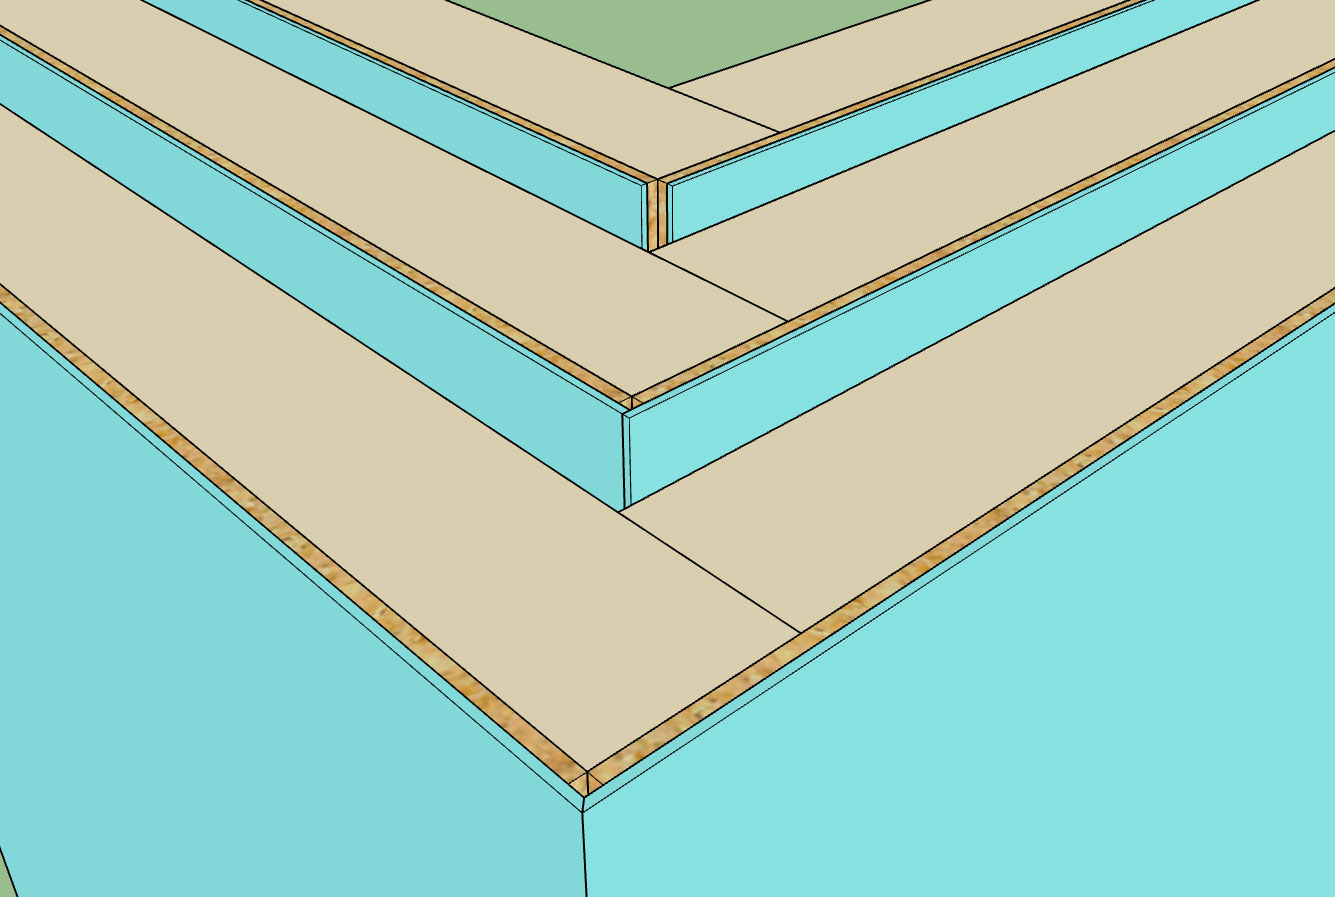
This parameter becomes important for certain cladding such as brick facade where the cladding thickness is significant and no corner trim will be present to cover up the corners.
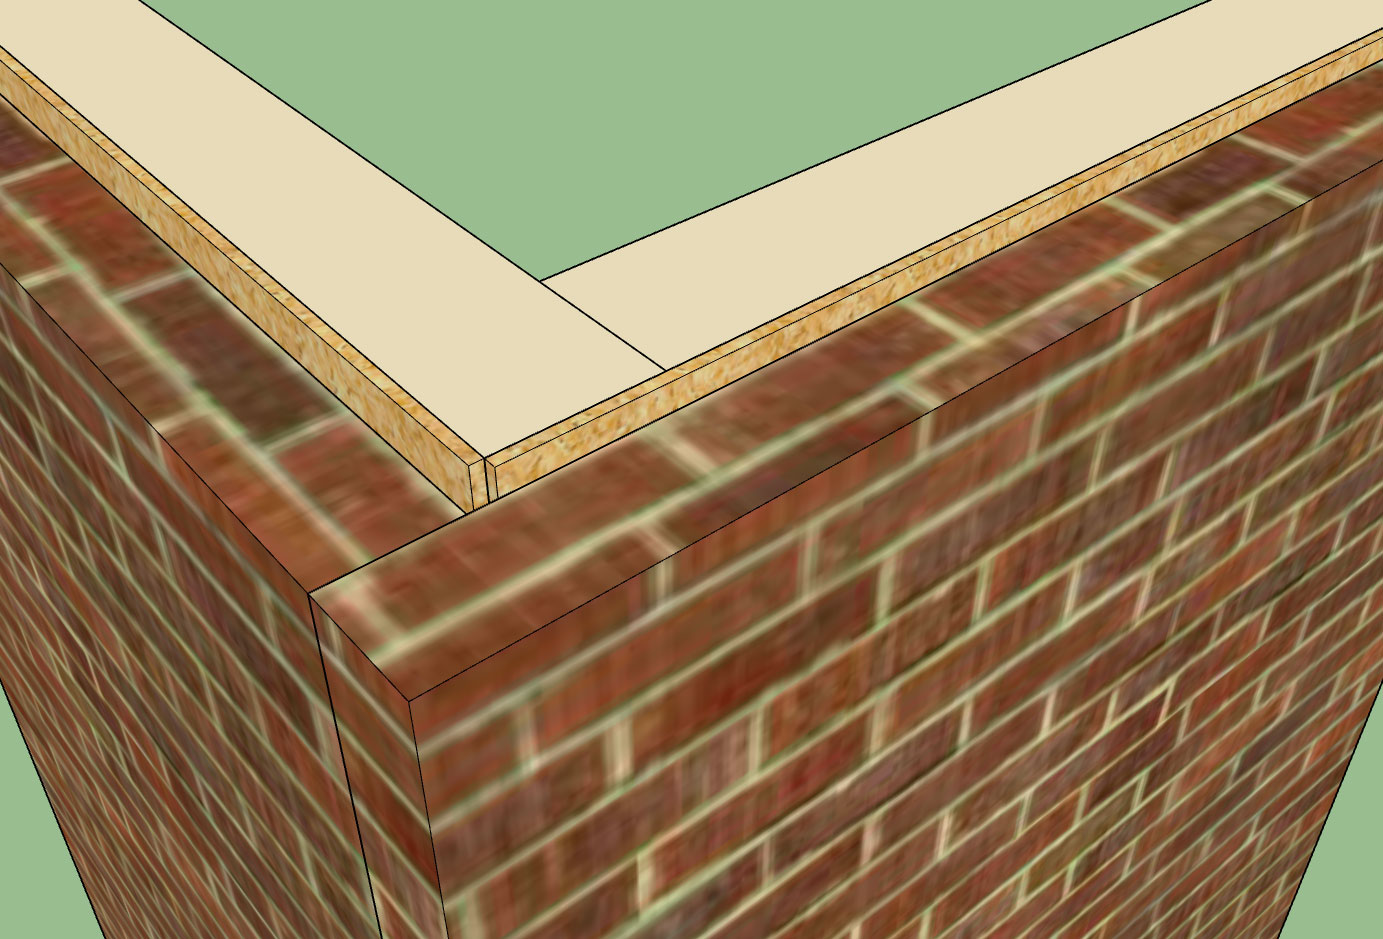
Another parameter that should also be added is an air gap, I am showing a 1" air gap between the brick cladding and sheathing in the image above.
-
I've added in the air gap and corner parameter:
I then put a wall on top of floor and stemwall foundation:
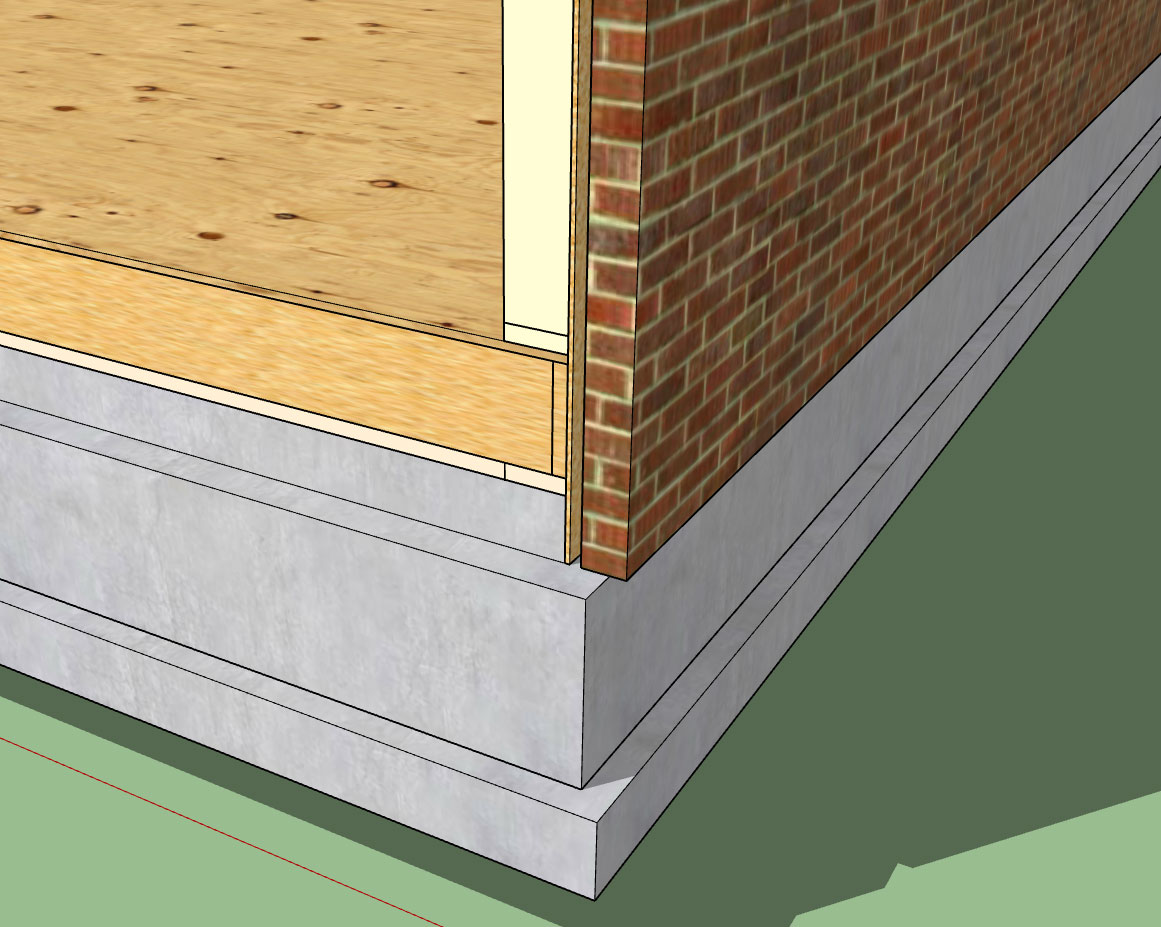
The one thing that immediately jumps out at me is that the vertical offset parameter for the sheathing and cladding probably needs to be divided into two parameters so that the offset can be set separately for both sheathing and cladding.
-
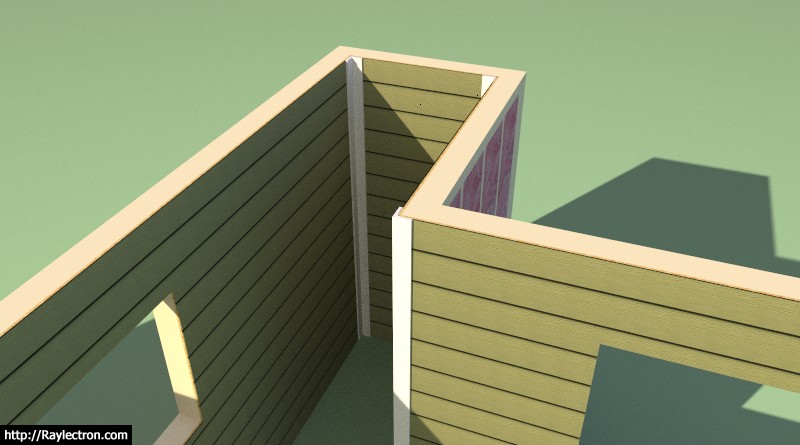
I've separated the cladding and sheathing vertical offsets (top and bottom) into separate parameters so you can now offset each independently of each other:

Notice the two value in the edit wall menu for the offsets. This should allow for maximum flexibility, however the addition of more parameters might make the entire interface more overwhelming to some.
-
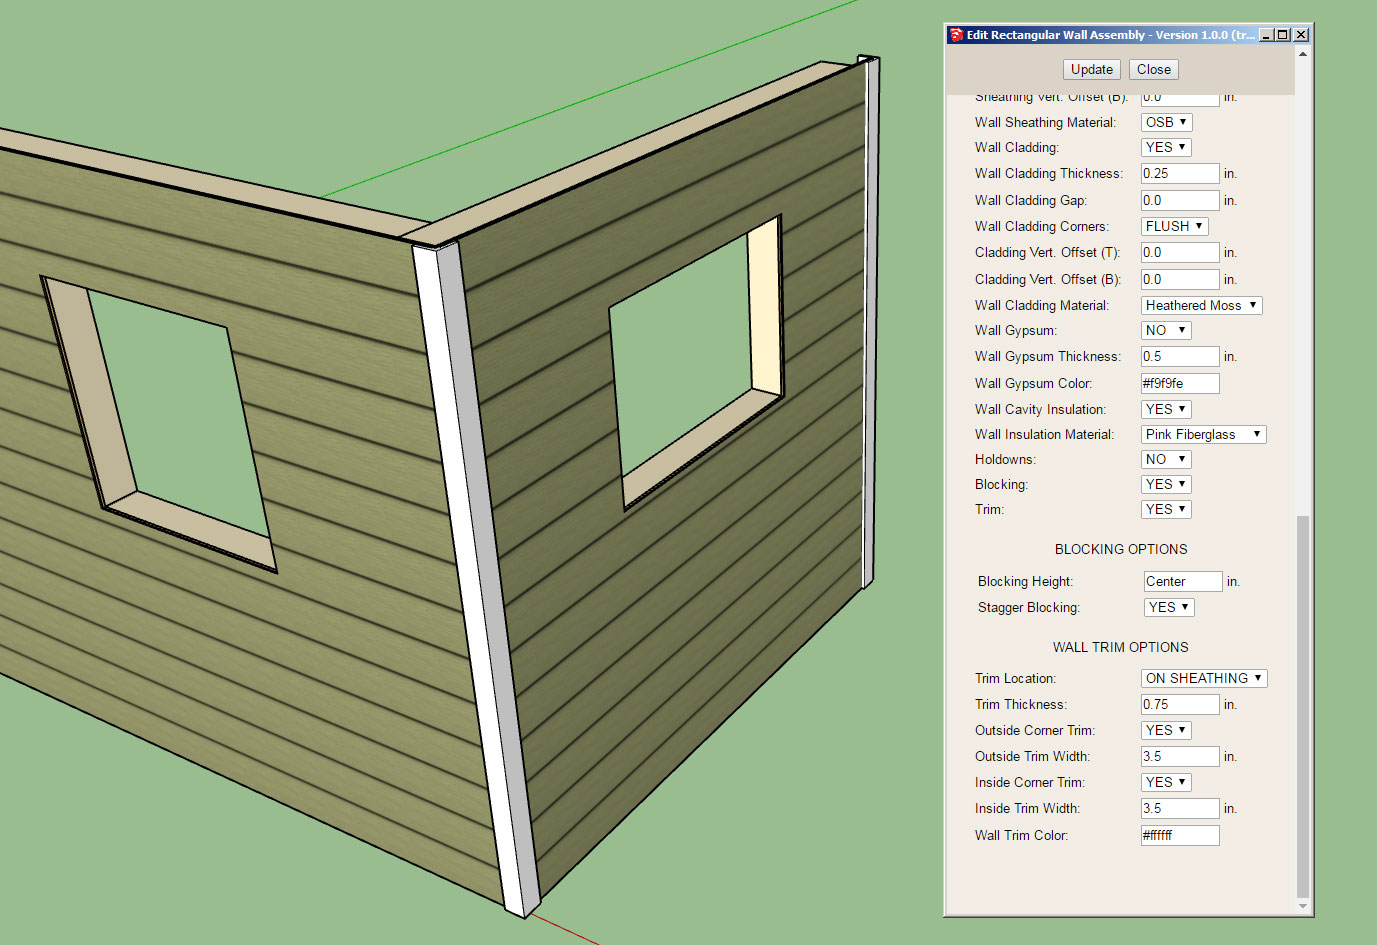
This evening I'm going to take a break from windows and doors and switch gears to the wall corner trim.
The wall corner trim (outside and inside corners) will be configured within the wall edit menu.
The door and window trim will be configured independently for each framed opening and edited within the door or window edit menu.
With trim in general I am trying to decide whether the trim should sit on top of the cladding or sit on top of the sheathing, or possibly a parameter that determines this location: ON SHEATHING/ON CLADDING
My initial list of parameters for the wall (corner) trim is looking like:
Trim Location: ON SHEATHING/ON CLADDING
Trim Thickness (in.): (defaults to 0.75 inches)
Outside Corner Trim: YES/NO
Outside Corner Trim Width (in.): (defaults to 3.5 inches)
Inside Corner Trim: YES/NO
Inside Corner Trim Width (in.): (defaults to 3.5 inches) -
You'll need to have both (on sheathing, on cladding) dependent upon what cladding you use.
-
@mtnarch said:
You'll need to have both (on sheathing, on cladding) dependent upon what cladding you use.
It makes more sense to put the trim on the the sheathing, since generally that is the way it is really constructed but there may be some designers who would like to have it on the cladding. I will provide the option for both.
In many cases the corner trim is assembled from two pieces but to start with I will go with the simpler monolithic corner piece (ie. AZEK).
-
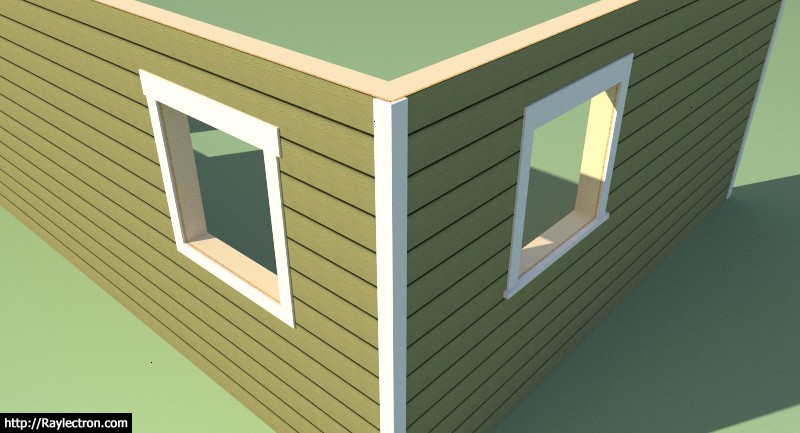
I've got the corner trim working reasonably well now:
It can also handle non-orthogonal corners.
-
That looks great!
-
The corner trim options within the Wall Edit Menu:
Then later today, a Style A (left wall) and Style B (right wall) window trim:
Style A is per the previous drawing I posted on the board. Style B is where the sill trim extends past the jamb trim(s). Note, that the thickness of the header, jambs and sill can all be independently set. At some point I would like to set it up so that users can save specific configurations
I'm now looking at the interior casing for the windows and also at the baseboard and crown molding trim. I'm not sure how elaborate I am going to get with this with the first go around, this may have to come later after the initial release. I'm trying not to get bogged down in the minutiae but as I've come to realize there are a lot of details when it comes to a full architectural design.
I'm also starting to think about the Windows and Doors. The doors (man doors) are fairly straightforward in my mind, use a typical pre-hung door, I've got some details that should guide me fairly well in that regard. Windows on the other hand are a real mixed bag, there are vinyl windows with the nailing flanges (the type I'm most familiar with) and then there are the much more expensive types. Any particular styles, brands or suggestions would be helpful.
-
Not sure this is in the plan, but of course it would make sense that a particular style is automatic for trim etc. once chosen. That is all new windows installed in the file come in with the correct style trim. Which leads me to the question with all parametric modeling like this where you seek to keep an identity for each object which can be updated: First, say you need to change all the trim at once--can you do that (happens to me all the time-- and components are helpful but don't do the whole job)? Secondly if the there is some window that must be different or there is something you must model "manually" which is outside the built-in options. What happens to those components down the road, can they somehow be integrated to the "smart" features of the model? A custom-modeled window that still has framing done by the plugin and cuts openings, is part of the materials list etc?
-
@pbacot said:
Not sure this is in the plan, but of course it would make sense that a particular style is automatic for trim etc. once chosen. That is all new windows installed in the file come in with the correct style trim. Which leads me to the question with all parametric modeling like this where you seek to keep an identity for each object which can be updated: First, say you need to change all the trim at once--can you do that (happens to me all the time-- and components are helpful but don't do the whole job)? Secondly if the there is some window that must be different or there is something you must model "manually" which is outside the built-in options. What happens to those components down the road, can they somehow be integrated to the "smart" features of the model? A custom-modeled window that still has framing done by the plugin and cuts openings, is part of the materials list etc?
A little bit to digest here, I will think on it. This project has ballooned well past my original estimate of what it would be. Like the truss plugin, I'm sure I'll be adding features and functionality well into the foreseeable future.
-
Here is my draft for Window Casing (Style A):

View model here:
3D Warehouse
3D Warehouse is a website of searchable, pre-made 3D models that works seamlessly with SketchUp.
(3dwarehouse.sketchup.com)
The parameters will probably be:
Head Casing Width: 5.5"
Side Casing Width: 3.5"
Apron Width: 2.5"
Jamb Ext. Depth: 2.5"
Casing Thickness: 0.75"
Stool Thickness: 1.0"
Apron Thickness: 0.75"
Jamb Ext. Thickness: 0.75"
Header Extension: 0.0"
Stool Extension: 1.0"
Apron Extension: 0.5"
Stool Projection: 1.25"
Casing Reveal: 0.25"
Shim Gap: 0.25"The values given are the default values and coincide with the model given above.
Some details show shims between the framing and the jamb extensions, others do not:

Hello! It looks like you're interested in this conversation, but you don't have an account yet.
Getting fed up of having to scroll through the same posts each visit? When you register for an account, you'll always come back to exactly where you were before, and choose to be notified of new replies (either via email, or push notification). You'll also be able to save bookmarks and upvote posts to show your appreciation to other community members.
With your input, this post could be even better 💗
Register Login


Advertisement