Need help making a hexagonal grid around a sphere!
-
Hello!
I'm in the middle of a school project where i need to design a parfume bottle. For this i need to make a 3D sphere with a hexagonal grid surrounding it. Since my experience and skills with sketchup is.. limited to say the least, i could really use the help of some pros!
I can't use a hexagon texture since i need to colour the individual hexagons red glass and metal. -
See TaffGosh at 3DWare house!

-
Hi Pilou, appreciate the help but i've looked through them all and i can't really use any of them. I need a make a sphere which hexagonal fields surrounding it. The final product should be a orange glass ball with an aluminium metal grid on it. Therefor i need a spere and the hexagons needs to bend around it. Is it even possible?
-
Ah, i figured it out, appreciate your help

-
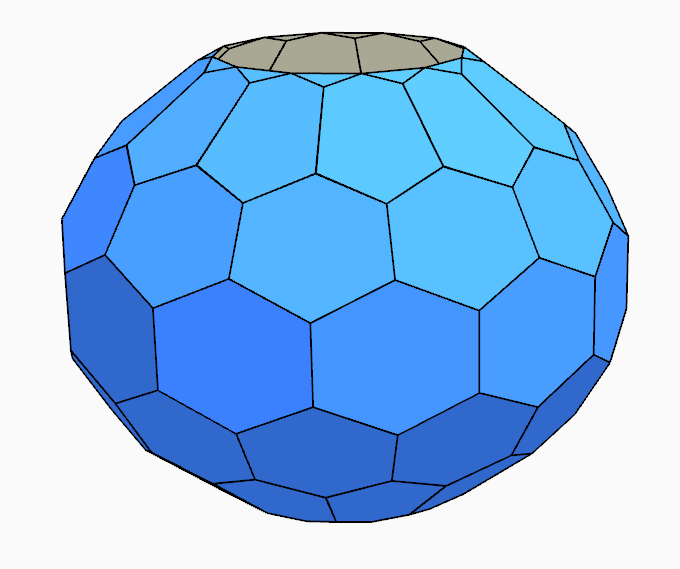
Make a basic sphere.
Draw a circle with the number of segments equal to the number of facets desired - default is 24 but it's also editable in Entity Info - let's assume 12 ].
Snap its center onto the model axes origin.
It'll make later operations easier...
The radius of this first circle is unimportant.
Select this circle and use Rotate snapped on to its center to get a segment parallel with the Red axis [with 12s that's 30/2 = 15 degrees]Draw a second circle perpendicular to the first - this time give it the same radius as wanted for the bottle - it must be vertically above the first circle's center and not touching it, also give it the same number of segments.
Select this second circle and use Rotate snapped on to its center to get a segment 'vertical' [with 12s that's 30/2 = 15 degrees]
We want the 'equator' to be vertical.
With even numbers of segments the top/bottom facets of the sphere are 'flat', as would be likely in a real-bottle...
Select the first circle and then the FollowMe tool.
Click on the second circle and it should now morph into a sphere.Select the sphere and group it.
Now with the sphere [group] selected use the Context-menu tool to 'Smooth' the sphere - but slide to 0 so all edges are UNsmoothed - this makes the next steps easier.You can now use the sphere-group as a framework, onto which you can draw your hexagonal facets.
Make a hexagon face [on one of the 'equator' facets of the sphere].
Explode its Curve and make it into a Component [so whatever you change in one is change in all others]
Select the instance and use Rotate+Ctrl 30 11x to copy it around the equator of the sphere.Now select all of the instances and make then into a Group.
Copy that Group upwards [using Shift to constrain in the Blue axis.]
Edit the second Group and Select all.
Use the Context-menu Make Unique so that when we edit the instances in this level it previous ones are not affected.
Rotate these instances about the circle-1-center/origin by 15 so it's offset from the equator set.
Move it down so the bottom most vertices of its hexagons snap to the indents in the equator set.Now start editing a component in the equator set and second set, alternating and snapping to each others vertices.
Use Edit Component Edit's Hide Rest... and Hide Similar toggles to help with seeing what you are doing and snapping.
Xray mode will also come in useful...Scale the group so that its top aligns with a change of surface angle in the guide-sphere.
You'll need to do axial rotations and relocation of vertices to get the hexagons in the second level's set approximating to the surface of the sphere.
Repeat this process for another level nearer the top.
Note how the hexagons in the levels get increasingly distorted to remain planar and mesh with their neighbors.
At the top you need to add triangles to make a non-serated rim.
You do not need to make the lower levels' facets as these will be a handed version of top ones.
Select those Move+Ctrl to copy to the side, Group and Flip so this copy is upside down.
Relocate it with Move Snapping to the equator set.It's impossible to make a perfect sphere from regular hexagons, but distorting them as they move away from the equator towards the poles , so that they will remain planar but join together gives you something that approximates to a spherical form.
Geodesic domes have distorted panels to make them mesh together, or non-hex panels to make it work in 3d...To add a 'frame' and 'glass', edit the 3 hexagonal [and one triangular topmost] components, PushPull outwards to make 3d, Offset the main faces to delineate the frame, and PushPull inwards on both sides to form the 'glass' [not shown in my quick illustration].
Then color the frame and glass faces as desired...
Hello! It looks like you're interested in this conversation, but you don't have an account yet.
Getting fed up of having to scroll through the same posts each visit? When you register for an account, you'll always come back to exactly where you were before, and choose to be notified of new replies (either via email, or push notification). You'll also be able to save bookmarks and upvote posts to show your appreciation to other community members.
With your input, this post could be even better 💗
Register Login


Advertisement