3D Truss Models
-
This revised code seems to work:
module Medeek_Engineering_Inc_Extensions module MedeekTrussPluginModuleLoader require 'sketchup.rb' require 'extensions.rb' require 'langhandler.rb' # Show the Ruby Console at startup so we can # see any programming errors we may make. # SKETCHUP_CONSOLE.show this_dir=File.dirname(__FILE__) # Fix for ruby 2.0 if this_dir.respond_to?(;force_encoding) this_dir=this_dir.dup.force_encoding("UTF-8") end PATH=this_dir entries=Dir.entries(this_dir) ext=".rbs" # Add a toolbar item to launch our plugin. toolbar = UI;;Toolbar.new "Medeek Truss" cmd = UI;;Command.new("Draw Roof Truss") { Sketchup.load(File.join(this_dir,"MEDEEK_ROOF_TRUSS.rbs")) Medeek_Engineering_Inc_Extensions;;MedeekTrussPlugin;;MedeekMethods.roof_truss_family_menu } cmd.small_icon = "images/mdkplg_tool_icon16_2.png" cmd.large_icon = "images/mdkplg_tool_icon24_2.png" cmd.tooltip = "Medeek Truss" cmd.status_bar_text = "Draw Roof Truss" cmd.menu_text = "Roof Truss" toolbar = toolbar.add_item cmd # toolbar.show cmd2 = UI;;Command.new("Draw Floor Truss") { Sketchup.load(File.join(this_dir,"MEDEEK_FLOOR_TRUSS.rbs")) Medeek_Engineering_Inc_Extensions;;MedeekTrussPlugin;;FloorTruss;;MedeekMethods.floor_truss_family_menu } cmd2.small_icon = "images/mdkplg_tool_icon16_3.png" cmd2.large_icon = "images/mdkplg_tool_icon24_3.png" cmd2.tooltip = "Medeek Truss" cmd2.status_bar_text = "Draw Floor Truss" cmd2.menu_text = "Floor Truss" toolbar = toolbar.add_item cmd2 # toolbar.show cmd3 = UI;;Command.new("Draw Truss Set") { Sketchup.load(File.join(this_dir,"MEDEEK_TRUSS_SET.rbs")) Medeek_Engineering_Inc_Extensions;;MedeekTrussPlugin;;TrussSet;;MedeekMethods.truss_set_family_menu } cmd3.small_icon = "images/mdkplg_tool_icon16_4.png" cmd3.large_icon = "images/mdkplg_tool_icon24_4.png" cmd3.tooltip = "Medeek Truss" cmd3.status_bar_text = "Draw Truss Set" cmd3.menu_text = "Truss Set" toolbar = toolbar.add_item cmd3 # toolbar.show cmd4 = UI;;Command.new("Draw Roof Rafters") { Sketchup.load(File.join(this_dir,"MEDEEK_ROOF_RAFTERS.rbs")) Medeek_Engineering_Inc_Extensions;;MedeekTrussPlugin;;RoofRafters;;MedeekMethods.roof_rafters_family_menu } cmd4.small_icon = "images/mdkplg_tool_icon16_5.png" cmd4.large_icon = "images/mdkplg_tool_icon24_5.png" cmd4.tooltip = "Medeek Truss" cmd4.status_bar_text = "Draw Roof Rafters" cmd4.menu_text = "Roof Rafters" toolbar = toolbar.add_item cmd4 toolbar.show # Add a menu item to launch our plugin. submenu = UI.menu("Plugins").add_submenu("Medeek Truss") submenu.add_item(cmd) submenu.add_item(cmd2) submenu.add_item(cmd3) submenu.add_item(cmd4) end end -
Now the largest file is only about 12,000 lines, a bit more manageable. If I spend some time cleaning it up and compressing redundant sections I can probably get it to half that amount.
-
Up until now I have maintained all of the code in one large file. However I keep adding more features so I need to split it out into multiple files to keep things manageable. My new load .rb file is attempting to use a method I found on another board but I'm getting a situation where the first click on the icon loads the plugin as it should however subsequent clicks on the menu or icon do nothing.
The problem is that after the menu item runs once it will not fire again.
Here is a snippet of the Medeek_Load.rb file :module Medeek_Engineering_Inc_Extensions module MedeekTrussPluginModuleLoader # Show the Ruby Console at startup so we can # see any programming errors we may make. # SKETCHUP_CONSOLE.show this_dir=File.dirname(__FILE__) # Fix for ruby 2.0 if this_dir.respond_to?(:force_encoding) this_dir=this_dir.dup.force_encoding("UTF-8") end PATH=this_dir entries=Dir.entries(this_dir) ext=".rbs" # Add a toolbar item to launch our plugin. toolbar = UI::Toolbar.new "Medeek Truss" cmd = UI::Command.new("Draw Roof Truss") { Sketchup.load(File.join(this_dir,"MEDEEK_ROOF_TRUSS.rbs")) } cmd.small_icon = "images/mdkplg_tool_icon16_2.png" cmd.large_icon = "images/mdkplg_tool_icon24_2.png" cmd.tooltip = "Medeek Truss" cmd.status_bar_text = "Draw Roof Truss" cmd.menu_text = "Roof Truss" toolbar = toolbar.add_item cmd # toolbar.show cmd2 = UI::Command.new("Draw Floor Truss") { Sketchup.load(File.join(this_dir,"MEDEEK_FLOOR_TRUSS.rbs")) } cmd2.small_icon = "images/mdkplg_tool_icon16_3.png" cmd2.large_icon = "images/mdkplg_tool_icon24_3.png" cmd2.tooltip = "Medeek Truss" cmd2.status_bar_text = "Draw Floor Truss" cmd2.menu_text = "Floor Truss" toolbar = toolbar.add_item cmd2 # toolbar.show cmd3 = UI::Command.new("Draw Truss Set") { Sketchup.load(File.join(this_dir,"MEDEEK_TRUSS_SET.rbs")) } cmd3.small_icon = "images/mdkplg_tool_icon16_4.png" cmd3.large_icon = "images/mdkplg_tool_icon24_4.png" cmd3.tooltip = "Medeek Truss" cmd3.status_bar_text = "Draw Truss Set" cmd3.menu_text = "Truss Set" toolbar = toolbar.add_item cmd3 toolbar.show cmd4 = UI::Command.new("Draw Roof Rafters") { Sketchup.load(File.join(this_dir,"MEDEEK_ROOF_RAFTERS.rbs")) } cmd4.small_icon = "images/mdkplg_tool_icon16_5.png" cmd4.large_icon = "images/mdkplg_tool_icon24_5.png" cmd4.tooltip = "Medeek Truss" cmd4.status_bar_text = "Draw Roof Rafters" cmd4.menu_text = "Roof Rafters" toolbar = toolbar.add_item cmd4 toolbar.show # Add a menu item to launch our plugin. submenu = UI.menu("Plugins").add_submenu("Medeek Truss") submenu.add_item("Roof Truss") { Sketchup.load(File.join(this_dir,"MEDEEK_ROOF_TRUSS.rbs")) } submenu.add_item("Floor Truss") { Sketchup.load(File.join(this_dir,"MEDEEK_FLOOR_TRUSS.rbs")) } submenu.add_item("Truss Set") { Sketchup.load(File.join(this_dir,"MEDEEK_TRUSS_SET.rbs")) } submenu.add_item("Roof Rafters") { Sketchup.load(File.join(this_dir,"MEDEEK_ROOF_RAFTERS.rbs")) } end end -
@medeek said:
Now the largest file is only about 12,000 lines, a bit more manageable. If I spend some time cleaning it up and compressing redundant sections I can probably get it to half that amount.
Coding related queries will probably be addressed a lot faster if you post them in the developers section of the forum?
-
Version 1.1.8 - 12.07.2015
- Added Gable Rafter Roof.
- Advanced options enabled for gable rafter roofs (sub-fascia, outlookers, sheathing, and rakeboards).
- New submenu item and toolbar icon added for rafter roof type.
- Plugin divided into multiple files for ease of management.
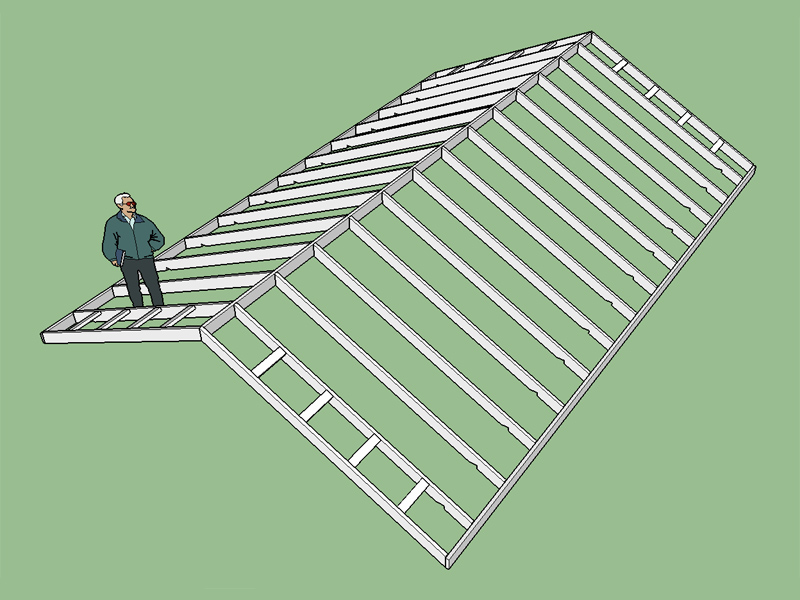
Structural outlookers for this type of a roof are still somewhat of a question. If they are horizontal it makes sense to notch the gable rafter but what if they are vertical?
-
Version 1.1.8 - 12.08.2015
- Structural Outlookers enabled for gable rafter roofs (vertical & horizontal).
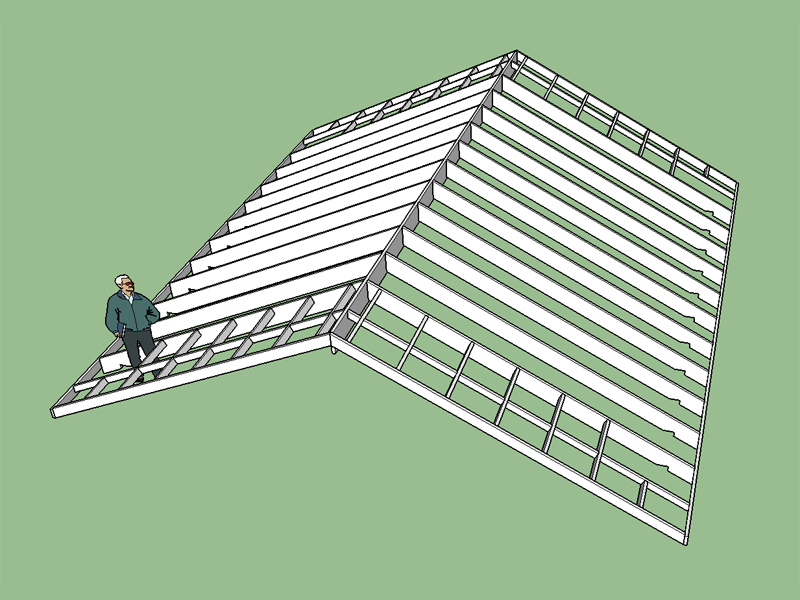
Notice in this case I have left the gable rafter in place but notched clean through it, so essentially it is blocking. However, I have also given the option for removing the gable rafter entirely. You will also notice that the gable rafter is the same depth as the outlookers, when you choose "CUSTOM" for the gable end rafter it allows one to specify the depth of this rafter.
When structural outlookers are used in a vertical orientation it is common practice to have them bear directly on the double top plate of the gable wall (balloon framed to roof). If there is some configuration that is standard in your neck of the woods that I am missing please let me know. I am currently providing three different configurations for the gable end rafters.
I think I am ready to now attack the gable rafter roof with glulam beam.
-
Admittedly the user interface is still very rough around the edges. One thing I've started working on is making the default values assume the last values inputted by the user. The code is fairly simple but updating all of the different menus is tedious because I have quite a few truss types now. This should make creating multiple truss sets in a document even quicker since parameters like roof pitch, overhangs and heel heights are typically the same for a given structure.
To test this functionality currently, download the latest version 1.1.8 and test the common truss types (Imperial Units). I will be updating all menus so that this functionality is present.
-
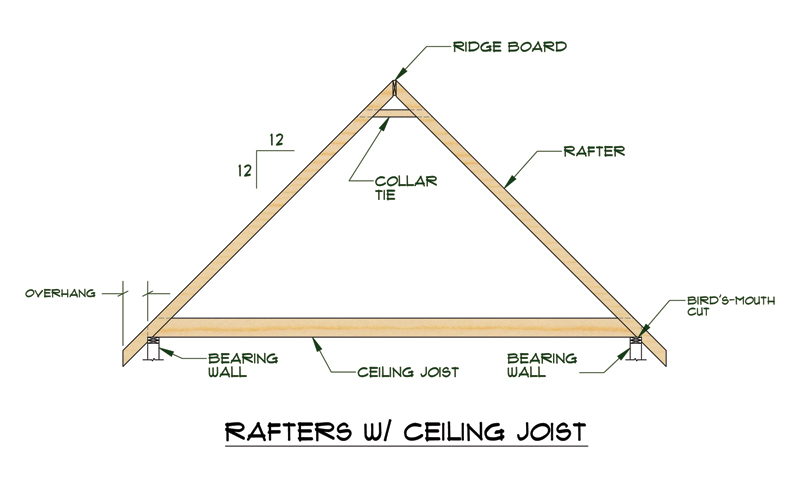
I'm wondering with my rafter roof if I should provide an option to draw ceiling joists?
-
option to draw ceiling joists? That would be great and a collar tie and ridge tie option. Better still give the option to place them at a given height.
-
Adding in ceiling joists is not a big deal but I don't want to add features that only complicate the plugin and the user experience. I could also make an option to offset the ceiling joist off of the wall top plate for a "raised" ceiling joist.
-
I'm getting ready to add in Glulam beams for rafter roofs. However, as I'm sorting out the details I'm trying to determine what would be the best way of modeling them. I would like to show the different plies but at the same time if someone wants to cut the beam, bevel it etc... I need to have it easily modifiable.
At first I was going to make a component for a single ply and then copy multiple instances. The problem with that idea is a beveled cut would then be difficult to make.
On a slightly different note I am wondering if there are standard metric sizes for Glulam Beams? I am using the 2015 AWC NDS Supplement for the standard US sizes. What similar standard exists for metric sizes?
-
given the differing sizes used (just referencing what is available in South Africa, not to mention globally), it's possibly best to create options for how many laminates and give the sizing for it...
-
The way I'm setting it up is the first menu takes you to an html web dialog (menu) that allows one to select from standard sizes from drop down menus. Then it automatically drops those values into the regular geometry UI were you can manually edit the depth, width and ply thickness of the glulam so the possibilities are infinite and complete customizable.
I like the ability to offer a prompt that gives standard sizes since I feel that is where some of the value comes in my plugin. It saves the designer having to go to the books to look up an actual available size, its all right there at the click of a mouse.
-
Version 1.1.9 - 12.10.2015
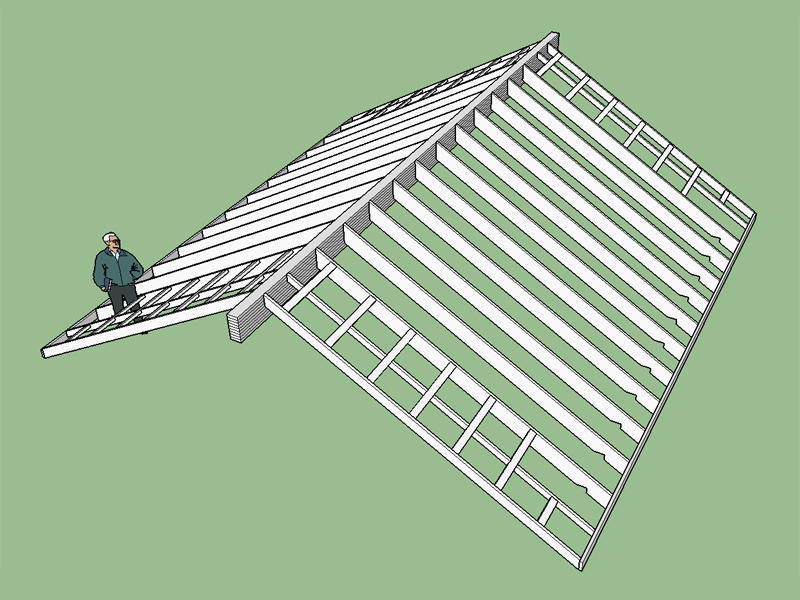
- Added Gable Rafter Roof with Glulam Beam (all advanced options enabled).
-
If anyone can give me links to resources documenting standard sizes for Glulam Beams (metric or imperial) I can work at getting those added into plugin and available for use.
Currently I have the following glulam beam standards available:
[Imperial Units]
- AWC 2012 NDS Supplement Table 1C (Western Species) and 1D (Southern Pine).
[Metric Units]
- AWC 2012 NDS Supplement Table 1C (Western Species) and 1D (Southern Pine).
With metric input the inch units of the NDS glulam selection is converted to mm. This is merely a stop gap until I can get some standardized tables entered for metric sizes.
-
After doing a bit of digging around on the internet I'm not sure standardized metric sizes will be something that is achievable.
For example two different size tables for glulam beams from two different manufacturers in New Zealand (both conform to the AS/NZS 1328 Standard):
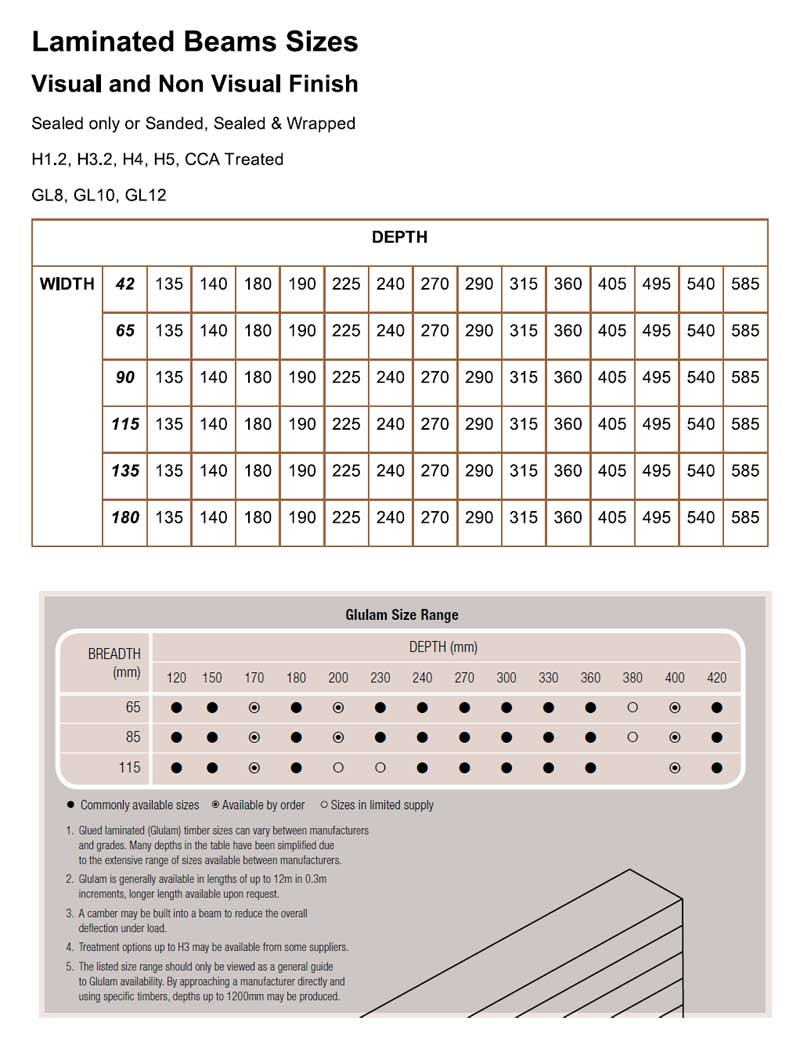
The various widths and depths are all over the board. Is there even a standardized ply thickness? Looking at these tables I cannot tell.
Perhaps other countries in Europe, Asia and Africa have more standardized methods like the United States.
-
In Victoria Australia there are several sources that should be the
same as NZ.One Example is noted below,
Refer to p 10 - p 13 in the pdf document:
http://www.wpv.org.au/docs/STPG.pdfWood Products Victoria (WPV)
The goal of Wood Products Victoria (WPV) is to ensure that sustainable timber and wood products grown, harvested, processed, manufactured or sold within Victoria or by Victorian-based businesses are supported by:› informed research
› credible technical publications
› comprehensive customer information, and
› positive product and market development.
Wood Products Victoria Ltd was established in June 2006.The Board of Directors includes representatives of timber growers, manufacturers, distributors and retailers who wish to ensure the ongoing viability of this sustainable, natural building resource.
For further information about WPV and its activities please email info@wpv.org.au or
call (61 3) 9611 9042.Refer to p 10 - p 13 in the pdf document:
http://www.wpv.org.au/docs/STPG.pdf -
South Africa is a bit different, the two predominant laminated beam types appear to be Pine and Saligna.
Pine laminated beams seem to be very standardized and straight forward.
Widths: 27, 40, 65, 97, 135, 165.
Depths range from 99 to 695
with a 33mm ply thickness.Saligna beams are a bit more interesting.
Widths: 25, 38, 50, 63, 89, 114, 140, 165
Depths: 67, 89, 111, 133, 156, 178, 200, 222, 244, 267, 289, 311, 333, 356, 378, 400, 422, 444, 467, 489, 511, 533, 556, 578, 600...
Ply thickness appears to be 22mm but you will notice it doesn't divide evenly into any of the depths. The actual ply thickness appears to be approximlately 7/8 inches or 22.225mm.Of course I did find some manufacturers whose widths and depths varied from these numbers but most manufacturers complying with SANS1460 generally follow the sizes above.
-
I may have spoken too soon on Australia and New Zealand. There is an interesting table at this link:
Which gives some standard sizes based on Grade. It states that these are the nominal beam widths and depths, I'm not sure if that is the actual size but I will assume so for now.
Some of these depths would suggest that the typical ply thickness is 30mm however there are also quite a few depths where this 30mm does not work. Either there is a different ply thickness for these other depths or they are planing down the larger beams to get to this size.
For example within GL18 the following depths exist: 270, 280, 300, 315, 330. 270, 300, and 330 fit nicely with a 30mm ply thickness, how is the 280 and 315 constructed?
-
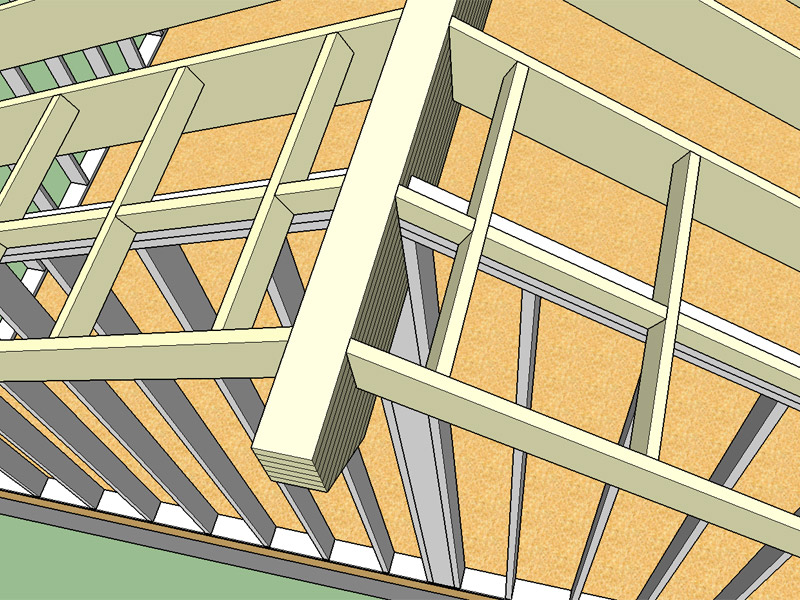
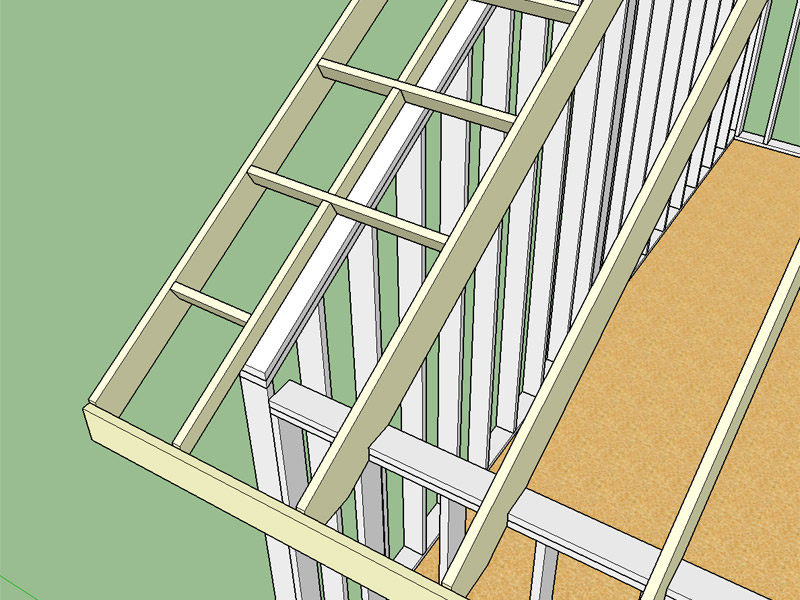
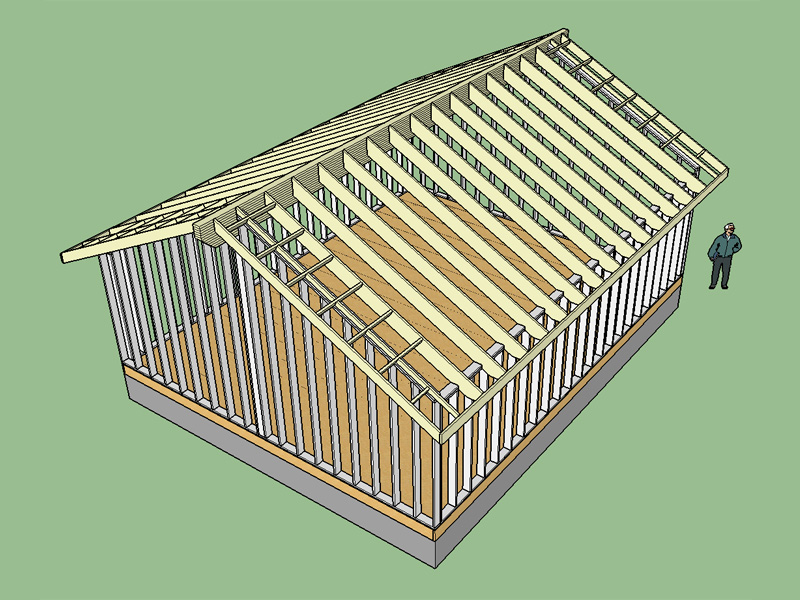
Here is quick model of the wall framing associated with a gable roof with a glulam beam:
Beam Pocket with 6x6 post:
Gable wall and eave wall intersection:
Overview of Model:
Advertisement


