HiDef Rim Tutorial using Flowify
-
A follow up to the Tire Tutorial, this shows how to use Flowify and Vertex Tools to create a rim for a tire.

-
Again a very nice video. Thank you!
-
@pilou said:
I see you use Solid Inspector and not Solid Solver: why ?

Fist don't fill a missing face, second yes!I just got in the habit of using Solid Inspector. I like it. I'll check out Solid Solver too! Thanks for the tip.
-
excellent!
-
I see you use Solid Inspector and not Solid Solver: why ?
First don't fill a missing face, second yes! -
Again, very, very nice tutorial. I think there are two points in relation to Flowify that are worth mentioning.
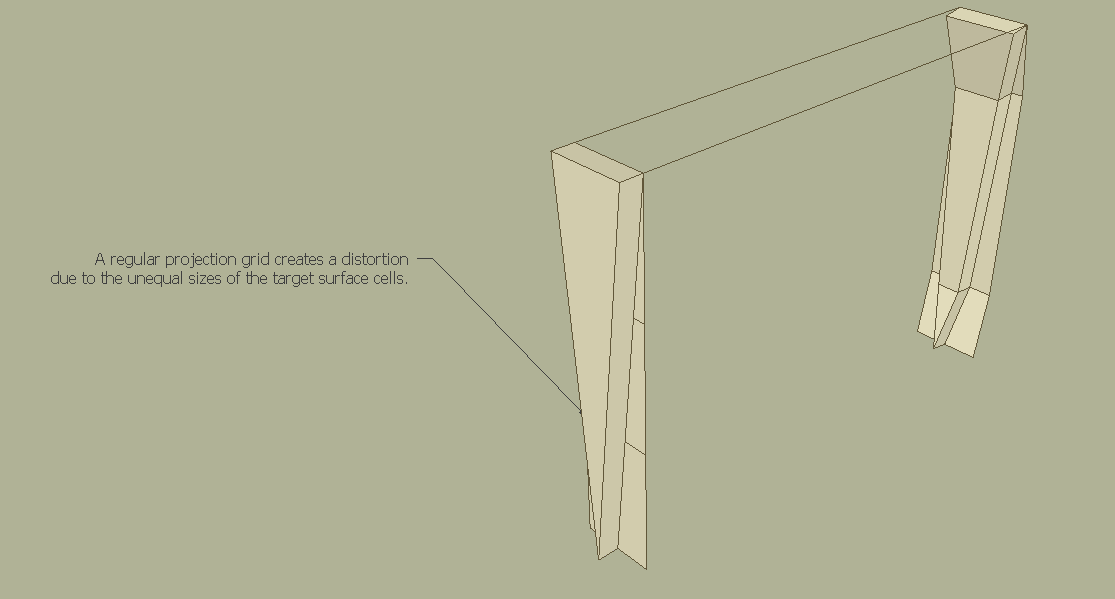
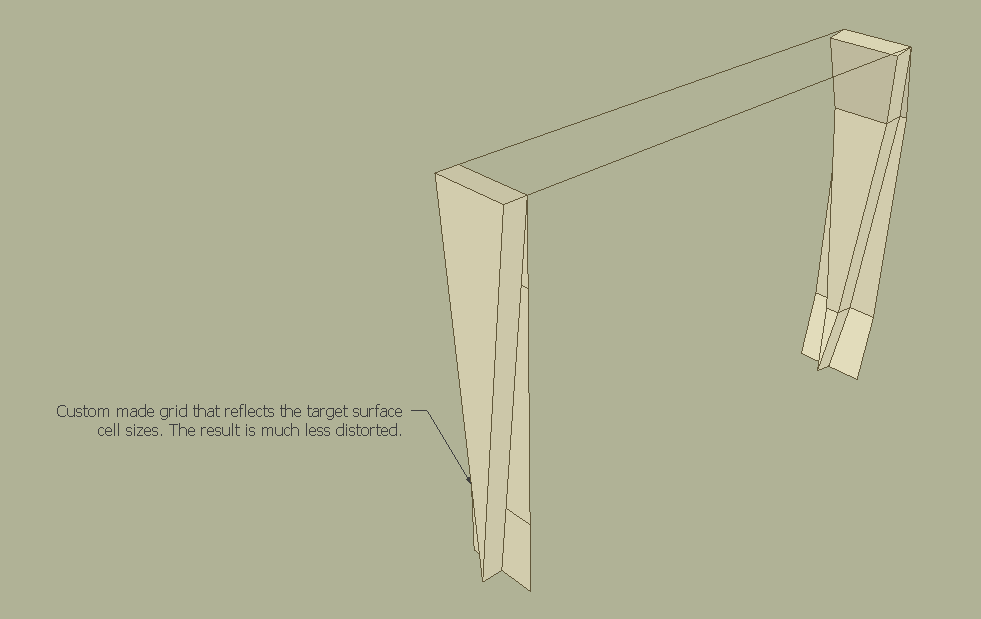
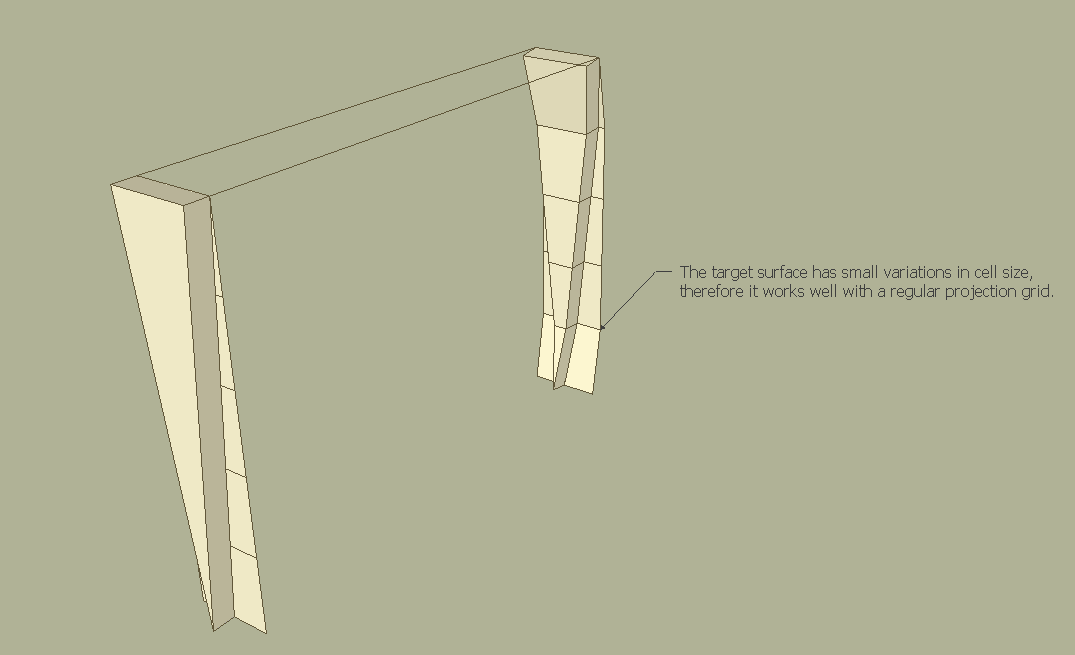
1) The thickness of the geometry (the dimension perpendicular to the projection grid) is transferred directly to target surface coordinates, the geometry is then transformed from there into world coordinates. So, if the target surface is in a scaled group the thickness will be scaled as it is transformed to world coordinates. For predictable results the target surface can be exploded and regrouped, this will put an identity transform (scale=1) on the target surface group. Ideally, Flowify should handle this but currently does not..
2) The second point concerns the relation between the projection grid and the target surface. Flowify sets up a coordinate system between the grids where all cells have the exact same size in uv-space. As seen in the image below, the results are more predictable if the projection grid and target surface have more corresponding cell sizes. This can be achieved by either constructing a custom projection grid (Image 2) or by having about equal sized cells in the target surface (Image3). In regards to the tutorial, if you keep the idle points in the poly line and convert these into quads, then the regular grid (constructed with impose grid) will better match the target surface.
-
Shared at my race car simulation forum.
http://isiforums.net/f/showthread.php/24899-SketchUp-Tire-Tutorial-using-Flowify
-
@caul said:
2) The second point concerns the relation between the projection grid and the target surface. Flowify sets up a coordinate system between the grids where all cells have the exact same size in uv-space. As seen in the image below, the results are more predictable if the projection grid and target surface have more corresponding cell sizes. This can be achieved by either constructing a custom projection grid (Image 2) or by having about equal sized cells in the target surface (Image3). In regards to the tutorial, if you keep the idle points in the poly line and convert these into quads, then the regular grid (constructed with impose grid) will better match the target surface.
Thanks for the advice. The problem with 'keeping the idle points' is that then one has to manually stitch up the resulting surface to create quads, which can take quite some time-- unless you know a way of automating quad generation on non-quad topology?
Check out the video at 3:25 where I confront this issue. If there are co-linear groupings of 3 or more vertices in the polyline, it will not generate a quad compatible surface. Any thoughts on how to automate quad generation during Follow-Me?
Thanks again for a GREAT tool!
-
@chippwalters said:
@caul said:
The problem with 'keeping the idle points' is that then one has to manually stitch up the resulting surface to create quads, which can take quite some time-- unless you know a way of automating quad generation on non-quad topology?
A kind of automation in this case...

-
Hello! It looks like you're interested in this conversation, but you don't have an account yet.
Getting fed up of having to scroll through the same posts each visit? When you register for an account, you'll always come back to exactly where you were before, and choose to be notified of new replies (either via email, or push notification). You'll also be able to save bookmarks and upvote posts to show your appreciation to other community members.
With your input, this post could be even better 💗
Register Login


Advertisement