Issue with push-pull, face is moving
-
Hello,
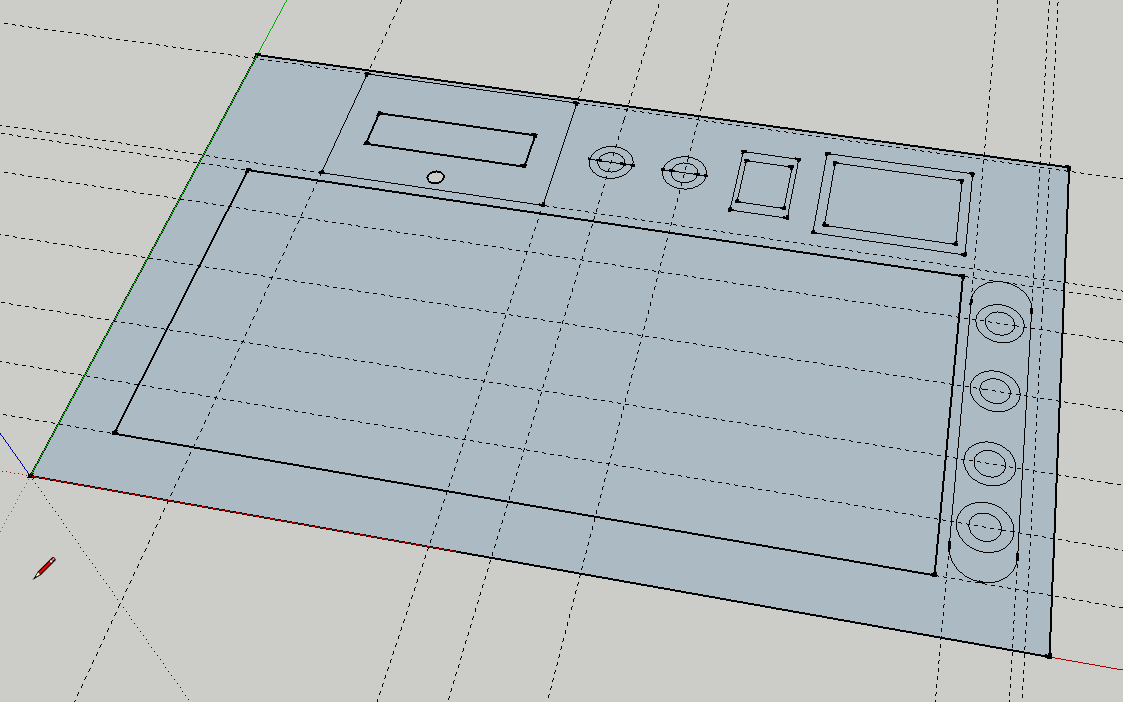
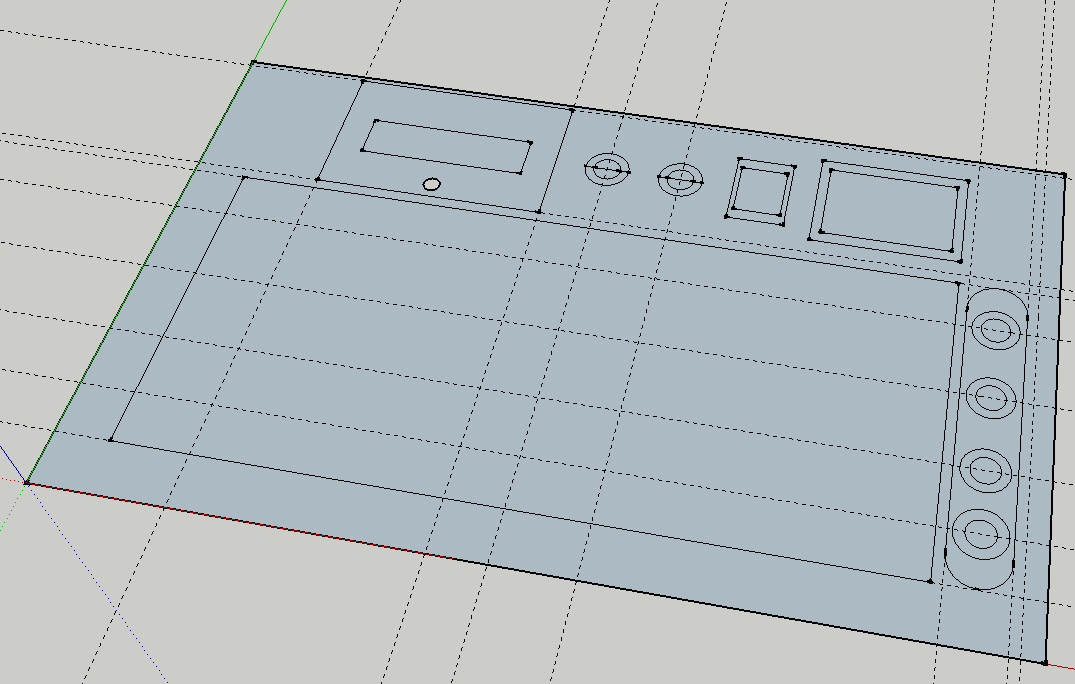
I'm trying to model a panel that will be used with a radio. I hope to 3D print this.
Panel has two features that are no simple thru-holes.
-
A space where a battery meter will sit. The LCD is 2mm thick, the panel will be 4 mm. I recessed the cutout for the PCB from the back. In Sketch-up it looks OK, but when exported to STL and loaded by a 3D printer website, it does now show the hole for the LCD (the full thru-hole)
-
A space where several audio and coax bulkhead connector go thru. Since the bulkhead connectors only span about 2.5mm I wanted to make a somewhat nicer looking rounded inset from the top.
No matter what I try, I can't get that to work. Every time I try to Push/Pull that face, it moved that plane. I can get it to fill the face back in, but then I can't get the round cut-out to select. I've used guides to find the middle of the hole, made a new circle overtop of the exact same size, but that still does not allow me to select the face inside the circle.
Getting somewhat frustrated after trying this for a few hrs

Any hints and tips welcome!!
Bas
P.s Also attached the flat file I start from. The outer borders are for me to show the visual size of the items going in. Inner borders are the actual cut-outs
-
-
I think one of your problems is this item is very small. You shuold model it at 100x size and scale down to export.
You should make all faces facing outside white. That is you have many backwards faces in the model.
I am not sure about problem #!. But getting faces oriented and eliminating the Interior walls in that area may help. You have faces or panels showing that are coplanar with the main face around them. I don't 3d print but what purpose is this? Won'b they just be one surface when printed?
For the set of holes. Copy the circles on the bottom and "paste in place. Then you can delete the faces. This is probably a product of modeling at such a small size.
-
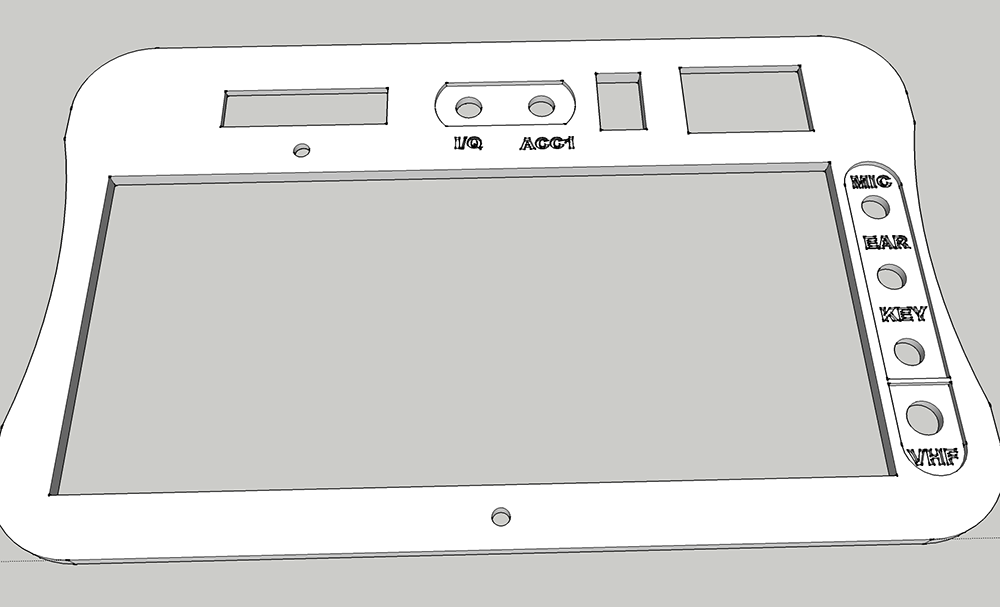
Here, try this.
I oriented the faces, right click on a white one and select Orient Faces.
Then I used Fredo's Curvizard to clean up and weld the edges. This fixed your problem circles so they could be removed.
I deleted four stay lines. and ones that seemed to be irrelevant to the shape. This removed inner faces.
Grouped it all and it is a solid.
It is borderline with the size, you would start to run into tiny face problems if you did any intricate editing. Tiny faces fail to form when line segments go below 1mm.
-
Peter is right. Considering the small size, you should work on a scaled up copy. I did find a few issues that if changed would create an easier time of it for you.
Model Info>Units: You have Precision set to 1mm. It would be easier to work on a small model if you would increase precision to at least a couple of places beyond the decimal. You have length snapping enabled and set to 1mm. It would be easier to work with precision if you disable it.
Your flat version illustrates some problems. Notice the rectangles with the heavy profile edges. The profile edges indicate they are not dividing the surface. The other shapes are dividing the surface and are not shown as profiles. Trace along an edge of each rectangle using the Line tool and you'll fix that, thus:
If you start by drawing a box to the full thickness of your panel and layout the holes and recesses on it, then use Push/Pull I think you'll find every goes more smoothly.
I was able to repair your model by first doing an Intersect Faces operation before correcting the face orientation. That's something you need to stay on top of. It won't happen if you make the plate first and layout the holes and recesses after.
Edit: I neglected to mention the internal faces which Box remembered. Without removing that stuff, it wouldn't have been a printable part. You need to watch for and remove them.
-
Tx all, the email notification did not seem to work. So I thought there was not replies. Instead there is these very detailed, very helpful ones!
I was modeling at the real size, that way it was easier to measure something and then enter the exact dimensions. But being metric, drawing everything in meters and then later sizing it down will be easy.
Will have to read thru the replies in detail. Lots that doesn't mean much to me yet.
Effort gone into these replies is MUCH appreciated!
-
Hi,
Thought I would report back. I managed to get it all sorted, thank you very much for the tips!
It's on it's way to being printed!
Bas
Hello! It looks like you're interested in this conversation, but you don't have an account yet.
Getting fed up of having to scroll through the same posts each visit? When you register for an account, you'll always come back to exactly where you were before, and choose to be notified of new replies (either via email, or push notification). You'll also be able to save bookmarks and upvote posts to show your appreciation to other community members.
With your input, this post could be even better 💗
Register Login


Advertisement