Problems with a half-torus
-
@pilou said:
@unknownuser said:
v6 for Pilou
Not just for me but for all users who have not the same up version than you!

PS you are making an engine in 3D Printing ?
What will be the fuel ? And for what vehicle ?Yes, it's to go on the carburettor intake on a petrol powered 1976 Austin Mini, my daily drive.

-
Carsten (cotty) did it exactly how I would have

@teig said:
And the scale tool. Sorry for sounding stupid but if I scale it by a 1000x what do I sale by to get back to my dimensions?
.001
You can also use the Tape Measure tool to quickly and accurately scale a model.
It's neat to watch your design iterations gradually improve

-
@d12dozr said:
Carsten (cotty) did it exactly how I would have
@teig said:
And the scale tool. Sorry for sounding stupid but if I scale it by a 1000x what do I sale by to get back to my dimensions?
.0001
If you look at p. 36 of my book, I explain how to use the Tape Measure tool and a reference line to quickly and accurately scale a model.
It's neat to watch your design iterations gradually improve
Thanks a lot Marcus, I knew it had to be some amount of 000s
It is one mighty learning curve, I'm sure a hotel would be an easier way to get started I'll go look at your book now, I haven't had much time to myself recently.
-
Hey Teig, I messed up the first time around...it should be .001. Sorry, I edited my post, but you already caught it.
Also the way to move the geometry is to draw a line separating the piece you want to follow-me, then group it for moving (or copy it and erase the original).
-
And while you are at it, you can make the piece a component, then scale a copy up to do your edits, then delete the large copy and the edits will have worked on the small version.
-
@d12dozr said:
Hey Teig, I messed up the first time around...it should be .001. Sorry, I edited my post, but you already caught it.
Also the way to move the geometry is to draw a line separating the piece you want to follow-me, then group it for moving (or copy it and erase the original).
Ah, OK, I wondered about your zeros but bowed to your wisdom
I've scaled it all up, I couldn't figure out how to separate the two parts so ran the Follow Me, it worked But... it wasn't solid so I ran SolidSolver which is really struggling at present and has been stuck on the Spinning Beachball of Doom for 10 minutes. Here's hoping... 
-
@box said:
And while you are at it, you can make the piece a component, then scale a copy up to do your edits, then delete the large copy and the edits will have worked on the small version.
Oh yeah??? That sounds like a great system! Let me get this correct... So the times when Follow Me won't work on my tiny component will work on the scaled up? And affect the edits on the tiny copy? Wow!
-
yep
Here's one I made earlier.
-
Thanks Box, I'll try that at some point.
For now SolidSolver reports a co-planer edge and isn't solid
How do I spot and correct this edge? -
Have a go with Thomthom's new Solid Inspector, it will find them, highlight them and fix them for you.
http://sketchucation.com/pluginstore?pln=tt_solid_inspector2 -
@box said:
Have a go with Thomthom's new Solid Inspector, it will find them, highlight them and fix them for you.
http://sketchucation.com/pluginstore?pln=tt_solid_inspector2Thanks again Box, downloaded and installed. One thing that's bugging me, how much to donate for these plugins? I am grateful for them but have stalled on donating for this reason.
The Solid inspector can't fix my item "Some errors could not be automatically fixed. Manually inspect and correct the errors, then run the tool again." Something about borders and mesh?
And now my .skp file is too large to upload...
-
Donations are something different for everyone, "to each according to his need" is the old saying, whatever you feel comfortable with, nothing is too small or large.
Have you purged your model, it may be bloated. Window/Model Info/Statistics Purge unused.
-
@box said:
Donations are something different for everyone, "to each according to his need" is the old saying, whatever you feel comfortable with, nothing is too small or large.
Have you purged your model, it may be bloated. Window/Model Info/Statistics Purge unused.
OK, I'll settle on something for a donation.
I have purged it but it's not having it.
The bad news now is my MBP has run out off power and I forgot to bring my charter in to work this morning, also all the servers are offline for the office computers so no more Sketchup for me for know, phone only
-
Stuck again!
I seem to have an odd edge and I'm not sure how to get rid of it. Also strange faces inside the model. The file is too large for the SU forum here so I have loaded it to Drive, this is the link for it if anyone can help?
Page Not Found
Web word processing, presentations and spreadsheets
(drive.google.com)
-
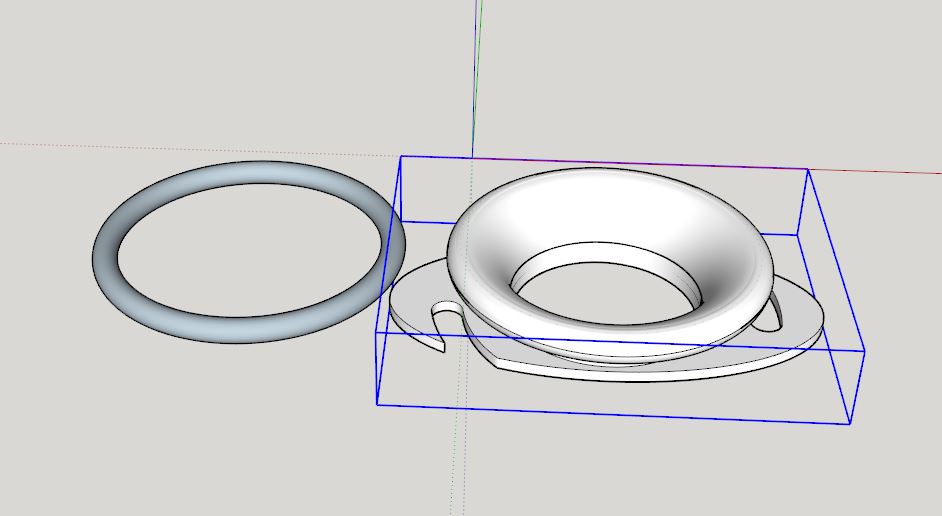
You've got a few odd things going on in there.
The first one, simple error, you triple clicked on the surface and made everything a group, problem is the inner tube isn't connected to the outer surface so it didn't get selected. So it's not part of the group.
The second and more troublesome thing is somehow you have produce an overlap in your throat, and some extra faces.
If you look inside near the drill holes you can see the double edges and twisted lines.
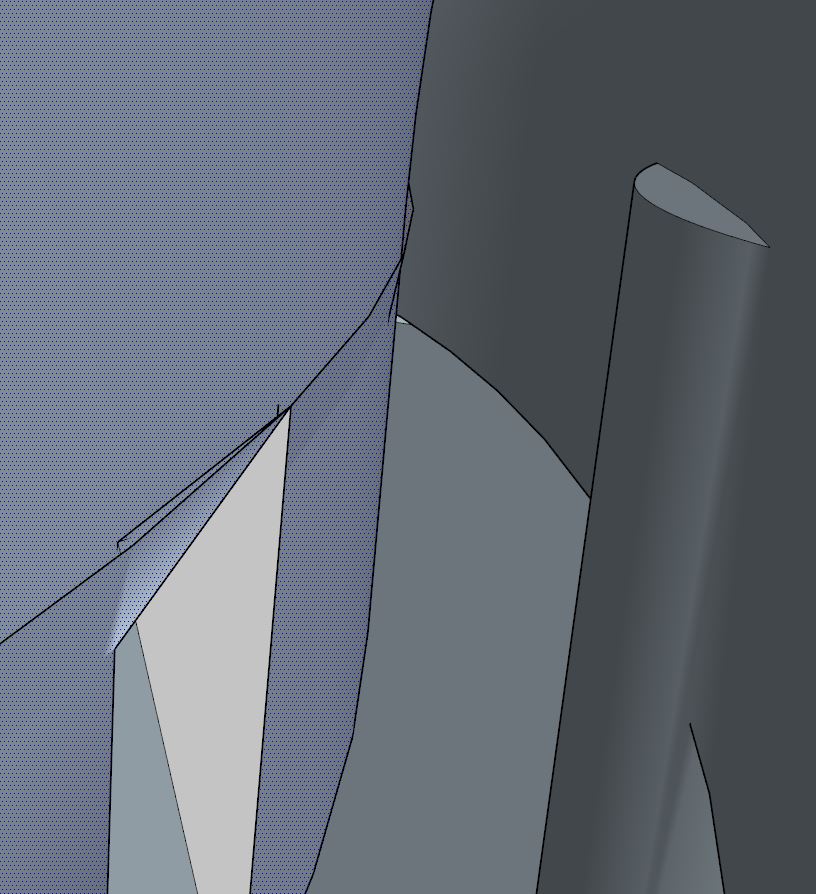
I've given you a cleaned one for comparison.
-
@box said:
You've got a few odd things going on in there.
The first one, simple error, you triple clicked on the surface and made everything a group, problem is the inner tube isn't connected to the outer surface so it didn't get selected. So it's not part of the group.
[attachment=2:2922mkxr]<!-- ia2 -->Innertube.JPG<!-- ia2 -->[/attachment:2922mkxr]
The second and more troublesome thing is somehow you have produce an overlap in your throat, and some extra faces.
If you look inside near the drill holes you can see the double edges and twisted lines.
[attachment=1:2922mkxr]<!-- ia1 -->Inside.JPG<!-- ia1 -->[/attachment:2922mkxr]
I've given you a cleaned one for comparison.So is the best way to select to group is to drag the select tool around the whole entity rather than triple click? Would that have selected everything?
Those troublesome things have been keeping me awake all night
Did you just go inside and erase them Box? I don't know what or why that strange triangle of faces on the throat was there. 
-
Normally a triple click is good, just that in this case the inside tube is separate, so it sort of a case by case thing, depends what is you are selecting.
Yes I basically just remove all the overlapping geometry and lofted the gap. So it's not actually how you made it originally.
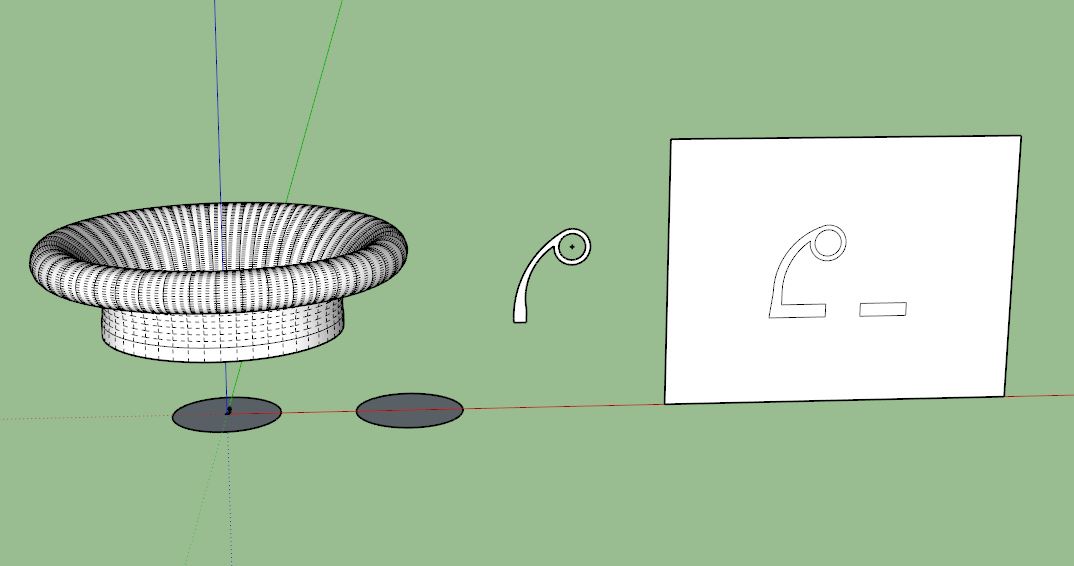
Looking at yours again I see you have drawn your profile in various sections, lots of different curves with varying sized segments and stuff. I have taken your profile and drawn a smoother set of curves roughly to fit to give you a less bumpy finish.
Also look at how many segments you want to use. In the actual throat you want a lot for smooth airflow, but the ring and the inner ring can have fewer segments and the outside of the throat under the ring can be a rough as you want.
In this quicky I have used 50 segments for the curve of the inner throat, 24circle for the rim and only 12 for the back. Then a 50s circle for the follow me.
I'm not suggesting you use it, just showing you some examples.
-
@box said:
Normally a triple click is good, just that in this case the inside tube is separate, so it sort of a case by case thing, depends what is you are selecting.
Yes I basically just remove all the overlapping geometry and lofted the gap. So it's not actually how you made it originally.
Looking at yours again I see you have drawn your profile in various sections, lots of different curves with varying sized segments and stuff. I have taken your profile and drawn a smoother set of curves roughly to fit to give you a less bumpy finish.
Also look at how many segments you want to use. In the actual throat you want a lot for smooth airflow, but the ring and the inner ring can have fewer segments and the outside of the throat under the ring can be a rough as you want.
In this quicky I have used 50 segments for the curve of the inner throat, 24circle for the rim and only 12 for the back. Then a 50s circle for the follow me.
I'm not suggesting you use it, just showing you some examples.
[attachment=0:8f6audq7]<!-- ia0 -->Throat.JPG<!-- ia0 -->[/attachment:8f6audq7]So, would dragging the selector around the whole model have selected that inside tube?
Yes, I've been trying to get the throat super-smooth so have been using 100 segments as standard, never considered anything else for the other parts - I suppose using less segments would keep the file size down?
Yes, I drew it as best I could think how to, complete with lots of scratching of the head and "argh, must put this away and come back later before my brain explodes" moments
-
Yes
and
yesMy profile is simply 2 circles and 2 arcs with a couple of straight lines.
Takes longer to type than to draw. -
Thanks again Box, I'll see if I can do it like you say, it might be the other way round for me though - longer to draw than to type
I'm really struggling with drawing two components and then lining them up exactly so I'll have to do a bit more learning in that area.
Hello! It looks like you're interested in this conversation, but you don't have an account yet.
Getting fed up of having to scroll through the same posts each visit? When you register for an account, you'll always come back to exactly where you were before, and choose to be notified of new replies (either via email, or push notification). You'll also be able to save bookmarks and upvote posts to show your appreciation to other community members.
With your input, this post could be even better 💗
Register Login


Advertisement