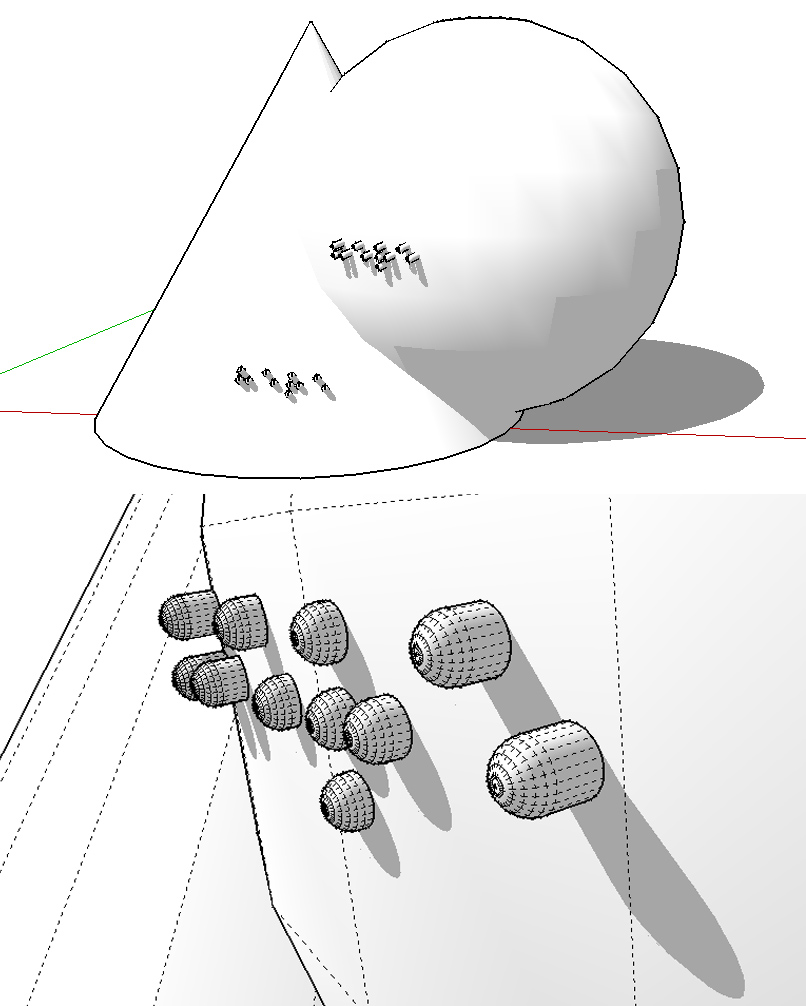
Is it possible to create 3D-braille-dots on ANY surface?
-
Hi there,
I am working at a school for the blind and our team recently got involved in 3D printing (using an Ultimator (model 1)) for creating tactile models of objects commonly used in Maths lessons. Creating these mostly simple objects was real easy with Sketchup.
However, we ran into the problem of adding tactile labels in braille to the models. On flat surfaces adding these labels was simple. We chose a truetype braille font, extruded it and placed it on the surface. On curved surfaces (e.g. a cylinder), adding labels in braille was possible (though time-consuming) using the plugin ShapeBender.
For objects that bend in more than one dimension (e.g. a cone or a ball), we haven't found a solution yet and kindly ask for help.
If you have any suggestions on how this can be done with Sketchup or know of any plugins that may help in the process we would very much appreciate your advice.Sincerely
Erich
-
One way would be to break your text into individual spheres, you can then select all the "dots" and throw them at the surface using the plugin, Throw to. They will all hit the curve evenly and you can move them into the surface as deep as you want and intersect them/ or solid tools if you have Pro.
I guess you would need to build a library of lettering, but you only need to do that once.
Edit: doesn't work if the curve is too tight.
-
here's a quick one with Artisan plugin
-
Is it necessary that the symbols follow the surface or is this a possibility:

-
Thank you Box, vicspa and cotty for your quick replies.
This all sounds very promising. I will try it and post the results.
@cotty: It is necessary that the symbols follow the surface. Writing in braille is usually quite large compared to the relatively small size of objects we can print. If the symbols don't follow the surface they sort of stick out as flat platform whenever the curve is tight.
Thanks again.
Erich
-
Another thought, but it all depends how tight your curves are and how big the bumps should be, and how much text there is. You may need to do it all scaled up then down for printing.
Make your braille text a group and use Tig's Super drape to drop it on the surface as a guide. Obviously if the curve is too tight you may need to reposition for each word.
Edit: Then create your bump as a Component, use a sphere as the dots and set the axis in the centre and glues to anything..
You can then quickly place the bumps on your guide lettering, you will need to do some adjustments to finish it as a solid, explode and intersect but it should fairly straightforward cleanup.
See very rough version below.
-
Does the matrix 2 * 3 has always the same size ? (relative to the fingers)
-
Make your dots patterns using simple 2d disks - no 3d extrusion.
Make it a group [if it is a a component, explode it, then immediately use 'make-group']
Use monochrome mode to check the dots face upwards - if not edit the group, select the faces and use the context-menu 'reverse'.
Distinctly color all of the faces - say 'red'.
Also make the recipient curved-surface as a group.
Place that surface below the flat dots-group.
Use my SuperDrape to imprint the 'red' dots onto the surface - they will remain colored red [unlike the Sandbox Drape tool].
Now edit the surface group.
Select one dot face and use the context-menu 'select by material'.
All of the red faces should now be selected.
Now use Fredo's Joint PushPull tool to extrude the selected faces up a little to form 3d dots.
Note you need to use TAB to set JPP's options - you will want NOT to keep the original back face [so the surface stays 'solid'], you also want the 'extrusion' to be 'perpendicular' to the faces [normal?].
Finally recolor the lot as desired...NOTE:
You might need to scale up x100, do the SuperDrape and/or the JPP and finally scale back down, because very very tiny edges and facets can be missed in intersection and extrusion processes, when SketchUp uses its 1/1000th inch tolerance and determines that two almost coincident points are indeed coincidental, and misses making the tiny geometry: tiny geometry can exist, but creating it can be an issue... -
@Box: The Tig's Super drape plugin really seems to work fine for this. The cleanup is not a problem. Thank you again for helping.
@Pilou: You are correct. The matrix must always have the same size to be readable (although most readers will cope with small glitches in size). As we are using Eurobraille (e.g. Euro850 or HBS-8-Braille), our dot matrix is 2*4. We got good results using a size of 8,5 mm per letter (height) and an extrusion of 0,6 mm. -
The only problem with that Tig, is that your drape tool doesn't drape perpendicular to the surface so you can get some distortion. Which is why I suggested using it to create a guide to replace with dots. Perhaps a modification of your tool is possible.
-
If the surface is gently curved them it should be acceptable.
BUT projecting onto a cylinder will of course give distorted start/end spacings/shapes...
Then perhaps the 'word' needs splitting it parts and these arranged around the surface.
Rotating the lot in turn to do a vertical drop for the say three parts ? -
@TIG: Thank you for submitting another solution. Yesterday I feared there wouldn't be a simple solution to this problem an now I have four.
Advertisement


