Cutting floor boards out of a cylinder
-
Hi,
I'm building a wooden structure that requires assembling planks of different widths (same thicknesses) into a 8' circular floor. I've tried starting with a 8' circle (100 segments) and drawing the planks in 2D and then extruding them individually, but that produced planks with hollow bottoms. I then tried first extruding the circle into a disk with the thickness of the planks and then cutting out the planks individually, but I couldn't figure out how to separate them. What is the proper way to do this so I can individually manipulate the planks. I want to connect them together using wooden pegs. Thanks.
-
I think they'd have to be groups or components. With native tools it probably involves using intersect with model inside each group. Remember you may save time by modeling half or quarter of the floor for all the trimming, then join up the boards for the other quarters later--or even leave as (each quarter floor) components. You could trim with solid tools if you have Pro.
To get definition in a rendering you'll have to provide some groove at the edges or miniscule space.
If you used push pull on the 2d planks you should not have lost the bottom. Try using the option key during pushpull--cntrl(?) on windows. But the way you describe, it would be difficult to end up with individual planks you could manipulate. I would consider if the planks want beveled or curved edges however small then extrude a section of them (actually you do one of each width, then duplicate the component).
-
Peter is correct. Make the individual planks as components and cut them with a cylindrical shape using Intersect Faces or with Solid Tools. Add edge detailing for separation as needed. Think of it much like you would make them if they were real wood. You wouldn't start out with a big circle and cut it into planks.
Do you need to show the pegs for joining the planks?

-
Thanks for the replies. I should have mentioned that I don't have the pro version. So the consensus approach is to make the planks as usual in 3D, then use the Intersect Faces with Model? I don't know how to use that tool yet so I'll have to study up on it.
-
The way I would do this sort of thing (and did it for the example) is to lay out the planks as in the assembled version on the left, above, then draw a circle on the planks and extrude it into a cylinder. Select the cylinder and use Edit>Cut. Open one plank component at a time and use Edit>Paste in Place. After pasting the cylinder into the component, select all of the geometry in the component, right click on it and choose Intersect Faces>With Selected. After the intersection is made, delete everything that isn't part of the plank you want to keep. Close that component and open the next. Rinse and repeat.
In my example, since I made the planks all the same width, I made pairs of planks so I only needed to edit half of them to get the entire circle.


-
Thanks. I did as you indicated and it worked very well. One final question: After deleting the waste, I'm left with planks that are open on the now curved ends. How should I make them solids again?
-
It sounds to me as if you didn't copy the cylinder into those components/groups before doing the intersect. By copying the cylinder in, when you delete the waste, you're suppose to be leaving part of the cylinder behind to make the curved surface. If you don't paste the cylinder inside the component, there won't be any face to leave.
At this point you could stitch the faces closed by drawing vertical lines between vertices or you could delete one face and the verticals and use Push/Pull to pull the plank back to 3D.
-
Does sections are like these ? So the Push Pull one face will don't working!

-
@unknownuser said:
Does sections are like these ? So the Push Pull one face will don't working!
He said he was going to join the planks with dowels which I think would mean there aren't tongues and grooves on the edges so then Push/Pull would work fine. If the planks are joined with tongue and groove joints, it would be best to just redraw the entire plank and cut the ends off as I described.
-
Thanks again. You're right that I neglected to "copy" the cylinder into the model. I did as you suggested and restitched the vertices from the top to the bottom of the circles ( I now see the downside of specifying a lot of "sides" when drawing a circle).
My next challenge is drawing the dowels, which are inserted into the edges of each plank, thus joining it to its neighbor. [Pilou, pls note that these are not typical flooring boards with the tongue and groove profile you suggested. The sides of the planks are smooth and holes are drilled to accommodate the dowels.] I was thinking I would draw the circles for them and then push/pull the hole into the edge of one plank and then try to copy the holes into the neighboring plank somehow. Would the rotate tool be best for this? Is there a faster way to do this for all the planks? Thanks.
-
So since you have the planks drawn and cut, try it this way:
- Lay out the circles for the holes on the edge of a plank.
- Select them and Ctrl+C copy.
- Use Push/Pull to push in the the holes to depth.
- Close the first plank and open the neighbor.
- Click on Edit>Paste in place.
- While the pasted circles are still selected, use Move-Copy to copy them to the opposite edge of the plank.
- Return to the first edge of this plank and push in the holes.
- On the second edge, add or subtract holes as needed.
- Select and Ctrl+C copy the circles.
- Push in the the holes.
- Open the next plank and go up to step 5 and repeat.
There's a cool plugin from Wudworx that would make this a lot easier but I would suggest that you learn this with the native tools first.
-
So if your plank are strictly "box plank" maybe Slice v5 by Tig will be a cool friend! ?
(but without an image of one of your plank...maybe i am wrong
No plank to draw!!!
Just draw a disc then and the plug make all the rest!At the end if you want that each different plank must be a component oe a group there are plugins for automatically made that!
-
Pilou, Slicer is nice for a lot of things but I don't think it is the right option for this. The OP clearly stated the planks are of varying widths and he wants the ends cut to the radius of the cylinder. Slicer only makes constant width slices and doesn't retain the radiused ends.


-
Will you be showing the dowel pattern here?
-
Ah damned, I am disappointed!

So TIG must improve his plugin! -
So my try
The two "one line" must be a "real one line" written inside the Ruby Console !
Face on Component by TIGm=Sketchup.active_model;n=m.active_entities;m.selection.to_a.each{|e|(g=n.add_group(e);g.to_component.definition.name="Face#1")if e.class==Sketchup;;Face}Thickness of a component By SDmitch
mod=Sketchup.active_model;sel=mod.selection;sel.grep(Sketchup;;ComponentInstance).each{|c| c.definition.entities.each{|f|(f.pushpull -10;break) if f.class==Sketchup;;Face}}Selection Toy by Thomthom
Inverse selection by TIG
Radial Move by CPlassais
PS Maybe following your version of SU when you "Explode all" , Faces are not trimed by segments ?
So Select all / Intersect Selected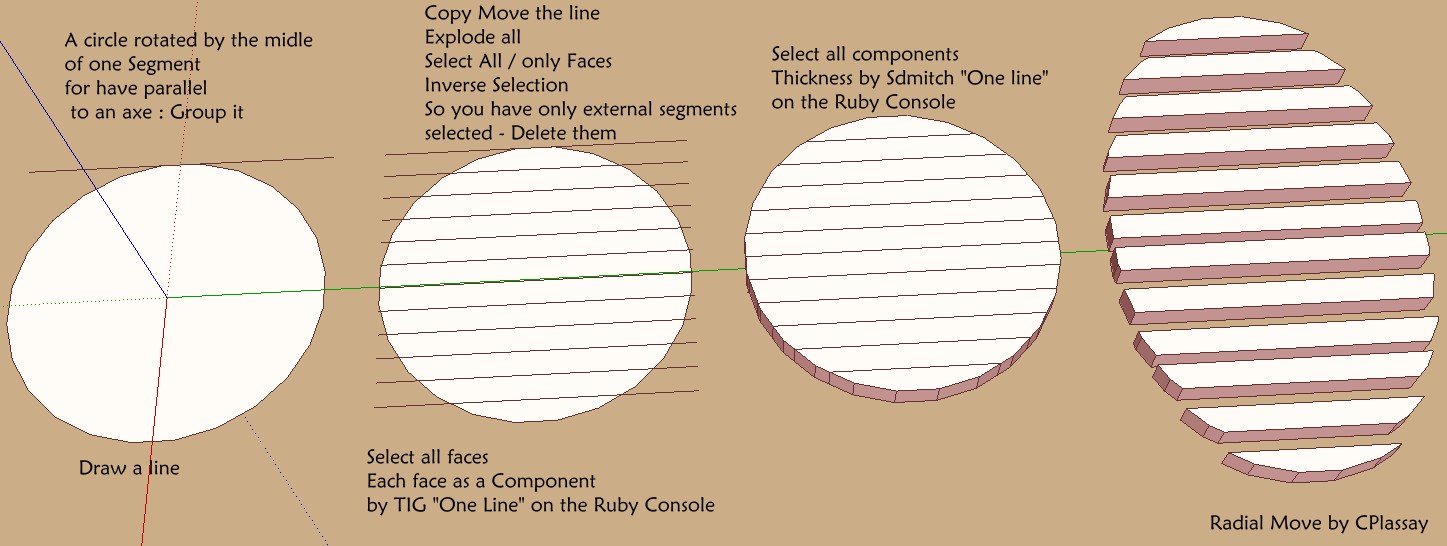
-
Anything to keep from using the native tools.
-
Not sure you can easily take away pieces between them without plugin!
For ten pieces maybe but for 100 ? -
Thanks. I've finished the floor boards (yes I put it down for a while). Now I've got a lot of dowel holes in the planks w/ no dowels. Making a dowel is easy, but how would you suggest I insert a copy of it into each of the holes? Is there some way of doing this quickly and accurately?
-
Make the dowel a component and set its origin and axis alignment so you can simply drop the components in to place. Did you use even spacing between holes? Could you either post the model or at least a screen shot in X-ray mode so we can see the arrangement of the holes??
Hello! It looks like you're interested in this conversation, but you don't have an account yet.
Getting fed up of having to scroll through the same posts each visit? When you register for an account, you'll always come back to exactly where you were before, and choose to be notified of new replies (either via email, or push notification). You'll also be able to save bookmarks and upvote posts to show your appreciation to other community members.
With your input, this post could be even better 💗
Register Login


Advertisement