Materials changing after creating and using
-
I used some .jpg files of wood textures to create .skm files through the material manager and they worked just fine. The next day though some of the materials now show up on the sketch having alternating material in true color/textrue with a big black line OR a shortened double gray/black line. Any ideas why this is?
Some notes:
Before using the .jpg I made sure they were square and then compressed them for web use to make the file sizes smaller. Their L X W varies from 250 x 250 to 650 x 650. I cannot find the criteria for best use of .jpg to .skm.Any ideas?
-
Bart, some screenshots - or even better, the skm files themselves would be helpful attached.
-
The file plywood_new.skm is attached. Thanks for looking at this.
-
I looks to me as if the dimensions were edited at one point. How did you create this texture? How big of an area did you intend for it to cover?
-
Dave, what are you looking at? As of your reply I do not see my uploaded file. I did use Microsoft Picture Manager to reduce the file dims from the original 650 x 650 to 327 x 327 (don't ask) and then used Sketchups Materials>>Create Materials and used that .jpg file, so Sketchup created the .skm file for me.
-
I was looking at the SKM file you uploaded.
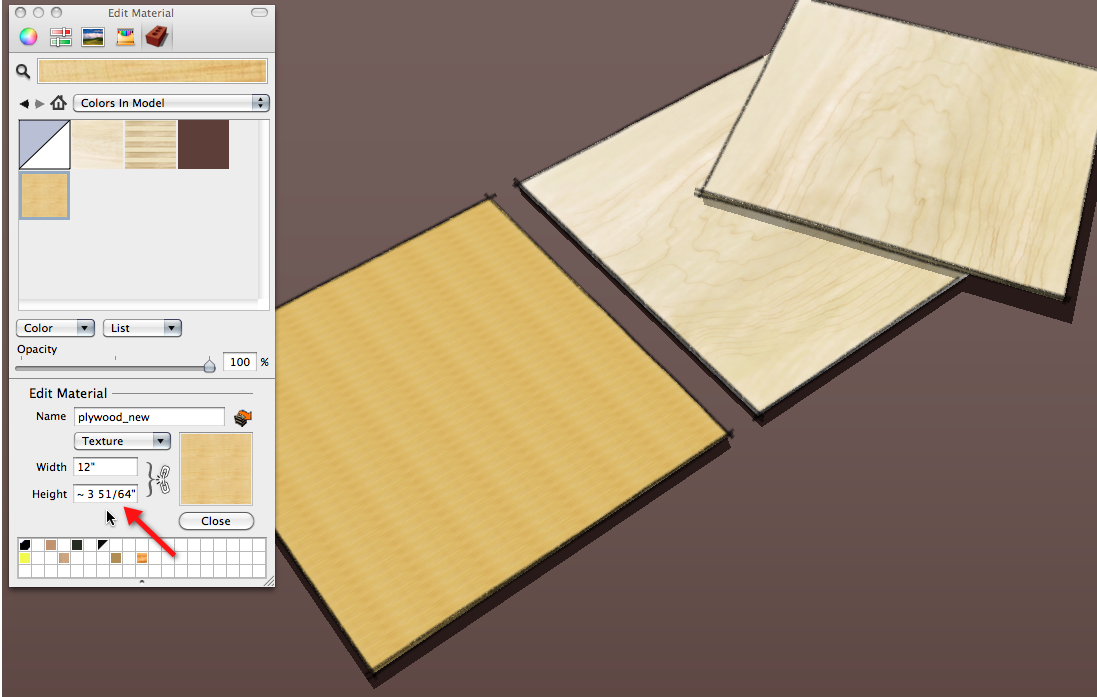
Notice the dimensions that show when in Edit mode for the material in SketchUp. 12 x ~3-51/64".
When I create materials from images, such as my plywood image in the background, I create a face with the dimension or the "board" and then use File>Import to import the image as a material and apply it to that face. Doing it this way automatically correctly defines the dimensions of the material.
It looks to me as if you just need to edit the dimensions of your material now that you have it in SketchUp. Break the link between the Width and Height so you can edit one without changing the other.
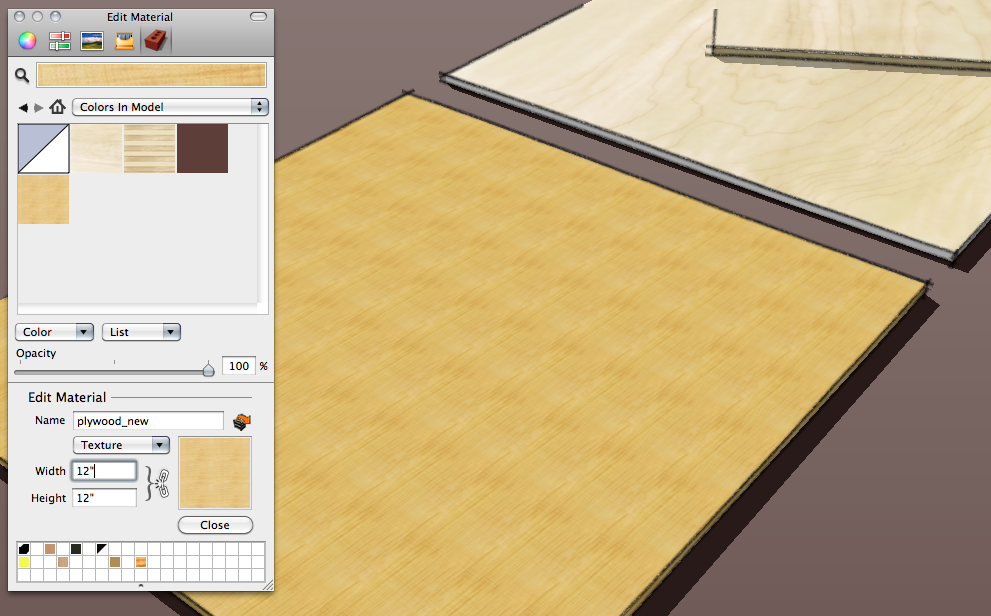
Here I've edited it to make it 12 inches square. I don't know if that's the area you intended it to cover, though.
-
Thanks, Dave. I set the dims to 12 x 12 and it looks fine now. I am using free V.8 so your screen shots didn't match mine (Materials panel) but I went to YouTube and learned a few things, which is a good thing. One of them is that you have to apply the material to a face in a drawing before you can actually edit the material. Thanks again!
-
The appearance of my screen shot has nothing to do with free/pro. I made these on my Mac.
If you create the material as I described, above, you don't need to edit the dimensions later.
-
So you are THAT Dave! Awesome!
Thanks for the link. It made all the difference. It made me re-think my organization and use of materials and so I have begun to create a "plywood" collection of 48 x 96 sheets and now I have no issues with weird lines. As a bonus it finally sunk in the difference between applying materials and paint. Thank you for the time and patience.
-
@bartgragg said:
So you are THAT Dave! Awesome!
You say that like it's a good thing.

@bartgragg said:
Thanks for the link. It made all the difference. It made me re-think my organization and use of materials and so I have begun to create a "plywood" collection of 48 x 96 sheets and now I have no issues with weird lines. As a bonus it finally sunk in the difference between applying materials and paint. Thank you for the time and patience.
I'm glad it helped.
Hello! It looks like you're interested in this conversation, but you don't have an account yet.
Getting fed up of having to scroll through the same posts each visit? When you register for an account, you'll always come back to exactly where you were before, and choose to be notified of new replies (either via email, or push notification). You'll also be able to save bookmarks and upvote posts to show your appreciation to other community members.
With your input, this post could be even better 💗
Register Login


Advertisement