Curviloft problem... need help.
-
Hey forum,
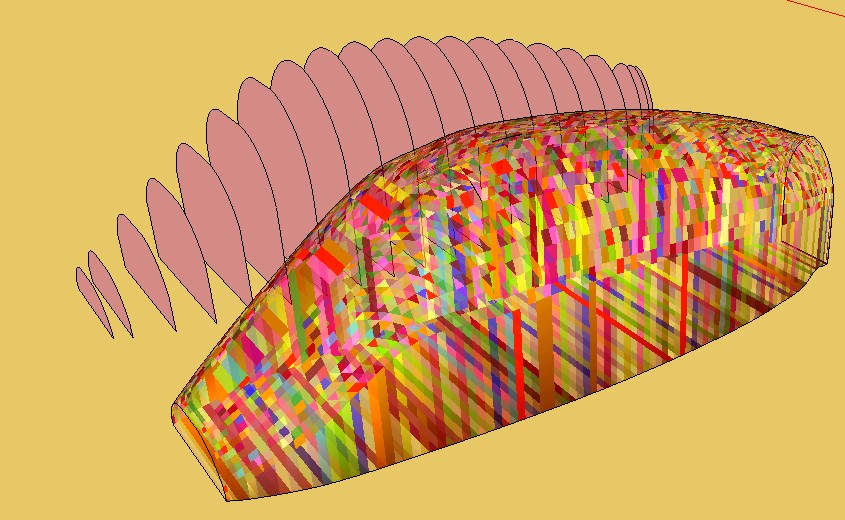
I have run into trouble with curviloft once again and I desperately need help, otherwise I'm going to have to scrap my whole project. So I was modeling the canopy of a fighter jet by creating ribs and then lofting them together with curviloft. That mostly works just fine for me, but this time I ended up with a large amount of imperfections. I'll just let the screenshots explain.
This is what the problem looks like. A small gap in the surface. The outlines don't seem to be normal lines, I cannot select them and place lines to manually close the gap.
You can see, the whole model is covered in tiny gaps, after using curviloft on the ribs.
Here's another close-up of one of the gaps.
According to the internet, I seem to be the only person in the world who has this problem. Does anybody have an idea what could be wrong and what I could do to fix it?
Thanks in advance, Kevin
-
First advice is to post an SKP file of the part who has a problem!
In save as V7 if possible for a more large audiance!
-
V7

Bought a Minitel II?
-
@unknownuser said:
First advice is to post an SKP file of the part who has a problem!
In save as V7 if possible for a more large audiance!
Good idea, here it is:
-
You jump from lofting 27 edges to 45 edges in one step. Then it goes up to 52 edges and back to 45/48 edges. More forward planning is needed.
-
@ Gilles : no,no always old minitel just another less old version of SU! So 2 versions in the same time! Transistors will be superheat overheat!

So It was a good idea to post the file because an image or a text are never sufficient!


Ps
Any reason for have perimeter's section not welded ? -
@rich o brien said:
You jump from lofting 27 edges to 45 edges in one step. Then it goes up to 52 edges and back to 45/48 edges. More forward planning is needed.
ok, I see. Is it necessary to have an equal amount of edges before lofting them? And if so, how do I build the ribs in order to archive that, is there maybe a tutorial out there? and how did you even count the edges? Sorry for the amount of questions I have

-
@unknownuser said:
@ Gilles : no,no always old minitel just another less old version of SU! So 2 versions in the same time! Transistors will be superheat overheat!

So It was a good idea to post the file because an image or a text are never sufficient!

[attachment=0:1gysff5t]<!-- ia0 -->CArlingue.jpg<!-- ia0 -->[/attachment:1gysff5t]Ps
Any reason for have perimeter's section not welded ?Perimeter's section not welded? I'm afraid I can't quite follow...
-
@unknownuser said:
how did you even count the edges? Sorry for the amount of questions I have

Double click the face to select face and edges
Shift click face and bottom edge to deselect these
Window > Entity Info to see number of edges
-
@unknownuser said:
Perimeter's section not welded? I'm afraid I can't quite follow...
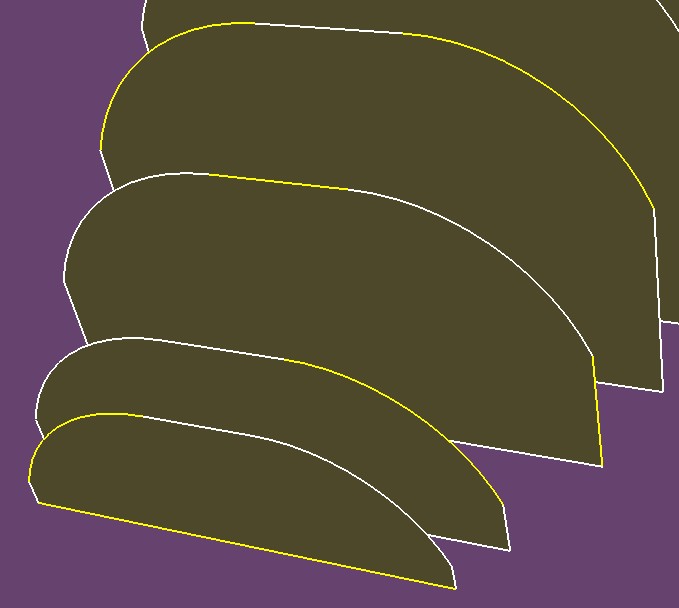
This...maybe that is not important...

-
@rich o brien said:
@unknownuser said:
how did you even count the edges? Sorry for the amount of questions I have

Double click the face to select face and edges
Shift click face and bottom edge to deselect these
Window > Entity Info to see number of edges
Thanks, thats good to know. So the point is, I have to plan ahead and make sure that the ribs have the same number of edges. But how exactly do I do that? What I usually do is create basic square planes with the dimesions I want and then round them off, using the curve tool. It turns out they have completely different amounts of edges, so later curviloft runs into trouble.
How do I create ribs with an equal amount of edges from the start? And is there a way to repair the ones I allready have? -
@unknownuser said:
@unknownuser said:
Perimeter's section not welded? I'm afraid I can't quite follow...
This...maybe that is not important...
[attachment=0:1e4ji5gj]<!-- ia0 -->not_welded.jpg<!-- ia0 -->[/attachment:1e4ji5gj]
What exactly does that image show, Pilou? What do the yellow sections mean? I'm sorry, I'm kind of a noob when it comes to this kind of stuff

-
@unknownuser said:
What do the yellow sections mean?
Just that the perimeter is composed of different curves not welded (click on it and you will see that I say

With native tools you can't weld curves or lines so you must use a plugin
the more practical for that is Recurve by Diggsey (on Right Click)But one more time maybe in your special case you need to have this segmentation of curves!
-
I found with curvizard, Cleanup contours for all curves, then simplify contours for some of the curves with larger segment count leaves you with only a couple places to fix by hand. But I think the contours show too much concentration of edges in some places and overall I would think you'll get better results with fewer and more evenly spaced segments. Rich is right and knows best how to do this sort of thing. You could also work on this with half the canopy.
I also worked at 10 time the size for good measure.
How do you arrive at the correct section and draw those curves?
-
@unknownuser said:
@unknownuser said:
What do the yellow sections mean?
Just that the perimeter is composed of different curves not welded (click on it and you will see that I say

With native tools you can't weld curves or lines so you must use a plugin
the more practical for that is Recurve by Diggsey (on Right Click)But one more time maybe in your special case you need to have this segmentation of curves!
Thanks friend, I'll give that a try.
-
@pbacot said:
I found with curvizard, Cleanup contours for all curves, then simplify contours for some of the curves with larger segment count leaves you with only a couple places to fix by hand. But I think the contours show too much concentration of edges in some places and overall I would think you'll get better results with fewer and more evenly spaced segments. Rich is right and knows best how to do this sort of thing. You could also work on this with half the canopy.
I also worked at 10 time the size for good measure.
How do you arrive at the correct section and draw those curves?
Thank you so much pal, I finally solved the problem, thanks to curvizard, which I had never heard of before you told me.
All I did was simplify all the cuves, it helped a ton: there is not a single imperfection to be found in the resulting model.
The model on the right is the new one.
Thank you, pbacot!

Advertisement


