Square Carnival Tent
-
@alan fraser said:
The sequence actually shows how to make a square tent, not a round one...but the sequence is exactly the same.
i have some questions on the scenes. how to:
- copy the curve?
- "stitch" the nodes?
- copy the 1st face to adjacent sides?
-
@unknownuser said:
Wow. . .the follow me tool! Who'da thought?
Here's a D'uh Moment!

yes, it didn't come across my mind
 especially because the base is square.
thank you. -
-
-
i didn't succeed using follow me tool either.
this is what i made using curvy loft.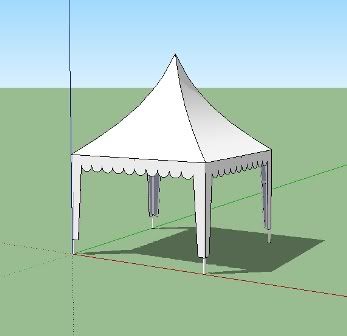
i don't know how to attach the skp file yet.
-
You must learn follow me. Always learn to walk before run. The tent looks good however.

@irwanwr said:
i don't know how to attach the skp file yet.
See below...
-
@gaieus said:
You must learn follow me. Always learn to walk before run. The tent looks good however.
thank you. i'll learn the tool again.
actually, in the first place i was looking for a plugin that able to make the physic looks on the tent cover surface. the tent cover should have straight diagonal frame. but the surface in the middle of each side should be a bit lower. i need to learn and practice more sketchup i guess. thank you again Gaieus.
-
Ah! more like a party gazebo. I wouldn't bother making the fabric sag in the middle of the sides (although it would sag in the middle of the roof ridges, as youve already done)...but I would round some of the edges a little. After all, the fabric will roll gently over the poles, not form razor sharp creases.

-
@alan fraser said:
Ah! more like a party gazebo. I wouldn't bother making the fabric sag in the middle of the sides (although it would sag in the middle of the roof ridges, as youve already done)...but I would round some of the edges a little. After all, the fabric will roll gently over the poles, not form razor sharp creases.
yes, thank you for reminding me about the round corner
 nice tent design and image by the way
 -
Hi Irwan, hi folks.
The Follow me tool needs two things:
1 - A facethat will follow a path.
2 - A paththat the face will follow.A faceis any closed flat shape delimited by connected edges and is coplanar (of course since it is flat).
A pathis made of any number of connected edges.
Another important thing is that the facemust be perpendicular to the first edge of the path. If the faceis not perpendicular to the first segment of the path, the facewill be projected on a plane perpendicular to the first segment of the path. This will cause a scaling which may prove detrimental to the wanted result.
The Follow me tool works in two ways.
1 - Manual follow
1.1 - Click on the Follow me tool to select it
1.2 - Click on the face.
1.3 - Follow the pathsegment per segment.
1.4 - Click to finish when the face is at the end of the last segment of the path.2 - Automatic follow
2.1 - Select the whole path. Use whatever selection method you want.
2.2 - Select the Follow me tool. The pathwill get deselected, don't bother.
2.3 - Click once on the face.This last method is very efficient and super quick to lathean object around a circle, for example.
In the example shown in my previous file, I use the perimeter of the horizontal square as the pathand the vertical shape as a faceand I latheit around the square path.
Don't worry if you select a pathwith a double click on a face enclosed by this path. Only the perimeter will be used by the Follow me tool.
Just ideas.
-
Jean Lemire
thank you, for step by step instruction provided. -
here's my homework on Follow Me tool (thank you Jean and all others).
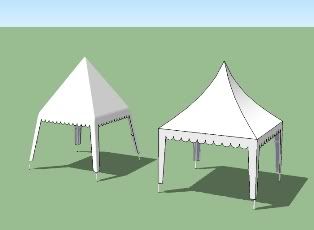
the second on the left have significant larger size than the earlier. is it probably because there are more geometry on the tent cover after using Round Corner plugin?
-
@alan fraser said:
... I would round some of the edges a little. After all, the fabric will roll gently over the poles, not form razor sharp creases.
if you don't mind, i'd like to know how to make those round edges as smooth as the image above?
-
Unless Alan really rounded them (adding geometry) which I doubt as he likes to keep his models low poly, simply use the Erasertool while holding down the Ctrlkey to soften edges. Very sharp edges do not look nice when softened but for a shallow roof like that, they may not be too sharp.
-
Actually, I did add geometry...but Gaius is right, I do like low polygon counts, so I only used 3 segments to the curve.
Find the Round Corners ruby script by Fredo. It gives you 3 options...round corners, sharp corners and bevel edges. Select the top of the tent, plus the four corners that hang down and choose the round corners option. You'll see a dialog appear at the top of the drawing window...and also the same parameters in the VCB (Measurements box)...the spread of the curve followed by the number of segments, separated by a comma. Retype your own parameters...these would be something like 1" or 2cm and 3 segments. Press Enter, see if the preview lines look ok on your model then use the tick on the end of the cursor to accept them. -
Okay, so my eyes did not deceive me (it indeed looks like something is added there but the image was not too large to precisely see)
-
@gaieus said:
Unless Alan really rounded them (adding geometry) which I doubt as he likes to keep his models low poly, simply use the Erasertool while holding down the Ctrlkey to soften edges. Very sharp edges do not look nice when softened but for a shallow roof like that, they may not be too sharp.
i see. thank you. perhaps i did that when i still using SketchUp 6. been a while i forgot.
-
@alan fraser said:
Find the Round Corners ruby script by Fredo. It gives you 3 options...round corners, sharp corners and bevel edges. Select the top of the tent, plus the four corners that hang down and choose the round corners option. You'll see a dialog appear at the top of the drawing window...and also the same parameters in the VCB (Measurements box)...the spread of the curve followed by the number of segments, separated by a comma. Retype your own parameters...these would be something like 1" or 2cm and 3 segments. Press Enter, see if the preview lines look ok on your model then use the tick on the end of the cursor to accept them.
thank you.
yes, i did download it yesterday and applied it to the second tent. perhaps i just made it too round. since the edges where the tent cover falls down look to smooth as if it is a pyramid.
Hello! It looks like you're interested in this conversation, but you don't have an account yet.
Getting fed up of having to scroll through the same posts each visit? When you register for an account, you'll always come back to exactly where you were before, and choose to be notified of new replies (either via email, or push notification). You'll also be able to save bookmarks and upvote posts to show your appreciation to other community members.
With your input, this post could be even better 💗
Register Login


Advertisement