How to add specularity map in Vray materials option ?
-
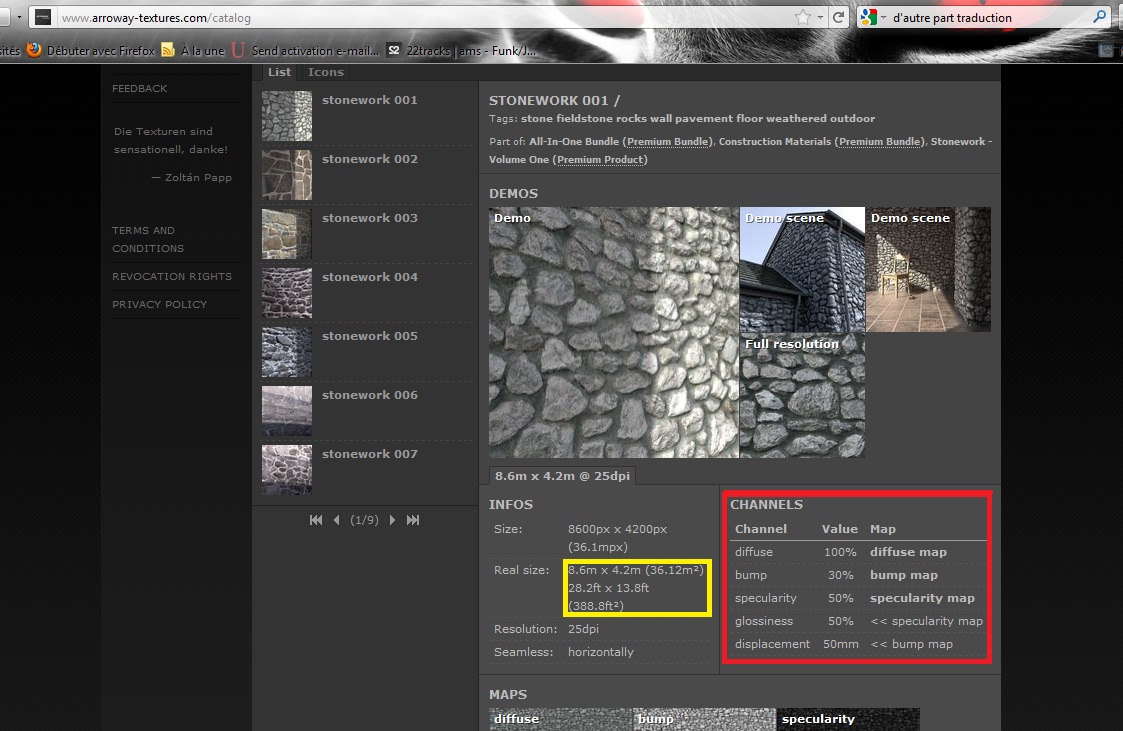
I had worked for hours to get the aspect that i've seen in the demo in this site : http://www.arroway-textures.com/catalog but still don't get it .
Can we get this result with Vray for sketchup ??I don't think that the reflection filter is used for the specularity; this is what it's said about it in Vray for sketchup " manual "
Reflection Filter :
The filter color is used to apply color to reflections. You can see that by changing the filter color
on each of the renderings below the color of the reflections change. The magnitude of this effect
will change based on the strength of the reflections themselves. In the case of materials which are
very reflective, filer color may be an effective way to change the object’s appearance.About the reflection glossiness :
You don't always get clear reflection from reflective material. Objects like matte finish metal, wood and some plastic materials do not reflect the lightsource clearly due to its uneven surfaces. This is because the
uneven surfaces create many reflecting angles for light to bounce around. So the highlight is not as sharp if compare to reflection from smoother surfaces. The best way to create this kind of rendering quality is playing around the setting of both Highlight Glossiness and Reflection
GlossinessThe specularity map is used to reflect the light form bright object "lightsource" and sun and let only some part of the material " or object that we have affected it " reflect them because of the iregularity of the surface like in concret .
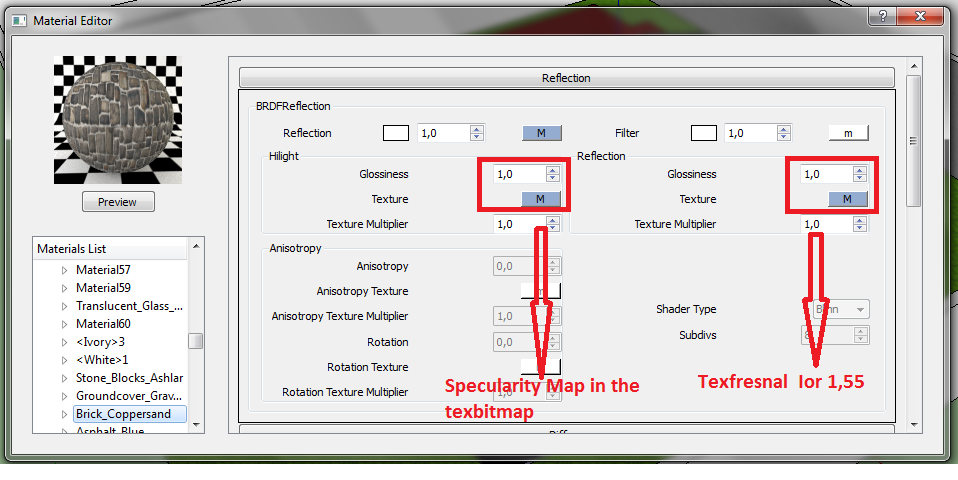
In this tutorial of chaosgroup Material part 2 he used the reflectivity map and set it as a texbitmap in both highlight glossines ans reflection glossiness . and for the the wall texture he used a fresnal for the reflectivity glossiness .
http://www.youtube.com/watch?v=ygvBfeK2HHY&feature=mfu_in_order&list=ULDoes someone can expaline to me where can i put exactly the speculartiy map and why ?
-
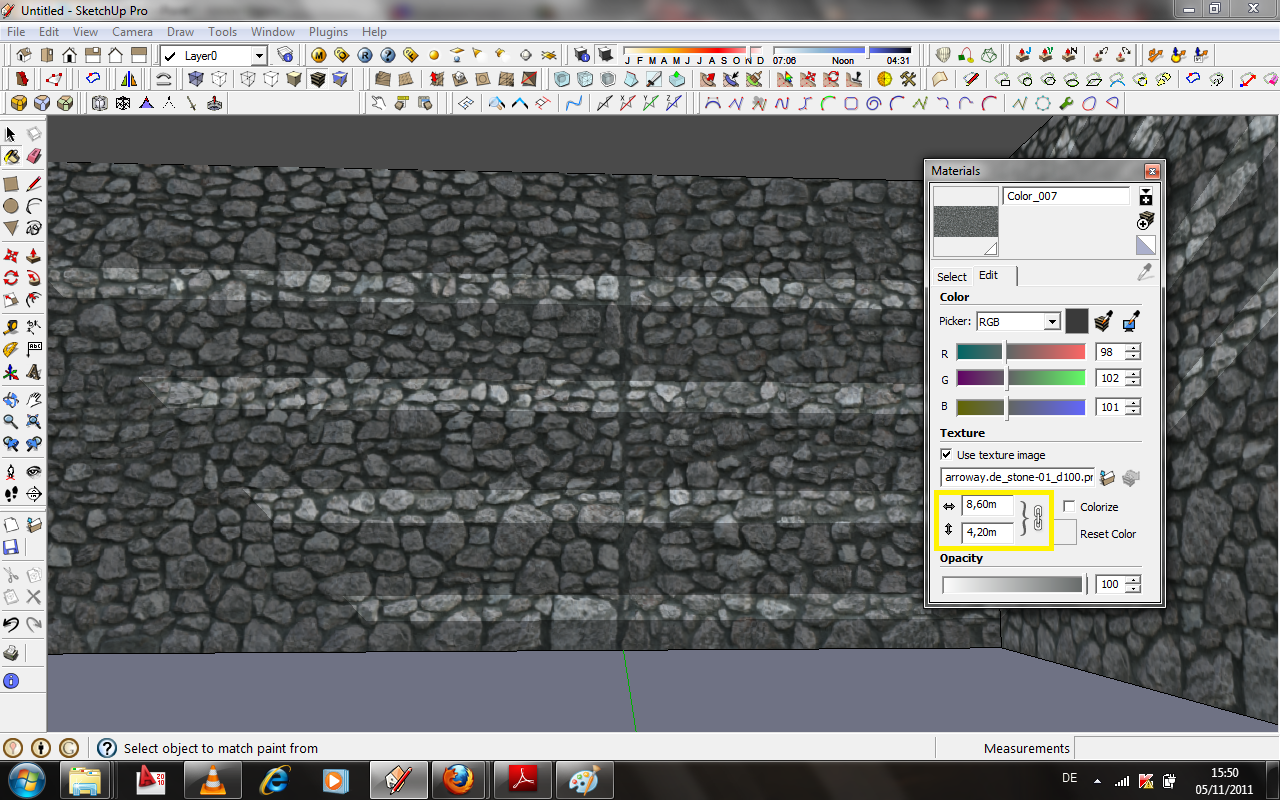
I set the exact size of texture like in the info form the website, I enabled the displacement and put the bump map and have given it 1,96 valu wich its corespond to 50 mm (converted into inches)always took the info from textrue info of website .
-
You're right - my mistake, the filter option only affects "coloring" of the reflection. The two glossy reflection slots are where you can put the specular map. I would suggest using bump map first, and not doing displacement if it looks okay with the bump. Displacement takes a lot more care to set up correctly and can lead to very long render times. Seems like you are finding the right tutorials, hope you get it sorted out.
One thing to note is that your reflection depends a great deal on what is being reflected. I would suggest using an HDRI for your background to get a good effect. -
Hello everyone
Thank you Andy for your posts and advices; excuse me for my english it's my third languange
After working on a house secen form model that i'Ve downloaded form google warehosue, here is some point that I want to share with you.
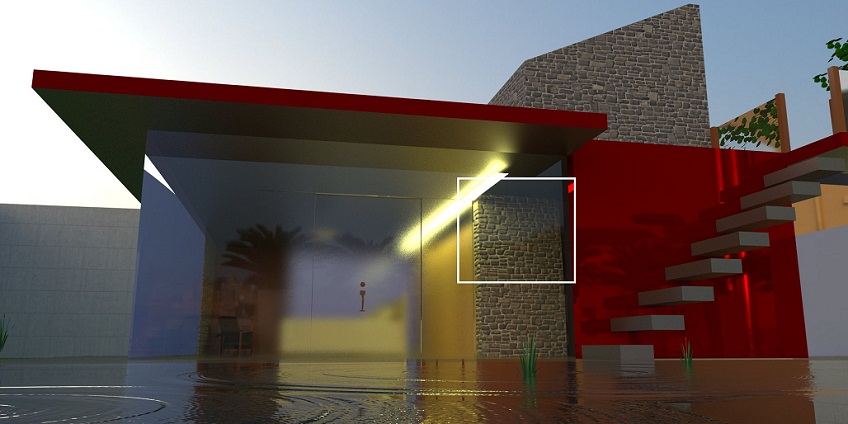
The specularity map when puted on highlight texture it gives a better reflectivity of artificial light on irregular surface , So bump map have a big part of standing out a realistic aspect of the material when combining with " specularity map " .
You're right andy for the dispalcement the bump map can replace it most of time I think and it takes too much time to render the scene .
The texture I used is downoladed from "free low resolution arroway texture" I guess that the high quality one will gives much more realistic image . ( of course am talking about Stone texture )
You can see just under the light source a good effect of bump and specularity just inside the house.
less is the artificial brightness less is the quality of the result . about the sun light I Think that its hard to get that effect without high quality texture. I'll try that and share the result .
-
Vray version 1.48.91
-
Thanks for posting your work-in-progress. I can see right away that you don't have any direct light on your walls. Do you have the sun turned off? If you rely only on GI, you will not get the strong contrast needed for making your materials stand out. My suggestion is either put some more lighting sources in your scene or put some direct sunlight on your wall.
By the way, the current version of vray is 1.49.01 so make sure you update when you have a chance. -
 If it can help those who asked the same question that I did YES i'll be glade to put all what I've learned up to now ..
I suppose that turning off the sun mean disable the physical camera (or the exposure), euh yes, because I've used an hdri file but I didn't enable the defaults lights under the global switches menu and neither adjust it in the reflect color under environment menu. it was just a little test to see how the specular map will work with artificial light sources .
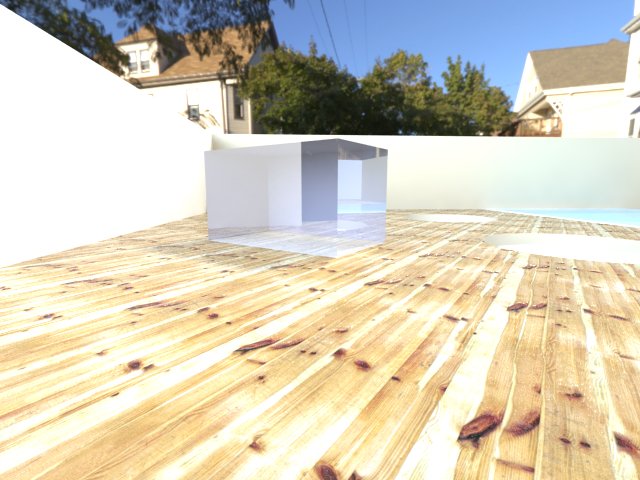
Yes andy, i totally agree with , The GI color will only affect the brithness of the model's textures ( increase the amount of white when increasing the value of the GI color)
Here is an exemple below.
-
We can also sorte out the mtexture when playing with the value of BG color and the Sm .
HERE is same difference when using the speculartiy map ( euh I used a diffuse map in this case i'll try it next time with another material with its own sm )The BG color affect the brightness of the refelction and the image of back ground of course.
Sm will affect the type of the reflection .
You can see same difference between the images below..
I also used an hdri file ..

-
@thegunslinger said:
I had worked for hours to get the aspect that i've seen in the demo in this site : http://www.arroway-textures.com/catalog but still don't get it .
Can we get this result with Vray for sketchup ??I don't think that the reflection filter is used for the specularity; this is what it's said about it in Vray for sketchup " manual "
Reflection Filter :
The filter color is used to apply color to reflections. You can see that by changing the filter color
on each of the renderings below the color of the reflections change. The magnitude of this effect
will change based on the strength of the reflections themselves. In the case of materials which are
very reflective, filer color may be an effective way to change the object’s appearance.About the reflection glossiness :
You don't always get clear reflection from reflective material. Objects like matte finish metal, wood and some plastic materials do not reflect the lightsource clearly due to its uneven surfaces. This is because the
uneven surfaces create many reflecting angles for light to bounce around. So the highlight is not as sharp if compare to reflection from smoother surfaces. The best way to create this kind of rendering quality is playing around the setting of both Highlight Glossiness and Reflection
GlossinessThe specularity map is used to reflect the light form bright object "lightsource" and sun and let only some part of the material " or object that we have affected it " reflect them because of the iregularity of the surface like in concret .
In this tutorial of chaosgroup Material part 2 he used the reflectivity map and set it as a texbitmap in both highlight glossines ans reflection glossiness . and for the the wall texture he used a fresnal for the reflectivity glossiness .
http://www.youtube.com/watch?v=ygvBfeK2HHY&feature=mfu_in_order&list=ULDoes someone can expaline to me where can i put exactly the speculartiy map and why ?
here in the image the specularity and glossy are specified as 50 %. but in fresnel we write 1.55 or something like that. how are the percentages written on arroway website then considered?

-
John, 50% means 0,5. Default is 1. So if u use a map in reflection glossiness, use 0,5 glossiness, NOT texture multiplier.
Since I jumped into this, I did some experiments based on my experience, so that doesn't mean that are 100% correct.
I'm using HDRI map in both GI Color and BG Color , IM and DMC,physical camera disabled .
I have bump map with 0,01 multiplier. Reflection glossiness and highlight glossiness always set to 1.
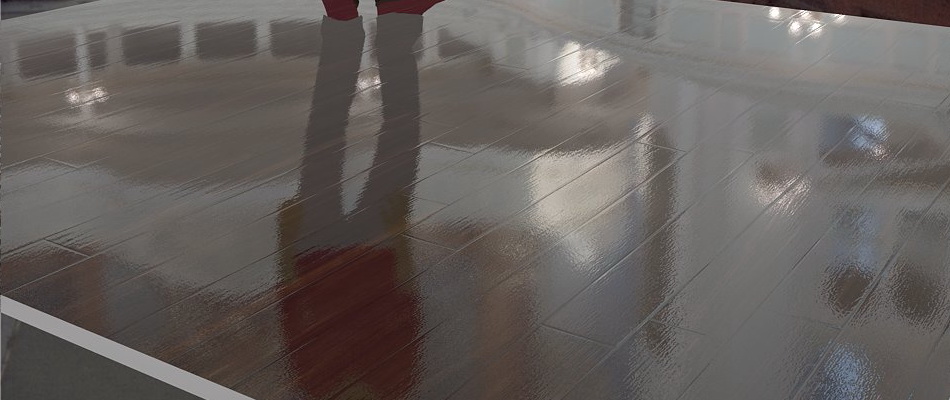
Image 1
I just added reflection layer to the material, with 1,55 Fresnel.
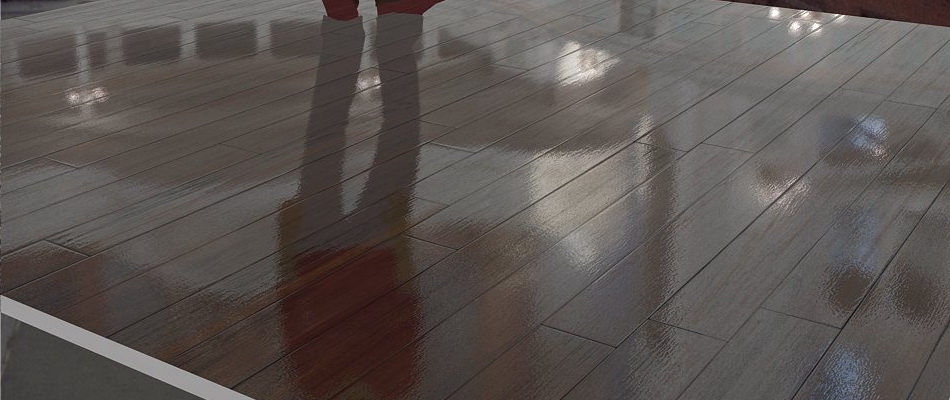
Image 2
I added the specular map to the perpendicular slot of the Fresnel. Note how nice the bump of the material is now defined (the bump is the same, 0,01)
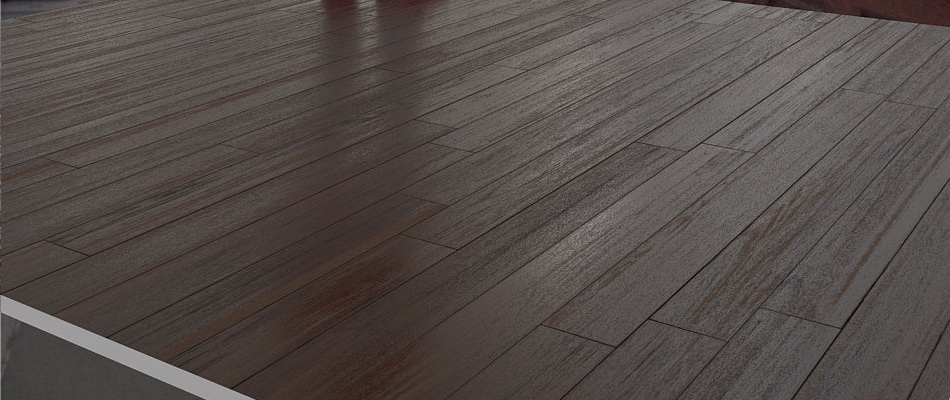
Image 3
I added the same specular map to the Reflection Glossiness slot.
This is where I usually stop. Adding the map to the highlight glossiness doesn't seams to affect the look of the material.
-
@stefanq said:
John, 50% means 0,5. Default is 1. So if u use a map in reflection glossiness, use 0,5 glossiness, NOT texture multiplier.
Since I jumped into this, I did some experiments based on my experience, so that doesn't mean that are 100% correct.
I'm using HDRI map in both GI Color and BG Color , IM and DMC,physical camera disabled .
I have bump map with 0,01 multiplier. Reflection glossiness and highlight glossiness always set to 1.
Image 1
I just added reflection layer to the material, with 1,55 Fresnel.
Image 2
I added the specular map to the perpendicular slot of the Fresnel. Note how nice the bump of the material is now defined (the bump is the same, 0,01)
Image 3
I added the same specular map to the Reflection Glossiness slot.
This is where I usually stop. Adding the map to the highlight glossiness doesn't seams to affect the look of the material.thanks a lot for clearing my doubts.
 image number two is really sexy!!.
  can you share the hdri map please? i have tried many times to change the environment to something realistic but my renders always look poor. i have to definitely learn about hdri to have quality renders. thanks again.
-
You're welcome, unfortunately I can't share it, because it is commercial, but you will find free hdri with amazing quality here: http://www.openfootage.net/?cat=15
-
@stefanq said:
You're welcome, unfortunately I can't share it, because it is commercial, but you will find free hdri with amazing quality here: http://www.openfootage.net/?cat=15
okay, just tell me the name. that'll help me find a similar free one .

hdri are light settings right? e.g. how the lighting would be in a mountainous region etc.?
-
Thank you Stefan,
This is an issue I have often wondered about.
And now I know!
Thanks again. -
another great tutorial here...

http://sketchupvrayresources.blogspot.in/2012/03/basic-vray-sketchup-tutorial-series-4.html
-
@stefanq said:
John, 50% means 0,5. Default is 1. So if u use a map in reflection glossiness, use 0,5 glossiness, NOT texture multiplier.
Since I jumped into this, I did some experiments based on my experience, so that doesn't mean that are 100% correct.
I'm using HDRI map in both GI Color and BG Color , IM and DMC,physical camera disabled .
I have bump map with 0,01 multiplier. Reflection glossiness and highlight glossiness always set to 1.
Image 1
I just added reflection layer to the material, with 1,55 Fresnel.
Image 2
I added the specular map to the perpendicular slot of the Fresnel. Note how nice the bump of the material is now defined (the bump is the same, 0,01)
Image 3
I added the same specular map to the Reflection Glossiness slot.
This is where I usually stop. Adding the map to the highlight glossiness doesn't seams to affect the look of the material.Stefan, thank you very much for this instruction!
 That's a great suggestion adding the specular map in the perpendicular slot of the Fresnel texture. Really helps the realism.
Andy
-
i get that .5 means 50 percent. and what does 1.55 in Fresnel mean?

-
@john2 said:
what does 1.55 in Fresnel mean?

The Fresnel value is for the IOR (Index of refraction) - it's the cosine of something or other... see if you can decipher the wikipedia article
-
@andybot said:
@john2 said:
what does 1.55 in Fresnel mean?

The Fresnel value is for the IOR (Index of refraction) - it's the cosine of something or other... see if you can decipher the wikipedia article
yup i know about index of refraction since a long time [thanks to all my class 9 physics lectures
 ] you really gave me a deja vu
i'm talking about Reflection.
Im aware that IOrefraction is
sine of angle of incidence in air
divided by
sine of angle of refraction in the material
-
@john2 said:
i'm talking about Reflection.
similar principal applies - the ior sets the strength of the reflection based on the angle of incidence.
Hello! It looks like you're interested in this conversation, but you don't have an account yet.
Getting fed up of having to scroll through the same posts each visit? When you register for an account, you'll always come back to exactly where you were before, and choose to be notified of new replies (either via email, or push notification). You'll also be able to save bookmarks and upvote posts to show your appreciation to other community members.
With your input, this post could be even better 💗
Register LoginAdvertisement


