Dynamic Windows Doors
-
As I explained in the German forum I know of no way of doing it with a DC because although the outer component might cut the face it's applied to because it is auto-linked to it during the placement, the inner one is separated by its 'context' and therefore cannot linked be glued to any other face outside of that. Some Ruby code could probably achieve the aim with a DC, but then my HolePunch tool already makes a selected ordinary cutting-component punch a hole with reveals through to the inner face of a two-skinned wall, and the hole is linked to the instance and it erases and moves with it etc.
If you do have some examples of DCs that do punch two faces I'd be more than interested to dissect them to see how they achieve the impossible !
-
Thanks Tig
I did not think that you answer here again... Anyway your answer is complicated, i do not understand it really... Attached a scene I found somewhere and maybe it explains something about this holes but I do not understand either...
Attached also a scene with wall and windows. Some windows do cut automatic a hole (on 1 side on wall) other does not. Also your holepunch plugin does not work on the windows wich does not make holes.
-
OK...
A component [DC or 'ordinary'] that glues and cuts a hole in the 'wall' face it's placed onto needs to have its axes correctly oriented [Z_blue=wall_face.normal - so it's either made on a wall or made laying on its back with the wall plane at ground level] and its behaviors must also be set to glue/cut.
One of the windows in the example SKP you provided was modeled with its axes wrongly oriented so it'll not glue/cut properly even if you give it those behaviors - the others seem OK and cut one skin of the wall.
All components will cut a hole in only one face at a time.
The second SKP you provided shows a 'trick' - using a component that glues/cuts one face of a wall and is made to be half the width of that standard wall; then when you place another one to the rear wall face and snap them together, because each one punches a hole in its own face there is a visible hole through the wall. However, these components are made for a set wall thickness and if you use the same component both sides the 'frames' are full width - not perhaps a problem with internal doors but most external-doors/windows have 'reveals'. Also these two 'trick' components don't move together as they are separate entities...
My 'HolePunch' Tool removes the limitation of a component only punching one face - it lets you select an instance of any hole-cutting component and use the right-click context-menu items available for that selection - so for example it will then punch a full geometry hole [with matching reveals] through the related wall to its back face [you can set any max. wall width, but this is not restrictive as walls thinner that the default 500mm/20" will still 'punch' as expected]; the punched hole is linked to that instance and so it selects, moves, copies and erases with it. It also possible to do other things to selected instances like undo punch, redo punch, unlink instance and punched hole etc and even 'reglue' instances if a wall face erased and replaced and the instances' gluing/cutting was thereby lost... -
puuhh, a lot to read and study! Thank you very much for help!! I will study this!

-
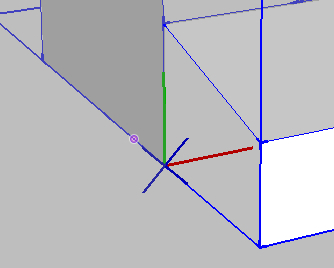
Slowly I understand... How do I set the axes like in screenshot? I am not able
 Normaly I have 3 lines XYZ and not a cross...
-
Found it!
-
For those of you who aren't clairvoyant...
Select an instance and context-menu 'change axes' so blue is 'out of the face'... AND also Edit component in the Component Browser to be gluing/cutting etc as needed... Future intsances will then glue/cut... -
The whole thing here I asked about one simple thing I do not know or better I am wondering: How does anybody construct buildings like houses?? The walls are easy but how are the windows made the easiest way? Every window made new without a window component? Or is it better to use windows components and use the hole punching tool to have holes on both sides? Until now I import the building from a cad software but this way the faces are many times wrong (backside faces are visible, wrong normals).
-
Here an interesting video how to set windows in SU:
-
I by accident came across this discussion
I have created doors and windows that cut holes in both sides of the wall, so long as the wall is at a set thickness
they are uploaded on the 3D warehouse and in this case the required wall needs to be 120mm thick and then you drop the door into the wall and explode
easy!
Try this double glass sliding door for example http://sketchup.google.com/3dwarehouse/details?mid=1a0cdc0066070dfe80d6227ff9b21190&prevstart=0
as long as placement of the component is correct, it works no problemo!
Hello! It looks like you're interested in this conversation, but you don't have an account yet.
Getting fed up of having to scroll through the same posts each visit? When you register for an account, you'll always come back to exactly where you were before, and choose to be notified of new replies (either via email, or push notification). You'll also be able to save bookmarks and upvote posts to show your appreciation to other community members.
With your input, this post could be even better 💗
Register Login


Advertisement