Slicing Help
-
I have created the attached file with Artisan and now I need to make vertical slices every 1/8" from the front to the back (long way). I want to be able to lay the slices flat and export these to my laser cutter, glue them together, and then make a plug to make a mold. When I try to use the slicer plugin it won't work since this is not a volume. Is there another better way to do this?
Thanks,
Larry
-
The cutter in Artisan doesn't do what you need? Try Zorro2? Copy the cut planes to the intervals you wish?
-
There were several small holes in the existing surface - a little vertex-move[+alt to auto-fold] fixed them quickly
I then added a quick 'bottom' surface with my EEbyRails tool, using a copy of the bottom edges made into the required 'curves'.
Recombining the groups etc into one... we have a 'solid'.
Then Slicer-ed it as required...
You can always slice the other way if that's what's needed...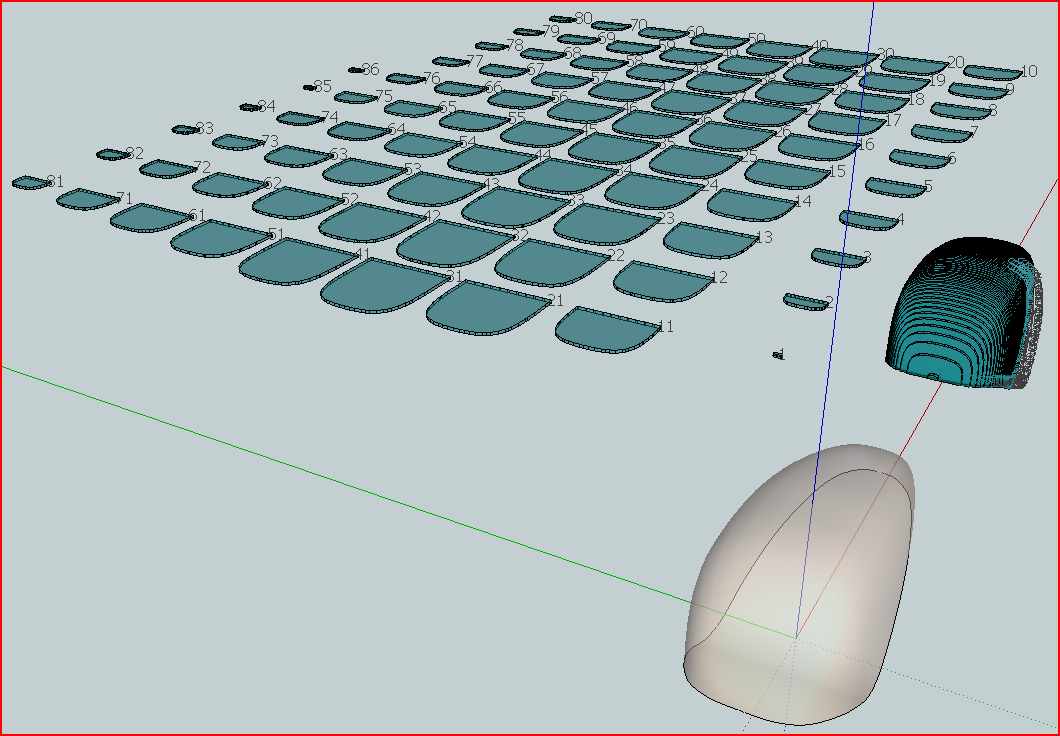 SliceNewWheelPant.zip
 -
Tig,
This is exactly what I wanted to do. I need to get familiar with your extrude tools.
Thanks,
Larry
-
Tig,
I have been trying to create the bottom surface using the Rails tool but I am stuck.
How did you make the curve and how long was each part? I have been using 2d cadd in my architecture practice for almost the last 30 years but 3d drawing is truly different.Thanks,
Larry
-
View > Hidden Geometry OFF.
Double-click surface to select the surface and the edges BUT NOT the 'smoothed-edges'.
Use Make Group to add it to a new group - it will be automatically be made a copy because the originals are needed by the surface.
Edit the Group.
View > Hidden Geometry ON.
View > Component Edit > Hide Rest of Model
You can now see what you are doing.
To make the base I did two meshes and then combined them.
Draw a line across to make two halves.
Select it and Divide into say 10, immediately use Weld.rb to weld it into a 'curve' of 10 segments.
This is the 'profile'
Draw two short edges away from the apex of each end.
Select the outline's edges from one of these to the 'profile' [~1/4], use Weld again to make it a 'curve' - this will be a Rail.
Repeat this for the other three pieces of the outline.
You now have a straight curve - the profile - and four 'rail' curves - we'll now process these two at a time.
Use EEbyRails, pick the profile-curve then two 'rails' on the same side, finish by picking the 'profile' again [i.e. there's no 'melding-profile' for this type of surface!], answer the questions with 'No' unless the mesh faces 'up' - if it does 'reverse' the faces.
You now have a mesh of ~half of the bottom face.
Repeat to make the other half.
Select the two groups and explode them.
You now have the bottom-group, explode that and it will heal with the main [original] surface.
Select All and group it, so Slicer has something to work on...Note: your surface is quite small so I recommend you first scale up the group x 8, make the slices at 1", then scale everything down by x 0.125... Sketchup has problems with making very small faces BUT they exist no problem when scaled smaller...
Hello! It looks like you're interested in this conversation, but you don't have an account yet.
Getting fed up of having to scroll through the same posts each visit? When you register for an account, you'll always come back to exactly where you were before, and choose to be notified of new replies (either via email, or push notification). You'll also be able to save bookmarks and upvote posts to show your appreciation to other community members.
With your input, this post could be even better 💗
Register Login


Advertisement