Anybody good at creating cartoon heads?
-
Just wondered if any of you guys have used SU to create life-like human heads? I'm not sure if the 'standard' SU set up is capable of doing this, but I'd be interested to know if anyone has taken this to an advanced level?
Spog
-
Check out our Organic Modeling forum. Especially Boofredlay's tutorial videos and Solo's cartoon models.
-
Thanks Rich, but how do I do that? There's no link here
-
Here is the forum: http://forums.sketchucation.com/viewforum.php?f=335
-
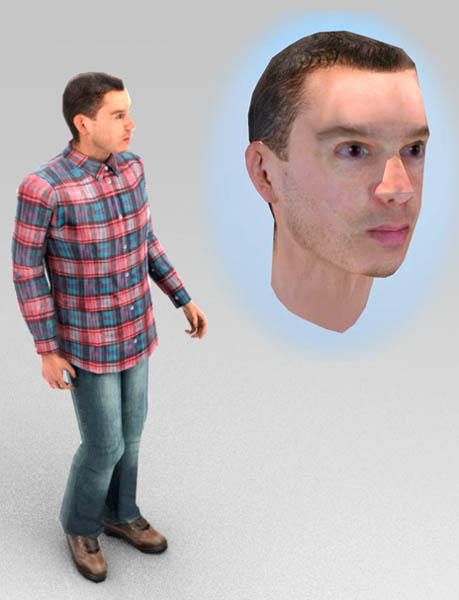
You can model people as real as you like; but you'll need to do any sophisticated mapping in other software.
-
@alan fraser said:
You can model people as real as you like; but you'll need to do any sophisticated mapping in other software.
That's fantastic, Alan. As a matter of fact I'm not bothered about surface-rendering, it's a poseable mannequin I'm trying to create.
My issue is where do you start with such a complex shape? I sat here last night and (eventually) managed to cobble together an upper and lower lip. I achieved this by creating a lip profile which I then extruded as a solid, shrank, re-angled, extruded, shrank, etc. I can see that if I continued with this method the best I could hope for would be a Kryten-like blockhead: all slabs and facets.
Yours, however, looks fantastic and is much more organic. Don't tell me, it's all down to 'rubies' and 'plug-ins'?
-
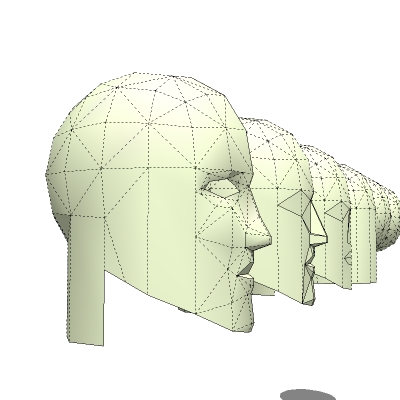
Well, there's no single correct method of constructing a head. I'm sure that others will advise using Artisan to push and prod a dense matrix of faces into shape, rather like you would a lump of clay. I guess I could do it that way...and then severely poly-reduce...but I'm in the business of producing low poly content, so that kind of organic modelling is a luxury I can't really afford. For me, an average head needs to be only about 500 faces...so that the complete figure ends up somewhere around 2500 faces. This is in game territory, not Poser.
Unfortunately, I've just reloaded my PC and haven't got screencap software back on yet, but I hope the attached skp file gives a general idea.
I'll start with a sphere, then drop a mask-like series of faces down from it. Then I'll roughly sketch out the overall proportions of the face. You really do need to do this, rather than just start with a set of lips and work out...like knitting; otherwise you'll end up with a head that's grossly out of proportion. Start big, then work down to the details. As you can see, I'm not using any Ruby scripts at all...counting every poly. I'm also only modelling half the face.You can see that the next stage is to roughly block in the ins and outs around the nose, lips and eye sockets. This process often involves getting a vertex where you need it to be in 3D space by drawing a series of lines along different axes until you arrive at where you want to be...then connect that point to the rest of the existing geometry and erase the construction lines.
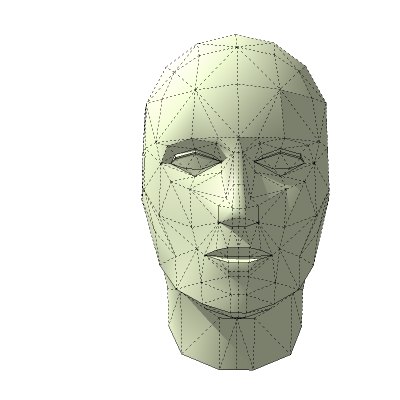
After that, it's largely a process of subdividing the very basic shapes you started with, in order to get the required level of detail. A load of vertex pushing and pulling is also required. I have to confess, I don't do all this all that often. I've got so many heads under my belt now, that I just usually edit one, or combine one or more when I need a new one.
It took me about as long to reach the most advanced stage in the model as it took me to write this.
-
The same head, a little further advanced, then mirrored. 390 faces so far...just about on course for 500 by the time I've added ears and some suggestion of hair.
-
Alan, Any special tips on selecting, and push / pulling vertexes? Especially those that are off-axis.
-
HD, I've never found a way of successfully moving vertices any way other than on axis. Anything else is just too unpredictable. If that means that a point has to be fine-adjusted in all 3 axes, then so be it.
Often, you can't tell exactly what a face is going to look like until you've mirrored it. The one I posted is actually way too wide. This then means that you have to move vertices on both sides of the face at once in order to edit it. The easiest way I've found to do that is to draw lines coming straight out from the two symetrical vertices you want to move...then join these line up with another one (not entirely necessary) so it looks like a giant staple. Then select all 3 lines and use a mixture of the scale and move tools on this staple to move the two points on the surface of the head in tandem. For instance, two point in the middle of the cheeks could be moved up and down together, or symetrically scaled closer together or further apart. -
Alan, Good technique to keep in mind. Especially once the halves are no longer transformations derived from the same component definition. The thought that it's a "Staple" will cause me never to forget this one:)
Just thinking, that fact is, our face in not symmetrical, maybe small distortions will increase a life like appearance.
-
Alan, I understand why you are not using some of the otherwise brilliant sculpting tools like Artisan - your low poly models would not be ideal candidates for those tools. Have you tried TT's Vertex Tools however?
-
There are a few very good apps that deal with 3D Human form. DAZ 3D V4 (FREE!!) and POSER are a the top of the list. They are optimized for human forms, and are adaptable to morphing or outright creation of alien life forms as well. They have all the skin texturing and lighting aids you need. Individual joint movement with skin smoothing is a basic function.
Using SU to do what you are attempting is akin to using a screwdriver to hammer nails. Doable, but not well. SU will frustrate you in short order trying to model/manipulate life shapes.
Trust me, I tried....
-
@jgb said:
Using SU to do what you are attempting is akin to using a screwdriver to hammer nails. Doable, but not well. SU will frustrate you in short order trying to model/manipulate life shapes.
Trust me, I tried....On the contrary, I've just spent most of this thread so far demonstrating exactly the opposite.

The figure 5th post down was constructed entirely in SketchUp. Sure it takes time if you're constructing it from scratch...but it does in Max or Maya too. Daz or Poser models...even if exported at low-res are MBs in size and almost unusable unless you go in for serious poly-reduction and cleaning up(which can take as long as actually building them yourself.)I've already demonstrated how to make a head. Justin Chin demonstrates here how to make the rest of the body. This is exactly the way I do it...but with fewer polys. It's basically just a series of layered cylinders which are then manipulated to the correct proportion and angle.
[flash=640,390:143iiri3]http://www.youtube.com/v/ZzDM_JrHCGM?version=3[/flash:143iiri3]
[flash=640,390:143iiri3]http://www.youtube.com/v/8pz7IXpTMMk?version=3[/flash:143iiri3]
-
@alan fraser said:
The same head, a little further advanced, then mirrored. 390 faces so far...just about on course for 500 by the time I've added ears and some suggestion of hair.
One of my replies appears to have been gobbled up in the ether. Here goes again. Are there any tutorials which shed light on how to 'pull' lines and points out of these polygon frameworks accurately and predictably? Mine are shooting about all over the place.
-
No tutorials as such, but I've found the best way is to help the movement by holding down Alt (to force autofolding...as it's often difficult in a complex mesh to see whether a point can move in a given direction without such help) then as soon you've got it moving on the required colour axis, hit Shift to lock it on that axis while you fine tune the distance. You might have to orbit a little to prevent it from shooting off wildly.
-
@spogadog said:
@alan fraser said:
Are there any tutorials which shed light on how to 'pull' lines and points out of these polygon frameworks accurately and predictably? Mine are shooting about all over the place.
Making fairings for airplanes has this same problem of tweeking points on a mesh. Most of it is by eye but there is some precise control that you can exercise.
Here's how I do it. You need mainly the move tool and the axis arrow keys.
First, you do NOT select the point/vertex you want to move. Nothing should be selected except in specific circumstances.
Choose (not select) a vertex to tweek and zoom in on it but at some angle where you can judge the movement, that is not directly looking at the vertex in some axis direction.
With the MOVE tool, hover over the vertex till SU snaps to the "endpoint" or "Intersection".
Click on the vertex and start to drag in the direction you want. It may jump depending on the background. SU is trying to find a snapping point which in all likely-hood is not what you want.You have several options to control the movement at this point, even if the vertex is way off where you want it.
You can define the exact amount of units to move the vertex from where it was in the direction you first went; release the move cursor, type to the VCB the offset units, then hit "Enter".
If you want the vertex moved relative to any or each axis (Red, Green, Blue), press and hold the Shift key to lock the DIRECTION and move the cursor in one of the 3 directions, or press the axis arrow key and move the point relative to where you want it, or type to the VCB the offset amount. Do this 2 times again for the other 2 axis directions.
Use this 3-axis move to put a vertex up against and merged to some other point on the model. Use this to close open gaps.
If you want to move a vertex along some specific trajectory, say along a line that forms that vertex, or any other line in the model, first use the Tape tool to create a guide line on or offset the line of motion. Then, if offset, copy that guide line to the vertex to be moved. Move the vertex along the guide line using Shift to lock the direction.
There are a few other techniques, but I would keep the Entity Info window open throughout the tweeking to warn you if some entity is actually selected, which is too easy to do and not realize. If one is, hit the space bar and click empty space to deselect it, or it is that entity that will move, not the desired vertex.
And, finally, UNDO is your best friend.
SU has 100 Undo steps (Yes, I counted).
-
@alan fraser said:
No tutorials as such, but I've found the best way is to help the movement by holding down Alt (to force autofolding...as it's often difficult in a complex mesh to see whether a point can move in a given direction without such help) then as soon you've got it moving on the required colour axis, hit Shift to lock it on that axis while you fine tune the distance. You might have to orbit a little to prevent it from shooting off wildly.
Thanks Alan, starting to make sense at last!
Couple of points:
-
I'm finding that if I choose the 'move' icon and THEN click on an end-point I just get that point - and can pull out little 'pyramids'. If, conversely, I select a line (or a point) and chose 'move' AFTERWARDS, I always/only select that line. Is this what's supposed to happen?
-
I've added an extra line or two to the polygon matrix (or whatever it's called!), effectively creating the odd triangle here and there. Does SU take this as a cue to add polgons across the board? This seems to be the case, as everytime I click on 'show hidden geometry' there are more and more of these little triangles! I'm just mindful of your sage words re: total polgon count and the crippling effect this can have on overall processing speed.
-
What was the 'nifty little trick' that allows you to move back from the face of the model and manipulate the polygons from a distance. For a while, I found this was happening by accident, but I can't get it to work when I want it to!
IM
-
-
@spogadog said:
@alan fraser said:
No tutorials as such, but I've found the best way is to help the movement by holding down Alt (to force autofolding...as it's often difficult in a complex mesh to see whether a point can move in a given direction without such help) then as soon you've got it moving on the required colour axis, hit Shift to lock it on that axis while you fine tune the distance. You might have to orbit a little to prevent it from shooting off wildly.
Thanks Alan, starting to make sense at last!
Couple of points:
-
I'm finding that if I choose the 'move' icon and THEN click on an end-point I just get that point - and can pull out little 'pyramids'. If, conversely, I select a line (or a point) and chose 'move' AFTERWARDS, I always/only select that line. Is this what's supposed to happen?
-
I've added an extra line or two to the polygon matrix (or whatever it's called!), effectively creating the odd triangle here and there. Does SU take this as a cue to add polgons across the board? This seems to be the case, as everytime I click on 'show hidden geometry' there are more and more of these little triangles! I'm just mindful of your sage words re: total polgon count and the crippling effect this can have on overall processing speed.
-
What was the 'nifty little trick' that allows you to move back from the face of the model and manipulate the polygons from a distance. For a while, I found this was happening by accident, but I can't get it to work when I want it to!
IM
I'm having to add this to my own post as I can't for the life of me find out where you add a new question on this thing. Perhaps it's my own (crappy) PC that's to blame? Either that or there's a virus in this thing that (among other things) makes you 'type blind' when you reach the bottom of the page. Very annoying, that.
Whatever, my question is this: what's the difference between 'Hidden Geometry'; 'Subdivide & Smooth' and Iterations?
Alan's 3D head seemed to consist of very few actual 'facets', yet there was claerly 'a lot more going on' than the simple framework would suggest.
IM
n -
-
-
Yes, you can preselect one or more lines or faces, then choose the Move tool, then move them...either directly, or from a distance. That is by placing the Move tool directly on one of the selected bits and dragging it...or by simply dragging the move tool along something else entirely in the model, be it a face, edge or axis that happens to be going in the direction you require.
However you can't preselect a single vertex. As you say, you have to just place the Move tool on it (after making sure you haven't already got something else selected) and just directly drag it. -
All faces have to be coplanar...completely flat. A rectangle or anything with more sides can only be flat in one very specific circumstance, whereas a triangle is always flat...the three-legged milking stool principle...they never rock, however uneven the surface they're placed on.
So any time you start monkeying around with the vertices of a polygon greater than a triangle, it will either refuse to go in the direction you want it to (because that would entail ceasing to be coplanar) or (if you hold down Alt while moving..to envoke autofold) it will go in the direction you are after, but will create the necessary autofold lines to enable it to do that. -
I already described the 'nifty trick'...preselecting stuff, then running the Move tool along an edge or face somewhere else in the model that happens to be going in the right direction.
A variation of this can be used with the Rotate tool...preselecting what you want to rotate then finding a face that is perpendicular to the axis of rotation that you require, placing the Rotate tool on that surface, locking that angle with Shift, then moving the Rotate tool to the desired centre of rotation, then doing the business. -
Hidden geometry is just that...hidden. You can either hide a line (Shift + Eraser) in which case it will hide, but the hidden edge will still remain sharp...there will be a noticeable angle between the two adjacent faces that it separates. OR you can smooth a line (Ctrl + Eraser or the smoothing dialog from the context menu). This will visually 'blend' the two adjacent faces into a single apparently curved surface (but it's just a visual trick...they are still separate and individually coplanar.)
If Hidden geometry is turned off, both lines will appear to disappear. However a hidden line will stay hidden permanently, whereas a smoothed line will reappear if you orbit the model so that it reaches the edge of the object and you are viewing it tangentially.
Hidden Geometry in the View Menu simply turns existing hidden geometry on and off...visually.
Subdivide and Smooth actually creates more geometry by subdividing what you've already got.
The iterations refer to the number of times you want to do this...ie subdivide the subdivisions.
NOTE: SDS is not the same as triangulating...which is why I tend to manually triangulate many things. If you manually triangulate the faces of a cube, you'll go from 6 to 12. If you SDS a cube with even just one iteration, it will divide each face into 4, then triangulate those 4 faces giving a total for the whole cube of 48.
The facetting on my faces is just pure skill and awesomeness.

Actually, you'd be surprised how much you can achieve with comparatively few faces. When you are using so few, it's also fairly critical which direction many of the diagonals run in...triangulate a 'square' in the wrong direction and it can look completely different. Luckily we have the Flip tool to correct that.
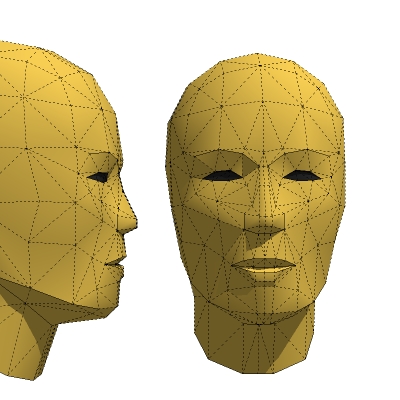
As an example of how subtle you can be with very few faces, here's the same head again with a few vertices tweaked, resulting in the head going from caucasian to oriental. The eyes have been changed largely by the addition of an epicanthic fold, hiding the upper eyelid.
Of course you have to know your way around human anatomy to do this kind of thing. You have to be able to draw convincing people on paper. SU is a tool, not a magic wand.
-
Hello! It looks like you're interested in this conversation, but you don't have an account yet.
Getting fed up of having to scroll through the same posts each visit? When you register for an account, you'll always come back to exactly where you were before, and choose to be notified of new replies (either via email, or push notification). You'll also be able to save bookmarks and upvote posts to show your appreciation to other community members.
With your input, this post could be even better 💗
Register Login


Advertisement