[WIP] NYC IRT R26 Train
-
If you share that part I think I can give you an advice after I find the best way .
If I understand well you want to extrude the outside perimeter you have drawn onto the surfaces, right ? I would go with Joint Push Pull but perhaps you will have to clean a bit the geometry because of the angle between the surfaces . -
@unknownuser said:
I tried last night to upload the file to share but it was too large (about 5 mb)How can I share a file larger than 4 mb here? I never did it before.
Add it to archive, zip or rar , it will drop like 70% .
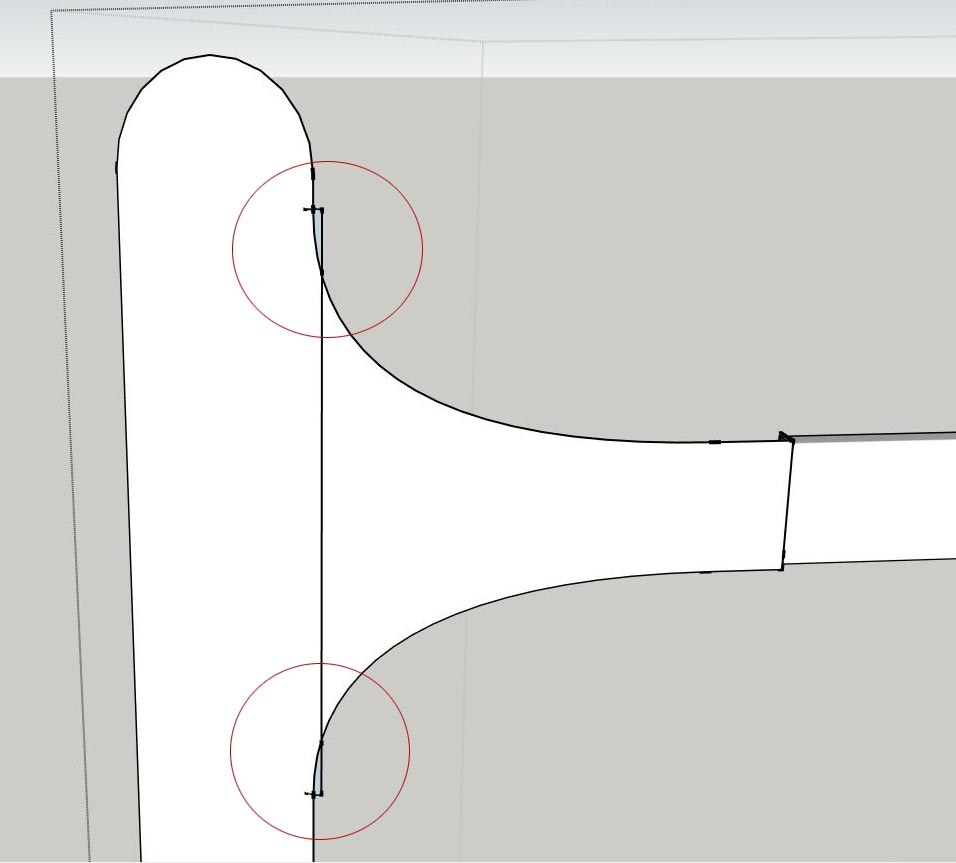
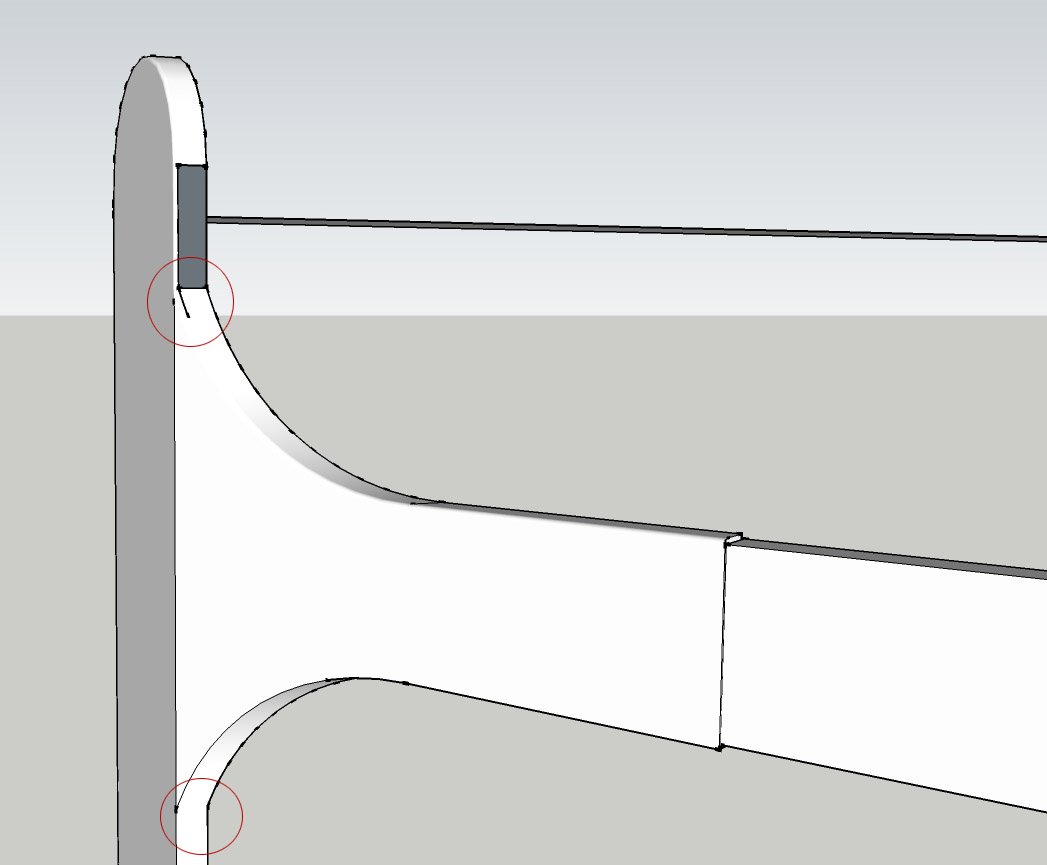
Just that part is over 4 mb ? WOW, what do you have there !!And the gap you got , I think you can simply fill it by drawing a line from the opposite corners .
-
@ely862me said:
Add it to archive, zip or rar , it will drop like 70% .
Just that part is over 4 mb ? WOW, what do you have there !!And the gap you got , I think you can simply fill it by drawing a line from the opposite corners .
Ha. I did a purge just to make sure and yeah...it's around 5 mb for that part. Must be all the donuts that make up the coil. I knew from the start that this model was going to be a monster. I'm putting a lot of love into it so I spare no expense of polygons as much as my system can handle. But if I can figure a way to lower poly count and maintain top quality, I'm open. This is actually my second serious Sketchup project I started back in spring of 2011 so my modelling skills were still very newbish. I'm inspecting it now though to see what I would do differently if I started it today with all the plugins I discovered.
Thanks for you tip on closing that hole. It worked but I'm still not satisfied with the geometry. Also thanks for reminding me I can make a zip file

I bet this is easy for some in these forums....feel a "duh" moment coming on.
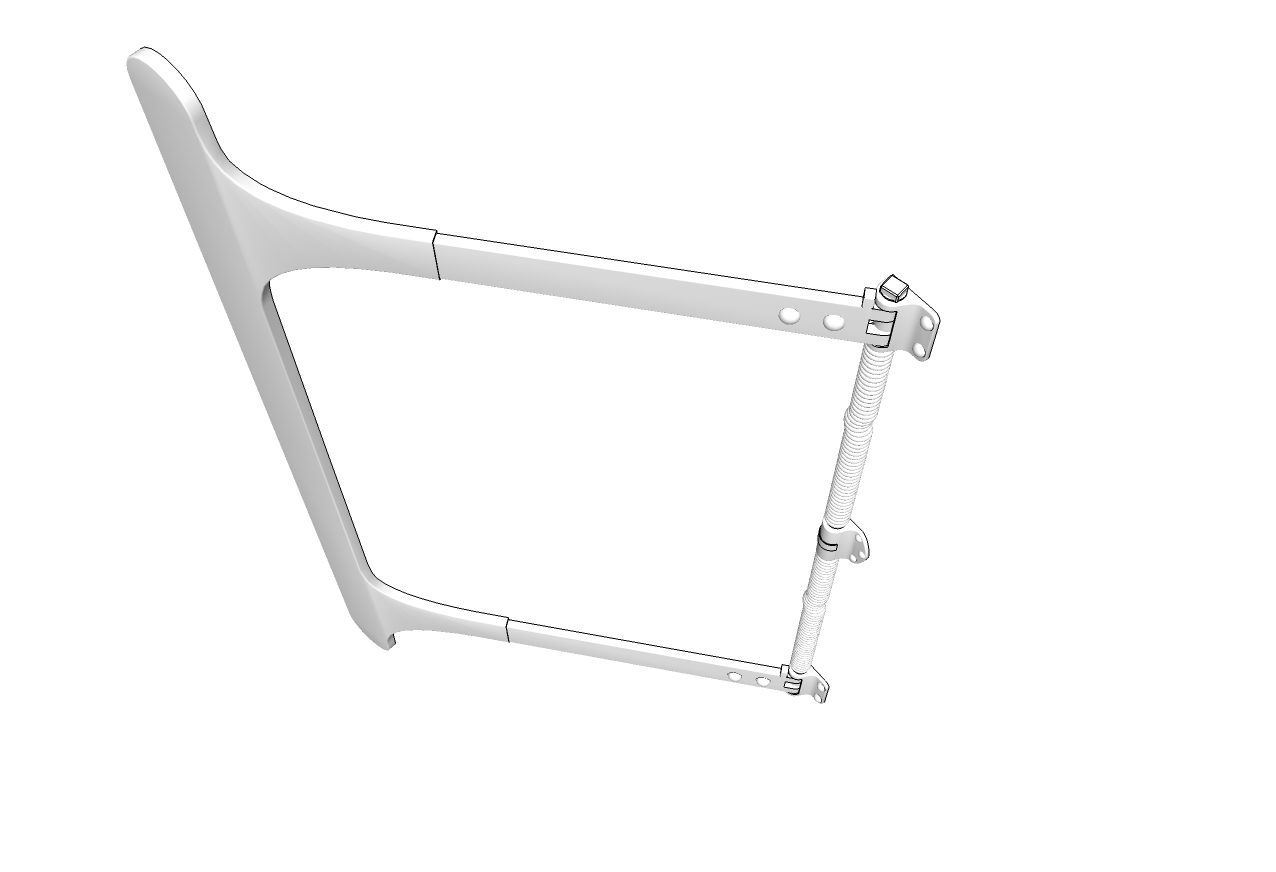
This is where I'm at now
Train Gate Thingy2.zipThis is the basic shape without rounded edges
Train Gate Thingy1.zipAnd this is a flat starting point in case the others are too messy to work with
Train Gate Thingy flat.zip -
Ok !
Things you need to take in consideration :- use components for all the geometry that repeat itself, like the donuts from the springs or the hinges, like you did with the bolts .
- clean the inside geometry
- smooth the geometry you are creating using the right click menu go to Soften/smooth edges
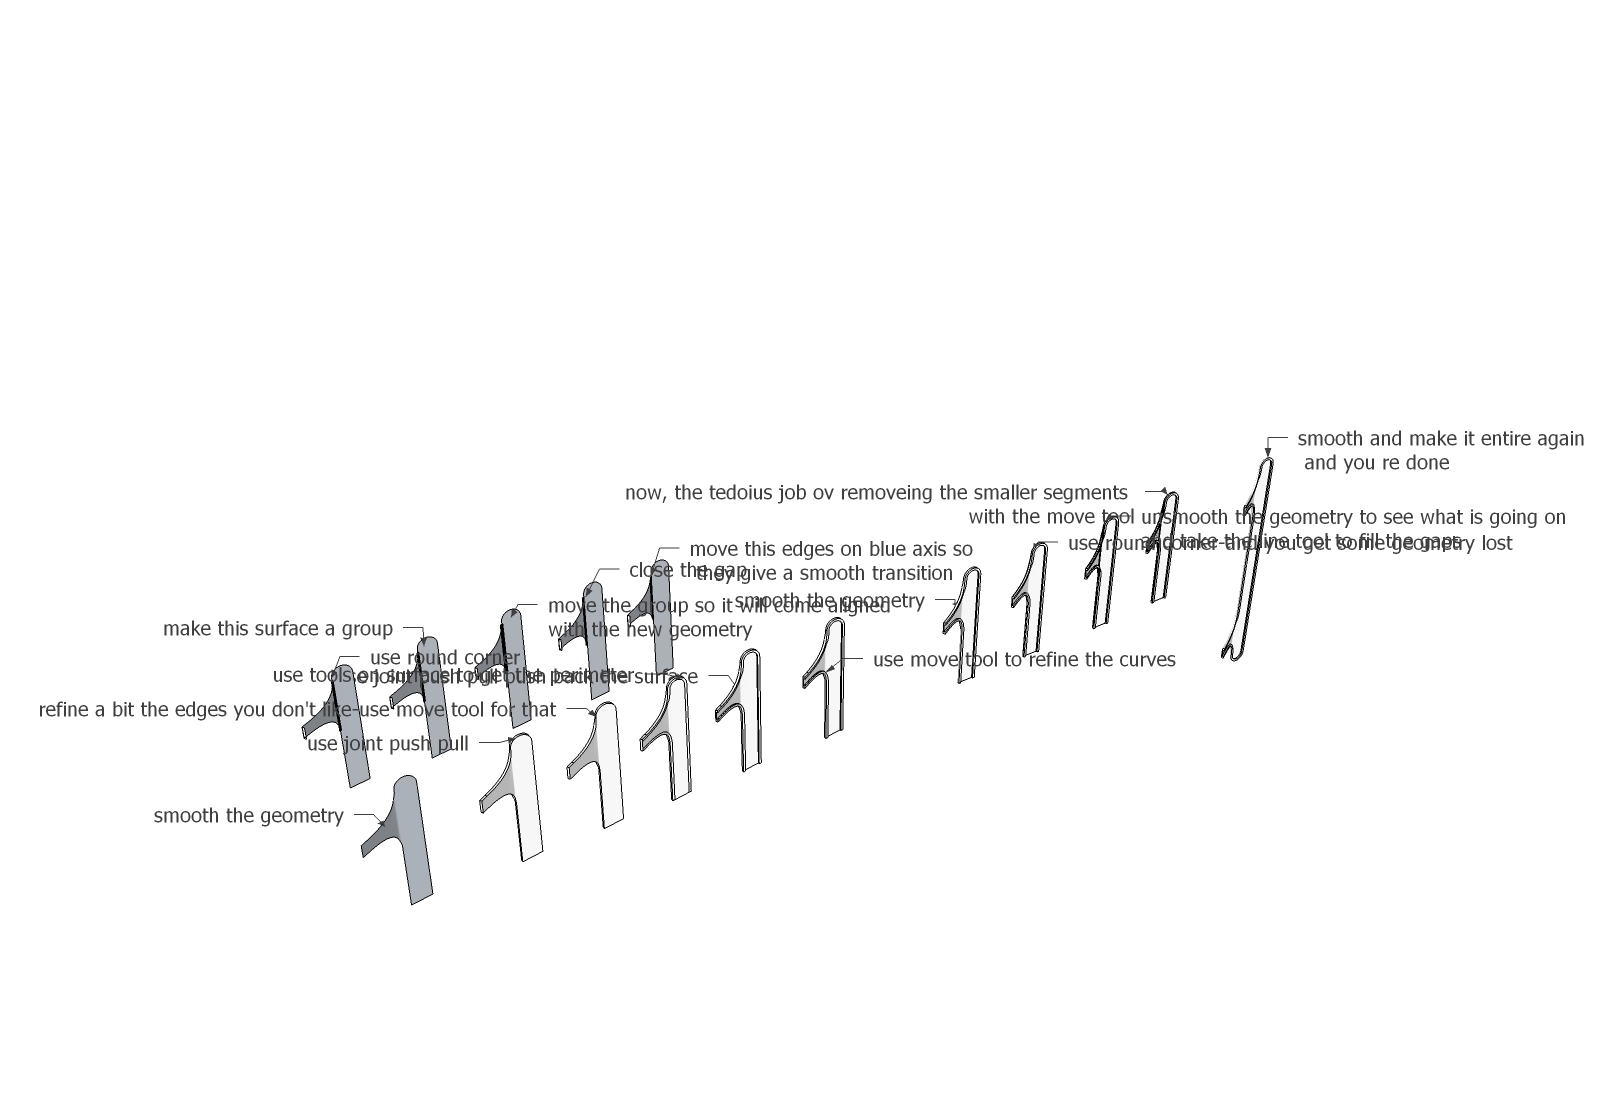
Coming to your specific problem . I used round corner to make the transition between the two planes smooth,then I used Joint push&pull to give thickness to the surface,then I used tools on surface to create the contour and pushed the inside part backward using again Joint push&pull .
At the final I used Round corner to make the outside edge round(although some geometry got erased, I redrawn it with the line tool and using move tool I closed the smaller edges) .If you have any questions feel free to ask !
Right now the model is about 600 kb !!
Train Gate Thingy flat ret.skp
-
@ely862me said:
Ok !
- smooth the geometry you are creating using the right click menu go to Soften/smooth edges
I used round corner to make the transition between the two planes smooth,then I used Joint push&pull to give thickness to the surface,then I used tools on surface to create the contour and pushed the inside part backward using again Joint push&pull .
Right now the model is about 600 kb !!
I'm Very impressed and humbled!


Still a little baffled at how you got it so clean. How did you get all the donuts to be components? And in doing so that brought the poly count down?
Thanks for your pointers, I will keep them in mind. I'm missing something with your first step of using round corner to make transition between the two planes. I assume you started from the flat version right? Did you smooth the geometry first before using round corner and if not, what edges did you select or did you tweak the joint pp parameters (tab button)?
I tried using round corner on the edges and keep getting broken geometry
So I tried smoothing the edges that connect the 2 planes one by one and got a continuous face. I then tried the Joint push pull and the transition is not as smooth as yours.
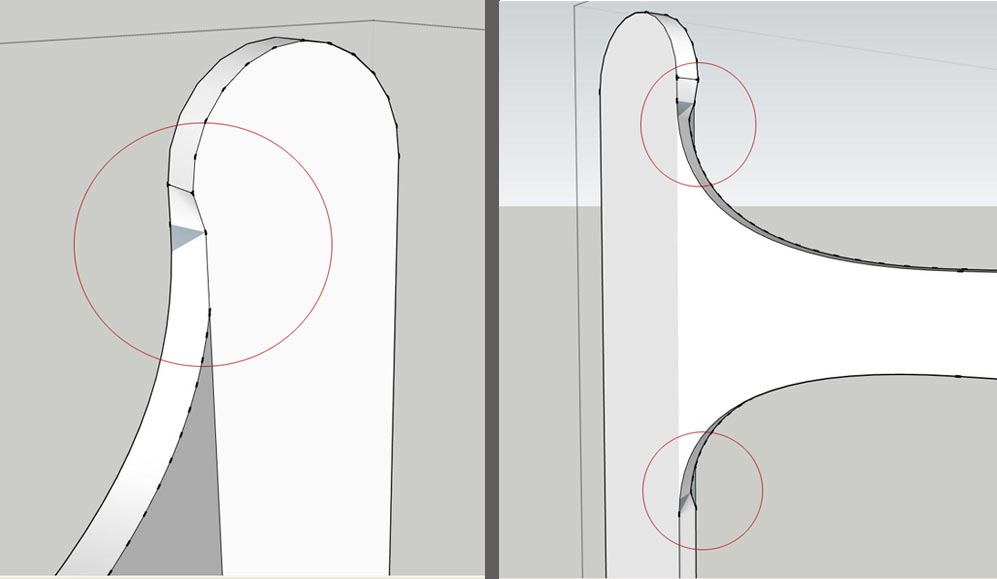
What did you do to keep the shape with the extrusion without getting that bubble effect?
-
How did you get all the donuts to be components?
I made another donut and made it component, then I created copies of it to match the others and I deleted the old ones(also I created a component for the top spring and made a copy to replace the lower spring)
And in doing so that brought the poly count down?
Yes, because it doesnt't matter how many components you have(of the same) they count nearly as one .I'm missing something with your first step of using round corner to make transition between the two planes. I assume you started from the flat version right?
Yep,but I kind of cheated a bit there-see the attached file.Did you smooth the geometry first before using round corner and if not, what edges did you select or did you tweak the joint pp parameters (tab button)?
Yes , I smoothed the geometry before using jpp. I don't know if it matters but at times I use 0 for the angle of influence(the lower parameter of the settings) .
So I tried smoothing the edges that connect the 2 planes one by one and got a continuous face. I then tried the Joint push pull and the transition is not as smooth as yours.
It almost never get smooth when you have complicated geometry, so you will have to retouch it.
-
Thank you Ely! When I'm done with this train you're the first to get a copy

Your tutorial gave me a new perspective on modeling in Sketchup. I got it now. I have to get out of the habit of neglecting the usage of some of the simpler native tools. I'm currently finishing another project and will get back with an update to this over the weekend.
-
You need to have an open mind when using sketchup. I am not wrong if I say I can model an entire car only with the line tool and the move tool .
Attached is a link with a video of how you can use line tool and move tool to get the proper result . http://youtu.be/tzjA0GPdQrwTake care and have fun !
-
@ely862me said:
You need to have an open mind when using sketchup. I am not wrong if I say I can model an entire car only with the line tool and the move tool .
Attached is a link with a video of how you can use line tool and move tool to get the proper result . http://youtu.be/tzjA0GPdQrwTake care and have fun !
impressive! what is the plugin that splits a line into segments? and what do you use to make faces between to lines like at 5:30 min?
-
@peter_shaw said:
impressive! what is the plugin that splits a line into segments? and what do you use to make faces between to lines like at 5:30 min?
That is not a plugin it is a sketchup ability , right click on the line and go to divide,then move from left to right to divide the line in segments .
And the second one was skin.rb but now I use Curviloft, search in the Resources/Plugins for them !
Take care !
Sorry for the off topic !
-
Thanks ely. I actually got some thickness via vector pp. The problem is when I attempt to round the outer edges because of the sharp angle where the curve meets crease. I'm getting close. On my last attempt I got a hole in the geometry.
I tried last night to upload the file to share but it was too large (about 5 mb)How can I share a file larger than 4 mb here? I never did it before.
Hello! It looks like you're interested in this conversation, but you don't have an account yet.
Getting fed up of having to scroll through the same posts each visit? When you register for an account, you'll always come back to exactly where you were before, and choose to be notified of new replies (either via email, or push notification). You'll also be able to save bookmarks and upvote posts to show your appreciation to other community members.
With your input, this post could be even better 💗
Register Login


Advertisement