Intro & Follow-Me Trouble
-
Hello!
I just signed up a few days ago. I'm pretty new to SketchUp and 3D software, but have used graphics applications (like Adobe CS) for a while now. I dabble in woodworking, and after getting a miter saw I got the bug to build a few projects
 SketchUp is perfect for me for some lightweight furniture design.
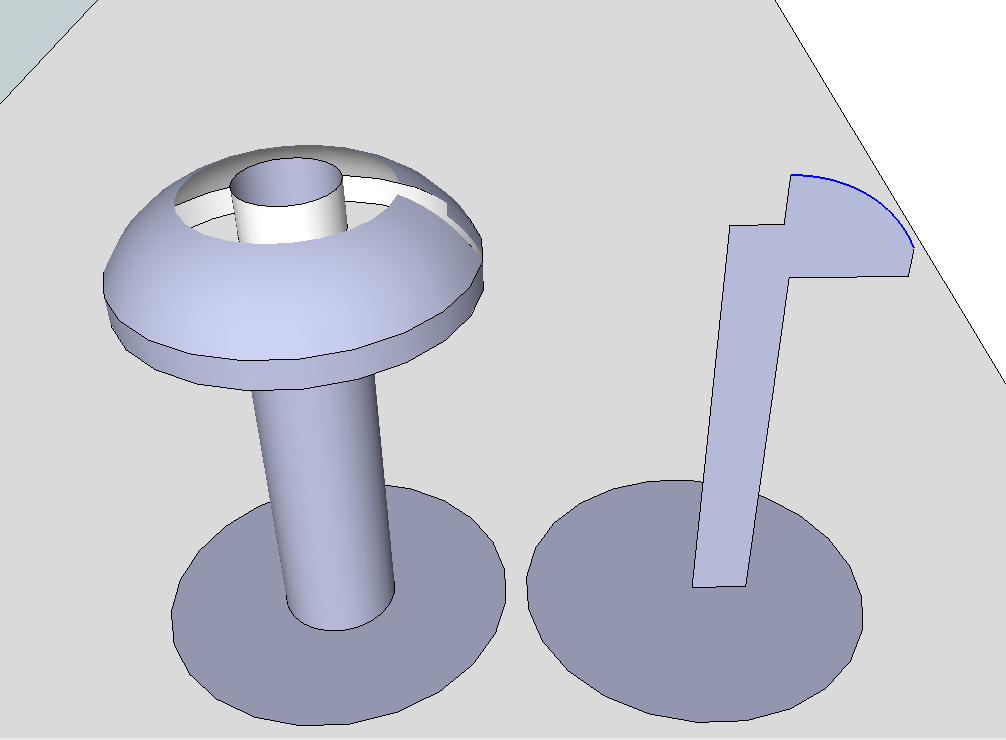
Not integral to my design, but I wanted to put this in as more of an exercise. I'm trying to make a basic screw to show how a removable section of a saw bench will work. I'm using the follow-me tool to lathe a shape I made out of a plane, perpendicular to a circular path. But it's not making a complete, solid shape. The arc only goes up 2/3 of the way, and there are some sections of the curve missing. Screenshot attached.
I think the shape I made is solid and one piece. It's all on one plane and when I double click it all the segments are selected. I was careful when drawing but might have missed something.
I could fake a screw with simpler geometry but I'd like to learn how to do this the right way. Any help appreciated, thanks!

-
it's hard to tell what the problem is without seeing the actual model.. you can upload a skp directly to the site it you want.. look below the reply window when you're making a post here and you'll see an option to 'upload attachment'.. using that, navigate to the skp on you're computer and it will upload and attach to your message..
i'm curious how you're using the followme tool.. if you're not already doing it this way, try it.
select the circle on the bottom of your drawing (either the line of the circle or it's face.. doesn't matter)
choose the follow me tool then click your screw profile.
-
The problem is that what you are working on is fairly small and SketchUp doesn't do tiny little faces which are needed to finish skinning the turned piece. The solution is to scale the model up prior to running Follow Me so that the faces won't be too small to fill. Scale up by a factor of 100 to be safe.
My process for this would be to make a component of the profile and the path (circle) and then make a copy of the component. I scale the copy up so it is quite large. Edit the large version of the component and run Follow Me. Then close the large version and delete it. the original copy will be completed and all faces will be filled in. Remember to correct face orientation, too.
If you look on the bottom of your turned piece you'll see that there is a hole in the bottom, too. You can prevent that by deleting the face of the circle before using it for FolloW Me or you can repair it by tracing a line segment on the edge of the circle at the bottom of the screw.
By the way, for small parts like screws, you can get by with fewer segments in arcs like the one for the screw head. This will reduce the number of entities in the resulting turned shape and keep the file size down a bit.
-
Scaling it up did the trick.
 Thanks!
I could simplify by getting rid of the curve but it's a pretty simple model anyway and I'm not having slowdown problems.
-
Glad that worked.
It's unlikely you'd have a problem with a single component but if you start adding a lot of parts to a model that all have a large number of entities, you will probably find the slow down.
Hello! It looks like you're interested in this conversation, but you don't have an account yet.
Getting fed up of having to scroll through the same posts each visit? When you register for an account, you'll always come back to exactly where you were before, and choose to be notified of new replies (either via email, or push notification). You'll also be able to save bookmarks and upvote posts to show your appreciation to other community members.
With your input, this post could be even better 💗
Register LoginAdvertisement


