SketchUP 8
-
Hi Dave,
As for texturing arches, ThomThom has a nifty plugin: UV Toolkit which can do wonders. Look at this mini-tut I made with the use of it.
-
-
One note;
You can assign the same "mini-texture" to each facet at the same time (select all > paint) and then while all are selected, run the plugin. to quad-UV map them. This will create a very homogeneous looking arch however so if you want to invest a bit more work, you can paint the facets individually with a few variations of the stone/brick textures and run the plugin individually on each. This takes longer (though you sill save your time from positioning the texture) but will provide a more convincing arch.
And do not forget to combine the small texture pieces as you will end up with a whole bunch of them!
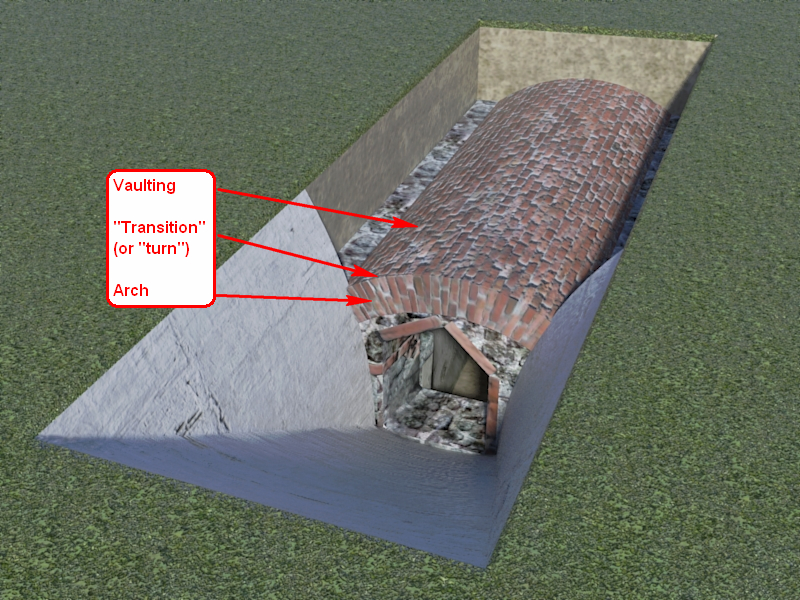
I developed another technique as well but that is also slow and manual - but will provide a nice transition (as the texture turns or wraps) between the cylindrical vault and the arch on its edge (see an example with an Ancient Roman burial chamber below) IF you need to display both. Once I have some time, I will make a tut of this as well.

We are getting off-topic however (sorry folks) so that will be in another topic... -
Very nice Csaba, i'd love to see a tut on this.
-
@genma saotome said:
There are times where I take a component in a model and rotate it for use in another situation. Because the axis of the component instance also rotates. I have many situations where that's not acceptable, so I have to explode the new instance and make a new component under a new name. It would be far easier if there was a function I could use that reoriented the component axis to the same as the whole model -- the move axis feature is far too cumbersome... I simply want a single click - bang - it's done solution.
Absolutely dead on. In most cases I have to maintain a separate copy of a comp. on a development layer simply to preserve the axis alignment for editing.
==============================
In a similar vein, component scaling should be modified as well. When you copy a scaled comp, say a set of comps that taper, such as a flap linkage component of a wing, big at the root, small at the tip, the scale of the copy is at the original scale. If the intermediate comps scale at 1.78% per object, AND must maintain axis alignment (along a non axis guide line) then it becomes very difficult, as well as growing inaccurate to compound scale the original comp, rather than just applying a common scale factor to each subsequent copy.If you need a copy at the original scale, then take it from the comp.library, or the original object.
Better yet, if copying a scaled comp, popup a d-box asking for "original scale", "last scale ratio" or "new scale ratio" and be done with it.
Last Scale Ratio would be especially useful where the scaling is different along the 3 axis, ie: not 2x all round, but 2x green, 2.5x red and 1.995X blue.
Hello! It looks like you're interested in this conversation, but you don't have an account yet.
Getting fed up of having to scroll through the same posts each visit? When you register for an account, you'll always come back to exactly where you were before, and choose to be notified of new replies (either via email, or push notification). You'll also be able to save bookmarks and upvote posts to show your appreciation to other community members.
With your input, this post could be even better 💗
Register LoginAdvertisement


