Msg to Gaieus
-
Hello Gaieus,
I got somewhere, see: http://www.youtube.com/wimkootstra#p/a/u/1/nhryARNTCEg
However, just spoke with your colleague in Germany, who told me the actual building differs from the construction drawings which I downloaded from the Bronzezeithof website. He'll send me sketches and I'll start again from scratch. I'll keep you posted. Meanwhile thanks for your great advice.
Best regards, Willem. -
Hi Willem,
Looking good so far. I am glad that you finally decided to take that little effort to learn SU so that you can model it yourself. So it wasn't that hard, was it?!

In the meanwhile I made a small, preliminary video of our Roman basilica here with a similar technique:
[flash=640,500:3muh4f52]http://www.youtube.com/v/QxiFQtdR344&hl=en_US&fs=1&hd=1[/flash:3muh4f52]
-
Hello Gaieus,
Impressive, your basilica. I like the way it rises from its foundation.
However, I cannot find any instruction on how to achieve that in the 887 page SU Helpfile.
Is that feature perhaps only available in SU Pro ?
I also noticed your basilica can be shown in 720 ppi.
That option is also absent in SU Pro, but please correct me if I'm wrong.
Is there an alternative way to let the pillars in my model rise from the ground ?
Best regards,
Willem. -
Hi Willem,
This is achieved by animating section planes. It can be done in the free version as well. See the help center articles about section cuts and their animation:
http://sketchup.google.com/support/bin/answer.py?hl=en&answer=115431
http://sketchup.google.com/support/bin/answer.py?hl=en&answer=94998And some videos
[flash=640,385:29sve3n0]http://www.youtube.com/v/qaQFpCQS_y4&hl=en_US&fs=1&hd=1[/flash:29sve3n0]
[flash=640,385:29sve3n0]http://www.youtube.com/v/Vtnryqm9jjo&hl=en_US&fs=1&hd=1[/flash:29sve3n0]
As for the animation resolution; I exported the image series (not avi animation) at 2048x1536 pixels then resampled them to 50% (that is a standard 1024x768) with finer antialiasing options and made the animation with VirtualDub. This keeps it at a nice, relatively high resolution and quality and after uploading to YouTube, a higher resolution version is also available.
-
Dear Gaieus. Unfortunately I haven't been able to get much further with my project than what I was able to show you last May. In June I was involved with further shooting for the documentary film and following that, editing audio tracks, recording voice-overs in three languages, searching for more pictorial materials etc. Having gone back to the SketchUp project last week I realised that I'll have to start again from scratch, still with insufficient details of the roof construction and still with insufficient knowledge of the SketchUp program. I'll keep you posted. Best regards, Willem.
-
Hi Willem - and welcome back!
Indeed, when there is insufficient info on what to reconstruct, it can be annoying. However you can always build to the point that is certain (or at least probable) and only change what little is left from the project according to the always changing ides. I have been doing this with different projects all the time (and I guess some of the arch-viz people also do this due to clients being too uncertain about what they want).
Keep us posted and we'll see. It seems that I will also need to build some ~2nd century (AD) rural Celtic houses in the near future.
-
Hello Gaieus, I've started again from scratch and discovered the free style drawing which suited me when drawing crescent shaped lime walls. However, hours of studying the 'animation of section cuts' have not yielded any working result. It's difficult to see what is ticked in the training videos and the written section does not offer a clear, step by step guide either. In the sample below I have attempted to activate the section cuts, but nothing happens at all. Where am I going wrong ? Best regards, Willem44
-
Hi Willem,
In the scenes dialog, you need to check the "Active section planes" box in order that the section cuts update when you change scenes (don't forget to update the scenes, too).
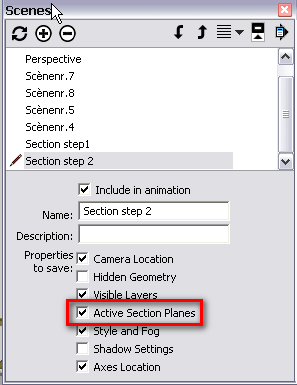
I made two new scenes at the end of the "row", see how it works now. The steps should be:- Add a section plane in scene 1 (right click and make sure it is the active cut)
- update the scene
- add a new section cut and add a new scene (again check if that is the active cut)
- turn of section plane visibility and update your style
-
Hello Gaieus,
Thank you for your swift reply. I'll try and work it out somehow, since I cannot reproduce the examples you have kindly added to my model.
Google SketchUp warns me that I have to update to version 8, to see the result, which cannot be shown in my version 7.
Best regards,
Willem44 -
-
Dear Gaieus, I had just downloaded and installed SU v.8 (English) when I found your v.7 example in the mail. I've seen it working. Just what I had in mind. The instructions make more sense now. They didn't in my native language version. The next job I must tackle is the rafters for the thatched roof, which extends from about 10 cm above ground level to the top, under an angle of 45 degrees all around. Should I make one single component to copy or adapt a dynamic fence that I can stretch along the parallel sides of the walls ?
Best regards and once again thanks for your help. Willem 44 -
Hm. I would not even think of a dynamic component although it sounds just handy. I would have probably gone along the single component > Multiple copies way.
As for the section curt animation, you have to keep in mind that there can be one active cut at the same time per editing context. I.e. at model level and at certain group level etc. This means that with a little fiddling around, you can have multiple animations either at the same time or after each other (and often just animating the cut on a certain group of entities)
-
Hello Gaieus,
Having started anew, I managed to complete the entire wooden framework of the bronze age farmhouse. I've got stuck in the final stage: putting the thatch on the roof. The flat parts are easy enough: a rectangle extruded to be painted with an imported photo sample of a thatched roof. But the conical bits above the doors and at the far end defy my best attempts. Please have a look at the model so far and the attached photograph of the real farmhouse. How shall I go about completing it ? Can I still animate the pillars first rising from the ground, then see the roof being added, perhaps horizontally from left to right and finally see the completed model blend into a live video scene ? Best regards,
Willem.

-
Willem
A few tips...
Make your model in 'real size' - you seem to be making it too small - it's easier to work in actual units.
Group parts of your model as you work to avoid geometry 'sticking together' you can then move/adjust more easily - you can always explode groups together later on if you want to join thing together.
Use a Style that shows edges - try to model without seeing them is difficult - you can always change the Style later.
To make complex 'organic' shapes you ought to think about a plugin - the quick half-baked example below was made with my EEbyRails tool - but to do that you'd need to separate out the 'profiles' and 'rails' as 'curves' [weld script] and the get it to make the 'meshes' to suit - there's also Fredo's CurviLoft tool. You CAN make organic shapes if you have edges 'shown' and you then hand-stitch edges to make triangular facets, adding one to another to make 'organic' surfaces - find some 'car' tutorials - they show this method and your roof shape is actually quite like a car or plane if you think about it as a shape rather than what it 'is'...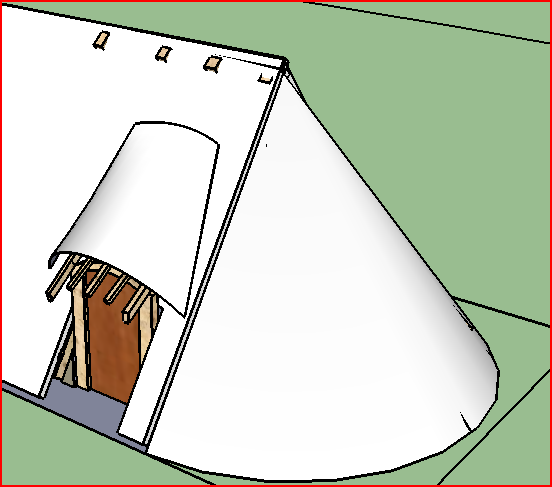
-
What TIG says is ver important. Always model to real scale and separate your geometry by grouping parts together (or - when there are more instances of the same object, use components).
Texturing should not be an issue. The part over the entrance can easily be textured with a projected photo of the thatch material and also the conical end is not that hard. We can get back to it when you finished those two parts and already have some good thatch material.
Hello! It looks like you're interested in this conversation, but you don't have an account yet.
Getting fed up of having to scroll through the same posts each visit? When you register for an account, you'll always come back to exactly where you were before, and choose to be notified of new replies (either via email, or push notification). You'll also be able to save bookmarks and upvote posts to show your appreciation to other community members.
With your input, this post could be even better 💗
Register Login


Advertisement