How to "build" with bricks in sketchup - Newbie
-
@unknownuser said:
@unknownuser said:
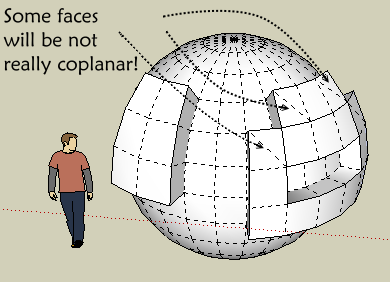
How about getting hold of one of DOme's segments and "cut" it up into bricks?
If you don't want absolute precision just aspect
(briks will be not separate objects)
Call hidden Geometry
Select faces you want and Apply Joint Push Pull by Fredo6
I think he wants accuracy. So why can't he trace appropriate hidden lines, create a brick using the geometry and then print the front + top face full size as templates for plywood templates?
Every home needs a DOme ...
PS don't forget the bunghole problem
-
I have managed to lay out the floor with your help. Thanks.
Now I need to trim it, and that, again, is not obvious to me. Also complicated to explain but I will try.
I want to take the included circle and lay it on the floor and cut away the surrounding bricks with the following exception.
There will be a vent floor that is 19" wide at the point that it touches the circle. Basically lopping off the section of the circle that is defined by a chord 19" long.
That floor will be 23" wide at the outside edge and will be 16" deep. the final form should be something like a keyhole shape. See the first photo in this thread.
Obviously possible but not easy to figure out. I laid the circle onto the bricks and thought that I would be able to push them away, but the only surface that is push/pullable is the full set of bricks contained by the circle. that I don;t understand at all but think it must have something to do with the fact that the bricks are components.
Again, looking for advice. I was thinking of making the courses of bricks on different layers. Would that be a good idea? I don't know if that will cause registration issues later.
Thanks,
Jim
-
Right, you cannot PushPull only "raw", flat, coplanar faces. So no components, groups, curved surfaces or image entities (and whatever I now forget). So in order to be able to PushPull a face in a component, you have to edit it to enter its editing context - then you can access the face inside.
Note however that if you edit one instance of the same component definition, all the other instances will be affected, too, so you need to make some of those bricks "unique" components (in which case the idea of being a component is somewhat redundant but we can live with that).
First you have to position your circle on top of the bricks, PushPull it into a cylinder (you will only need the side of the cylinder), delete a 19" part in its front, make the affected bricks (quite a lot) unique one-by-one (I painted them in the model), edit each, intersect with the model and then you will find the intersection lines appearing - along which you can PushPull and lose the parts that are outside of your cylinder.
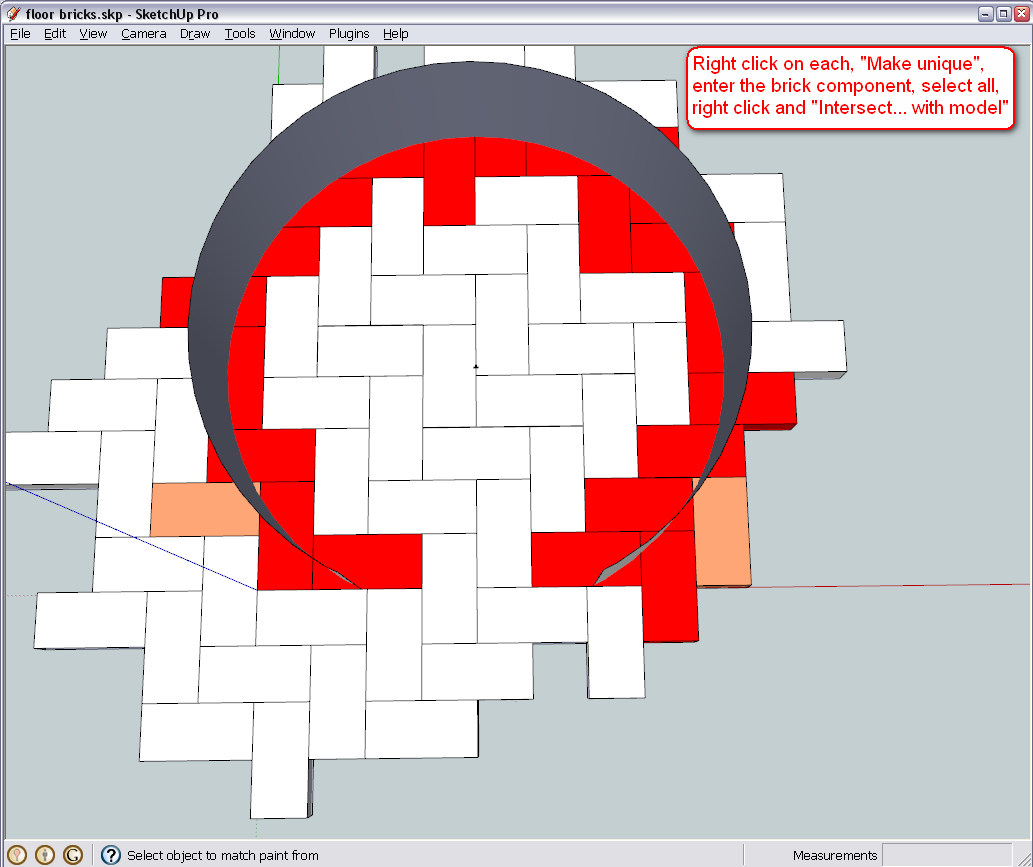
If you wish, you can play around with finding symmetrically similar pieces and spare some bits of memory using parts that are cut similarly as instances of the same (but already unique) component (see two, probably similar pieces painted differently) but that would be more hassle than finishing with each one by one.
This is actually the same as in real life - you need to cut those pieces one by one while the whole ones inside or outside can come from the factory.
-
Hi Gaieus,
I am able to edit the component and push the faces away as you have instructed thanks. As my goal is twofold, however, to learn as well as model, I have another question.
super simple as well but I have to ask it as I can't make the circle. My circle is not hollow as yours is, but is a solid circle. I then have no idea how to cut out a piece that is 19" wide.
As I said, these seem like simple things but I don't know how you did them.
Thanks for getting me this far.
Jim
-
You can always select a face/surface and delete it. I pulled the circle up to be a cylinder and deleted the top.
As for the opening - I made a cube with 19" sides, made it a group, poked it into the cylinder, entered the cylinder group (I believe I made it a group), selected the sides and right click > Intersect with model. Then deleted the useless geometry and there is the opening.
In SU you keep adding/subtracting until your model is done.
-
@unknownuser said:
How about getting hold of one of Dome's segments and "cut" it up into bricks?
If you don't want absolute precision just aspect
(briks will be not separated objects)
Call hidden Geometry
Select faces you want and Apply Joint Push Pull by Fredo6
-
Duhhh is the only response that seem appropriate. I should have been able to figure that out.
Well, thanks though. On to the next phase.
I am sure i won't have anymore questions as it is all super clear to me now ;>)
-
@jagizzi said:
...I am sure i won't have anymore questions as it is all super clear to me now ;>)
You never know...
-
-
@jagizzi said:
Gaieus,
I am on my Mac, which is new to me, so I don't know how to capture a window to post so I will have to save the sketchup file itself. (Would take that bit of knowledge too, if you knew how). Easy on my PC buy am learning the mac as i go.
Thanks,
jagizzi to do a screen capture on your mac you can use "command/shift/3" for a full screen capture, or "command/shift/4 " will bring up a set of gun sights to capture the area you highlight.
I have always wanted to build one of these ovens for bread and pizza, so I will follow this closely.

Hello! It looks like you're interested in this conversation, but you don't have an account yet.
Getting fed up of having to scroll through the same posts each visit? When you register for an account, you'll always come back to exactly where you were before, and choose to be notified of new replies (either via email, or push notification). You'll also be able to save bookmarks and upvote posts to show your appreciation to other community members.
With your input, this post could be even better 💗
Register Login


Advertisement