Organic Chair Model Question....I need help?
-
Terry,
That looks great! How long it take?
Jeff -
yes that looks amazing!
-
@click draw said:
Terry,
That looks great! How long it take?
JeffThanks Jeff,
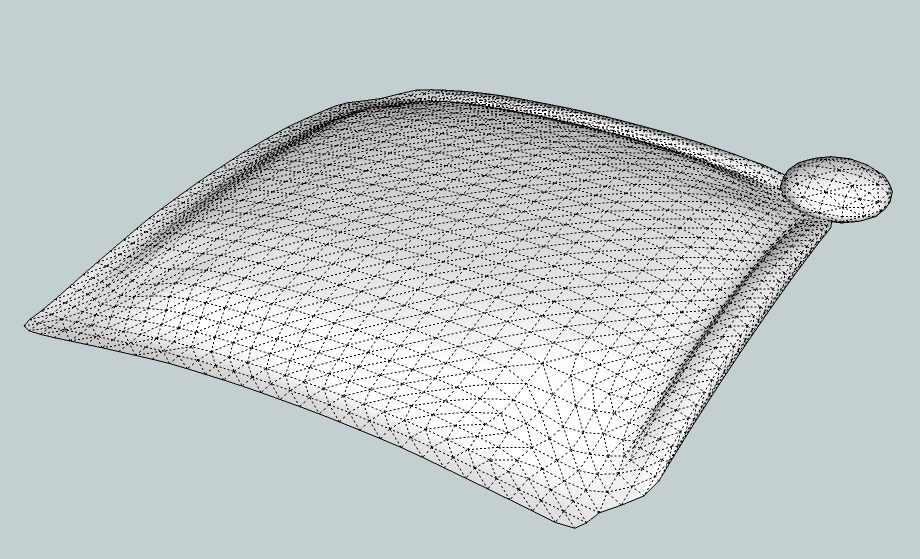
That was the third try, and I think it took about 3 hours. I saved the successful steps as I went, so here's what the sequence looked like:
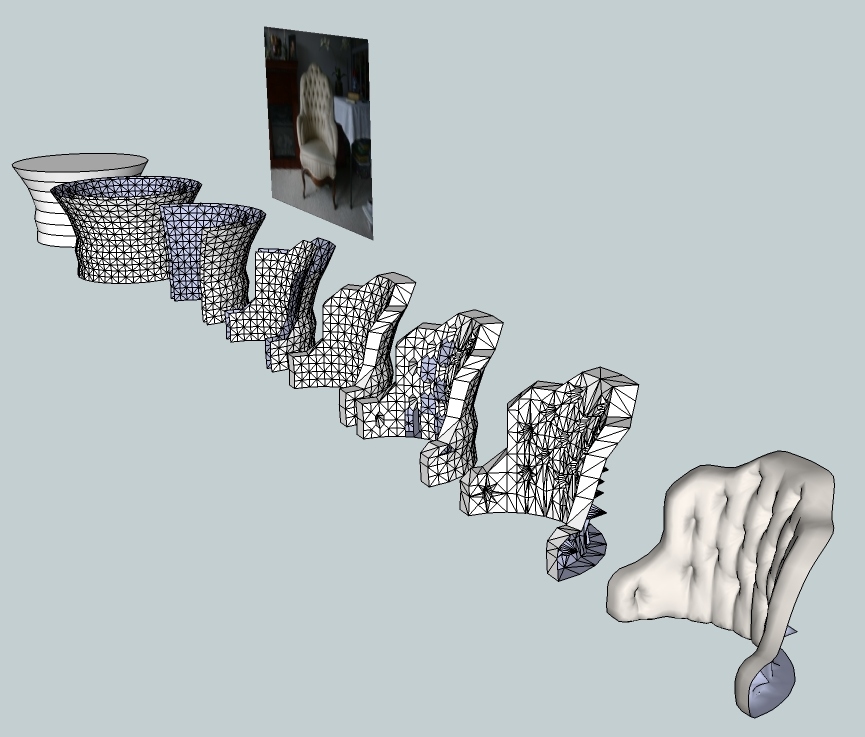
I didn't try to exactly duplicate the chair cushion from the example, so my model has a slightly more open pattern. I started with a standard SU circle (24 sides), and perhaps 36 sides would make a tighter pattern that looked more like the photo.And if anyone would like the .skp of the above, here 'tis...
 Chair.zip
 -
That is simply beautiful. I am really inspired now. I am assuming you used sub+smooth right? and did you just use the move tool to manipulate the geometry for the tufting and little details? and it would be very interesting to know a general idea of what areas you had to crease before using sub +smoothe? One last thing, how did you get your geometry to be subdivided into boxes of four triangles? mine only divides it into boxes of 2 triangles. (sorry if that does not make sense). Oh and do u think we could get an SU6 version of this. Again great work, and thanks to all for their suggestions
-
-
I decided to give it a go, so far I'm at 440kb, I guess it will be near 1mb when done

It's just so time consuming, I will continue when I have more patience and there is nothing better to do.If I decide to make another model pack I may include a few of these and some beds that I've already done.
1 Iriteration and 2 Iriterations, modeled 1/2 and duplicated.

Quick render

-
@steelers05 said:
That is simply beautiful. I am really inspired now. I am assuming you used sub+smooth right? and did you just use the move tool to manipulate the geometry for the tufting and little details? and it would be very interesting to know a general idea of what areas you had to crease before using sub +smoothe? One last thing, how did you get your geometry to be subdivided into boxes of four triangles? mine only divides it into boxes of 2 triangles. (sorry if that does not make sense). Oh and do u think we could get an SU6 version of this. Again great work, and thanks to all for their suggestions
Thanks. I'm glad that you're stoked. Oftentimes just knowing that it can be done makes a job easier.
I did use SubSmooth, of course, but no other rubies -- just regular SU tools. I didn't use the SS crease tool, either. After I created the cylindrical shape that would give me the cushion shape, I subdivided it with the SubSmooth Subdivide-only tool. That gave me a bunch of working geometry to hack away at. I did all of the detail work by drawing lines where I wanted them and deleting the stuff I didn't want.
Here's an export of version 6:
Chair6.zip -
Solo, how did I know you would give this challenge a try. Great looking work, you never fail to amaze.
Teezer, thank you for the explanation and su6 file. Much appreciation.
Im gonna give this one a try as soon as a get a moment away from school. For now, I think we are stuck using an imported model for this project due to time constraints. But I am definatelly going to try and give this a go and Ill post results if I have any success. Thanks again guys.
-
@solo said:
If I decide to make another model pack I may include a few of these and some beds that I've already done.
Looking forward to it
 Blocky furniture will no longer plague our renders!
 -
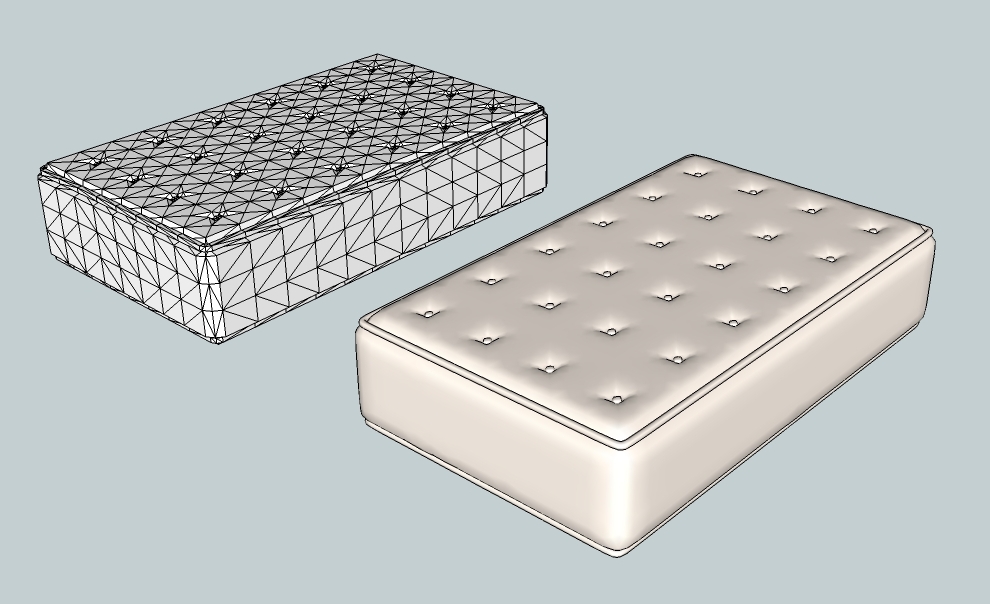
OK here was my go at it with some organic modeling and I thought I was getting somewhere until I hit the sub+smooth button. The first image shows you how I subdivided and manipulated the geometry and the tufting itself actually worked out but it is the rest that was the reall problem. I tried creasing edges as well and still had poor results like you see in the second image. It just seems like sub+smooth never seems to respond how you would expect. Any of you pros and organics have any suggestions? Any help is greatly appreciated. But I am encouraged with the tufting so far, hopefully I can the rest to work out.


-
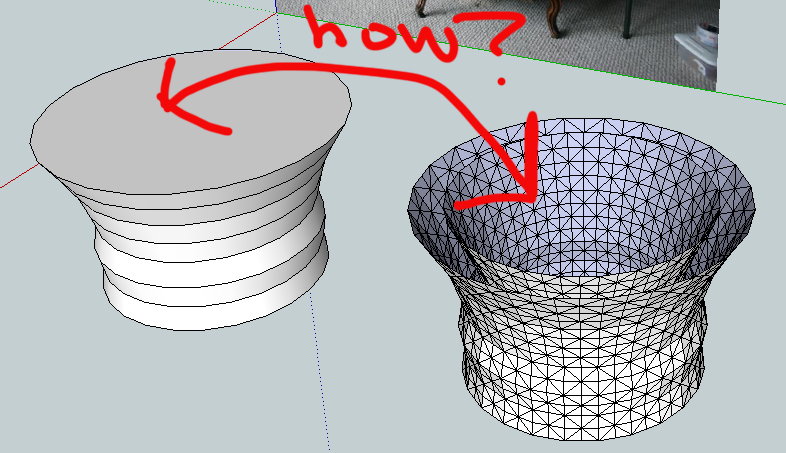
so how does one go from step one to step 2? how was the mesh created? Sandbox?
( i probably know the answer already . .but I am still having "DUH" moments" )
And then I noticed that in the last 2 steps the back was gone? Goof? on purpose.
tell me. . ..I want to know. . . .

-
@unknownuser said:
so how does one go from step one to step 2? how was the mesh created? Sandbox?
( i probably know the answer already . .but I am still having "DUH" moments" )
And then I noticed that in the last 2 steps the back was gone? Goof? on purpose.
tell me. . ..I want to know. . . .
David,
From step 1, I removed the horizontal faces, selected the whole cylinder, meshed it with SubSmooth's "Subdivide Selection" option, saved a copy to the clipboard, resized the cylinder with the scale tool, then did a "paste in place" from the clipboard.
I removed the back from the last two steps to keep SubSmooth from wrapping the edges around. I wanted the cutoff edges to remain in place, because the cushion image was to be placed in the frame of the chair in that form.
Steelers05,
You've got too much geometry in there before you do the SS. Less is more...

-
oh yes. . .the subdivide section option. that is one I rarely use. thanks!
-
Steelers05,
It appeared that you were trying to make a stuffed cushion or a mattress. When I said that you had "too much geometry" in the earlier post, I meant around the edges where the SS process was visibly corrupted. Around the indentations that produce the plush surface, you actually have too little.
You can get predictable results from SubSmooth if you follow a couple of simple rules when you prepare the proxy:
-
Don't leave any irregular polygons. Manually subdivide everything down to triangles. No rectangles, no odd shapes, only triangles.
-
If you have a triangle that is extremely skewed (two very long sides and one very short side, for example), subdivide it along the longest sides to make it into a more regular shape.
-
When you enclose a shape, make sure that there are no unexpected faces inside the shape (they will distort the outside surface). When you have a bit of experience with this, you can do it on purpose for specific effect, however.
Here's what I think you were trying to do:
-
-
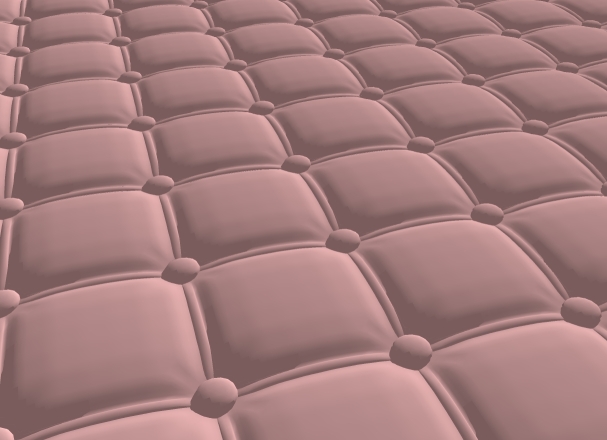
Upholstery is interesting. I started looking for pictures of upholstery styles, and decided to try making a "square tufted" surface.
Sandbox and Subsmooth:
-
Really nice Teezer. Could you show the mesh?
-
@unknownuser said:
Really nice Teezer. Could you show the mesh?
Pretty simple, really. Just a repeating component:
Here's the .skp if you'd like to fuss with it:


Advertisement