Very heavy model.
-
Thanks, I think that the texture that I use in my scene are olso to big.
I will copy all layer, group etc in default material, and paste to a new su.
-
Depending on what you're doing with your SU model you should be careful with how you make your texture files smaller, in particular if your rendering. For example, I use Maxwell, which takes the UV mapping info from SU when I export. So if I have a brick building I need to use the same brick texture in SU that my Maxwell material is using. The problem is some of my Maxwell brick materials are over 5000x5000 pixels. If I reduce the size by making that same image 1024x1024, for example, it can mess up the UV later on in Maxwell. So what I do is save a copy of the brick map w/o changing the number of pixels but instead I'll make it a .jpg compressed at about 2% quality.
-Brodie
-
Hi everyone!
I pull up this discussion because I have the same problem... my model is too heavy (86 Mb) and it takes too much time to save and open... also I have some difficulty to go around into the model whit the orbit tool.
Are only the texture that cause this problem? I tried to explode some components and groups and I pourged the model, but the file became heavier (94 Mb).
Do you have some suggestion for me?
Thank's

-
Components reduce filesize and also performance because they contain certain geometry only once; if the component is used many times, each instance needs only coordinates, rotation and scale.
The issue above why components made some files larger was about unused components.
Maybe there are other solutions than what I can suggest:Firstly use as much components as possible. This way, you can easily edit and update identical geometry and the edges do not stick together. My current model has more than 150 000 polygons but less than 1MB.
The second thing is, I use a 'details' layer where I put all components and groups and detailed geometry that I do not need at the moment. When I need some geometry, I select it and put it on 'layer0' and turn off the 'details' layer. Textures are turned off in face style unless I need to see them for texturing. This way I can orbit very fast.
-
Components are not always efficient. Have a look at this very interesting thread: http://www.sketchucation.com/forums/scf/viewtopic.php?f=15&t=12618
-
Tiriki,
First, note that using components doesn't help you orbit any faster, basically it'll just make your overall file size smaller when you save.
Second, big textures aren't the only thing that cause big file sizes, that's just the most common one I see. Occasionally I'll have a file where I'm using components well, and have low res textures, and have purged but my file size still seems much larger than I think it should. In those cases I've actually opened up a blank SU file, and copy/pasted the old SU file into the blank one. This has worked for me a couple times (sort of like a super-purge). If that still doesn't work you might see if you can't post the SU file for the community to take a look at and give you more specific advice.
-Brodie
-
The 'PurgeAll' ruby is really handy for this, it sits in your top menu and you just get in the habit of hitting it before saving.. It purges components, materials, layers and styles at the same time and works a treat:
-
Thanks to all of you, sorry if I didn't answered before.
I tried all of yours advice, i have copy/paste the model in a new SU file... I have purge all every time I save, but the file is still to heavy. I think I'm using the same file for too many things... I'll divide the interior from the exterior and may be it will be ok.
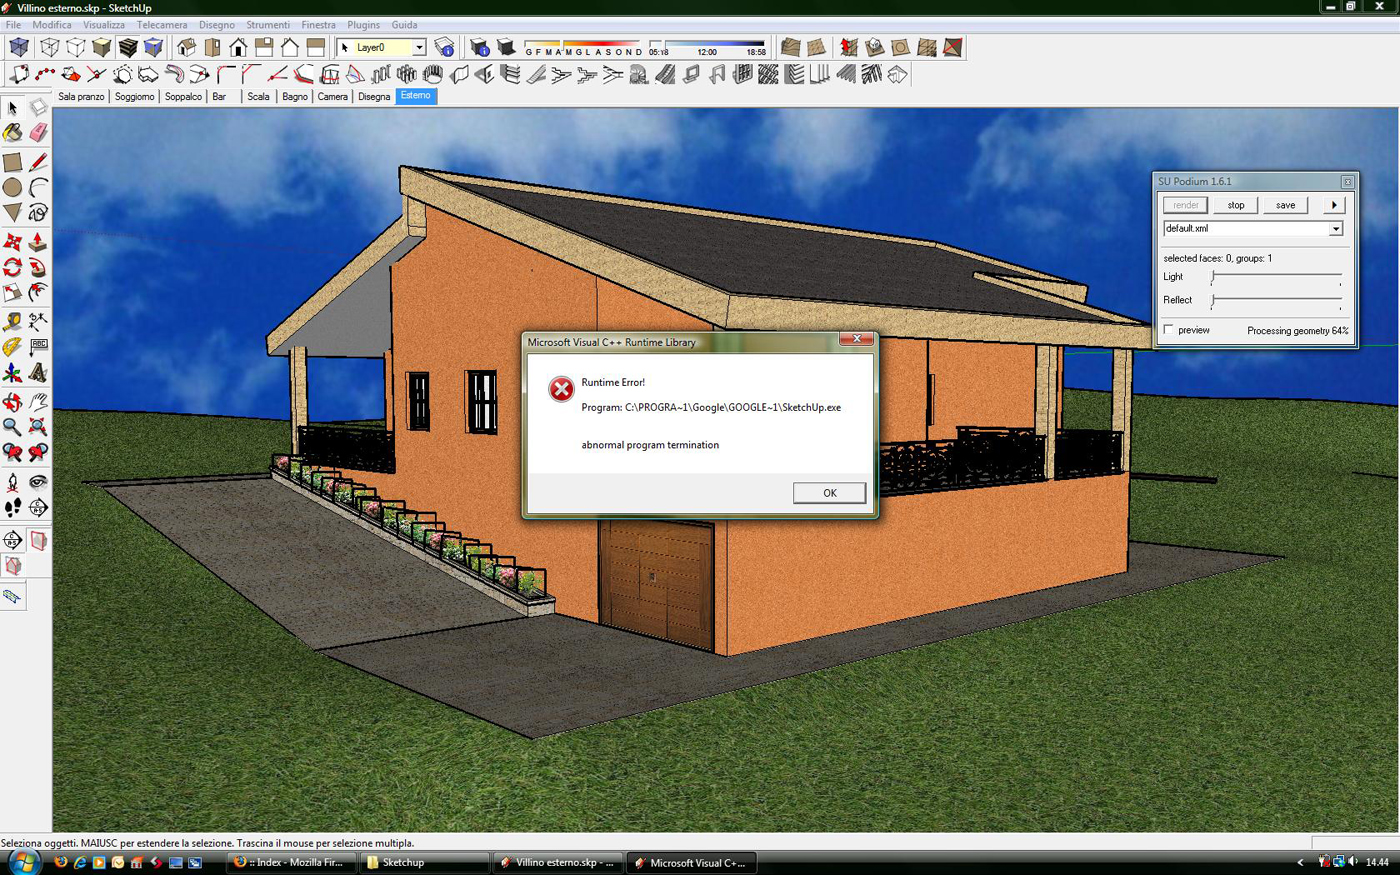
I'm trying to render my scene, but the process doesn't go on and appears an error. Could you help me to understand what I'm doing wrong?
In SU podium forum they told me that it's an error of SU... is my model too heavy to be managed from SU? There is a limit for SU?Thank's a lot


-
The fancy scrollwork on the railings looks like it might be overly high poly. Is that possible?
Try hiding deleteing it all and see if that helps?
Chris
-
@tiriki said:
I'm trying to render my scene, but the process doesn't go on and appears an error. Could you help me to understand what I'm doing wrong?
Check the 'nesting' of your components.
Having components within components within components of components etc... the 'parsing' time will increase exponentially.In my experience, don't go higher than a 'to the third degree' nesting, or you get in trouble using render engines.
-
@kwistenbiebel said:
Check the 'nesting' of your components.
Having components within components within components of components etc... the 'parsing' time will increase exponentially.In my experience, don't go higher than a 'to the third degree' nesting, or you get in trouble using render engines.
That applies to Podium and other engines as well? Not just V-Ray?
-
In my experience, yes.
Skindigo, Maxwell, Fry, Vray, Podium....all of them.
I am not sure how the exporters are written, but they seem to have that in common. Do they all do a camouflaged .3ds export?Fully exploded models tend to export the fastest (except when using 'instancing methods' as Fry, skindigo, Maxwell and Kerkythea more or less can)
-
Are those plants that are next to the house? If so they may be your problem. In one of my last projects I had a building that had planters everywhere, and green walls also. Needless to say I had a lot of high quality, high poly plants everywhere. The only way I could manage the model was to have all the plants on one layer, so I could turn that layer off, and by creating a scene that had shadows off, and plants off, and in my case some other high poly objects off, it allowed me to be able to work on the model without the redraw time lag.
-
I think kwistenbiebel's toptip about not going nuts with nesting is a good one. Not particularly from a technical standpoint - there is no reason why a 3 nested model works but a 5 nested does not - but because its deceptive just how much geometry you're generating by adding a top level with many nested parts.
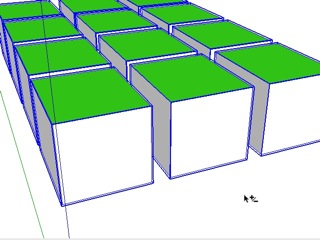
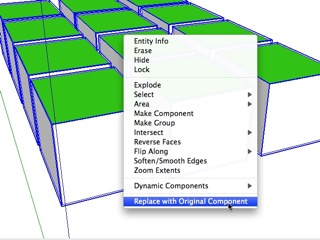
One thing I added to my stuff is a Context (right-click) menu that will flip any component to a bounding box proxy component. So you can select your toplevel nested components and flip them into box proxies for positioning and fast navigation but they get rendered using the original geometry. The flip is pretty much instant (unlike exploding) so it doesn't break the workflow.
So if I highlight all my top level complex nested components, it looks like this:

Then I can orbit/navigate really fast using simple proxies

And to flip back to the original geometry

Adam
-
Cool trick Adam, is this an available ruby or one of your personal ones?
-
Thanks.
No, its part of that glorious LightUp plugin..

-
Cool feature for sure. Another reason to at least try it out!

-
Any chance of making it a seperate commercial ruby?
Mike
-
Hi Tiriki, hi folks.
@tiriki said:
Hi everyone!
I pull up this discussion because I have the same problem... my model is too heavy (86 Mb) and it takes too much time to save and open... also I have some difficulty to go around into the model whit the orbit tool.
Are only the texture that cause this problem? I tried to explode some components and groups and I pourged the model, but the file became heavier (94 Mb).
Do you have some suggestion for me?
Thank's

To speed up orbit, pan, zoom, etc with a heavy model, try to show as little of the geometry as you can before using these tools. Then, when done, show all that want.
For example, I would use "Shaded" viewing mode instead of "Shaded with textures" or even "Wireframe" for more extreme cases. I would also set the profiles to 1 pixels instead of 3 (default value). I would set shadows to off. I would hide as many elements as possible, using layers made invisible and, of course, assigning the unneeded geometries to these layers. Etc, etc. Everything that requires computing power from the graphic engine would be minimalised.
Then, I would create a scene and uncheck the "Camera location" from the items to update. This in order not to affect the actual view. Lets call this scene "Work".
Then I would create another scene where all the wanted elements would be visible, the shadows on, if needed, the profiles at 3 pixels or whatever you want. Etc, etc, required for the nice view that you want. Again, I would make sure to uncheck the "Camera location" to avoid loosing a carefully defined view. Lets call this scene "Render".
Then the workflow becomes:
1 - Click on the scene tab for "Work".
2 - Orbit, pan, zoom to set the view as you want it. Since there is very little to show, the actions shall be fluid.
3 - When done, click on the scene tab "Render". It should not take too long for the image to improve with all hidden stuff now shown, etc.
Just ideas.
-
@alpro said:
Any chance of making it a seperate commercial ruby?
Mike
Sure. I'll need to get some feedback from LightUp users first - and get the next version out too! But after that, I don't see why not.
Adam
Hello! It looks like you're interested in this conversation, but you don't have an account yet.
Getting fed up of having to scroll through the same posts each visit? When you register for an account, you'll always come back to exactly where you were before, and choose to be notified of new replies (either via email, or push notification). You'll also be able to save bookmarks and upvote posts to show your appreciation to other community members.
With your input, this post could be even better 💗
Register LoginAdvertisement


