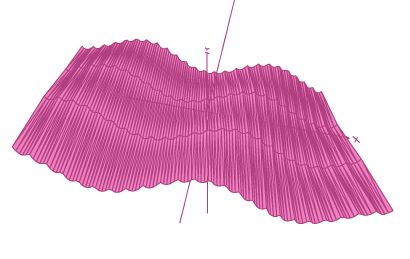
Is it possible to model this material in sketchup?
-
How was this designed? Do you have the xyz information for the rows? I'm thinking that if you had profile lines that show the y and z movement of each line, you could run a circular face with follow me along each line. Then intersect them all and clean up the leftover. I'll try to post an example of what I'm thinking of,
Chris
-
Chris,
I don't know how they design this product and I have no knowledge about any xyz info. I will probably re-do the grooves to match the sample more closely, but I first wanted to see if I could do it at all. I don't think I am capable at this point to use the follow me tool trick you mentioned unless there is a way to make the grooves expand and reduce horizontally as I pull them along the paths, and match up somehow with the ones above and below it....But, I'm curious to see what you mean exactly.
-
I think the pencil tool is your friend here.. I would draw several equally spaced sections through the object, then connect the verticies along the sections. Since the pattern is highly repeating, you would only have to draw the smallest unique section then tile it
-

I'm getting pretty close here. I tried taking the flat grooved edge and using the follow me too along a curved line. Then when I went to distort it with the FFD plug-in to get the grooves to expand and contract it worked fine.
-
That is looking pretty good. I am wondering if the original model acutally has as much left to right meandering of the lines. I was seeing it as mostly a stright line that moves up and down. But perhaps there is a bit of left to right meandering too.
At any rate, that looks really good and clean.
Chris
-
Here is a model that quickly shows it and I tihnk it is succesful.
Scene 1 - Create profiles of for each groove showing how it moves up and down.
Scene 2 - Add a circle to each profile to use with "follow me" tool.
Scene 3 - Now make the circle follow along the profile path
Scene 4 - I added the large faces to help clean up each end of the model. Then select everything and "intersect with model".
Scene 5 - Final, after deleteing all un-needed faces.Some tips. Mine would have come out better if I had put the lines closer together and therefore used smaller circles. The undulation in the example you provided moves up and down a good 4 or 4 times the diameter of the circle I think. So more up and down movement, smaller circles by putting lines closer together. Also, take time to make to make elegant profile lines. Use the bezier tool to make the undulation nice and smooth and gradual.
Hope that helps,
Chris
-
It is pretty meandering lol, but I think I can do it right next time. Thanks for helping me. My next giant hurdle will be to make a box out of this stuff and have all of the grooves line up. It sort of makes my head hurt when i think about it.
-
btw...your sketchup file wasn't there before...I just opened it and it's awesome....although i still can't figure out exactly how you did it.
Thanks again.
-
If you are still looking, here is my attempt in attached model.
I think I can do better now after this first one, adding a few steps to it, getting closer to the real thing.Wo3Dan
-
looks damn good! There are a few different variations of this material and your model looks pretty much exact to a # of them. If you scroll down this link you can see some of the ones that match.
http://www.interlam-design.com/Art_Product_Search.cfm
It's a pretty bada$$ product.
How did you do it?
-
How do you slice geometry? and what is the purpose of doing that....outside of this particular situation?
-
The easiest way to 'slice' geometry is to get a load of planes that intersect th surface, select the whole lot->right click-> intersect with selected. Youll then need to delete any unwanted geometry.
The purpose of this is to create more control points for FFD to work with, as it can only distort corners and not lines, so by intersecting the model with lots of planes you are creating lots more corners for the plugin to work on.
-
ah ha! knowing that helps a lot! especially when using FFD to distort flat shapes smoothly and accurately. Great to know that, thanks!
-
@skaught said:
looks damn good! There are a few different variations of this material and your model looks pretty much exact to a # of them. If you scroll down this link you can see some of the ones that match.
http://www.interlam-design.com/Art_Product_Search.cfm
It's a pretty bada$$ product.
How did you do it?
skaught,
(sorry for the delay.)
Here is a model explaining how it can be done with only SU + sandbox tool.
The technique is simple but laborious.
One note. With the smoove tool you can input an offset. But unlike with other tools you type the value first and then release the mouse button.
See this model in 3DW:
http://sketchup.google.com/3dwarehouse/details?mid=68b60c0a964174c5b2dd3120ca5e0662Wo3Dan
-
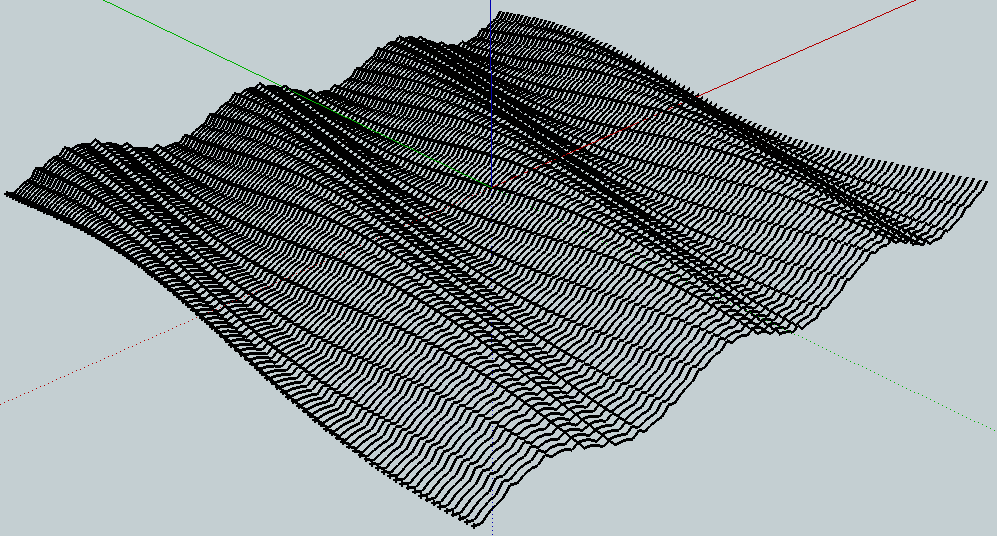
Your material may be approximated as the sum of two types of waves, the big ones and the tiny ones.
The big ones are a sin function, while the small ones have some cusps.
I wrote a formula for your material:z = ( ((x-floor(x))*2 - 1)^2 - 1 )/3 + 1 * sin(x/2 - y/6)
it reproduces the dunes of your material,
you can have a look at the result in the image or by going to
http://www.archimy.com/ and pasting the codetmin = -12 tmax = 12 tgrid = 2000 x = t z = ( ((t-floor(t))*2-1)^2 - 1 )/3 + 1 * sin(t/2 - y/6)["Floor" stands for the "bigger integer number less than"]
You can change the numbers to tune the result:
z = ( ((t-floor(t))*2-1)^2 - 1)/3 + sin(x/2 - y/6) * 1y/6 -> change the 6 to change the angle between waves
( ((t-floor(t))*2-1)^2 - 1)/3 -> change the 3 to change small waves height
1 * sin(x/2 - y/6) -> change the 1 to change big waves height
x/2 -> change the 2 to change the ratio between small and big wavesYou're allowed to use decimal numbers.
I dont know how to draw a graph in SU.
Hope this helps.

-
I can imagine some improvements to the function but
I didnt want to make things too involved. -
holy crap I have a lot to learn...
will be back!
edit: I seems a little ridiculous to just keep saying thank you again and again...but damn, thank you again. I guess I can't really say I'm teaching myself this program anymore.
-
too late. lol
-
-
@guzman tierno said:
I dont know how to draw a graph in SU.
This might not be exactly what you are looking for, but Jim Foltz wrote a plugin that allows you to generate 2-D graphs in SU. It is called "eq_grapher.rb", and you can get it from the Ruby Library Depot (http://www.crai.archi.fr/RubyLibraryDepot/Ruby/em_edi_page.htm). The script iterates in x only, but it can be extended to sweep both x and y coordinates or even a parametric variable (look at method self.graph), thus accomplishing what you want.
I took the liberty to modify the script to do this in 3D in case you guys are curious. And here is a sample output.

The script can certainly be improved, but then this might be a subject for the scripting forum

Juan
Advertisement


