[Plugin] follow me rotate
-
This video does not work for me. I have only black screen.
-
Hi Miguel,
Great tutorial. I noticed some quick shots of your tools which don't look familiar. Would you mind posting a screen shot of your tools so I can see what ones you have that I don't?
Thanks,
Jeff -
"...in response to this tutorial found on the web:"
I wish I could see your video. I've tried the plugin but it doesn't yield the same thing I showed in the tutorial. I did the tutorial without the plugin because of that and because I was asked to demonstrate a manual way of drawing that.
-
+1 with Sepo !
-
Hello, Dave. I'm sorry, I'll be more careful with the wording in the future.
I liked your tutorial because it is actually the best way to do it in SketchUp without having to install any additional scripts.
It's just that I really think that Follow Me Rotate is an extremely cool script thas not everybody is aware of, so I wanted to share with your readers an even faster way to do the same balaustre.
Here's the Youtube link for those who can't see it embedded: http://www.youtube.com/watch?v=0eBIQC2Cgps
(Weird, it's working fine in Google Chrome...)And sorry for my bad English, I learned it through Pink Floyd songs...
-------------------UPDATE--------------
Video does not work in Internet Explorer 6, but works fine in Firefox 2 and Google Chrome. -
Thank you, very much, wikii. This tool is extremely useful and solves one of my main gripes about SketchUp.
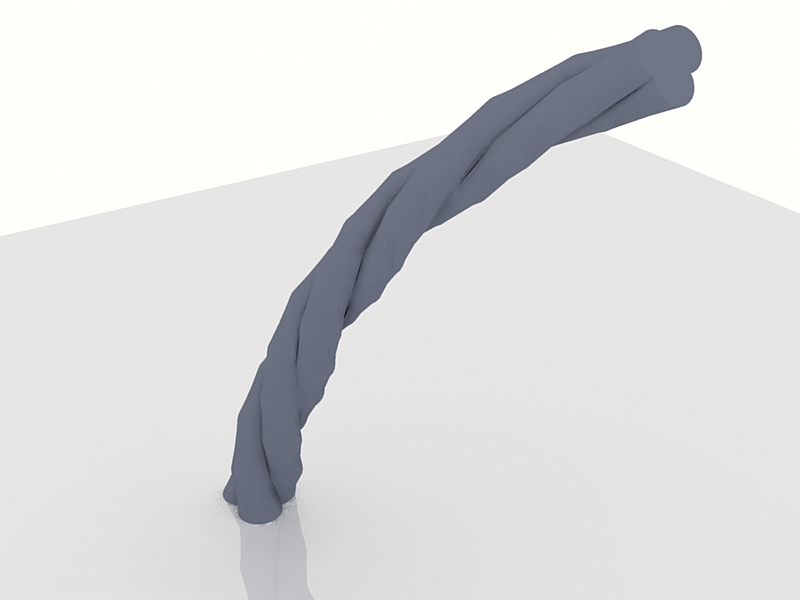
I created a video tutorial for twisted balaustres/legs...
[flash=425,344:10ax4kg1]http://www.youtube.com/v/0eBIQC2Cgps&hl=en&fs=1file=http://www.youtube.com/watch?v=0eBIQC2Cgps[/flash:10ax4kg1]
...in response to this tutorial found on the web:
http://finewoodworking.taunton.com/item/6095/doin-the-twistI hope you see the BIG difference your script makes. Without Follow Me Rotate, it is like being in the stone age!
By the way, I discovered that if I don't deselect the line after dividing it and make sure it has been properly divided, sometimes Follow Me Rotate will extrude in the opposite direction.
Thank you again.
And thanks to Simon Bonnet for the tip on posting Youtube videos here.---------------------18:08 31/01/2009 UPDATE--------------
Here's the Youtube link for those who can't see it embedded:
http://www.youtube.com/watch?v=0eBIQC2Cgps
I've just discovered that the video shows only a black screen in Internet Explorer 6, but works fine in Firefox 2 and Google Chrome. -
I appreciate you wanting to show the readers a faster way but you need to provide the links for the plugins or they're not in any better position.
-
Sure, I posted the links in the Youtube video description. click on "(more info)" to show it. I'll copy the description here:
"
Today I read this tutorial for doing a "twisted leg": http://finewoodworking.taunton.com/item/6095/doin-the-twist
But I remembered that in the SketchUp Community Forums there are free tools that can do the same thing in a snap. So I decided to record a video tutorial.You'll need the SCF Power Toolbar, which includes the "Join edges" tool by Rick Wilson:
http://www.sketchucation.com/forums/scf/viewtopic.php?f=180&t=14770&st=0&sk=t&sd=a&hilit=powertoolbar
And the "Follow me rotate" script, by wikii:
http://www.sketchucation.com/forums/scf/viewtopic.php?f=180&t=13014&st=0&sk=t&sd=aIn this video I did a counter-clockwise twist. To do it clockwise, simple input a negative value in the "Rotate" field of the Follow And Rotate script.
Remember to check that the line was properly divided before using the "Join Edges" tool; if you don't, the Follow And Rotate tool might not work properly.
Tutorial created with Camstudio, a free and open-source excellent little piece of software, and subtitles added in Windows Movie Maker.
" -
Now I see. It's all hidden normally.
Thanks.
-
I thought this plug-in would be useful in finally solving the missing "sweep" tool, so I tried it. More specifically, I showed this one before, trying to make a squared handrail on a spiral staircase. Using follow me doesn't work because it curves the form so that the top isn't parallel with the ground. For this spiral stair case the steps are rotated 30 degrees so I tried the ruby with a 30 degree input. Totally didn't work. I tried various different inputs and I finally found one that visually, was "good enough". The input was -3 degrees.
Can you take a look and let me know if there is a better number and if I there should be some relationship that can always be used to figure out what angle to use?
Even if not, this saves just a ton of time as is and it is quite adequate for this job too! Thank so much.
-
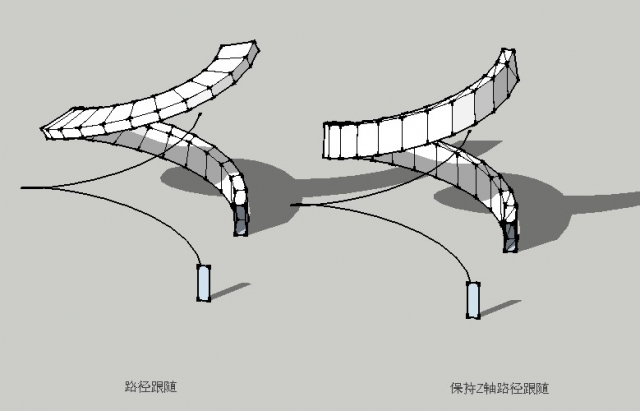
Another script still in development can do followme and keep the profile from rolling.
Left part of the first image is followme ,right part is follow_me_and_keep .
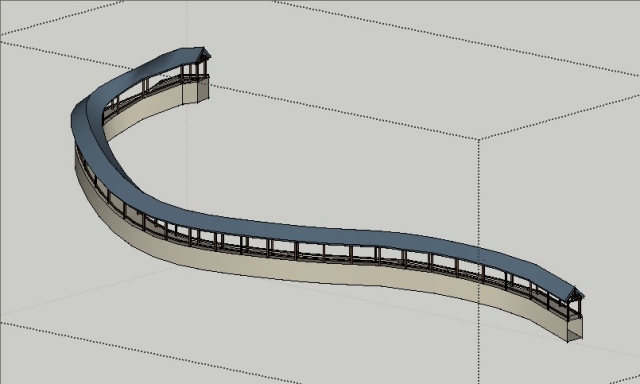
In the second image ,the Long Corridor (exclude columns) is built by follow_me_and_keep after one time running.


-
Fantastic! Can't wait.
-

Sounds fantastic! That would be something needed so long! -
Follow_me_and_keep should be a big hit among fans of the Great Wall, and will certainly help a lot when modeling roads. Keep up the excellent work, wikii!
Mrs. Susan, for your specific case, the screw1_5.rb script works well, too. Unlike FollowMeRotate, with screw1_5.rb you have to select both the face and its borders, and it only works around the blue axis, so before using it you have to center your stair in the origin. You can find it here:
The "first end" and "second end" that you are required to enter are just required to determine a differential in height, so, irrespective of where you click, the shape will always be created around the blue axis.
-
@wikii said:
Another script still in development can do followme and keep the profile from rolling.
Left part of the first image is followme ,right part is follow_me_and_keep .
In the second image ,the Long Corridor (exclude columns) is built by follow_me_and_keep after one time running.A must have tool!
-
I am looking forward to it.
-
Until follow_me_and_keep is ready (which will save all these following steps), here's a workaround:
-
Go to Camera > Standard Views > Left
-
Draw your profile within the plane formed by the positive blue and green axis, touching the origin.
-
Erase the face leaving the lines, and make it a component.
-
Select your profile (it must be a curve or a polygon, if it isn't, first join the edges with the join tool by Rick Wilson in the SCF Power Toolbar).
-
Use the "copy along distance" button on the SCF Power Toolbar (also a script by Rick Wilson) and play with the distance until you're satisfied.
-
Select all instances of the component and explode them. You can use Rick Wilson's script "select all instances": http://www.smustard.com/script/Instances
-
Click on the "configuration" button of the "Skin" script by Darrel to "By order". Leave the other options blank.
-
Execute the "skin" command and keep pressing "Enter" like crazy until the full object is done.
-
Add soften/smooth edges to your taste.
You can download the "skin" script from this post:
http://www.sketchucation.com/forums/scf/viewtopic.php?f=180&t=1306&st=0&sk=t&sd=a&hilit=skin&start=105#p101209
And you can browse the rest of that thread for the latest version of skin.rb, too, if you want...Yeah, it's a lot of extra work, that's why all await for follow_me_and_keep.
-
-
This is pretty fun to play with.

-
it's really nice
-
Thanks for this awesome script!

Hello! It looks like you're interested in this conversation, but you don't have an account yet.
Getting fed up of having to scroll through the same posts each visit? When you register for an account, you'll always come back to exactly where you were before, and choose to be notified of new replies (either via email, or push notification). You'll also be able to save bookmarks and upvote posts to show your appreciation to other community members.
With your input, this post could be even better 💗
Register LoginAdvertisement


