What's your beginners tip?
-
When moving objects with dimensions that are very small like <0.000001 feet, it hits a base grid of precisions. The snapping grid is usally above this precision but if you zoom into base points it will turn into a snapping grid.
Yes this is true that it act like a snapping grid when you zoom to base precision even if you have the snap off.
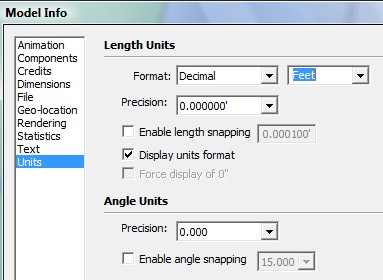
Now how can you get the objects to move about smoothly in very high precision?
1)hint By turning the units feet to in, cm, or mm will lower the base snapping grid.
Also
2)Trick I do is to use the scale tool by pulling one side a given scale and then pull the other far parallel side in same direction with same scale when done it shift objects to your point. -
Use the zoom tool - and use it a lot
I had some odd problems with straight lines refusing to join up with other straight lines, faces which should have been at right angles to each other behaving as though they were seperate and what appeared to be other strange things going on with SU's inference engine.
What I'd forgotten was that the day before I'd been playing around trying to orient my model (our house) so that I could drop it onto Google Earth. When I zoomed in real close, the cause of all my problems became clear. When I'd rotated the whole model, I'd done so by about 178 degrees. As a result it was now slightly out of alignment with the red and green axes, causing all the inference problems I'd been seeing. Putting it back in line solved all the problems.
-
If you're working on a model and you want to select something and make group, but when you select thing with one click and pull of a mouse you are not sure if u selected the things you wanted or something else also, so you just copy and paste it and then you will see what do you have in your selection if you put it outside of the model where you can see only pasted surfaces... that helps me, its quick so i hope it will be helpfull for someone else
so ctrl c, ctrl v, and you see your selection outside
-
Having just started with SU a couple days ago, the most important tip I've received is how to multiply/divide a copy.
For example, I wanted to make a brick wall. To use this feature:
select the object to array
select the "move" tool
push ctrl (this shortcuts the copy feature)
click on a part of the object as a base-point to move fromIF you want to use the multiplication tool
place the copy in the direction you want your array of copies
also place the copy a distance away from the original at desired interval (all copies will have this spacing)
after placing the copy (before leaving the move tool) type in the number of copies you want in the format "#x" for example, if I wanted 3 copies made in addition to the original, I would type "3x"
if you need more or less, type again. you can edit the number of copies until you leave the toolELSEIF you want to use the division tool
place the copy in the direction you want your array of copies
also place the copy at the desired position for the last piece
after placing the copy (before leaving the move tool) type in the number of copies you want in the format "#/" for example, if I wanted 3 copies made in addition to the original, I would type "3/"
instead of continuing outward infinitely like the multiplication tool, the division tool will space the copies out evenly in between the original and the specified end piece.
if you need more or less, type again. you can edit the number of copies until you leave the tool -
- Start with copying/modeling stuuf in your direct surroundings
- Start simpel and work your way up to the more fine and difficult stuff
- Ctrl-S is your best friend
- Ctrl-Z is your mistress
- Doubting if there is no faster/easier way to do 'something'? ask here and search for plugins.
- Press every button, use every tool, change every setting and learn as you do
Last tip, but certainly as important: don't let your courage drop when you see all them beauties of models on the net, here of where else! One day, you will be able to do the same it just takes time and experience.
Ooooh God, how I wish I could buy time. Any tips on that anybody?

-
My tip is use the follow me tool to make lathed edges
-
Make sure all the faces on the outside of the model are white, and the one's inside are purple (or blue, i'm colour blind). This will save you a lot of trouble later on when you start exporting into other packages/games etc. To do this, simply select the purple face>right click>reverse face(s) you can select multiple faces to do this at the same time. If you have textured your object and can't tell which faces are what, then go view>face style>monochrome and this will show your object as if it was un-textured.
Hope this helps,
-Archy
-
practice makes perfect! there are lots of tutorials in the youtube and one of my favorite is the 60 seconds tutorial in sketchup.
-
Visit SketchUcation every day... That's my tip.
-
There are some repetitive tasks - in modelling, texturing, rendering nearly in every phase. I always try to make notes of them - they are like algorithms. They've got to main tasks - to remind you those repetitive jobs and not have to invent the wheel from scratch and to help you in improving those jobs. From one time to the next of using such an algorithm you will try to make it better, simpler, or more effective. Every time you find a good improvement idea - change the algorithm note. That'll make your progress keep a good direction. It's nice to use some notes tools for it, like evernote or springpad. Which would be my next advice
. To use a useful tools! -
yes I need a follow me short cut thanks. My tip from beginner (me) to beginner:
Learn the art of mirroring, (using groups and components for such) and intersect with model. Two good videos for these are the speeded up tractor (you tube) and the sketch up help videos 'intersect with model). -
If you are more used to AutoCAd than SU, don't assume that layers are the same in both apps. They behave very diffrenetly in SU. In SU use 'Scenes' and 'Outliner' (under Window-Outliner)to control visibility. Consider putting all CAD info onto one layer (after cleaning up the CAD drawing first) before importing into SU. Try keep SU layers to a minimum at first.
-
@unknownuser said:
If you are more used to AutoCAd than SU, don't assume that layers are the same in both apps. They behave very diffrenetly in SU. In SU use 'Scenes' and 'Outliner' (under Window-Outliner)to control visibility. Consider putting all CAD info onto one layer (after cleaning up the CAD drawing first) before importing into SU. Try keep SU layers to a minimum at first.
if I'm importing a cad file into sketchup, I normally import it into a 'new' file (if I've been working on a model), delete all the layers and make a new one such as 'cad plan' or 'cad elevations' or whatever. then copy and paste into the main model file. no messing about with cad layers then.
I also use prefixes for my sketchup layers, e.g. s-furniture, or s-cars. this is helpful if I import something from the 3D warehouse that has some layers in it. I can then quickly identify which layers are not my own, delete and assign the imported model to the appropriate layer.
-
not sure if already mentioned, but grouping objects with same texture/colour helps when you add said textures/colours. and check plugins for ease of use tools (ie workplane tools).
-
Go to Window>Preferences>Shortcuts and assign:
Ctrl+G to Edit/Make Group
Ctrl+Shift+G to Edit/Item/ExplodeThis way you can group and ungroup fast, change component to group...
-
Know how to turn them on and off. A straight line can accidentally end up being several end-to-end segments which "endpoints" will show you. Endpoints will show intersections of very slight angles that you wouldn't otherwise notice and help you see polygons that you didn't know where there. It will help you see why some surface shapes defy closing as you draw line after line.
-
Yeah, use google (or ur favorite search-engine) when you tired to repeat your activity with SU!
For example, as beginner I dont know how to make a model with paper.
I rotate and rotate again each side of my model...
Luckily, there are some plugin (fold) that makes my life easier,
Even, I feel blessed since there are free-plugin (no cost), as I were a beginner and has no profit from my current work.So? even often a stupid word (such "Sketchup print model to printer") will make us happier
Best regards,
==x2nie -
In woodworking/construction: Model as you are going to build. Learn the dimensions of the materials you are going to use during the build and adhere strictly to these in your model. And draw the hidden parts as well: if you for example will be using mortise and tenon in a joint then draw these too. While you draw your model as you're going to build it you will go through all kinds of considerations and you will find the best solutions for them.
And it's so much easier to press 'Undo' than trying to glue sawdust back together.

- Kristian
-
Tip_dj no 14
Alternet way to restore toolbars prosition
without using veiw-Toolbar - save toolbars prosition (reg ToolbarsUserCustom-Bar)Ok you know that everytime you boot sketchup the tool bars are set the same as you left
rightnow if you move thing around and if your tool bar get mix up by resizing sketchup bordders and you want to restore toolbars prosition to a standard view (veiw-Toolbar -restore toolbars prosition is ok to use)
but
To return to how it was when you started, just start a new sketchup instance then exit out the old then exit the new.
when you come back toolbar are fix to how they were
-
Tip_dj no 1
This is my best tip all year of 2011
by dukejazz on Mon Dec 19, 2011 7:52 amWhen sketchup starts up it doesn't see any hidden ruby files
(note: With windows explorer toolbar, Tools-folder options-view-show the hidden files = on)
You can hide what you don't need to load, and unhide the require ones that you do.
Later with Jim ruby toolbar you can load the hidden ones.
That's because your telling the script loader about the name, type and location of ea. plug-ins to load...thus no need to double buffering of plug-ins in folders by loaders.
Also the plug-ins are in the folder that are meant to be in.
 win win!
Jim
http://forums.sketchucation.com/viewtopic.php?t=1542
Ruby Toolbar
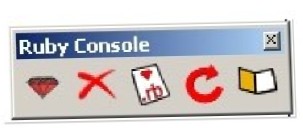
Download here
http://sketchuptips.blogspot.com/2007/08/plugin-ruby-toolbar.html
Hello! It looks like you're interested in this conversation, but you don't have an account yet.
Getting fed up of having to scroll through the same posts each visit? When you register for an account, you'll always come back to exactly where you were before, and choose to be notified of new replies (either via email, or push notification). You'll also be able to save bookmarks and upvote posts to show your appreciation to other community members.
With your input, this post could be even better 💗
Register Login


Advertisement