What's your beginners tip?
-
when composing a scene for rendering, the look around tool is quite handy. you can change your eye height by simply typing in numbers while using the tool.
-
Beginners tip? Use a programable multi-button mouse. I recommend Logitech Revolution VX, smallish and elegant (unfortunately discontinued). You can assign 10 functions and now you're a speed demon in SketchUp. There aren't that many makes out there which is frustrating because I've worn out four of these Logitech mice and the new Logitech iterations are cheaply made with fewer functions, although there's the option of going to a full-blown gamer's mouse.
-
I'm a beginner but I'll allow myself to be a bit philosophical
as I've come to a conclusion which may or may not mean anything
to you - besides going through all the sketchup videos and duplicating
the steps in the videos and understanding the basics of the tools, my tip
is that you have to stop thinking about drawing (lines, shapes etc.) and
start thinking creatively about geometry, components, groups
and how the tools can be combined in magical ways to draw what you need.

When you have some spare time, pick some questions on the forum on how
something was done and you'll further speed up filling your bag of tricks. -
u can shortcut any function, even plugins. as a gamer, my hand automatically rests on wasd all the time
so i set up shortcuts that are easy to reach from that: q: make line, w: paintbucket, e: push pull, r: move
spacebar: selection tool, x: xray mode
etc.
one of the best shortcuts for modelling with groups and components is view/component edit/hide rest of model.
the ability to toggle that is just awesome. -
needs the how to set up shortcuts instructions
ETA.. ^found it^ nm
btw.. loving that icon picture of yours Peter.. can't stop looking and smiling
-
everything has thickness - walls, glass panes, even paper when you make a face on sketchup, it is only a 2D shape which cannot exist in real life. make sure you give every object a thickness
start on components early. groups will prevent you from getting in a mess if you want to seperate 2 objects, and will enable you to select whole objects easily. components do the same, but you can copy a component around, and if you edit one all the others can change.
when drawing shapes, you will often benefit from typing in the desired length. this will help you keep track of things and have regularity in your model. also don't use sill lengths like 147.43528m unless necessary
Components window will allow you to keep track of all components in your model, and see which ones are in the file but not in the model. you can then delete those to speed things up. same with materials. if you use one once, it remains in the file, even if you remove it from the model
soften edges to hide a line, and this will also try to smoothen the face. go to view>hidden geometry to see all lines you have hidden. a curve is actually a series of straight lines, and extruding a curve will make lots of lines.
For accurate selection, you may want to use the views toolbar, and parallel projection
-
Hello Everyone
I am very new to this Sketchup world, but I have 2 tips narrowed down from 2000.
-
Make sure you have a very clear idea of what you want to achieve with a drawing. Have the Endgame in mind at all times. Don't do a me and get distracted by overcomplicating a drawing. If you are designing something archtiectural that exists in the real world make damn certain you have decent photos to work from, from the start. Its really annoying having to go back to take more, not to mention photomatching at the end of a design is just downright depressing lol.
-
Learn the Lingo. As with any new piece of software what you think some operation, action or effect should be called and what it is really called and what other people call it are often different things. I forget how many times I have rumaged about youtube, typing in all sorts of keywords to only stumble upon what I wanted to learn by accident way after the fact. From what I can tell, everything I want to do with sketchup is possible, it is only me that does not know how to do it and importantly what its bloody called.
-
-
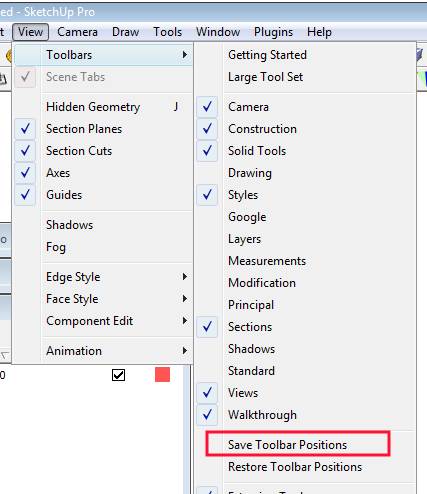
If you took time to arrange your toolbars, use 'View/Toolbars/Save Toolbar Positions'.
You never know when sketchup will stumble and ruin your workspace.
-
@ross macintosh said:
Tip: Orbit, Pan & Zoom using the middle mouse button / scroll wheel.
middle mouse button to orbit
middle mouse button + shift to pan
and the scroll wheel to zoomThe tool buttons for orbiting, panning and zooming almost never need to be used.
I had been using this program for about a week, and JUST found out this tip when you mentioned it! AWESOME! Thank you!
-
@hfm said:
My tip:
While selecting different kind of materials for your model to try out looks, don't forget to delete them afterward since SketchUp will remember every single material you've selected, clogging op your model's file size in the process.
Thank you! I was just adding layer after layer, not deleting the old materials. That must be why the program lagged really bad after a while.
-
@rami_lpm said:
If you took time to arrange your toolbars, use 'View/Toolbars/Save Toolbar Positions'.
You never know when sketchup will stumble and ruin your workspace.i am so agree with u...
my toolbar often go haywire during rendering...
-
I have found that no matter how much I think I have learned in SU, I will always have more to learn. If SU is important in your work flow then decide to research here and everywhere to see what will help you work better. Decide to spend some "many" hours to practice - research- and create. It is mindblowing to see what people are doing with this and many kudos to those who are creating plugins that make our life "that much easier". I am inspired and amazed by these creative folks.- Thanks for your work Mates.-And Always Make Components
-
When moving objects with dimensions that are very small like <0.000001 feet, it hits a base grid of precisions. The snapping grid is usally above this precision but if you zoom into base points it will turn into a snapping grid.
Yes this is true that it act like a snapping grid when you zoom to base precision even if you have the snap off.
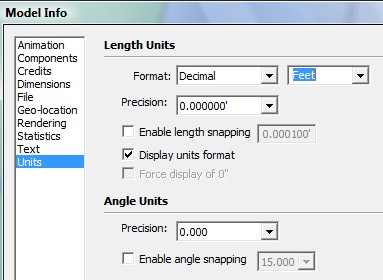
Now how can you get the objects to move about smoothly in very high precision?
1)hint By turning the units feet to in, cm, or mm will lower the base snapping grid.
Also
2)Trick I do is to use the scale tool by pulling one side a given scale and then pull the other far parallel side in same direction with same scale when done it shift objects to your point. -
Use the zoom tool - and use it a lot
I had some odd problems with straight lines refusing to join up with other straight lines, faces which should have been at right angles to each other behaving as though they were seperate and what appeared to be other strange things going on with SU's inference engine.
What I'd forgotten was that the day before I'd been playing around trying to orient my model (our house) so that I could drop it onto Google Earth. When I zoomed in real close, the cause of all my problems became clear. When I'd rotated the whole model, I'd done so by about 178 degrees. As a result it was now slightly out of alignment with the red and green axes, causing all the inference problems I'd been seeing. Putting it back in line solved all the problems.
-
If you're working on a model and you want to select something and make group, but when you select thing with one click and pull of a mouse you are not sure if u selected the things you wanted or something else also, so you just copy and paste it and then you will see what do you have in your selection if you put it outside of the model where you can see only pasted surfaces... that helps me, its quick so i hope it will be helpfull for someone else
so ctrl c, ctrl v, and you see your selection outside
-
Having just started with SU a couple days ago, the most important tip I've received is how to multiply/divide a copy.
For example, I wanted to make a brick wall. To use this feature:
select the object to array
select the "move" tool
push ctrl (this shortcuts the copy feature)
click on a part of the object as a base-point to move fromIF you want to use the multiplication tool
place the copy in the direction you want your array of copies
also place the copy a distance away from the original at desired interval (all copies will have this spacing)
after placing the copy (before leaving the move tool) type in the number of copies you want in the format "#x" for example, if I wanted 3 copies made in addition to the original, I would type "3x"
if you need more or less, type again. you can edit the number of copies until you leave the toolELSEIF you want to use the division tool
place the copy in the direction you want your array of copies
also place the copy at the desired position for the last piece
after placing the copy (before leaving the move tool) type in the number of copies you want in the format "#/" for example, if I wanted 3 copies made in addition to the original, I would type "3/"
instead of continuing outward infinitely like the multiplication tool, the division tool will space the copies out evenly in between the original and the specified end piece.
if you need more or less, type again. you can edit the number of copies until you leave the tool -
- Start with copying/modeling stuuf in your direct surroundings
- Start simpel and work your way up to the more fine and difficult stuff
- Ctrl-S is your best friend
- Ctrl-Z is your mistress
- Doubting if there is no faster/easier way to do 'something'? ask here and search for plugins.
- Press every button, use every tool, change every setting and learn as you do
Last tip, but certainly as important: don't let your courage drop when you see all them beauties of models on the net, here of where else! One day, you will be able to do the same it just takes time and experience.
Ooooh God, how I wish I could buy time. Any tips on that anybody?
-
My tip is use the follow me tool to make lathed edges
-
Make sure all the faces on the outside of the model are white, and the one's inside are purple (or blue, i'm colour blind). This will save you a lot of trouble later on when you start exporting into other packages/games etc. To do this, simply select the purple face>right click>reverse face(s) you can select multiple faces to do this at the same time. If you have textured your object and can't tell which faces are what, then go view>face style>monochrome and this will show your object as if it was un-textured.
Hope this helps,
-Archy
-
practice makes perfect! there are lots of tutorials in the youtube and one of my favorite is the 60 seconds tutorial in sketchup.


Advertisement