Barber pole
-
Hi All,
I'm sorry to bug you guys with a question that is probably trivial to you, but I can't figure this one out. I'm trying to draw a cylinder with stripes that rotate around the cylinder like an old style barbers pole. I have just about banged my head on the desk until its bloody, but even that didn't help! Any help or tips would be greatly appreciated.
Devin
-
I think theres a video about this on the SU website, its the tutorial about manipulating textures, i think. I'll post a link in a while.
edit: http://sketchup.google.com/gsu5vtviewer.html#id=11
the barber pole bit is towards the end.
-
-
Bob YES!! Exactly. How did you do that?
Devin
-
Dear Devin,
Okay, so this is what you do.
First, you need to install a plugin called drawhelix13.rb
Go to http://www.crai.archi.fr/RubyLibraryDepot/Ruby/em_geo_page.htm
Right, now having installed the plugin and restarted Sketchup, go to the Draw drop-down menu and select DrawHelix13. Fill in the dialogue box. I suggest you use the following to start (in mm):
Start radius = 150
End radius = 150
Pitch = 2000
No of rotations = 4
Sections per rotation = 24Click okay and the script will draw a helix about the z-axis. The elements of the helix are grouped.
Using the rotate tool, rotate and copy the helix around its centreline (z-axis) by placing the rotate tool at the origin. I suggest you rotate 90 degrees as a start.
Next select the circle tool and draw a circle with the centre at the origin and with a radius equal to the radius of the helices (= 150 mm for this example). Use the push-pull tool to extrude a cylinder and snap to the end of one of the helices.
Last but not least, select all and explode. You should now find that the helices define a spiral area which you can colour with the paint bucket.
I hope this helps.
Kind regards,
Bob -
Nicely explained Bob

I will look at placing this in the tutorials forum tomorrow if you don't mind.
-
Dear Dylan,
The more tutorials the better, and I am happy to contribute.
Regards,
Bob -
thanks, Bob.
really nicely described - now even I should be able to create a helix

-
Here's a non-Ruby way of tackling it...offered not because it's easier, but because it helps to get your head around such problems which may not always be Ruby-soluble.

-
what an easy and simple way to do it, Alan. marvelous!
truly an Egg of Columbus - to figure that one out has surely taken some time.

-
Hi guys,
If you don't necessarily need the geometry itself, you can do it by texture positioning:
- Turn on hidden geometry (View menu)
- Import any striped image as texture and apply it on one face of the cylinder (see attached file)

- right click on it and go down to Texture > Position in the context menu
- make sure you are in "fixed pin mode" and rotate the texture about the red pin with the green pin (you can still resize it here - see picture)
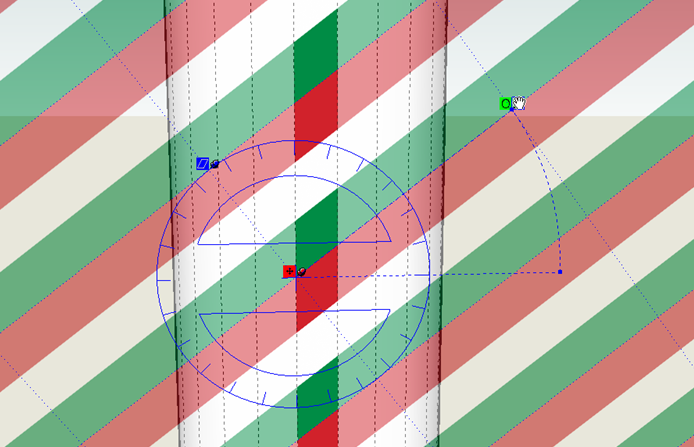
- when you are fine with what you see, right click > done (or hit Enter)
- turn off hidden geometry and choose the paint bucket tool
- Press the Alt key (the PB tool turns into an eyedropper)
- sample the painted facet, release the Alt key and apply the texture to the rest of the column (see result)

 If you don't mind, I used my national colours...
 -
a wonderfully lazy way to achieve the same result... and if you apply a bumpmap and render it, it even looks carved into the cone...
@gaieus said:
If you don't mind, I used my national colours...
well Gaieus, now I would really fancy "Caprese" (didn't have lunch today...)
-
Oh yes, bumps and such - or even clipmaps and layered materials so that it could look like a marble column with a winding, gilded stripe on it!


Hello! It looks like you're interested in this conversation, but you don't have an account yet.
Getting fed up of having to scroll through the same posts each visit? When you register for an account, you'll always come back to exactly where you were before, and choose to be notified of new replies (either via email, or push notification). You'll also be able to save bookmarks and upvote posts to show your appreciation to other community members.
With your input, this post could be even better 💗
Register Login


Advertisement