Medeek Wall Plugin
-
Trying to find a decent wood grain to use for timber beams, any suggestions or images anyone is willing to share? I've got a decent end grain image, just looking for the side grain.
P.S. I am also looking for a good pressure treated texture/material.
-
The currently available beam types are:
- Timber
- LSL
- Lumber
- Glulam
- LVL
- PSL
The number of plies can be 1, 2, 3, and 4
Glulam species are currently Western Species and Southern Pine.
SCL lumber (LVL, LSL, PSL) are the US industry standard sizes (Weyerhauser, Boise Cascade, Louisiana- Pacific).
The miter cut puts the diagonal facing the bottom, the fire cut puts the diagonal facing the top.
https://3dwarehouse.sketchup.com/model/fff4b0c1-c0c6-4ab3-865c-67c9836a99f9/Medeek-Beams-1
The materials shown are the default (built-in) materials for the plugin if the materials option is turned on. I'm not totally in love with the various textures I have for LSL, PSL, LVL and Timber but it is better than nothing I suppose.
For the timber and LVL option you can see that the end and edges have there own material assigned. Also if you apply a custom cut (after the fact) the way I have the materials assigned should allow you to maintain the proper end grain appearance.
The only thing really missing is steel beams which should not be too big of a leap now that I have the whole beam system/module in place.
Tomorrow I will jump back on the garage door module and see if we can make some headway with that.
-
One last thing to note with the beam module is that all of the standard sizes are US/Imperial.
I can add in standard sizes for metric however I will need that information. I currently have glulam beam data for the UK, South Africa and Australia but I will also need PSL, LVL, lumber, timbers and LSL.
-
Version 0.8.2b - 06.29.2018
- Steel: Wide Flange (W) beam types added to the beam module.
I've only added five wide flange sizes thus far. I just need to know what sizes are most typically used and I can add them in.
Note that miter and fire cuts work with the steel beams as well.
I was also thinking an advanced option for steel beams might be a nailer plate on top and/or bottom of the beam, again feedback in this regard will determine if I pursue this further.
Another thing to note with beams is that you can move them around just like any other object in SketchUp using the SU move tool, unlike the walls. Technically you can move the walls with he SU move tool as well its just they won't stay connected if you do.
Another advanced option for beams would be a hanger library which can be added to or modified by the user. I am already doing this sort of thing for window and door components so it isn't a big stretch for beam hangers.
-
Version 0.8.2c - 06.29.2018
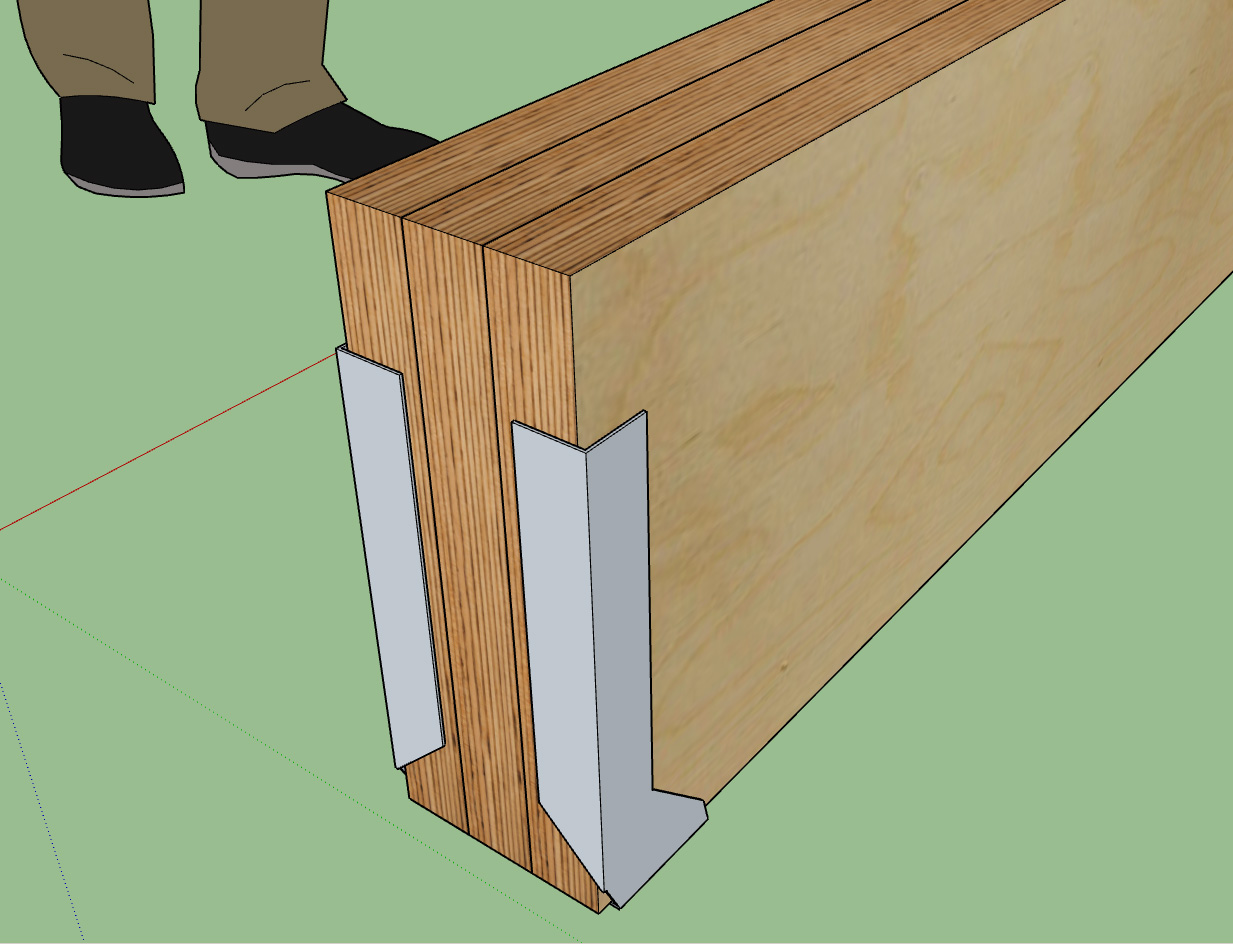
- Added a hanger library (customizable) and the ability to place hangers at the start and/or end of a beam.
Hangers shown are: HU612, LUC26Z and LUS26
The hanger library is located in the "hangers" sub-folder of the library folder of the plugin.
I have a few Simpson Hangers included but any of these can be modified and additional SKP files can be put into this folder. The plugin will automatically allow the selection of any components found within this sub-folder when selecting hangers for beams within the draw and edit menus.
I have contacted Simpson Strong-Tie in an effort to get a few more of their more common hangers that I can then simplify and include in the plugin. I am particularly interested in the HUCQ series.
In order to minimize polygon count I typically eliminate most of the holes in the hangers and also any curved surfaces, the goal is to keep the file size below 50 kb if possible.
I should also add that one could also include column caps in this sub-folder, like the CCQ/ECCQ/ECCLQ/CCTQ series.
-
@bob james said:
As of 0.8.2c the only thing in
C:\Users\Bob\AppData\Roaming\SketchUp\SketchUp 2018\SketchUp\Plugins*medeek_wall_ext\library*
is one window and one door. : :You'll need to download 0.8.2d, I'll roll it out tomorrow.
-
As of 0.8.2b the only thing in
C:\Users\Bob\AppData\Roaming\SketchUp\SketchUp 2018\SketchUp\Plugins*medeek_wall_ext\library*
is one window and one door. : : -
The Hangers are in the 0.8.2c Library.
I was looking in 0.8.2b
My mistake: sorry -
Re: Wainscoting feature/suggestion
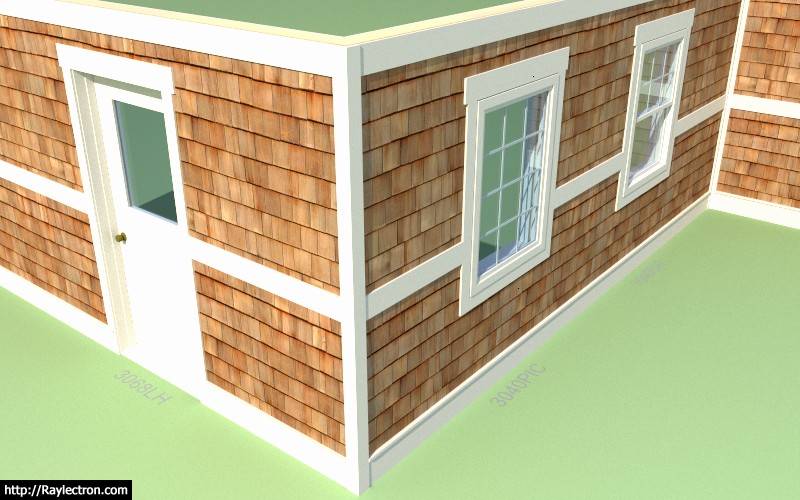
Pretty common to have a "band board" in SE USA (sometimes called "water table").
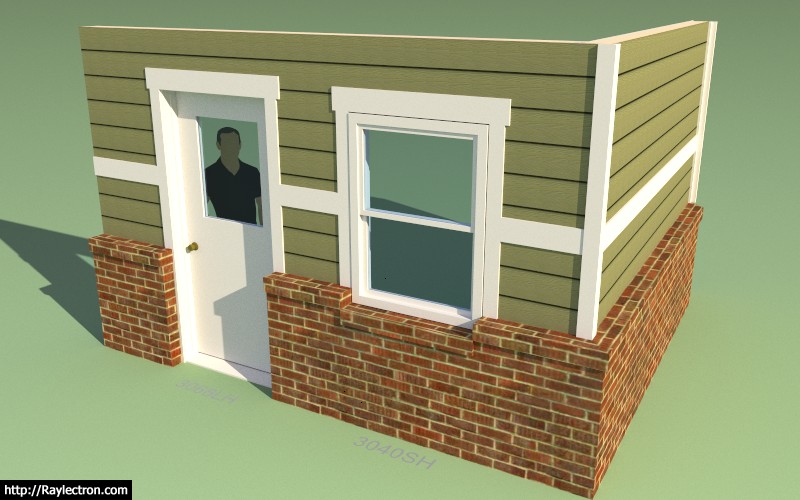
Perhaps your wainscoting code could be adapted to create the band board and possibly a freize board as well.(please see pic & SU model)
Having it automatically cut out for door openings/etc. would be quite handy.......merely a suggestion.
BandBd_WaterTable_06_30_2018.skp
C
-
Version 0.8.2d - 06.30.2018
- Created a number of low polygon count Simpson Strong-Tie hanger and column caps.
The full list of included hangers and column caps can be found here:
http://design.medeek.com/resources/wallpluginvendors.html
Any hardware included with the plugin are custom drawn by me to reduce polygon count and standardize layers and materials.
If you would like to see specific hardware added please email me the manufacturer, part numbers and reference material. For Simpson hardware I typically refer to their literature and their various DWGs files found on their website.
-
This is what dedication looks like! Don't forget board and battens!
-
@charlie__v said:
Re: Wainscoting feature/suggestion
Pretty common to have a "band board" in SE USA (sometimes called "water table").
Perhaps your wainscoting code could be adapted to create the band board and possibly a freize board as well.(please see pic & SU model)
Having it automatically cut out for door openings/etc. would be quite handy.......merely a suggestion.
[attachment=1:2w17f8d7]<!-- ia1 -->BandBoard_WaterTable_Freize_06_30_2018.PNG<!-- ia1 -->[/attachment:2w17f8d7]
[attachment=0:2w17f8d7]<!-- ia0 -->BandBd_WaterTable_06_30_2018.skp<!-- ia0 -->[/attachment:2w17f8d7]
C
I've looked at this in some detail and have the following observations and thoughts:
1.) The wainscoting is really a separate feature from the exterior trim even though they do interact.
2.) Currently the only option (feature) available with exterior trim is the corner trim and of course the window and door trim, the following three additional items need consideration and will be added to the exterior trim module:
a) Frieze Board: at the top of the cladding (width and thickness)
b) Band Board: somewhere midspan on the wall (width, thickness and height on wall)
c) Skirt Board/Water Table: at bottom of the cladding (width and thickness)
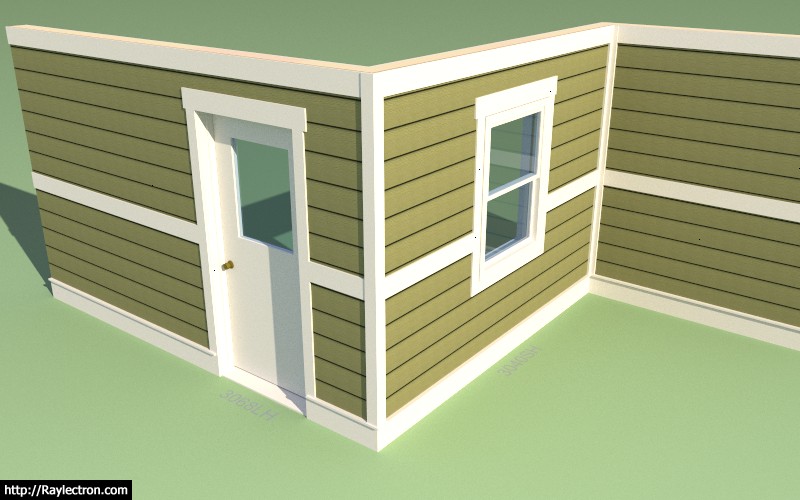
3.) Three additional parameters are needed to determine whether the three boards cut through the corner trim or terminate at the corner trim, see examples below:
The same holds true for what to do where the boards meet door or window openings and their trim. In the picture above the skirt board cuts the man door trim however the band board does not and terminates at the trim. Also one must consider the case where the frieze or band board bisects the window or door only partially.
In the image below the band board terminates at the door trim:
In the image below the band board bisects the window partially and replace the windows bottom trim:
It's complicated, but we must start somewhere.
Additionally with wainscoting it would be nice to be able to terminate or start the wainscoting at any arbitrary distance along the length of the wall, this would allow for a 48" return for brick or cultured stone rather than only being able to terminate at the corner. I will be looking at this later today and see if it is something I can implement relatively quickly.
-
@pbacot said:
This is what dedication looks like! Don't forget board and battens!
Yes, I seem to have opened a whole can of worms. Exterior treatment of walls is complicated business, there is no getting around that.
For now I am treating board and battens as a simple material/texture just like lap siding. If one were to draw all of the battens the model would get very heavy in my opinion.
-
Changing gears from exterior trim to gable walls you can see in the image below that a symmetric gable wall with equal wall heights and equal pitches is only the tip of the iceberg. In the example below the pitches are equal but the start and end wall heights differ by four feet. One could also have different roof pitches so the pitches may differ as well.
Theoretically one could draw a scenario like this with two "shed" wall panels butted up to each other except for the problem that the door would bisect this wall junction, hence it must be drawn as a single wall panel.
Also note the double stud placement at the pitch break. This may not be typical for all builders but I would recommend this more conservative approach rather than a single stud at the pitch break.
Looking at this wall segment it occurs to me that wall panels that connect to this panel at the corners or tee into it cannot be treated the same way rectangular wall panels connect with lapping top plates.
Again, things just got a little more interesting.
The most common (balloon framed) gable shapes are probably the following:
- Shed (monopitch with different start and end wall heights)
- Symmetric Gable (equal pitches and equal wall heights)
- Non-symmetric Gable (equal/unequal pitches and equal/unequal wall heights)
- Symmetric Gambrel (dual pitch equal and equal wall heights)
- Hip (equal pitch, equal wall heights with a flat middle section)
- Clerestory (equal/unequal pitches with equal/unequal wall heights with a kneel wall at pitch break)
Please feel free to add to this list. I believe the first three of this list are the highest priority.
-
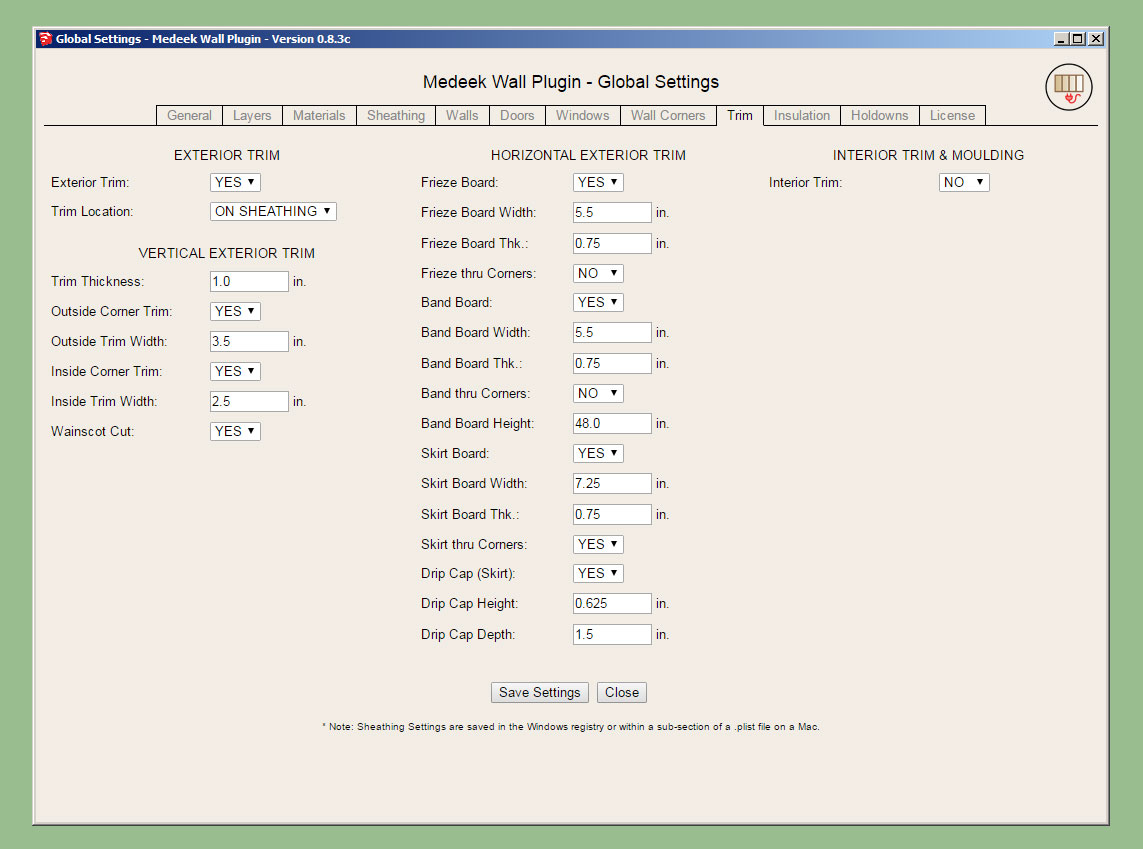
I'll start with the band board. The updated exterior trim menu now appears as so:
The band thru corner parameter causes the band board to cut through the corner trim boards and extend all the way to the corner (mitered).
The four additional parameters should be sufficient to fully define the band board. The band board trim thickness is the same as the corner trim, I'm assuming that typically you would want these various trim boards to all be the same thickness? If not then an additional parameter for the band board thickness is required.
By the time I add in all of the parameters for the frieze and water table the menu is going to get quite large, which can create problems for people working on laptops with small screens. My only option at that point is to remove some variables from the draw wall tool ext. trim menu (still available in the global settings and wall edit menu) or go to an HTMl menu.
-
Its now been a little over a month since I released the initial BETA of the plugin:
http://design.medeek.com/resources/wallpluginchangelog.html
June has been a very active month, as documented by the changelog.
There is still a lot more to do and some small fires still exist so July should also be relatively busy month as well.
Wrapping up some loose ends and fixes are on the top of the list as is the gable wall module. Fortunately, a lot of code for this new module will be recycling of existing code but due to the complexity of gable walls it will probably take a couple weeks to really pull it all together.
From a marketing stand point I am a little concerned with the interest level in the plugin. I fully expect that the actual purchases of the plugin will still be low since it is still in a beta stage however I am surprised that more people are not at least downloading the plugin and trying it out. This is cause for some concern.
Any thoughts on lethargic response would be helpful. I am always open to changing direction or marketing strategies if common sense or certain factors dictate it.
I apologize if the plugin is "too deep" for some, my intent is not to overwhelm or even over complicate things. Unfortunately, buildings are complicated structures and as my previous post on exterior trim has shown even fully defining a sub-system within a structure can get a little crazy at times. To be perfectly honest, a couple months in and I've only really scratched the surface. The engineering and estimating and auto-layout modules are stilling waiting in the wings.
I don't think my pricing is too high or asking to much, but I realize it might still be a bit to bite off for some considering the current developmental state of the plugin. I guess what you have to realize is that you are not paying for two or three months of coding you are actually purchasing everything I've done up till now plus two more years of full time development. So I do think it will be good value for the money.
I also realize that the SketchUp community has a slightly different mentality than the rest of the design world. We are used to a lot of quality plugins and even the SU software coming at no cost or a greatly reduced cost when compared with other drafting/design software and tools out there. We are hesitant or unwilling to accept subscription type licenses (myself included). With all that being said perhaps a different business model would meld better with the SU design community. Any thoughts in this regard would be greatly appreciated, please send your comments directly to nathan@medeek.com.
-
The ability to easily add in components into the library is kind of nice. After about an hour of work I added in the following Simpson column caps just to give it a go:
- CCCQ6666
- CCOQ6
- CCQ66
- CCTQ666
- ECCLLQ666
- ECCLRQ666
- ECCQ66
It was as simple as dropping the files into the folder, no coding required.
View model here:
https://3dwarehouse.sketchup.com/model/1540008d-5740-4e86-82ce-6bacb4a638ff/Framing-Test-29
The parametric ability to change the "hanger" at each end is vital when setting something up like this. Not saying you would actually build this but I've worked on some local designs with complex porches that easily rival this monstrosity.
I will roll these components into the hanger library on the next sub. revision, probably tomorrow.
P.S. I will also include the following caps and hangers:
- CCOQ4, ECCOQ4
- CCQ44, CCQ46, CCQ64, CCQ88
- ECCQ44, ECCQ46, ECCQ64, ECCQ88
- HUCQ410, HUCQ412, HUCQ610, HUCQ612
-
As amazing as this extension is I'm sure you understand that it can not (and probably should not) try to cover every possible design subtlety. Remembering the awesome number of options could become a deterrent to use by some. Inevitably, some of the detail will have to be added by the user. So I agree with Charlie_V with regard to presets.
I also agree that adding "beta" to the title would be a very useful "warning" to alert potential users to expect changes.
Many years ago I wrote a very large program to model the operational flow of work in our facility to arrive at a price to charge the customer. We provided support to the processing and testing of satellites prior to launch. It was a "masterpiece" that covered a massive amount of the detail needed to configure the support equipment, how much of the facility and support equipment would be used, the manpower required, the days/hours involved in each portion of the process, etc. It worked great until I started adding more and more options based on what the customer might need and the manpower and equipment required to respond to them. It ultimately failed to be used when even I could not be sure all the applicable values were accounted for. Once I reverted back to the basic (but still complex) model and separately dealt with the "one-off" mission unique variations, all was well again.
Your breaking down of some of the options into separate toolbars is a great idea and is a significant help in reducing the number of things that need to be remembered.
Personally, I don't mind the flow of revisions. I find it exciting to see and try them even though I will most likely never have occasion to use them. I still think it would be easier for me to manage them if you added the revision number to the rbz file (e.g., medeek_wall_ext 0-8-1c.rbz).
-
@bob james said:
I'm sure you understand that it can not (and probably should not) try to cover every possible design subtlety.
I fully understand what you are saying and I am trying to allow enough flexibility with the parameters to handle 90% of the design possibilities and then leave that other 10% alone otherwise the plugin does become too complex and cumbersome.
A good example is the recent freize/band/skirt board discussion. To handle these three items involves at least 15 more parameters be added to the exterior trim menu. However, I sense, from my private discussions with quite a few designers, that most everyone wants these features added. In order to simplify things a bit the drip cap over the skirt board will probably be modeled as a rectangular profile, however more accurately it should be a sloping profile, with a flashing. There are also some other things I can do to help simplify things with the global settings and menus themselves.
Then there is the further complication of band borders that move up and down on the wall (zig-zag), I'm not even going to attempt coding something like this.
What you probably don't see is the number of daily requests I receive for various features that I ended up having to toss out or at least shelve until enough demand increases that I deem that particular request has some serious merit. Of course, some requests make perfect sense right off the bat, and those I try to implement as quickly as possible, or at least get put on the list for future consideration.
For instance someone requested that I add more Mitek/USP hardware to the plugin. I have no problem with that but until specific part numbers are requested I will probably assign this request to a lower spot on the todo list.
Where to draw the line on what level of detail or item gets added and what does not is a tricky process in my opinion. To much unnecessary detail and the designer/user will become overwhelmed and will view the plugin as cumbersome and clunky. To little flexibility and void of features, and the user will not be able to execute their design quickly without having to do too much manual editing.
The whole point of the plugin is to hopefully eliminate most if not all of this manual editing, at least that is my goal, realistic or not.
-
Version 0.8.3 - 07.02.2018
- Added a band board option to the exterior trim module.
- The "band thru corner" option allows the band board to cut through the corner trim.
Advertisement