Medeek Wall Plugin
-
This looks really interesting, however, when trying to download the trial version on your website (http://design.medeek.com/resources/medeekwallplugin.html) I get a "The page cannot be found" message...?!?
Furthermore there's another serious mistake on the page...
@unknownuser said:
Purchase the full plugin ($5.00) at the following link:Purchase plugin
When users arrive at the order page, they don't see the price 5.00 USD, but 50.00 USD...
-
I should probably temporarily disable the web page since the plugin has not yet been released yet, and yes you are correct, the listed price of $5.00 is incorrect.
-
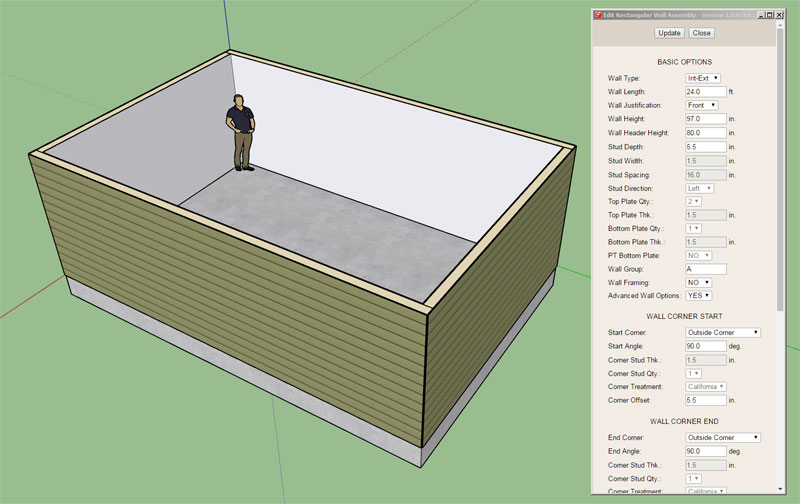
I am now testing the stud placement and top and bottom plates:
So far only the line tool is available but seems to work fairly robustly now.
Please download and comment on the model below:

3D Warehouse
3D Warehouse is a website of searchable, pre-made 3D models that works seamlessly with SketchUp.
(3dwarehouse.sketchup.com)
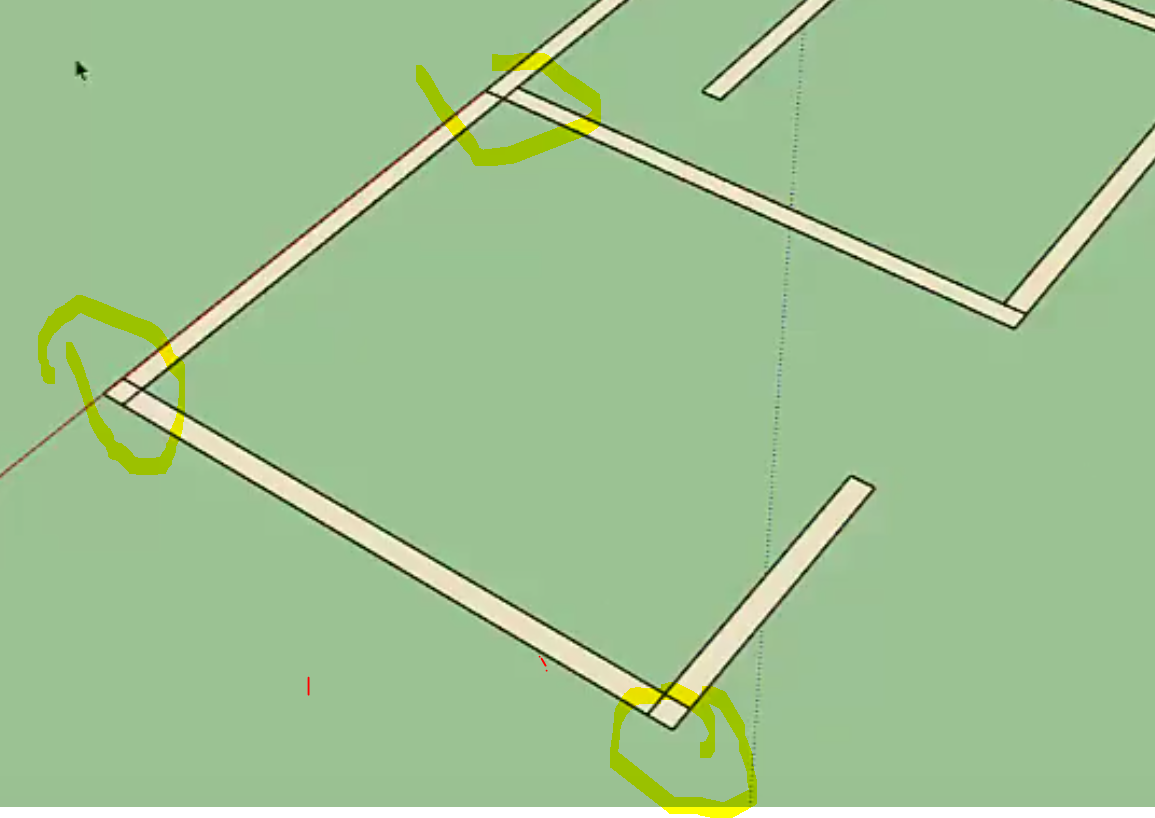
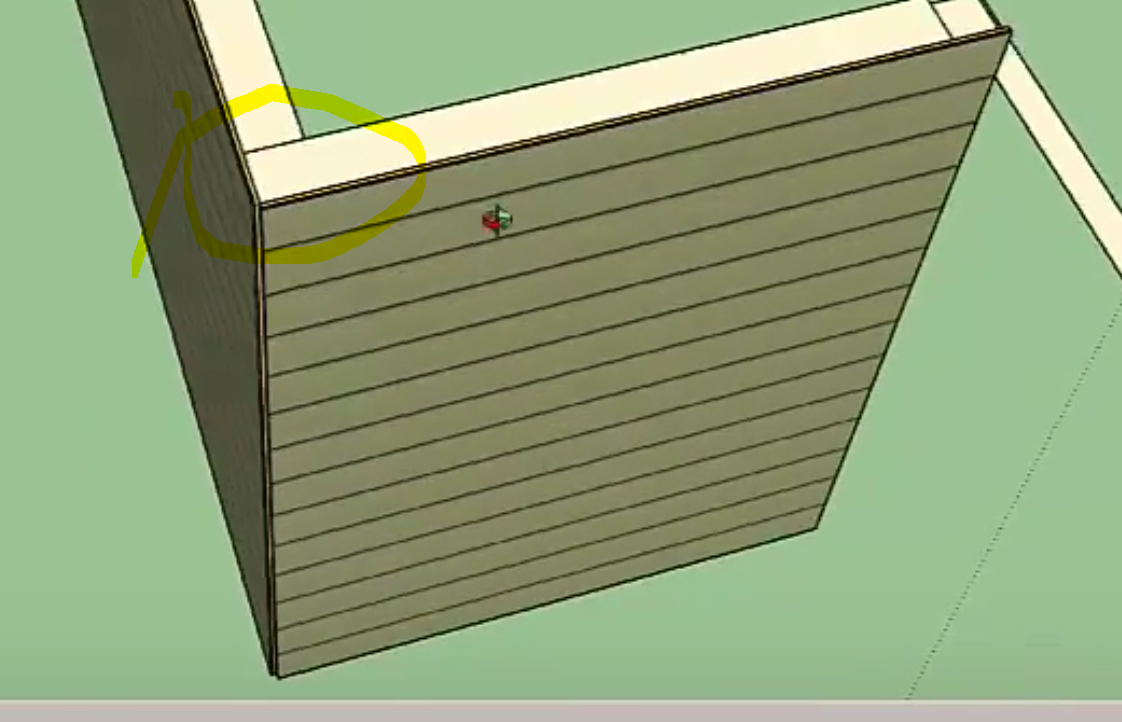
There are a few minor issues that need further attention:
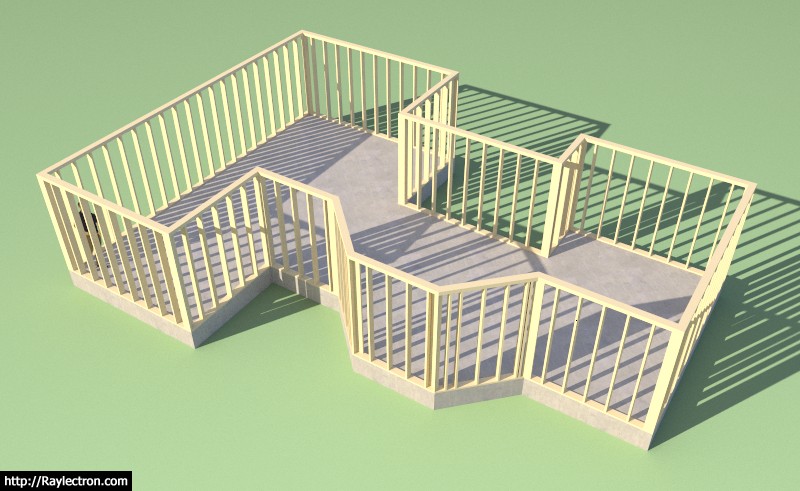
1.) How to position studs with non-orthogonal walls, I could use some direction on this.
2.) I have California Corners enabled for outside corner and inside corners, what do you do when there is a clash between the nailer and the regular stud layout, see model for examples.
3.) When there is more than one top plate (2,3 etc...) I have them setup to lap each other. However multiple bottom plates do not lap, they are currently setup just to stack.The items for tomorrow's programming todo list are:
- Setup the HTML form and backend for the wall edit feature.
- Finish cleaning up the global settings, HTML and backend.
- Further debugging and refinement of the stud placement module.
Future items:
- Addition of window and door modules (framed openings)
- Advanced wall options (sheathing, cladding, gypsum, insulation, trim, holdowns etc...)
- Window and Door Plugin
- Gable Wall Tool
- Polyline tool for Rectangular Wall Tool
I'm sure there are plenty of other items that don't come to mind right this minute, please feel free to pass along any thoughts, comments or suggestions.
-
Working on the advanced options this morning, I've added in sheathing, cladding and gypsum:
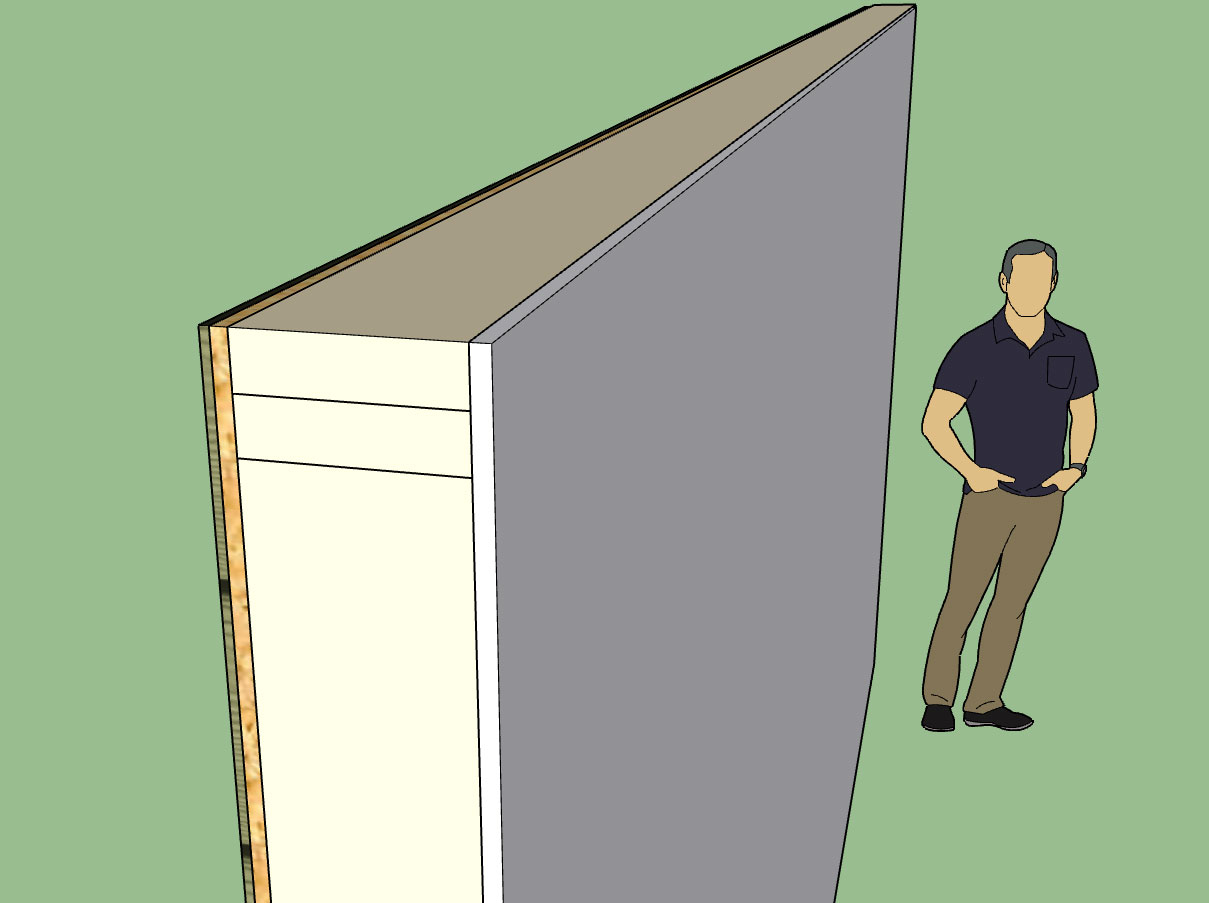
As windows and doors are added to the wall they will automatically cut holes into the framing and these three other building layers. The code to cut holes in solids is actually not to difficult, I developed it with the foundation plugin when I needed to add foundation vents into stemwalls.
I will probably put the cavity insulation and the holdowns on the backburner for a a while as I focus on the wall edit function and the window and door (framed opening) module.
I've also added one additional (Tee Corner) corner configuration for each end of the wall.
I will also be adding in two additional parameters so when you edit a given wall panel you can offset the sheathing and cladding above or below the actual wall panel to tie into a rim joist above or below. Some contractors also like to lap the sheathing and cladding over the foundation rather than having it flush with the sill/bottom plate.
On a similar note it might also be useful to allow the user to set the bottom plate as pressure treated (ie. garages where the wall is directly in contact with the foundation). I'm not sure yet where I want to put this parameter.
-
PT bottom plate option added into the first menu.
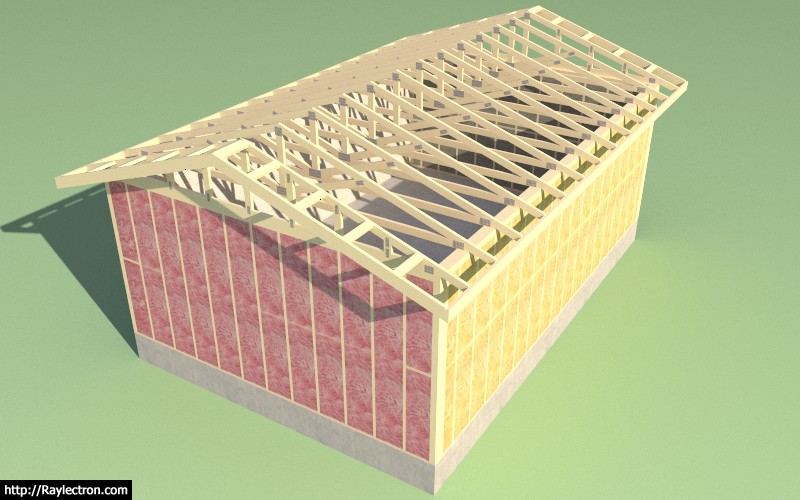
The little structure below is not much to look at (no windows or doors yet) but it is the first time I've been able to create an entire building envelope with absolutely no manual editing of the SketchUp model. This in itself is a major break through for me. I used all three plugins to create the model: Foundation, Truss and Wall.
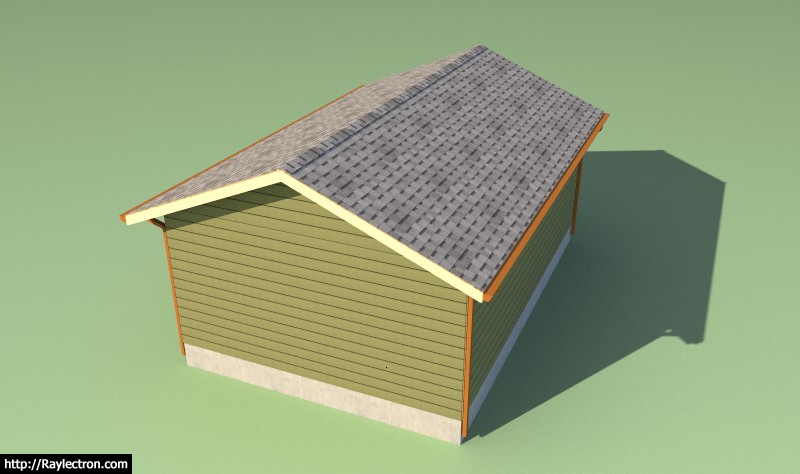
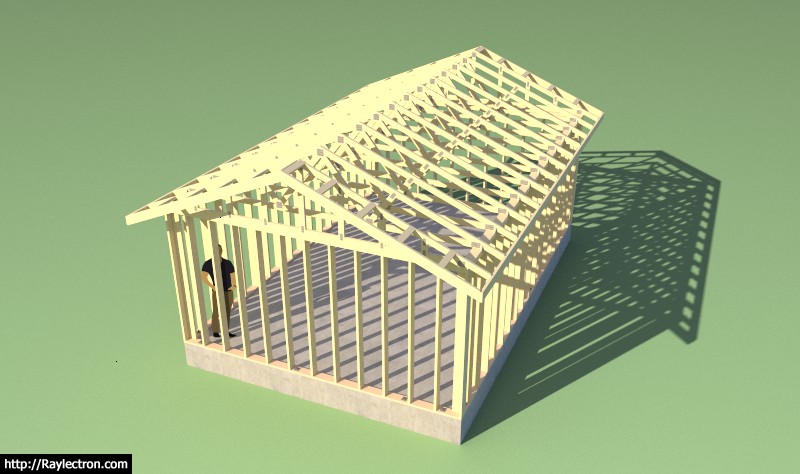
All principal architectural elements are there: sheathing, cladding, gypsum, anchor bolts, rebar, concrete, roof cladding, gutters etc...
The only items missing are exterior and interior trim/molding and of course the windows and doors.
My next push will be the windows and door module.
The time required to create the walls was under a minute however once I have the polyline tool enabled this will cut down the initial wall creation time to literally seconds.
Insertion of doors and windows will always take a bit longer primarily because the designer actually needs to determine where they want to place their openings. There is not much one can do about that other than to make the actual placement/insertion process as intuitive and automated as possible.
-
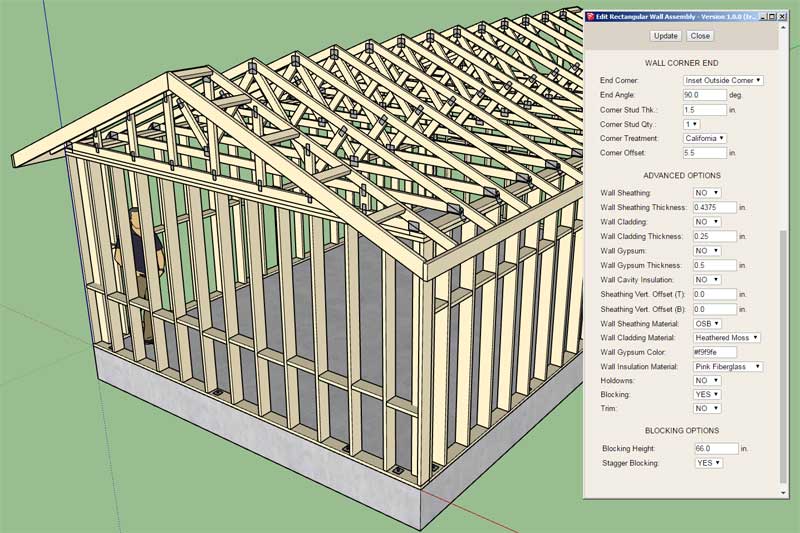
The wall edit feature is now functional and seems to be fairly robust:
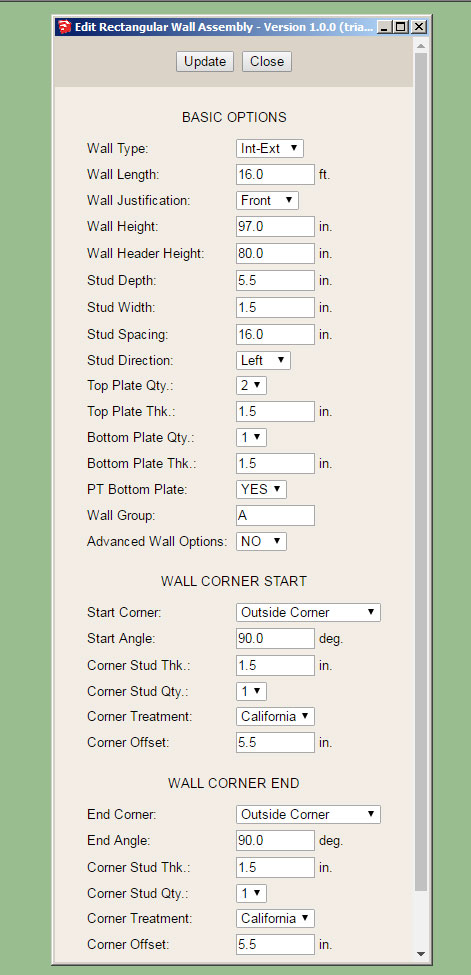
The wall edit menu shown above.
Originally I was going to have all the windows and doors load up within this same menu but given how big it has grown already I think a separate edit menu for door and windows would be more practical.
I will also need to add in some additional code so that when certain parameters are modified in the wall edit menu those changes are then propagated to other wall panels that are assigned to the same wall group letter.
-
I've added mid-span blocking into the advanced options:

View model here:
3D Warehouse
3D Warehouse is a website of searchable, pre-made 3D models that works seamlessly with SketchUp.
(3dwarehouse.sketchup.com)
This option will probably need additional parameters (mid-span, 8' on center, 4' on center) to make it really useful but at least it is a placeholder for now.
-
Looks excellent!
-
The cavity insulation option in the advanced options will fill in the wall cavities with insulation:
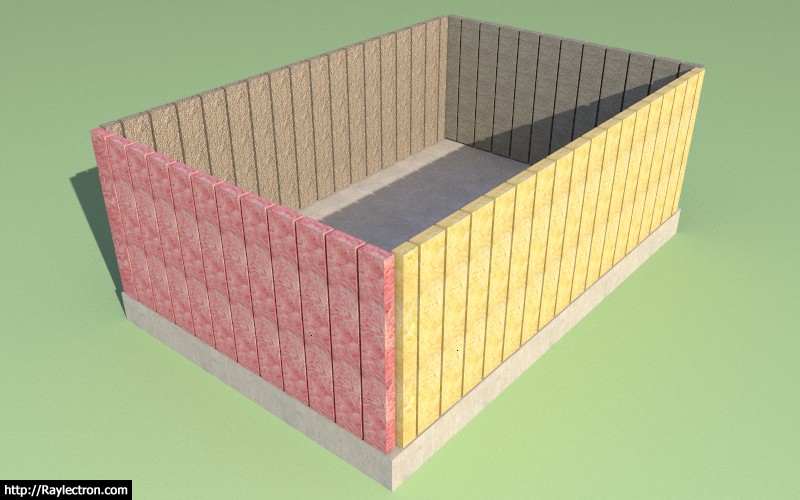
This feature will only get more interesting as windows and doors are added.
I supposed there will be some utility to this option for some since it will allow the designer/contractor to calculate the volume of insulation needed with fairly decent accuracy.
I could use some better textures for my insulation, the ones shown are pink and yellow fiberglass, rockwool and cellulose. I also have a blown fiberglass (white) not shown.
View model here:
3D Warehouse
3D Warehouse is a website of searchable, pre-made 3D models that works seamlessly with SketchUp.
(3dwarehouse.sketchup.com)
I've now started wading into the window and door module, this may take me a 2-3 days to sort out since it is fairly complicated.
-
Looking good Medeek!
-
The global settings will have two parameters:
Blocking Height: Center or some numeric value
Stagger Blocking: Yes / NoOnce you create the walls you can also change these two parameters up for each wall panel:
See model here:
3D Warehouse
3D Warehouse is a website of searchable, pre-made 3D models that works seamlessly with SketchUp.
(3dwarehouse.sketchup.com)
-
Since the model can get quite heavy with all of the studs, blocking, insulation and other geometry I've decided to add one additional option to the basic parameters called "Wall Framing". By turning this option to "NO" the walls are drawn with all of the internal geometry removed (ie. plates, studs, headers, kings, trimmers, insulation, holdowns etc...)
However, you can still use the advanced wall options and display sheathing, cladding and gypsum:
The model is now quite boring but is significantly more lightweight and will lend itself to quick edits by the designer. Walls and Doors can be inserted and all of the internal framing can be turned on at any time within the wall edit menu.
See model here:
3D Warehouse
3D Warehouse is a website of searchable, pre-made 3D models that works seamlessly with SketchUp.
(3dwarehouse.sketchup.com)
The wall framing parameter will also be available within the global settings so that its default behavior can be set.
Notice how certain parameters are grayed out in the wall edit menu when wall framing is turned off, this is by design.
-
I'm still recovering from a cold/flu bug so I apologize for my coughing during the video:
-
I think the "no" idea is great. At first we just want to layout spaces and be free to think of the environment and function of the design and not the framing. "Structure" can be an important part of design but not so much stick wall framing in conventional construction (roofs require more forethought than wall framing). But later the designer or someone else can bring the wall framing up and work with it. In some cases the designer might only check into the wall framing during construction documents but the contractor could take the model and work on the wall and floor framing details and material take offs. I knew a contractor who modeled framing for all his projects beforehand, whether the designers did or not.
-
@Pabcot
I like the whole idea of the model changing hands from the designer to the engineer and then finally to the contractor or builder.
Initially the designer would use first the 2D mode to work on overall space layout and then bring it up into the no-framing option to consider all of the architectural elements (ie. trim, windows, doors, siding/cladding etc...) I agree that most architects are generally not overly concerned with stud layouts, holdowns and all of the nuts and bolts that go into a design. They are the big picture guys who are responsible for selling the design, look and feel, and functionality to the customer.
From there the engineer can look into the insertion of additional wall columns and also review the headers, beams, king and trimmer qty. etc... and stud layouts. At this stage something might jump out at him, for example he may determine that a triple top plate is required because of a large truss span, or 2x8 wall studs are required due to the wind loads or wall height or both. The engineer would want to have the full 3D model with framing enabled. He is the nuts and bolts guy when it comes to safety and structural issues.
This is sometime where the engineer and architect clash. I've actually had to delete windows out of a design for lateral strength (steel moment frames were too expensive) much to the chagrin of the designer of that job but sometimes practicality overrides ambition and creativity.
The engineer can also enable holdowns/straps (with anchor bolts, threaded rods, coupler nuts) for specified wall panels. He will probably turn off the layers that deal with the look and feel of the building, ie. gypsum, cladding, windows, doors, trim etc...
Then the model gets passed to the contractor who then has the full details of literally every component including the nailing information for every wall panel (that is my goal).
He can quickly pull dimensions or other information from the model as needed and also be able to see exactly what was intended by the designer and engineer.
With the new layout API I am also planning on setting up some automation for wall plan generation and wall framing elevations/details. I haven't fully defined what the end product will be in this regard but I think some production drawing automation may be useful, especially for prefab wall panel designers/companies.
-
As I've been testing the plugin and debugging it I've noticed that performance lags a bit when the wall gets quite long and there are a number of studs (components) present.
Speaking with some other developers, it is their opinion that it would be better to model the studs, blocking and insulation as groups rather than components. From what I understand the overhead associated with groups is less than components and the model would therefore be less bogged down once there are a lot of studs/blocking floating about.
Any additional thoughts in this regard, especially from the SketchUp Sages would be greatly appreciated.
-
2nd Toolbar:
Like the Truss Plugin the Wall Plugin will have a second toolbar. The planned icons/tools will be:
- Wall Split
- Wall Move
- Window Edit
- Window Move
- Window Delete
- Door Edit
- Door Move
- Door Delete
To delete a wall it is just a matter of deleting it from the model, all windows and door embedded in that wall (group) will of course be automatically removed as well.
-
Really great progress.
When drawing in 2D the wall intersections are not the same (just dual overlap) as when that 2D is changed to 3D.
-
@bob james said:
Really great progress.
When drawing in 2D the wall intersections are not the same (just dual overlap) as when that 2D is changed to 3D.When you are in 2D mode the wall is represented by the outline of the bottom wall plate. When in 3D you will see the top most wall plate which will probably lap the corner if you are using double top plates.
-
@medeek said:
@bob james said:
Really great progress.
When drawing in 2D the wall intersections are not the same (just dual overlap) as when that 2D is changed to 3D.When you are in 2D mode the wall is represented by the outline of the bottom wall plate. When in 3D you will see the top most wall plate which will probably lap the corner if you are using double top plates.
I understand that: but the bottom wall plates would butt up against each other, not overlap as shown.
Hello! It looks like you're interested in this conversation, but you don't have an account yet.
Getting fed up of having to scroll through the same posts each visit? When you register for an account, you'll always come back to exactly where you were before, and choose to be notified of new replies (either via email, or push notification). You'll also be able to save bookmarks and upvote posts to show your appreciation to other community members.
With your input, this post could be even better 💗
Register Login


Advertisement